Most common reasons
It is worth noting that the heated rear window most often does not work in a VAZ-2115 car for the following reasons:
- fuse is blown;
- there is no contact at its terminal;
- The toggle switch that turns on the heating is broken;
- the relay has become unusable;
- contacts on the terminals of the heater circuit have oxidized;
- The threads have broken.
Fuses blow out quite often. This usually happens unnoticed by the car owner.
As a result, one or another device stops working. For this reason, you should pay attention to them first of all if you do not want to join:
- cigarette lighter;
- stove;
- burnout installed on the rear window, etc.
Replacing them with serviceable ones will solve the problem completely. In other cases, it will also be necessary to clean the terminals from dirt, and at least visually make sure that the power wires have not come off the buttons. If the relay is faulty, then it will need to be replaced - it is not very expensive and is quite easy to install.
Rear window heating fuse for VAZ 2114
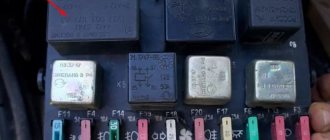
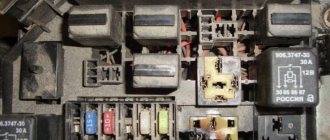
Each electrical device in the 2114 model is equipped with a fuse. In the situation with domestic cars, one element may be responsible for the operation of several devices at once. It is logical that such a load on the fuse leads to its periodic failure. Without understanding where the blocks with circuit breakers are located, it is difficult to search for the causes of the malfunction. First, let's determine where the required fuse is located in the old-style mounting block. The photo below shows a mounting block from the engine compartment of older versions of 2114. The fuse responsible for heating the surface has the index F4 .
The power of this fuse is 20 Amps.
In addition to the heating system, this element is responsible for the operation of the cigarette lighter. Therefore, if your cigarette lighter stops working along with the heated rear window, then the problem is 100% in the fuse.
Having figured out where the rear window heating fuse is located on a VAZ 2114 in the old-style block, study its location in the updated version of the block. F7 with a power of 30 Amperes is responsible for the heating system This fuse is located in the left row, seventh in a row, counting from top to bottom. Its exact location is shown in the photo below.
It is also responsible for the operation of the following devices: the electric motor of the heating system (stove motor), the windshield washer motor, the cigarette lighter and the glove compartment light bulb.
Having understood which fuse is responsible for heating the rear window on the VAZ 2114, you can replace it in a matter of minutes. To quickly solve the problem, you can purchase a set of spare parts. If the problem is in the heating filament itself, replacing the burnt element alone will not solve the problem.
How to find a breakdown
To find out exactly what the reasons for the failure are, you only need a standard voltmeter, which every self-respecting car enthusiast should have. By simple manipulations with this measuring device, the problem will be identified very quickly.
You should start checking the heating element filaments with the following steps:
- the metal tips of the probes are wrapped in tin foil (this will avoid damage to the tracks);
- turn on the ignition;
- check whether the heating button is pressed;
- one probe is applied to the plus of the heating element mounted on the rear window;
- the second is installed approximately in the center of the thread.
If the device shows 6 volts, this means that there is no damage in this area. If the tester produces 12 volts, the gap is located somewhere in the segment between the probes.
If there are 10 volts, we can confidently say that the gap is located between the minus and the center of the track. In this situation, connecting one probe to the negative output will allow you to more accurately determine where the damage is located. At the same time, the second one must be carefully guided along the thread from the plus to the opposite end. Finding the exact location of the break is indicated by an increase in voltage from zero to 5 volts.
If you don’t have a voltmeter at hand, then the break will also be easy to find visually. To do this, you will need to wait until the windows in the car fog up, and only then turn on the heating. Where the track remains operational, the moisture will begin to evaporate noticeably. Condensation will remain in de-energized areas. It is these sections of the heating element that will need to be examined in detail. To do this you will need a magnifying glass.
If the heating is completely out of order, it can be replaced with a removable model, which is attached to the glass using special suction cups. It is connected to the car's electrical network, like many other devices, through the cigarette lighter.
There are also modifications on sale in which an additional fan is installed. But this option is not very practical because it requires too much electricity.
Eliminating the break
Patching a cliff in general is not a difficult task, and there are several ways to solve it. The most commonly used is electrically conductive paste. Before repairing, it will be necessary to secure the broken area with adhesive tape (two pieces - one for each fragment of the track). The ends of the thread are cleaned and washed with alcohol. The paste is then applied to them and left to dry for at least 24 hours.
You can also restore the functionality of the rear window heating element using:
- glue (type BF);
- metal filings;
- magnet
Sawdust is quite easy to make using a file yourself. In turn, any magnet will do. It should be placed on the outside of the window, and metal dust should be placed on the inside, where the heating element is located. Then the joint remains to be treated with glue and varnish. Any oil paint can also be used.
Heating can be repaired quite effectively with a soldering iron. Here you will need solder containing a small amount of tin (for example, POS-18); in this case, instead of flux, use zinc chloride. But this method is suitable only if the cliff is small. You will have to fill a large area with either copper or silver wire.
In addition, it should be noted that now in stores there are also special adhesive compositions for repairing heating filaments. But for some reason they are currently not in demand.
The video below will help you understand in more detail how to repair a damaged rear window heater:
The rear window heating does not work, but the button is “on”
I noticed that the glass on the back does not defrost. The relay does not click, the button lights up.
I immediately ruled out the option of a non-working button, since firstly it lights up, and secondly, I updated all the buttons immediately when I bought the car about two years ago and was more than confident in the functionality of this one.
I started checking with the relay.
Taking it off
And further disassembled.
You can see how everything melted.
I was surprised by this design, how many relays there were on 2110 and they all worked on a spring, like this:
And here is a plate with the same operating principle.
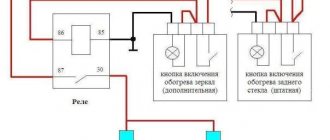
So, we connect the plus and minus from the ROM to the red circles.
ROM
at, say, 10A, so that there is enough power to operate relay A to the yellow ones for the multimeter to ring:
I apologize right away, there was a picture of a sample here earlier, I threw it in by mistake, now I replaced it.
The polarity doesn't matter what's on the ROM at all.
And we see that nothing works, doesn’t beep, the plate only slightly gives a one-time push, trying to close the contact, “but it doesn’t work.” We help her with our finger and hear a squeak from the multimeter. I have several of these relays left from 2110, some of them I removed from the car:
I took some new ones “as a spare”, took one of them and checked it the same way, the tester lit up.
Just installed a working one.
I checked the heating on a car with a new relay, everything works properly: the relay clicks, the glass thaws.
As for the relay, I read that sometimes it turns off after 20 minutes, nothing will melt if you forget to turn it off, you need to buy one.
The heated rear window of the VAZ 2110 does not work, what is the reason?
Reasons why the heating does not work on the rear window of the VAZ 2110
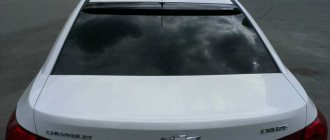
Almost all VAZ 2110 cars have a rear window heating system. But even if this system is not provided for in some models, it is usually “finished”, since here we are talking about basic comfort today. If the rear window heating does not work on a VAZ 2110, this creates many problems.
As a rule, heating is especially needed in cloudy, cold weather in autumn and early spring, when the glass becomes covered with condensation, blocking the driver’s visibility of what is behind the car.
This lack of vision is especially dangerous when parking. The same can be said about winter use, when the frost literally draws patterns that you don’t want to admire at all.
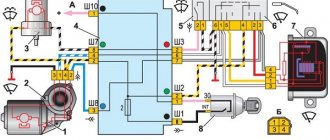
How the system works
The operating principle of heating is very simple; it is used today in almost all cars, including foreign cars. Something simpler and better has not yet been invented. A conductive thread is applied to the rear window on the interior side, which heats up; accordingly, the glass is heated, which eliminates fogging from the inside, as well as snow and ice located on the outside.
Why doesn't the rear window heating work?
The heated rear window provides good visibility (fights icing and sweat during the cold season or during temperature changes). It is difficult to overestimate this function, because the driver’s ability to adequately and fully assess the road situation is worth a lot.
Stern heaters are practically no different from each other. Threads that conduct electricity are applied to the glass from the inside. They heat the surface, which melts the ice and removes moisture.
System components:
- threads (there are different quantities - depending on the model);
- wires (supply current);
- safety relay;
- fuse;
- “On” button with indicator.
Let's look at the most likely causes of heating failure.
What to do if the rear window heating does not work (VAZ 2109, 2110, 2114)
Sometimes we find ourselves in a situation where the rear window heating does not work. What to do - more on that below. First, let's look at the causes of the malfunction.
The most common reasons may be as follows.
- The fuse has blown. Option - there is no contact with it in the sockets. Actually, the check should begin with replacing the fuse, even if visually it looks intact.
- The switch has failed.
- The relay has “flyed”.
- There is no contact at the heater terminals.
- Break in the wiring.
- Breakage of the heater filaments themselves.
Armed with a car tester, with certain skills, all these defects in the rear window heating can be detected.
Now specific answers to the question: the heated rear window does not work - what should the owner of the car do in such a situation (no matter what domestic model - VAZ 2109, 2110 or 2114)?
Regarding the first four points, if the tester “found” them, there should be no questions. A malfunction has been identified and needs to be fixed, which is understandable.
What to do next ? There are two ways to go.
- Replace the stationary heated rear window with a removable version (with suction cups) connected via the cigarette lighter. Or install a heater with a fan (not a very rational option, given the subsequent increased current consumption).
- Restore the conductive threads if the rear window heating does not work. There are many ways to do this. So what to do in this situation? What methods of “treatment” are there?
- “Patching” the breakage area with conductive paste. The place needs to be localized with two pieces of adhesive tape. Connect the ends of the conductor, stripped and washed with alcohol, with paste and let dry for a day.
- Restoring the heated rear window using glue and a magnet. You will need homemade sawdust, which needs to be “planed” with a file. The magnet can be taken from any broken speaker, the glue is BF-2 or its equivalent. The magnet is placed on the reverse side at the breakage site, the sawdust is placed on the side of the thread. Next, coat the “joint” with varnish.
- Electrolytic method. You will need sulfuric acid and copper sulfate. The method is quite labor-intensive; the point is to redirect copper ions from the copper electrode to the heating element.
- Sometimes soldering is used if you use zinc chloride as a flux, and use low-tin solder (POSS-4-6, POS-18). This is the case if the break is point-like. If it is large-scale, it is better to “patch” it with silver or copper wire.
There are special adhesives for restoring heating filaments. They are not particularly popular yet.
In principle, these are the main methods and algorithms that need to be used if the rear window heating does not work. Now the question - what to do - will not confuse you.
Damage to threads
Electric strips act as current conductors, heating up slightly due to resistance (the strips are connected in parallel - the voltage is distributed evenly). If even one heating strip is damaged, the current stops circulating in the system - the heating does not work.
To restore the heating strips, you will need to buy a special repair kit from a car store (do not buy the cheapest one, so as not to run into a low-quality product).
The set includes:
- special glue with high electrical conductivity (choose by color so that the “restored” area does not stand out);
- a brush for applying it;
- tape to mark boundaries.
Find the location of the chain break (often mechanical damage). Study the instructions for the restoration kit, pay attention to the drying time and the recommended method of application. Prepare the damaged area for repair - wipe it with alcohol using a lint-free, clean rag (remove dirt and grease). Apply strips of tape in the area of the tear on both sides of the tape (leave the appropriate width). Apply the special product in several layers (see the instructions for the quantity). Let the glue dry - often a day is enough. After this, remove the tape and check the operation of the unit.
This method is suitable for repairing rear window heating in domestic cars (for example, VAZ 2114, VAZ 2112, VAZ 2107, VAZ 2109, Lada Granta).
There are two more alternative methods for restoring a break:
- Using metal filings. You will need sawdust, a magnet and clear glue (preferably some tape). Description of the process: attach the magnet to the back side, pour sawdust onto the damaged area from the inside. Place tape under the bottom of the strip to prevent any metal shavings from sliding off. We fix the material on top with glue. Let it dry. Ready!
- The point here is that they use a mixture of non-ferrous metal shavings and paint. This substance should be identical in density to plasticine. Next, fix the tape, as in the previous version, and heat it up. Apply the material to the damaged area and wait half an hour (hissing is normal). Allow the glass to cool for another hour before using the heating fully.
Electrical wiring failure
The fuse is good - check the heater. If it still doesn't work, do some electrical diagnostics. Often the wires on the mount are broken or broken. What to do? The algorithm is like this:
- put the button in the “on” position;
- we check the voltage at the terminals (the place where the wires are connected);
- if there is no U, we look for a break in the wiring;
- We clean the terminals and connections from traces of corrosion.
Contact an auto electrician if you are unable to trace the path of the electrical wiring.
Control system
It happens that the rear window heating stops working, but all the parts are in good working order. The reason may be hidden in the control element. The button is on, the indicator is on - no warming up. The working contacts of the switch may be worn. Replace the toggle switch, as repair is not possible in this case.
Connecting the heated rear window button of a VAZ 2114
This product was chosen by 35 customers
Adjusts the heated rear window on/off.
Set: 1 button
Weight, kg: 0.05 Dimensions, cm: 6 x 3 x 3 Volume, m3: 0.00005