Taillight tuning ideas
You have to tune the headlights not only to somehow make the car stand out from the crowd, but also for the safety of the optics. Often, at first glance, “gadgets” are an elegant decoration, for example, the same eyelashes for headlights, however, in fact, they protect the optics from an unfavorable environment.
Manufacturing of overlays
Headlight covers are the most favorite and popular way for car enthusiasts to tune taillights.
They can be made manually using:
- LED light bulbs;
- fiberglass;
- sticky tape and epoxy glue.
Covers for rear lights
The scheme of actions proceeds as follows:
- cover the entire surface of the rear light with adhesive tape, on top with fiberglass on which the covers will be installed;
- cover the fiberglass fabric in several layers with epoxy liquid, and do it so that there are no defects on top;
- wait for the liquid to dry, then remove the blank for the overlay and mark the outline of the future decoration on it;
- cut the profile on the template using a cutting tool;
- sand with fine-grained sandpaper;
- cover with a primer layer to protect against corrosion, then apply paint and cover with a special protective varnish;
- install LED blanks.
Installing LEDs in taillights
Installing LEDs is quite a creative solution, because there are a lot of options.
To realize the idea, you need to spend some time on drawing, and also prepare the following tools:
- a set of LED lamps and resistors;
- fasteners;
- adhesive tape and glue;
- a device similar to a sealer.
LEDs in the rear lights
For installation you need to perform the following steps:
- Pull out the headlight, reflectors and reflectors, and then separate the glass.
- Using a marker, mark the places where the LEDs will be installed.
- On the inside, stick pre-prepared small round fragments cut from adhesive tape.
- Paint the lights and remove the tape after the paint dries.
- Install the reflectors using epoxy-based glue, and then treat each of the joints with sealant.
- Attach the LED boards to the machine wiring, marking them inside the lamp.
- Assemble the turn signal control units and restore the contacts.
- After this, install the modules with glue (video author - Alex Aitov).
Manufacturing of diode rings
To create a lantern based on a ring, you need special glue. A diode ring will be used for the base. The headlight housing is made of reflectors. In addition to other materials, you will need paint that matches the color of the product.
Manufacturing proceeds as follows:
- Diode rings must be installed in tin cylinders.
- You can make them from cans, cutting out holes so that the tin looks like a well: external and internal.
- Install a reflector in each such well. The remaining space in the device can be decorated with an LED ring.
- Install the reflectors using adhesive fasteners to successfully connect the device to the body.
Diode rings
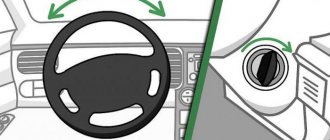
Tinting
To tint the glass yourself, you first need to dismantle it. If you do not remove the glass, you need to remove the seals. Before tinting, thoroughly clean the windshield, carefully inspecting all the corners and places where the most dust collects.
When the window is degreased, it must be wiped again so that there is not a speck of dust. Spray the surface of the glass with a special solution, and carefully apply a tinting strip on top. After gluing the film, carefully remove all air bubbles using a staple knife.
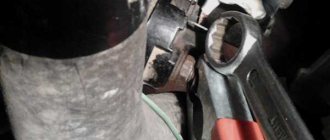
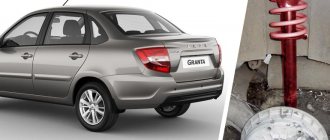
Modernization of rear lights of VAZ 2115
Recently I was puzzled by the operation of the rear lights on my 15. They all lit up in unison, then blinked away. After scouring the Internet and reading various articles on upgrading the rear light wiring, I decided to get down to business. I went to the store to look for the necessary parts. But there were no cartridges worth a penny in our stores. After some thought, I decided to see what the local car dismantling shop had to offer.
The most easily accessible ones turned out to be the rear sockets from the old Gazelle (the new sockets are slightly different and the light bulbs do not have quite standard sockets). Next, take out the rear light board and use a screwdriver to pry out the plastic sockets. Having taken out the cartridges, we carefully cut the tape, leaving the contacts to which we will solder the wires.
We don’t throw away the tape. We mark and then drill holes for the cartridges in the same places where they were installed earlier.
For a better fit and reduction in size, it is better to process “Gazelle” cartridges by cutting off the excess with a hacksaw. It is better to drill holes up to 10 mm with a drill. Further, if you have drills of a larger diameter, then to avoid tearing the plastic, it is better to drill by hand and then finish it with a regular knife, cutting off all the excess.
We glue the cartridges in and check the contact of the central part. If the contact is in doubt, then it is better to re-solder.
We solder the wires to the minuses and insulate them. I insulate with heat shrink tube, heating it from different sides with the untinned part of the soldering iron tip. We drill a hole for the wires and bring everything out to the inside.
We make the total mass by combining all the cartridges.
Having combined the electrical tape and the scrap, we find the minus along its tracks. We are looking for a plus for the turn signals. Using the diagram, we also determine the contact between the side light lamp and the brake light. Using a sharp knife, carefully peel off the green varnish down to the copper base, and then quickly tin the ends of the stripped track. If you heat a section of a track with a soldering iron for a long time, the track seems to creep apart. After soldering the wires to the track, cover them with varnish or sealant.
We fix the wires with thermal glue. We put everything back and check its functionality. As a result; there is nothing hanging from the outside. The pads remain original. Lamps (21w by 12 W) are ordinary with one spiral, they work no worse than 2 spirals. Nothing is buggy.
PS: There are almost no costs for this modernization. Cartridges are free at a car dismantling point (they throw them away in the same place as the light bulbs). I used “window” glue for gluing plastic (RUB 150). Also on the second headlight I used cartridges from a new type of Gazelle (for rear corners, diameter 20 mm, old type 16 mm).
Author: Victor Golunov
Possible malfunctions of brake lights and their elimination
Regarding malfunctions related to optics, we can say that the most common problem is the contacts on the board coming off. To avoid such problems, many car enthusiasts replace circuit boards with cartridges. The circuit board in the flashlights burns out at regular intervals, but upgrading may be a solution.
Replacement occurs without any special complications: remove the board, and in their place make a suitable hole for the cartridges. Then make contacts from the total mass. When working, be careful not to blow fuses. After this there should be no problems with the headlights.
Photo gallery “Replacing the board with cartridges”
For more successful modification of the rear lights of the VAZ 2115, you can take a look at the photographs provided below.
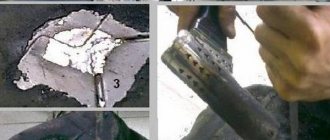
1. Prepare the necessary parts.
2. Remove the cable and drill holes for the cartridges.
3. Connect the wires on the board.
Loading …
How to troubleshoot?
The most common reasons that the brake light on the VAZ 2114 does not work are the following factors:
- Fuse failure.
- Broken wires in one of the sections of the circuit.
- Limit switch faulty.
- Bulbs burn out.
- Oxidation of contacts in lamp sockets.
- Damage to the contact board.
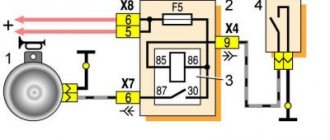
The most common and at the same time the most easily removable of the above reasons is a blown fuse. To identify such a malfunction, you need to examine the fuse box. A 10-amp fuse F3 is responsible for the brake lights, which also protects the ignition switch, computer and interior lighting.
Malfunctions in the operation of the latter may also indicate a malfunction of the stop fuse (and in this case, troubleshooting should begin with the block). If it turns out that the fuse has blown, then you should replace it with a new, similar one.
The problem may also be in the fuse block itself - sometimes the tracks on its printed circuit boards burn out or the contact legs oxidize. In order to check its serviceability, it is enough to measure the voltage at the contacts of the newly installed fuse.
Another common reason why the brakes of the VAZ 2114 do not light up is a malfunction of the limit switch that turns on the signals. It is located on the brake pedal bracket and is always in working order, regardless of whether the car engine is turned on or not.
It works automatically when you press the pedal. In order to check its serviceability, it is enough to see whether the power supply is suitable for its contacts (on one of the contacts the presence of power must be constant). In addition, if you press the pedal and thus turn on the limit switch, you can measure the voltage at its connectors.
If there is no current at the switch contacts, you should check the wire going to the limit switch from the fuse box. If the test shows that the wire is faulty (there is a break), then it should be replaced with a new one and the test repeated.
Otherwise (if everything is in order with the wire), you should disconnect it (as well as the other wire suitable for the second connector) from the switch and connect directly. If after such an operation the brake light works, then the limit switch itself has failed and should be replaced.