Exhaust System Mounting Parts
A clear understanding of the algorithm of actions when carrying out such an event as replacing a VAZ 2107 muffler will help every car enthusiast carry out his plans quickly and without errors. On the one hand, removing the old muffler and installing a new one seems simple, but on the other hand, you need to be prepared for some difficulties.
Why and how often is it necessary to change the VAZ 2107 muffler?
The exhaust system of a car, despite its relatively simple design, performs many functions. The main ones are:
- removal of fuel combustion products;
- significant reduction in exhaust sound level;
- maintaining air balance with the intake system;
- ensuring effective cleaning and ventilation of cylinders.
The VAZ 2107 muffler experiences enormous loads like no other part of the car. First of all, constant temperature changes have a destructive effect on the metal, which actively destroys not only the protective paint and varnish coatings, but also the structure of the metal itself.
Gases heated to a high temperature literally “eat up” the internal filling of the muffler, mixing with water condensate and oils, dissolving the metal walls, forming through corrosion. Externally, the muffler elements are also adversely affected by moisture, road sand and gravel; salt solutions in winter intensify the decomposition process.
As a result, after some time the driver can observe under the bottom of the car the pitiful remains of what was once called a muffler. Whether we like it or not, the muffler of a VAZ 21074 or any other model will have to be changed periodically. To the question of how often you should change the muffler, every car enthusiast must find the answer himself.
The service life of an exhaust system, like many others, depends on factors such as:
- activity of vehicle operation;
- quality of fuel used;
- the car owner’s attitude towards the condition of the car;
- frequency of use of the machine in adverse weather conditions;
- quality of previously installed exhaust system parts.
Having come to terms with the fact that the VAZ 2107 muffler will not last forever, you need to buy a new one and start replacing it.
Replacing the VAZ 2107 muffler - procedure
An inherently simple procedure can take a lot of effort and time. Before installing a new muffler, you must remove the old one. To do this you should:
- install the car on an overpass or above an inspection hole;
- prepare a set of tools, ensure good lighting under the machine;
- The muffler is connected by a pipe to the resonator pipe in front of the rear axle. The ends of pipes with a slot and a male-female connection are tightened from the outside with a coupling;
- Corrosion under the influence of lubricant and temperature can solder the joints so much that it becomes very difficult to remove them. It is better to moisten the pipes at the junction and the coupling in advance with a solution that corrodes corrosion. For this purpose, as a last resort, brake fluid or used oil is suitable.
The procedure for replacing the muffler is as follows:
- the crimp coupling is untwisted or cut off using a cutting tool (grinder) (in this case, a new coupling should be on hand);
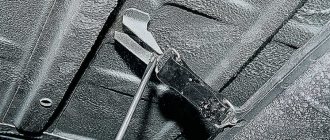
- use a thin chisel or screwdriver to bend the flared edges of the pipe;
- the muffler is disconnected from the resonator (if it comes out tight, you can help yourself with a hammer by tapping on the pipe);
- hanging pillows are detachable. By the way, when buying a muffler, it is advisable to buy three suspension rubber bands (two in the center and one at the rear).
After this, the old muffler is in your hands and you can install the new one in the reverse order.
How to replace the muffler of a VAZ 21074 and other modifications of classics
Very often, car enthusiasts, seeing in the title of the article that the make of the car does not exactly match what is indicated in the registration certificate, continue to search for instructions. VAZ cars are charming because they differ from each other for the most part only in appearance, but the internal structure is completely identical.
It doesn’t matter what kind of car is in the garage: 2105, 2104, 2107 or 21074 - their exhaust system is completely the same. Having studied the repair instructions for one car, you can safely begin repairing another classic model.
Functions of the VAZ 2104 exhaust system
Replacing valve stem seals on a VAZ 2107 with your own hands
To get maximum energy from the engine, you need to burn the fuel under optimal conditions. The required volume of air is added to the gasoline, then the mixture is sent through the inlet manifold into the cylinders, where it is compressed by pistons 8-9 times. The result is that after the flash, the fuel burns at a certain speed and pushes the pistons in the opposite direction, the motor performs mechanical work.
In addition to the energy that rotates the engine crankshaft, by-products are released when the air-fuel mixture is burned:
- exhaust harmful gases - carbon dioxide CO2, nitrogen oxide NO, carbon monoxide CO and other chemical compounds in smaller volumes;
- a large amount of heat;
- a loud sound similar to a rumble that is formed with each flash of fuel in the cylinders of the power unit.
A significant portion of the released thermal energy is dissipated into the environment thanks to the water cooling system. The rest of the heat is taken up by combustion products that escape through the exhaust manifold and exhaust pipe.
The exhaust pipe of the “four” is located closer to the right side of the car - as on all classic Zhiguli models.
What problems does the VAZ 2104 exhaust system solve:
- Removal of flue gases from the cylinders during the exhaust stroke - combustion products are pushed out of the chambers by pistons.
- Cooling of gases by heat exchange with ambient air.
- Suppression of sound vibrations and reduction of noise levels from engine operation.
How much does it cost to hand over a VAZ 2107 catalyst?
The ability of Russian people to effectively transform unnecessary waste into quite good income is amazing. The business of collecting used automobile catalysts, which brings significant dividends, is a prime example of this!
Catalysts in modern cars contain a certain amount of precious metals. To a greater extent it is Platinum or Palladium. Rhodium is less common.
The cost of metals used in catalysts for purifying exhaust gases today reaches 3,500 rubles per gram, while one unit can contain from 1 to 8 grams of Platinum, or another noble alloy.
The main business associated with the purchase of used catalysts from the population lies precisely in the removal of precious metals from vehicle waste.
Even an ordinary motorist can hand over a used device and receive from 1,000 to 18,000 rubles for it.
How to do it? Read below and then perhaps you can make good money by collecting autocatalysts containing platinum.
What catalysts do you buy?
They buy automobile catalysts of both domestic and foreign production.
Accepts metal and ceramic.
Foreign copies are accepted both in whole and disassembled condition.
Domestic, only disassembled.
How much do catalysts cost?
The cost of filters for purifying exhaust gases of a foreign-made car can be determined by the serial number of the product.
The most expensive specimens can be valued at 15,000 - 20,000 rubles per piece up to 45,000 rubles per kg.
Domestic catalysts are bought from 800 rubles to 4000 rubles per piece.
How the price is formed.
The cost of the catalyst at collection points (they are accepted mainly by weight) directly depends on the content of precious metals in them.
If 1 kg contains 6 grams of platinum, then the price will accordingly be based on the cost of 6 grams of platinum. The fewer precious metals there are in a kilogram of catalyst, the correspondingly cheaper it is.
How do you find out how much platinum is in the catalyst?
A disassembled catalyst is taken (only models in exceptional condition are not disassembled).
All filter mass is removed.
Afterwards, using a special device, X-ray fluorescence analysis is carried out, the purpose of which is to determine the exact amount and mass of precious metals in the catalyst.
XRF spectrometer for checking the content of precious metals
Next, the cost of the precious metal on the world market is clarified, a commission of up to 30% is subtracted from it, and the total price of the metals in the catalyst is calculated.
For example, you have 1 kg of catalysts containing 1 gram of Palladium (3000 rubles per gram) according to the XRF test. In this case, you can get 3000 - 30% = 2100 rubles for this mass
Each catalyst has a different content of Platinum, Palladium or other precious metals, so XRF is required when selling them.
Where can you find catalysts containing platinum?
More often, catalysts are supplied to purchase points by service stations, car dismantlers and organizations involved in the purchase of scrap metal. Less often, catalysts are brought by an intermediary who buys the units from the population at lower prices.
Sources
- zr.ru/content/articles/922074-flamegasitel-catalizator/
- zen.yandex.ru/media/autolifestyle/ubral-katalizator-i-vot-chto-izmenilos-v-povedenii-avtomobilia-rasskaju-kak-na-etom-mojno-esce-i-zarabotat-5f1aa0f3dae5eb15901a3548
- drive2.ru/l/548535357054910514/
- drive2.ru/l/1056727/
- zen.yandex.ru/media/id/5c49e7b7df2d7400ade0306d/kak-i-za-skolko-mojno-prodat-otrabotannyi-avtokatalizator-5d25044f23371c00ad7b9f65
Lada 2107, 250 thousand without capital › Logbook › Replacing the VAZ-2107i injector resonator
Hello everyone, back in the winter on New Year’s Eve the resonator burned out, it was 4 years old, it was inherited from the previous owner, I changed the main muffler about a year and a half ago. I decided to wrap it with asbestos cord until spring, but after a month it burned out, so I wound it again.
Recently it became warmer, and the whipping started again - I decided to replace it.
I bought a resonator made in Tolyatti in advance; the main muffler was from the Seversky Pipe Plant, near St. Petersburg.
It turns out that there are 2 types of injector: Euro-2 and Euro-3. It differs in the bend of the flange and, it seems, in length. Before purchasing, I had to look under the car to make sure I have Euro-2, so the pipe with the flange has a bend, while for Euro-3 it is straight.
For some reason I bought a metal-graphite ring with bolts, which is used to connect the exhaust pipe and the catalyst, in my case they are not needed - the resonator with the catalytic converter has a rigid flange connection. But I think sooner or later they will also come in handy.
I prepared the tools, lubricant and sealant, there was an extra clamp left over from the last time.
With sin, I unscrewed two stuck bolts from the flanges; the clamp on the muffler came off easily, since it lubricated the threads even when replacing the muffler. During removal, the resonator flange completely came off - it was already held on by snot.
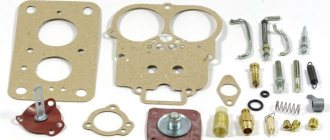
I had to unhook the muffler to disconnect the pipelines; the fastening belt broke, but fortunately I have a spare repair kit, also from last time.
The catalyst honeycomb is visible.
Just for fun, I decided to measure the thickness of the metal pipe of the new resonator - it is about 1.5 mm.
It looks well made, the seams are from an automatic machine, for some reason the article number comes from the “six”, although it seems that no injectors were installed on them.
Before reassembling, I lubricated the joints with a thin layer of graphite paste.
During installation, a problem immediately arose - the bend of the muffler began to rest against the bottom of the car - this is the geometry.
I tried this way and that, but still something stuck somewhere - either in the handbrake cable bracket, then in the cable itself, or in the shock absorber.
There was no autogen, to heat it up and bend it, I had to cut off a couple of centimeters from the tip of the resonator pipe with a grinder.
Somehow we managed to move it a couple of centimeters away from the bottom. Before the final tightening, I also lubricated all the bolts with copper grease, and on top of that with graphite grease, and installed new engravers.
I also lubricated the wire securing the muffler belt with pushsal, since everything there also rusts and you have to tear the belt with a mounting tool or saw it.
Upon inspection, it turned out that siphonage was coming from the new resonator at the place where the 2 halves were welded from a small hole of half a millimeter. It was discovered by the condensate coming out - such is the quality of production, they don’t even check the tightness of the seams.
I didn’t have time to drip it with electric welding or cover it with epoxy, I’ll fix it next time.
Subscribe! Good luck on the roads!
What will be required for replacement?
1) New resonator (other names: first stage muffler or additional muffler).
Aluminized Transmaster Universal stainless steel resonator. (double barrel)
Which resonator to choose: one or two tanks (barrels)? Single barrel or double barrel?
The first Zhiguli models were equipped with additional mufflers with one barrel, and on cars with a more powerful engine with a volume of 1.5, 1.6 liters (VAZ 2105, 2106, 2107) - double-barrel ones.
There is no particular difference in installing a resonator with 1 or 2 barrels; they are interchangeable and will fit any model, with the exception of the VAZ 2102, 2104 station wagons.
As for the noise level, an additional muffler with one barrel is considered a little noisier, but it gives a slight increase in power to the car (there is no additional exhaust resistance). Although the increase in this power is barely noticeable.
A classical resonator consisting of two “cans” is less noisy. Usually, the first can is a fire extinguisher.
2) Two metal clamps (44 mm - for the junction with the main muffler, 46 mm - for the junction with the exhaust pipe). Slightly larger clamps are also suitable, for example, with a diameter of 44.5 mm. and 48 mm.
Muffler clamp d44.5 mm and d48.5 mm
3) Graphite grease
4) Medium-grain sandpaper (sanding) 5) Wrenches for “7”, “13” mm. 6) Universal fluid WD-40 (“vd”, “vedeshka”) 7) Hammer, wooden spacer, screwdriver.
Purpose and design of the resonator
The structure of the resonator is similar to a direct-flow muffler - a perforated pipe is laid inside the cylindrical body without any partitions. The difference lies in the jumper that divides the jar into 2 resonator chambers. The element performs 3 functions:
- perceives and pre-damps sound waves;
- dissipates part of the heat coming from combustion products;
- Extends the service life of the main muffler.
Unlike direct flow, the resonator does not absorb, but repeatedly reflects sound vibrations
When operating, a two-chamber tank uses the principle of resonance - sound vibrations are repeatedly reflected from the walls, collide with oncoming waves and cancel each other out. The VAZ 2104 was equipped with 3 types of sections:
- Cars with a carburetor power system were equipped with a long resonator for 2 tanks.
For the modification with a 1.3 liter VAZ 2105 engine, an element with 1 can was installed. The number of cans in the resonator section depends on the engine displacement - Models with an injector, produced under Euro 2 environmental standards, were equipped with a shorter resonator with 1 tank. The inlet pipe began with a flange, which was fastened with two bolts to the mating part of the neutralizer.
- On modifications of VAZ 21043 and 21041, “tailored” to Euro 3 requirements, the shortest resonator was used, equipped with a mounting flange for 3 studs.
On the “four” with an injector, shorter resonator sections Euro 2 and Euro 3 are installed
Damage and malfunction of the resonator cans are similar to the main muffler section. During operation, housings and pipes burn out, rust or break due to external influences. The repair methods are identical - welding, temporary bandage or complete replacement of the part.
Manufacturers of resonators for VAZ 2107
In the post-Soviet space you can purchase resonators from many manufacturers. The production devices in greatest demand are:
- OJSC AvtoVAZagregat (manufacturer of original parts);
- OJSC Togliatti Plant of Technological Equipment;
- LLC "Izhora Silencer";
- TRANSMASTER UNIVERSAL (manufacturer of exhaust systems made of regular and stainless steel).
There are no big differences between the products of these brands. The service life of resonators made of refractory steel is approximately the same and amounts to 20-30 thousand kilometers. The service life of stainless steel products is approximately twice as long, but the price is one and a half times higher than the price of analogues made of ferrous metal.
Stainless steel resonators last much longer than conventional ones, but they also cost significantly more.
The nuances of muffler repair
The muffler of “classic” VAZ cars, according to the manufacturer’s recommendations, cannot be repaired. If a malfunction occurs in any element of the exhaust tract, the part must be replaced with a new one.
In fact, motorists often prefer to repair holes burned in the muffler - the most common defect - by welding.
The occurrence of “fistulas” is indicated by a change in the sound of the engine and the appearance of smoke from under the car. To troubleshoot, place the machine on a platform and inspect the elements of the exhaust system.
If the cause is a burnt gasket, remove the muffler and replace it. When you have an assistant, you can do without removing all elements of the system. Proceed in the following order:
- Unscrew the pipe fastening to the gearbox.
- Unscrew the nuts securing the exhaust pipe to the manifold.
- Together with an assistant, pull the “pants” off the pins while simultaneously rotating the bend of the resonator pipe.
- Replace the gasket, install the pipe in place, tighten the fasteners.
A welded muffler usually lasts less than a new one. But welding is also cheaper than buying. Usually, if it is necessary to repair a muffler by welding, they turn to professionals. If you have the equipment, you can do the work yourself. For this you will need:
- welding machine;
- blanks for patches made of sheet metal 1–2 mm thick;
- a piece of pipe of the same diameter as the failed one;
- grinder with cutting disc for metal;
- metal brush;
- sandpaper;
- heat-resistant paint for metal.
To repair the muffler, follow this sequence:
- Remove the muffler from the vehicle.
- Using an external inspection, determine the location of the malfunction and the extent of the damage.
- If there is a large hole in the muffler body, evaluate the condition of the internal parts. It is possible that repairing the external surface will not bring the desired restoration of the functions of the muffler without replacing the internals. In this case, it is advisable to contact professionals or simply replace the faulty part with a new one.
- Cut out the burnt area. From the blank, make a patch larger than the damage. Weld the patch over the hole with a continuous seam.
- If there is damage at the junction of the pipe and the muffler body, cut out the defective area, replace the damaged part of the pipe, and weld the repaired pipe to the muffler with a continuous seam.
- Clean the repaired muffler from dirt and rust, paint the part with two layers of heat-resistant paint.
Video: repairing a VAZ muffler by welding
Replacing and repairing a muffler is a dirty and time-consuming job. But there is nothing complicated about it. You never know what you can do till you try.
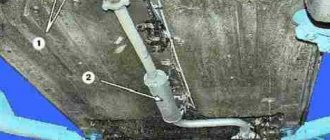
Sooner or later, every owner of a 7 has to deal with muffler repair. To carry it out, you will need minimal knowledge of what the muffler consists of:
- Resonator (consists of a front and rear muffler and is located between the “pants” and the main one).
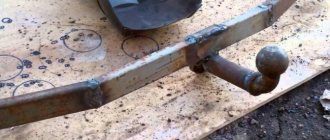
- The downpipe (colloquially “pants”, as it has two branches).
- Connections between these parts.
- Attaching the muffler to the bottom of the car.
What needs to be changed:
- First of all, the main muffler.
- Less often - a resonator.
- Pants are a very rare case.
Types and causes of malfunctions:
- The muffler may burn out due to high temperatures.
- The formation of corrosion due to poor fuel and condensation, which leads to metal rotting and the formation of holes in the muffler.
- Mechanical impacts, sand, gravel, salt on roads.
- Poor quality parts installed previously.
What will tell you if the muffler is faulty? First of all, the usual sound of a running engine will change, it will begin to growl. There will be a persistent smell of exhaust gases in the cabin.
A trip in such a car will not be very comfortable, problems will arise in obtaining a diagnostic card for issuing an MTPL policy, and increased attention from traffic police officers will be ensured. In addition, a faulty muffler will not provide proper ventilation to the cylinders. What mufflers are on sale for 2107
These are stamped and welded products from Takt, Togliatti and AvtoVAZagregat. It is the latter that is the original, so it is better to buy it. The cost of Takt mufflers is from 700 rubles, Tolyatti mufflers – from 850 and the original – from 1000 rubles. Prices are given in Moscow.
What mufflers are on sale for 2107. These are stamped and welded products from Takt, Togliatti and AvtoVAZagregat. It is the latter that is the original, so it is better to buy it. The cost of Takt mufflers is from 700 rubles, Tolyatti mufflers – from 850 and the original – from 1000 rubles. Prices are given in Moscow.
Instructions for replacing the resonator
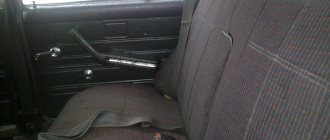
Since the resonator on the VAZ 2107 is not attached to the body, it is necessary to hold it when replacing so as not to deform the exhaust pipe.
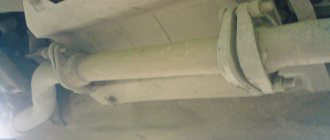
Resonator VAZ 2107
- Tap the pipe connections and clamps with a hammer, as in the previous case.
- First of all, we disconnect the resonator from the muffler, then from the “pants”. When connecting the resonator and the receiving pipe, we proceed according to the same scheme, bend the petals, use a “liquid key” or a grinder in the most extreme case, and very carefully.
- At the point where the resonator meets the muffler, the situation is more complicated. When the pipes have become stuck, we cut off a piece of pipe coming from the resonator, then remove the remaining part from the flare using a gas wrench or pliers. Usually in this place the pipes are stuck tightly, when it is impossible to separate them, we also change the muffler
- We install a new resonator, observing its original position. If the resonator is installed incorrectly, it will start knocking on the underbody or hitting uneven roads. It is desirable that the resonator pipe running from the receiving tube to the tank be parallel to the ground
- In the same way, we align the connection of the resonator with the silencer so that the tank is parallel to the ground and does not knock on the body
Changing the “pants” (reception pipe)
When replacing VAZ 2107 pants, be sure to stock up on a new gasket between the pants and the manifold, because it is destroyed when removed. It is also recommended to replace the nuts securing the pants to the manifold. So:
First, disconnect the pants from the resonator. If problems arise, as in the case of the resonator, given the fact that the pants are replaced less often than other parts of the muffler, and the heating temperature of the connection during engine operation is quite high, we use an angle grinder.
Mounting for a carburetor engine. Nearby is the injector pants mount
After removing the resonator, unscrew the four nuts securing the exhaust pipe to the manifold.
Major changes to components and assemblies
The matter was not limited to installing equipment for distributed injection on the VAZ 2107 car. The system, which ensures the exhaust of burnt gases, has also undergone serious modernization. A number of new elements have been added to it:
- A sensor was embedded in the exhaust manifold at the junction to determine the level of residual oxygen.
- A catalytic exhaust gas converter was installed under the bottom of the car in the central tunnel.
- This unit heats up to high temperatures during operation, and an additional steel screen was installed to protect the body and other parts.
- The resonator was shifted back in the direction of travel.
As a result, the exhaust system has become more complex, while reducing the toxicity of burnt gases. The injector allows you to regulate the specific amount of fuel in the mixture, reducing its consumption to a minimum.
Replacing the muffler VAZ 2107
The VAZ 2107 muffler (injector and carburetor) is connected to the resonator with a clamp, which is located in front of the rear axle. Before removing the clamp, it should be tapped with a hammer to make it easier to unscrew the threaded connection and uncouple the pipes. To change the muffler, you need to do the following:
- loosen the clamp bolt and remove (move) the clamp;
- pull the flared muffler pipe off the resonator (if that doesn’t work, knock it down with a hammer and chisel);
Advice: if you can’t separate the parts, you need to cut off the “petals” of the muffler pipe with a grinder.
- remove the muffler from the cushion and mounting straps;
- install a new muffler on the VAZ 2107;
- tighten the clamp.
Main advantages of the updated model
Diagnosis of faults, repair and replacement of elements of the VAZ 2113-15 stove with your own hands
The modernized version of the VAZ 2107, which has an injector and an improved exhaust, has a number of advantages. The main advantages of the machine are as follows;
- The injector ensures high stability of engine parameters in different operating modes.
- The injection system increases specific power and torque, which adds dynamism to the car.
- During operation, the car's power unit produces less toxic emissions of CO and other compounds than its carburetor counterparts.
In practice, the operation of the machine is simplified for the driver; the injection system used is less demanding on the driver’s qualifications.
The nuances of muffler repair
The muffler of “classic” VAZ cars, according to the manufacturer’s recommendations, cannot be repaired.
If a malfunction occurs in any element of the exhaust tract, the part must be replaced with a new one.
In fact, motorists often prefer to repair holes burned in the muffler - the most common defect - by welding.
The occurrence of “fistulas” is indicated by a change in the sound of the engine and the appearance of smoke from under the car. To troubleshoot, place the machine on a platform and inspect the elements of the exhaust system.
If the cause is a burnt gasket, remove the muffler and replace it. When you have an assistant, you can do without removing all elements of the system. Proceed in the following order:
- Unscrew the pipe fastening to the gearbox.
- Unscrew the nuts securing the exhaust pipe to the manifold.
- Together with an assistant, pull the “pants” off the pins while simultaneously rotating the bend of the resonator pipe.
- Replace the gasket, install the pipe in place, tighten the fasteners.
Replacing a burnt muffler gasket eliminates extraneous sounds from the engine
A welded muffler usually lasts less than a new one.
But welding is also cheaper than buying. Usually, if it is necessary to repair a muffler by welding, they turn to professionals. If you have the equipment, you can do the work yourself. For this you will need:
- welding machine;
- blanks for patches made of sheet metal 1–2 mm thick;
- a piece of pipe of the same diameter as the failed one;
- grinder with cutting disc for metal;
- metal brush;
- sandpaper;
- heat-resistant paint for metal.
To repair the muffler, follow this sequence:
- Remove the muffler from the vehicle.
- Using an external inspection, determine the location of the malfunction and the extent of the damage.
- If there is a large hole in the muffler body, evaluate the condition of the internal parts. It is possible that repairing the external surface will not bring the desired restoration of the functions of the muffler without replacing the internals. In this case, it is advisable to contact professionals or simply replace the faulty part with a new one.
- Cut out the burnt area. From the blank, make a patch larger than the damage. Weld the patch over the hole with a continuous seam.
- If there is damage at the junction of the pipe and the muffler body, cut out the defective area, replace the damaged part of the pipe, and weld the repaired pipe to the muffler with a continuous seam.
- Clean the repaired muffler from dirt and rust, paint the part with two layers of heat-resistant paint.
Photo gallery: muffler welding
If there is damage at the joints of the pipe and the muffler body, weld the repaired pipe to the muffler with a continuous seam. From the workpiece, cut a patch larger than the damage. Weld the damaged pipe with a continuous seam.
Video: repairing a VAZ muffler by welding
Replacing and repairing a muffler is a dirty and time-consuming job. But there is nothing complicated about it. You never know what you can do till you try.
The exhaust system of a car performs two useful functions at once: releasing exhaust gases, partially cleaning them, and also reducing the noise level from the operation of the internal combustion engine.
Today we will talk about such an important part as the resonator. Let's try to figure out why and how the replacement is performed.
The resonator of any car is an additional muffler that reduces the noise level of the engine. In addition to the main “can,” the resonator, or as it is also called, receiving pipe can be equipped with an additional one.
It is worth noting that the resonator operates at high temperatures. Exhaust gases at high temperatures are supplied to it, which gradually cause the heat-resistant metal to wear out. In addition, the resonator on the VAZ 2107 is too close to the road surface, which causes mechanical damage to the exhaust pipe.
Ultimately, holes appear on the surface of the resonator, which disrupt its operation. Exhaust gases escape through these defects, creating an unpleasant sound of the engine, which is not only unpleasant to others, but will certainly not leave traffic inspectors indifferent. That is why a damaged resonator must be replaced immediately.
Purpose and design of the resonator
Repairing the hydraulic clutch drive of a VAZ 2107 with your own hands
The structure of the resonator is similar to a direct-flow muffler - a perforated pipe is laid inside the cylindrical body without any partitions. The difference lies in the jumper that divides the jar into 2 resonator chambers. The element performs 3 functions:
- perceives and pre-damps sound waves;
- dissipates part of the heat coming from combustion products;
- Extends the service life of the main muffler.
Unlike direct flow, the resonator does not absorb, but repeatedly reflects sound vibrations.
When operating, a two-chamber tank uses the principle of resonance - sound vibrations are repeatedly reflected from the walls, collide with oncoming waves and cancel each other out. The VAZ 2104 was equipped with 3 types of sections:
- Cars with a carburetor power system were equipped with a long resonator for 2 tanks. For the modification with a 1.3 liter VAZ 2105 engine, an element with 1 can was installed.
- Models with an injector, produced under Euro 2 environmental standards, were equipped with a shorter resonator with 1 tank. The inlet pipe began with a flange, which was fastened with two bolts to the mating part of the neutralizer.
- On modifications of VAZ 21043 and 21041, “tailored” to Euro 3 requirements, the shortest resonator was used, equipped with a mounting flange for 3 studs.
Damage and malfunction of the resonator cans are similar to the main muffler section. During operation, housings and pipes burn out, rust or break due to external influences. The repair methods are identical - welding, temporary bandage or complete replacement of the part.
Video: how to replace the resonator on classic VAZ models
Over the years, it has become more difficult to find high-quality spare parts for domestic cars that have long been out of production. Practice shows that it is better to repeatedly repair the original factory muffler than to buy a part of unknown origin that will literally fall apart after 10 thousand km. The second reliable option is to incur financial costs, but install a durable stainless steel exhaust pipe.
How to repair a muffler with your own hands
Before you begin repairing the muffler, you need to evaluate the feasibility of these actions. Not every car owner has the skills to work with a welding machine. In addition, the muffler cannot always be properly repaired - in cases of severe burnout, it is best to immediately replace it with a new one.
Reasons for failure
Most often, mufflers on the VAZ 2106/2107 lose their functionality for the following reasons:
- mechanical damage while driving on uneven roads, impacts;
- rapid changes in temperature conditions, especially in winter, when it is cold outside, and inside the case there are very high temperatures due to exhaust;
- impurities in gasoline that come out along with exhaust gases and affect the condition of the metal surfaces of the muffler.
It is unsafe to operate a car with such damage to the muffler.
However, how urgently do you need to repair the muffler if you suddenly notice some damage to its body or black exhaust from the pipe? What are the dangers of operating a Zhiguli with a burnt out or deformed muffler?
Firstly, if there are holes in the body of any element, then the generated gases will enter the cabin. The main danger is that the exhaust is colorless and odorless and cannot be felt. In this case, the driver begins to experience headaches, nausea and dizziness. If you stay inside a car with the engine running for a long time, you can lose consciousness and even die.
Secondly, if the exhaust system does not work properly, engine power is reduced. This is especially noticeable when accelerating, starting from a standstill, or overtaking.
Thirdly, if the plug is faulty, the engine begins to consume a lot of gasoline. The carelessness of the car owner will lead to the fact that the muffler will work worse and worse, and the displacement per 100 km will increase.
How to weld a muffler
Most often, the muffler loses its tightness and therefore cannot work normally. In this case, holes can appear both on the pipes themselves and on the welds.
It is recommended to clean the weld seam and paint the work area with heat-resistant paint
Using a welding machine and metal patches can be considered the most reliable way to repair mufflers.
In order to weld a “muffler”, you need to prepare electrodes of a suitable size (it all depends on how large the hole is burned in the muffler) and a sheet of metal of the required size. After which it is recommended to carry out welding as far as possible from the edge of the holes, since the thinned edges of the metal can quickly collapse:
- Clean the torn edges of the muffler from rust and dust.
- Degrease the metal with a solvent.
- Apply a metal patch to the body and grab it in several places around the perimeter of the hole.
- After this, you can begin to apply full welds.
- After the seams have hardened, it is recommended to clean the slag with a wire brush.
It is recommended to apply welds carefully so as not to burn through the muffler body
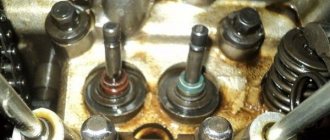
How to change the gasket
There is a reinforced gasket between the main muffler and the resonator part. Its purpose is to prevent the resonator from heating, so it is made of heat-resistant metal.
After dismantling the muffler, it is recommended to change the gasket. This does not take much time, since the element is inserted into the muffler pipe and clamped between its parts.
How to replace hanging rubber bands
This is perhaps the simplest procedure in repairing Zhiguli mufflers. The rear part of the pipe is attached to the body with three hanging rubber bands. During the ride, some of them may get lost or seriously deformed.
To change these rubber bands, you just need to drive the car into an inspection hole or overpass, remove the old products and install new ones in their place. Some car owners change suspension rubber bands without an overpass, simply crawling under the body from the rear left side.
Muffler device (diagram)
The design of the muffler has already been partially discussed, now let’s delve deeper into the topic.
You probably already realized that mufflers have many distinctive features; no devices have the same design; each manufacturer introduces its own innovations to improve the design of its brainchild.
The main goal is to reduce the sound as much as possible without losing engine power.
In a typical production car, the muffler takes from 5 to 7% of the power. To achieve absolute silence, you need to either increase or install an additional device with a resonator, and this will take another 5 to 7% of the power. The total is 10–15%, which no one wants to lose.
Those. It turns out that it is not so easy to make an ideal muffler so that there is little noise and no loss of power.
The design of the product is largely influenced by:
- Engine capacity;
- Tuning or regular engine installed;
- Make of the car and its purpose (sports or regular);
- Who is the manufacturer.
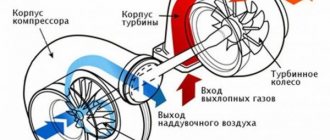
The classic muffler for most cars consists of:
- Inlet and outlet pipes;
- Internal pipes;
- From two or more expansion chambers;
- Internal partitions;
- Helmholtz resonator.
The sound entering the device through the inlet pipe is reflected from the walls and travels a distance of more than 1 km, constantly weakening.
The resonator serves to weaken the most powerful component of the sound wave, which a conventional labyrinth cannot cope with.
The chambers in the muffler are of different sizes because the length of the sound waves is also different.
The inlet pipe, as a rule, has holes and is considered dissipative, since sound entering it is partially dissipated in the first chamber.
The waves move chaotically in space, reflecting from the walls and constantly losing energy. This occurs due to the force of friction against air molecules.
The more of the wave remains in the first chamber, the more the wave attenuates.
The remaining waves pass into the second scattering chamber; however, it is not easy for them to pass from a narrow pipe into open space since, according to the law of acoustics, a sound wave seems to collide with a wall of air.
Part of the wave is not able to enter the second chamber and is reflected back from the interface and partially absorbs the oncoming flow.
The same waves that were able to get into the second chamber are randomly reflected from the walls, absorbing each other and losing energy during friction with the air.
But the main component of the sound wave passes further and enters the Helmholtz resonator.
The sound wave again has to leave the narrow space into the free chamber, and it seems to press on the air in the resonator, creating air vibrations.
This creates a reverse sound wave that has the same frequency as the original one. They collide and destroy each other.
Some of the waves remaining in the second chamber enter another pipe and are transported to the third chamber.
There again, sound loss occurs due to friction with the air, and only after this the weakened wave enters the output pipe, and from there out.