Replacing the catalytic converter (according to Murzilka) with a spacer was let down by the signs by which a cat, as a rule, becomes unusable: a dull exhaust and a “sluggish” set of revolutions (I experienced this slightly from 3000 rpm). The replacement took about 15 minutes. The kata fastening bolts came off almost immediately (WD rules). After removing it, what was my surprise when I looked inside it - the honeycombs were not clogged, their surface was smooth, without soot (my opinion - it would have been similar). Anyway. We install a spacer. After starting the engine, the difference in the sound of the exhaust became very noticeable: the sound resembles a groove (both in timbre and smell). With the catalyst, the smell of the exhaust was sweetish, unobtrusive, but now it stinks like a carburetor. Still, a catalyst is a useful and necessary thing if it is not clogged and fulfills its function. Well, a test for acceleration without a neutralizer. While I’m driving out onto the road, I remember in my head the reviews of car owners of injection-powered Zhigulis, who were amazed by the result that even the acceleration was at the level of a foreign car. Well, I think it’ll trample now. I’m looking forward to a positive result, and here’s what I’m observing: I personally didn’t feel any additional traction. The only barely perceptible effect is that the acceleration up to 4500 rpm is now a little smoother, without obvious attenuation and decline, the engine spins easier up to medium speeds, no more (I want to emphasize the words A LITTLE and EASIER. There is no locomotive traction, there are no crazy accelerations either). Apparently, for the authors of the reviews, the catalyst really “choked” the engine and did not allow it to realize its full potential. This is how it should have been, but apparently in my case the cat did not play a special role.
Euro-2 firmware with one oxygen sensor before the catalyst, so nothing more than replacing a pipe cut was required.
Question: should I remove the catalyst or not? If it is in good working order, then there is no need to get rid of it (let me remind you that it fulfills its environmental functions 100%; this became noticeable when it was removed). If the car's mileage is over 100,000 km. Don’t be lazy to look into it if you suspect a drop in power (provided that all sensors and the engine as a whole are in good working order). For interested and doubtful car owners whose cars have mileages of over 100,000 km. it makes sense to remove the catalyst and look at the result, which may please you (the average price of a spacer is 300-400 rubles).
Conclusions: 1) Consumption remained the same (theoretically, due to better throughput, even if it changed in the direction of economy, then within imperceptible limits, just like car acceleration); 2) The ground clearance has increased (a definite plus, since the catalyst is almost the lowest point of ground clearance); 3) Low cost of the spacer compared to the catalyst (besides, if the catalyst is really clogged, it is a rational alternative). The only negative is the toxicity that the catalyst reduced. A lot or not (by smell - a lot). Well, the choice is everyone's.
This spacer is marked 2110 (for Euro-2 classics). I bought it at the VAZ store on the dam (the lowest price in Ulyanovsk).
The exhaust system of classic VAZ models consists of three elements. The middle element is usually called a resonator. Any malfunction is accompanied by a roar coming from under the bottom of the car. Repairing and replacing the resonator with your own hands is quite simple. In this case, the choice of a new part becomes especially important - the manufacturer installed several types of resonators on the VAZ 2107, depending on the type of engine and power system.
Proper removal of the VAZ 2107 Euro-2 catalyst. Stronger installation
If you also decide to remove the catalyst on a VAZ 2107 car (in particular), then it is recommended not to leave an empty pipe. In order for the rest of the exhaust (resonator, muffler) to live for a long time, you need to install a stronger-type flame arrester.
I chose gill type CBD companies on the 45 tube. Allows exhaust to flow in one direction only. There is one BUT
Since this stronger will be installed by cutting off the flanges from the catalyst and welding them to the stronger, I recommend taking the stronger on the 51 pipe. Believe me, it will be easier to fit such a stronger into the catalytic body.
First of all, we remove the old catalytic converter from the car. Let's try on the strongman. The second thing we do is cut off the flanges from it and weld them to the stronger. The third step is to install all this on the car and enjoy the new interesting sound!
However, I took a slightly different route. Because I ordered a stronger on a 45 pipe (don’t repeat my mistakes), welding the flanges was problematic. Therefore, the flange was cut off from the new factory resonator and butt-welded to the stronger, and the other end, which goes to the pants, acquired a flange.
Now the resonator with a flame arrester is a single part, just like on a carburetor Lada.
The advantages of this stronger: 1) Add a bass sound; 2) Protects the resonator; 3) The exhaust does not hang to the ground!
Honest 175 mm returned to Lada ;)
Choosing a resonator for VAZ 2107
Four types of resonators are installed on the VAZ 2107:
- Long section with one tank. Installed on all classic carburetor VAZ 2101-2107 with an engine capacity of no more than 1.3 liters. Catalog number - 2101–1202005.
The last two types of resonators are shortened due to the addition of an additional element - a catalytic converter. Parts for Euro 2 and 3 differ in length (spare parts for Euro 3 are shorter) and the number of mounting bolts on the flange. The second tank is missing - its functions are performed by the catalyst.
The choice of resonator depends on the specific modification of the VAZ 2107. When purchasing, you need to keep in mind the following recommendations:
- On the carburetor version with a 1.3 liter engine, you can easily install a long section with one (VAZ 2101-07) or two (VAZ 2106-07) tanks. In the second case, the sound of the running engine will become quieter, but the power will drop by about 3-5 hp. With. Shortened resonators will not work.
- Both long resonators are suitable for carburetor and injection VAZ 2107, corresponding to Euro 0. When installing a part with one tank, the exhaust noise will increase and the engine power will increase slightly. Short pipes cannot be installed.
- The exhaust system for Euro 2 is equipped not only with a catalyst, but also with an oxygen sensor (lambda probe) mounted in the exhaust pipe. For such cars, the original shortened resonator with a two-bolt flange or any long section is suitable. However, such a resonator is not suitable for the VAZ 2107 Euro - it is connected to another catalyst and differs in length.
- The exhaust system of the VAZ 2107, manufactured in accordance with Euro 3 standards, has two oxygen sensors. On the VAZ 21074 you can install the original short resonator or a long one, but with some modifications.
Once it was possible to modernize a 1.3 liter engine by increasing the displacement to 1.7 liters by replacing the crankshaft and boring the cylinders to size 82 mm. After which it was necessary to replace the “native” resonator with one barrel, because with an increase in engine power, the exhaust pipe began to roar more strongly, especially at speeds above 2500 rpm.
It makes no sense to install a resonator from other brands of cars and front-wheel drive VAZ models on the “seven”. You will have to strongly heat and bend a pipe made of refractory steel. An alternative option is to weld the resonator tank with your own hands based on the burnt-out element.
Installing long sections on the VAZ 2101-07 that comply with Euro 2 and 3 standards is advisable in cases where it is necessary to discard a failed catalyst. The latter is quite expensive, and not every car owner is ready to make a full replacement. In this case, after installing a long resonator pipe, you will have to install a snag instead of the second lambda probe or reprogram (reflash) the engine control controller.
Video: choosing a resonator for VAZ 2107
How to make a flame arrester from a catalyst yourself - another way
To make a flame arrester you will need:
- welding machine;
- two metal pipes, one of them should be of a smaller diameter;
- metal brushes-scrapers for washing dishes;
- old exhaust gas converter.
Our homemade flame arrester will be located in the catalytic converter housing, so it will need to be cut in half and the non-working honeycomb removed.
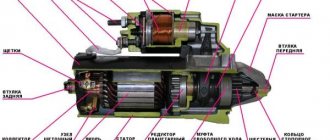
Many people are interested in the question of what the VAZ 2107 catalyst is and what its function is. This issue becomes especially relevant when car service specialists report a malfunction of this part and the need to replace it.
The catalyst is not a cheap part, so in order to decide whether it is worth spending money on it, you need to understand its structure, purpose and operating principle
Design of the VAZ 2107 catalyst
The catalyst consists of three main elements:
The carrier block is the main element of the catalyst, which is the basis for the catalytic converter of harmful impurities. The block material is heat-resistant ceramics, resistant to flame. In its structure, it resembles a beehive with honeycombs, which significantly increase the contact area of the catalyst surface with the exhaust gases.
The catalyst body is made of stainless steel, and the surface of the catalytic converter block is covered with a thin layer of platinum, palladium and rhodium, which, by acting on the substances contained in the exhaust gases, contribute to their oxidation.
Recommendation "Behind the Wheel"
There are three options for solving the problem with a failed converter - from good and expensive to simple and cheap.
The most correct thing is to replace the failed catalytic collector with a new one. But the price of the issue is, as a rule, inhumane. On Rio or Solaris, a new collector costs about 50,000 rubles.
- Luckily for us, a number of companies produce repair catalytic units. It looks like a flame arrester, only inside the cylinder there is a full-fledged ceramic base coated with precious metals. And also, to the delight of intimidated car owners, the base is not ceramic, but metal. This one will definitely not collapse, turning into dust. Such blocks are installed instead of the standard neutralizer or inside its body, depending on the car model. The part itself will cost 6,000–9,000 rubles. Those with a metal base are the most expensive. Installation work costs another 1,500–2,000 rubles.
- Owners of some models have another option to solve the problem. For example, almost all Korean cars, in addition to the main catalytic converter, have an additional one in the exhaust manifold - under the bottom. It is significantly inferior in efficiency to the main neutralizer and will not be able to compensate for its loss. But in its place (under the bottom of the car) you can install a cheap but full-fledged catalytic converter, for example, from a VAZ-2107 with an injection engine. It will cost a little more than three thousand rubles. For poor car owners, this is a salvation. Just keep in mind that the rate of warming up of the converter under the bottom will not be the same. And so that the second oxygen sensor does not lie, you will need to reflash the engine control unit.
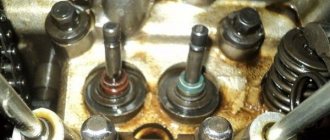
Replacement for an 8-valve engine
Option for an eight-valve device Some believe that instead of a failed filter device, you can install a regular corrugated pipe .
Also a wrong decision. This will make the noise incredibly loud, and the exhaust gases will very quickly destroy the muffler. You can get by with a budget replacement option - cut out a section of the catalyst, knock out a honeycomb of ceramics from it and perform welding, thereby sealing the body. But be prepared for noise to become your constant companion. It is best to replace the factory catalyst with an effective flame arrester. They assemble it with their own hands or seek help at a service station, and also purchase ready-made solutions at auto parts stores. Whichever option suits you best, choose that one.
Removing the unit and replacing it with another device is a matter of one hour. At the same time, there is no need to worry about electronics. There is only one oxygen sensor, and it is installed before the catalyst. Therefore, replacing it with a flame arrester will not affect the measurement readings in any way.
Why does the lambda probe break on a VAZ 2107?
The oxygen sensor on the VAZ 2107 compares the oxygen content in the atmosphere and car exhaust. The principle of operation of the device is based on the supply of signals in the form of increased or decreased voltage supplied to the ECU. Depending on the signal received by the computer, the composition of the mixture entering the cylinders is adjusted.
Until 2004, injection sevens were equipped with oxygen sensors without heaters, and after that with heating elements. The exhaust system design may use one or two devices. If there is one, then it is installed immediately at the outlet of the exhaust manifold in front of the converter, which complies with the Euro-2 standard. The presence of a second sensor indicates that the car complies with the Euro-3 environmental standard. If the first sensor reacts to excess gas toxicity, the second is used to monitor the quality of the catalyst.
The only lambda probe is located on the seven under the bottom of the car immediately after the exhaust manifold, and is part of the exhaust system. Oxygen sensors often fail, which occurs due to the use of low-quality fuel. Low-quality fuel is gasoline, which contains a large amount of lead. Lead is added to gasoline to increase the octane number.
In addition to the high lead content in the fuel, the reasons for the rapid failure of the oxygen sensor are:
- Liquid entering the intake manifold. These liquids include water, brake fluid, antifreeze, oil, gasoline. Any type of liquid that settles on the device leads to the formation of microcracks.
- Clogged fuel filters. In this case, the blockages reach the exhaust system and settle on the body of the lambda probe, thereby reducing the efficiency of the device.
- Overheating of the housing in case of incorrectly set ignition.
- Popping noises in the muffler, which lead to a violation of the integrity of the ceramic base.
- Service life - like any part, the oxygen sensor on the VAZ 2107 has a certain service life. It ranges from 3 to 5 years or from 40 to 70 thousand kilometers. After the specified period, the device in question must be replaced.
Read this, it might come in handy: Replacing the flywheel with a lightweight one, what does it give?
Replacing the catalyst on a VAZ 2107 (injector)
What is needed for replacement? An inspection hole or lift, a set of spanners and a standard new catalyst for this car model. The cost of the catalyst depends on the manufacturer and can vary by half.
Replacing the catalyst does not require high qualifications and is carried out in literally three steps:
- Using a spanner wrench, unscrew the nuts securing the catalyst to the resonator. When unscrewing, it is necessary to hold the bolt with a second key, preventing rotation. In total, you need to unscrew two nuts from two bolts.
- Unscrew the bolts securing the VAZ 2107 catalyst to the exhaust pipe of the exhaust system.
- Remove the catalyst.
To install a new catalyst, you must perform the operations in reverse order.
Important! The main reason for catalytic converter failure is poor quality fuel. To extend the service life of the catalyst (and the engine itself), it is necessary to refuel the car at trusted gas stations that sell high-quality certified fuel.
I took it off, cut it into pieces, removed the mesh, welded it, put it back in place, and the result is that the machine began to type faster!
About symptoms of malfunctions
The lambda probe cannot last forever; there comes a time when it becomes unusable. The following signs of malfunction indicate this to the driver:
- Fuel consumption has increased.
- Interruptions in engine operation.
- The car begins to move jerkily.
- Idle speed changes
- The Check Engine light comes on on the dashboard.
The indicator appears when the sensor completely fails. The listed symptoms should alert the driver; they indicate that it is necessary to urgently diagnose the power unit.
FakeHeader
Comments 16
The spacer seems to cost 500r. less hassle than cooking
inserting costs money, but here everything is done with free material!
why did you remove it?) was the check constantly on or what?)
I have one Euro 2 sensor, on my pants, there wasn’t a second one initially, so I didn’t have anything on, I pulled it out because with it the output resistance was greater, the car is now picking up speed better and better!
I have Euro-3.) and the check light periodically lights up, bastard, due to the insufficient efficiency of the catalytic converter) I remove it through a computer in the service center)
buy yourself an on-board computer and you will delete errors yourself and you don’t have to pay anyone money, the simplest one on the diamond costs 1000 rubles in place of the parking brake lights and a beard belt!
Is it possible to clear the errors yourself so that the check does not light up? )
did you mean the brake fluid and heated rear window lamps)) but you can put it to the left, where the plug is, and there are no lamps))
I have Euro-3.) and the check light periodically lights up, bastard, due to the insufficient efficiency of the catalytic converter) I remove it through a computer in the service center)
there is no need to go to the service center, I removed the positive terminal on the battery for a couple of minutes and the check light does not light up
yeah, it's burning, it's still on))
I didn't feel hot after that
the terminal is also not good, when I bought the car, naturally, after spending a penny, I removed the terminal from the battery at night, when I installed the battery, it started giving me an error saying that the power to the brain was being lost, I haven’t removed it for 4 months now and everything went away, but the check still doesn’t work caught fire!
About checking the oxygen sensor
Check the oxygen sensor with a multimeter. The test can be performed as follows: one probe is connected to a white wire, the other probe provides contact with the machine ground. With the ignition on, the multimeter should show a voltage of no more than 0.45 volts. If its readings are greater than this value, the oxygen probe is broken and needs to be replaced. You can also check the resistance of the sensor. To do this, the multimeter should be set to the “resistance measurement” position. Modern sensors have 4 wires for connection. Two white ones are the voltage supply to the heater, blue (may be gray in some models) and black are the signal circuit.
Measure the resistance between the white wires, which must be at least 10 ohms. When it is higher, this indicates a faulty oxygen probe. If you have the necessary equipment, look for the error code. P0131 indicates the presence of a low signal level from the lambda, this occurs due to a lean mixture. To check, you should inject gasoline into the intake tract; if the sensor is working, it will show an enriched mixture. If the error does not disappear, provide air suction. The lambda reaction indicates the serviceability of the device. Signs of malfunctions of the VAZ 2107 injector oxygen sensor have been discussed, now we should talk about replacing it.
"Native" oxygen sensors
For VAZ cars equipped with an injection system, the following oxygen sensors are ideal:
- For engines with a volume of 1.5 liters, complying with Euro-2 standards, they were equipped with a lambda probe manufactured by Bosch, number 0258005133. It was also used on cars that were compliant with the Euro-3 standard, directly in front of the catalytic converter.
- The second oxygen sensor is manufactured by Bosch with model number 0258006537. It has been actively installed on cars since 2004. The difference from the first lambda is that it has a special heater. This oxygen sensor can be installed on a car that was equipped with a lambda without a heater. But under no circumstances should you carry out a reverse replacement.
Types of lambda probes
Modern cars are equipped with the following sensors:
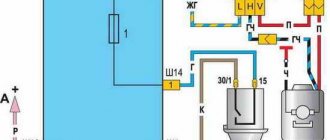
Connection diagram to the lambda probe depending on its type
The presence of voltage in the heating circuit is determined with a multimeter or voltmeter in the following sequence:
- Without removing the connector from the sensor, turn on the ignition.
- The probes are connected to the heating circuit.
- The readings on the device must match the voltage on the battery - 12V.
“+” goes to the sensor from the battery through the fuse. In its absence, this circuit is called.
“—” comes from the control unit. If it is not detected, check the terminals of the lambda probe - ECU circuit.
The reference voltage measurements are carried out using the same devices. Sequencing:
- Turn on the ignition.
- Measure the voltage between the signal wire and ground.
- The device should show 0.45 V.
To check the heater, set the multimeter to ohmmeter mode. Diagnostic stages:
- Remove the connector from the device.
- Measure the resistance between the heater contacts.
- The readings on different oxygen pumps are different, but should not go beyond 2-10 ohms.
Important! The absence of resistance indicates a break in the heater circuit.
A voltmeter or multimeter is used to check the sensor signal. For this:
- They start the engine.
- Warm it up to operating temperature.
- The probes of the device are connected to the signal wire and the ground wire.
- Engine speed is increased to 3000 rpm.
- Monitor voltage measurements. Jumps should be observed in the range from 0.1 V to 0.9 V.
If during at least one of the checks the indicators differ from the norm, the sensor is faulty and needs to be replaced.
VAZ 2107 catalytic converter with ECU flashing
Let's reflash the engine ECU, excluding the second lambda probe from the circuit. The electronics “believes” that there is no second detector in the exhaust system, so it does not expect any readings from it, and the engine operates as usual. With the “bleeder” (installed after removing the catalyst), the consumption of the fuel mixture remains the same as before with the catalytic converter.
If the catalyst is excluded from the gas exhaust system on a gasoline engine, the combustion products of the fuel mixture will act as an unextinguished flame and lead to failure of parts of the gas exhaust system (resonator, muffler). To increase the service life of the gas exhaust system, it is necessary to install a flame arrester in it. If there is such a possibility, then you can replace the catalyst with a flame arrester in the same place. If the catalyst is simply thrown out of the system, the engine ECU will display the error “insufficient catalyst efficiency p0420”. To prevent this from happening, either a decoy is installed, or the engine ECU is fully re-flashed to operate within Euro2. The more modern and complex the car, the more complex the methods for testing and monitoring the efficiency of the catalyst, so the use of decoys in terms of the significance of the result comes to naught. For example, as catalyst performance decreases, the engine ECU can change the mixture composition to reduce catalyst wear.
Read, it may come in handy: The smell of gasoline in the cabin of the injector and carburetor: why it smells, causes and solutions, instructions with photos and videos
Replacing the VAZ 2107 resonator
Replacing the VAZ 2107 resonator is carried out on an inspection pit, overpass or lift. To complete the work you will need:
- two keys for 13;
- powerful flat screwdriver;
- hammer and wooden handle;
- pliers;
- pipe wrench (gas);
- aerosol lubricant WD-40 or equivalent;
- fabric gloves.
Theoretically, disassembling the exhaust system is not very difficult. However, in reality, the problem of separating sections usually arises, since the joints of the joints are firmly stuck due to heating and the formation of internal carbon deposits.
The resonator is mounted at four points: at two joints (with the exhaust pipe and muffler) and at two rubber hangers, hooked directly to the tank. Its dismantling is carried out in the following order:
- Drive the car into a viewing hole (overpass), set the parking brake and secure it with wheel chocks.
- Apply aerosol lubricant liberally to the joints of the resonator section and wait 15-20 minutes.
- Using 13mm wrenches, loosen the rear and front fastening clamps. Carefully knock the mandrels off the thickened part of the joint onto the pipe.
When removing Euro 2 and 3 type resonators, instead of the front clamp, you need to unscrew the mounting flange bolts.
If you cannot disconnect the pipes in this manner, try bending the end of the outer pipe with the slots by driving a flat-head screwdriver under it. When the gap widens, spray the joint again with spray lubricant. If necessary, you can remove the rear suspension of the main muffler and have an assistant rotate this element while you hold the resonator with a pipe wrench.
The new resonator is installed in the reverse order. Before installation, it is recommended to carefully inspect the main muffler and intake section. If burns are detected on them, appropriate work should be performed.
During the assembly process, it is necessary to ensure that the pipe does not sag and at the same time does not touch the body. In the first case, the resonator may be damaged on a rough road, and in the second, it will hit the body while driving, causing a dull knock in the car's interior. Upon completion of the work, it is necessary to start the engine and, going down into the inspection hole, make sure that the joints do not allow exhaust gases to pass through.
Video: replacing the VAZ 2107 resonator
The VAZ 2107 resonator operates under difficult conditions - the temperature of the gases passing through the section is about 600 °C. If you do not monitor the condition of the rubber fasteners, the pipe will become loose and begin to leak gases. If a fistula appears in the body, the tank should be welded immediately, otherwise the damage will quickly increase. Replacing the VAZ 2107 resonator is quite simple. To do this, you will only need a minimum set of plumbing tools and step-by-step implementation of the instructions of professionals.
Electronic snag instead of the second oxygen sensor (without flashing)
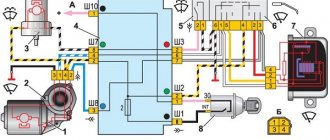
Another way to eliminate problems with the DC is to use an electronic decoy of the lambda probe, the diagram of which is presented below. Since the oxygen sensor transmits a signal to the controller, a decoy circuit connected to the wiring from the sensor to the connector will “crude” the system. Thanks to this, in a situation where the lambda probe is faulty, the power unit will continue to operate correctly.
The installation locations for such deception may differ depending on the PBX model. For example, it can be mounted in the central tunnel between the seats, in the dashboard or in the engine compartment.
The decoy circuit is a single-chip microprocessor that analyzes the processes in the catalyst, receives data from the first DC, processes it, converts it to the indicators of the second sensor and issues a corresponding signal to the car processor.
To install this type of snag, you will need a lambda probe connection diagram, which looks like this.
As you can see, there are different pinouts of the lambda probe (4 wires, three and two). The colors of the wires may also vary, most often there are products with 4 pins (2 black, white and blue).
To make a deception device, you will need:
- soldering iron with a fine tip and solder;
- rosin;
- non-polar capacitor with a capacity of 1 µF Y5V, +/- 20%;
- resistor (resistance) 1 mOhm, C1-4 imp, 0.25 W;
- knife and insulating tape.
Before installation, it is best to place the circuit in a plastic case and fill it with epoxy.
Next, the electronic snag is mounted on the lambda probe with your own hands as follows:
- Disconnect the negative terminal of the battery.
- “Dissect” the wire that goes from the DC itself to the connector.
- Cut the blue wire and connect it back through the resistor.
- Solder a non-polar capacitor between the white and blue wires.
- Insulate connections.
Below is a do-it-yourself diagram of a lambda probe for pinout into 4 wires.
At the final stage, the following should happen.
Such manipulations should not be performed if you do not have the proper experience. Today, stores offer ready-made decoy circuits that even a novice driver can easily install.
Replacement problems
When replacing, the old sensor may stick to the pipe. In this case, proceed like this:
- Apply wd-40 generously and try to unscrew
- Turn on the engine, heat the exhaust system and unscrew the sensor
- We try to heat (being careful) the sensor itself and unscrew it
- Tap lightly with a hammer and try to unscrew it again
- If that doesn't help, try thermal shock. Pour cold water onto the well-heated sensor. Try unscrewing it again.
How to choose a new oxygen sensor
Retail chains offer a large selection of oxygen sensors, which can be of both domestic and foreign production. The VAZ 2107 has been discontinued, so finding an original spare part is problematic. Finding a replacement for this part will not be difficult, you just need to be careful about your choice, since there are many fakes on the market. First of all, pay attention to the packaging; for fakes it is usually not of very high quality. You should also be wary of the low cost of the part. Spare parts from DENSO, Bosch, Stellox have proven themselves well. Their cost can range from 1500 to 3500 rubles.