AND
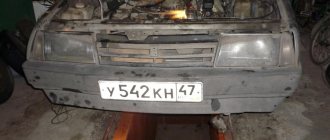
So, the season is already open, I’ll be going to work any day now, so it’s necessary to prepare the car to protect it from drug addicts and hooligans who like to steal music, batteries, etc. Are all classic owners familiar with the method of quickly opening the hood (without any tools) through the grille?! For those who don’t know, I’ll teach you now: The plastic grille is pulled out, through the resulting huge hole in the hood we pull the cable braid and that’s it! Do whatever you want with the engine bay. As a rule, they remove the battery and hand it over at the reception for 400 rubles.
The latest fashion in Ulyanovsk is to unscrew the wheels and drain the gasoline. I will not write the signaling model here, because... it doesn't make any sense. I installed a feedback alarm. All alarms are connected in the same way. Here I will describe which wires go where in order to connect the alarm yourself and save several thousand rubles!
What do we need
— Alarm (For classics, you should take an alarm without autostart, otherwise you will suffer from suction) — Siren (Not necessary, if you only need a feedback key fob to silently go down to the car and kick the villain.) — Door activators (Not necessary, if not necessary automatic locking/unlocking of doors. For the front doors, activators with a force of 4 kg are sufficient, for the rear doors 6 kg. If desired, you can put the activator on the trunk, there is also 6 kg.) - Wires (Not necessary, if you do not install activators, cross-section 0.75-1mm. It took me about 4-5 meters to arrange everything neatly and leave a reserve in case of repairs.)
For the money
Alarm: from 1,500 to 3,500 rubles. on average Siren: 150-250 rubles. Activator 1 pc. 100-160 rub. Wire 5m, 1mm section. 100-120 rub.
Installation
Because On each alarm, the colors of the wires coming out of the connector may differ, so you should use the instructions from the alarm itself to determine which wire is needed for what. It shows schematically where to connect what, but specifically for the VAZ 2106, I’ll write it out myself.
1. To connect to the turn signals, there are usually 2 wires from the alarm (sometimes one). If 2, then you can pick it up at the steering column switch connector. There is one blue wire, the second blue with a black stripe. One wire to one, one to the other.
2. To connect to the standard door opening limit switches, there are usually 2 wires from the signaling system. One for +, the other for -. The VAZ 2106 does not use a positive wire! We don't connect it anywhere. We connect the negative one for the limit switch to the wire that goes behind the tidy, to the left of the rack. There is a white wire with a black stripe coming out there, this is the wire from the driver's door switch. We connect it to it, the alarm will go off when any of the doors is opened.
3. We connect the wire that comes from the ignition signal to the 15th contact on the ignition switch.
4. We connect the alarm power supply as follows: (+) we pull the wire from the alarm either to the battery (stupid way), or to the brown wire on the small fuse block, or to the pink/brown wire of the ignition switch. (-) connect the wire to ground, i.e. We fix it on the car body. The main thing is to have good contacts everywhere!
5. We attach the wires that go to the activators like this: green and blue directly to the door activator, the colors of the wires there are the same. Green and blue with black stripes for ground, and the remaining 2 wires, as a rule, are also green and blue, only with red stripes, these are positive contacts that are attached (MANDATORY) through a fuse to any contact where there is a permanent positive (see connecting the alarm power supply in paragraph 4)
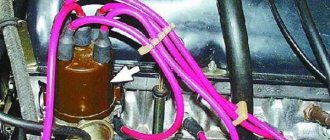
6. To connect the siren and the hood switch, take 2 wires, which we pull out under the hood. The siren has 2 wires, the black one is ground, we fix it, for example, under one of the mounting bolts of the siren itself, or somewhere else where there will be good contact with ground, and the red wire is connected to one of the wires that was pulled out from the alarm under the hood ( do not confuse with the wire for the hood switch!). The limit switch has only one contact, this is actually ground, we connect it to the second wire, which was pulled out under the hood. When the limit switch is not pressed, the wire is supplied (-) from the body of the car, to which the limit switch itself is screwed, therefore, the alarm will go off.
7. Connecting the trunk/gas tank lid switch is done in the same way as connecting the hood switch. There is only one wire.
8. Some alarms come with an ignition lock relay. You don’t have to attach it, but if you decide, the principle of the relay is such that there are 2 wires coming from a 5-pin relay. At the ignition switch (to block the starter), we cut the red wire, and solder the relay to the two ends obtained. You need to look at the alarm circuit to see which wire to solder where in order for the relay to function correctly. The blocking relay can be hung not on the starter block, but on the ignition block; in this case, the blue wire with a black stripe coming from pin 15 of the ignition switch is cut. All that remains is to carefully wrap the extra wires into a bundle and hide the whole thing under the dashboard.
Lada 2106 “New History” › Logbook › Installing alarms and door activators with YOUR own hands!
And
so, the season is already open, I’ll be going to work any day now, so it’s necessary to prepare the car for protection from drug addicts and hooligans who like to steal music, batteries, etc. Are all classic owners familiar with the method of quickly opening the hood (without any tools) through the grille?! For those who don’t know, I’ll teach you now: The plastic grille is pulled out, through the resulting huge hole in the hood we pull the cable braid and that’s it! Do whatever you want with the engine bay. As a rule, they remove the battery and hand it over at the reception for 400 rubles.
The latest fashion in Ulyanovsk is to unscrew the wheels and drain the gasoline. I will not write the signaling model here, because... it doesn't make any sense. I installed a feedback alarm. All alarms are connected in the same way. Here I will describe which wires go where in order to connect the alarm yourself and save several thousand rubles!
What do we need
— Alarm (For classics, you should take an alarm without autostart, otherwise you will suffer from suction) — Siren (Not necessary, if you only need a feedback key fob to silently go down to the car and kick the villain.) — Door activators (Not necessary, if not necessary automatic locking/unlocking of doors. For the front doors, activators with a force of 4 kg are sufficient, for the rear doors 6 kg. If desired, you can put the activator on the trunk, there is also 6 kg.) - Wires (Not necessary, if you do not install activators, cross-section 0.75-1mm. It took me about 4-5 meters to arrange everything neatly and leave a reserve in case of repairs.)
For the money
Alarm: from 1,500 to 3,500 rubles. on average Siren: 150-250 rubles. Activator 1 pc. 100-160 rub. Wire 5m, 1mm section. 100-120 rub.
Installation
Because On each alarm, the colors of the wires coming out of the connector may differ, so you should use the instructions from the alarm itself to determine which wire is needed for what. It shows schematically where to connect what, but specifically for the VAZ 2106, I’ll write it out myself.
1. To connect to the turn signals, there are usually 2 wires from the alarm (sometimes one). If 2, then you can pick it up at the steering column switch connector. There is one blue wire, the second blue with a black stripe. One wire to one, one to the other.
3. We connect the wire that comes from the ignition signal to the 15th contact on the ignition switch.
4. We connect the alarm power supply as follows: (+) we pull the wire from the alarm either to the battery (stupid way), or to the brown wire on the small fuse block, or to the pink/brown wire of the ignition switch. (-) connect the wire to ground, i.e. We fix it on the car body. The main thing is to have good contacts everywhere!
5. We attach the wires that go to the activators like this: green and blue directly to the door activator, the colors of the wires there are the same. Green and blue with black stripes for ground, and the remaining 2 wires, as a rule, are also green and blue, only with red stripes, these are positive contacts that are attached (MANDATORY) through a fuse to any contact where there is a permanent positive (see connecting the alarm power supply in paragraph 4)
6. To connect the siren and the hood switch, take 2 wires, which we pull out under the hood. The siren has 2 wires, the black one is ground, we fix it, for example, under one of the mounting bolts of the siren itself, or somewhere else where there will be good contact with ground, and the red wire is connected to one of the wires that was pulled out from the alarm under the hood ( do not confuse with the wire for the hood switch!). The limit switch has only one contact, this is actually ground, we connect it to the second wire, which was pulled out under the hood. When the limit switch is not pressed, the wire is supplied (-) from the body of the car, to which the limit switch itself is screwed, therefore, the alarm will go off.
7. Connecting the trunk/gas tank lid switch is done in the same way as connecting the hood switch. There is only one wire.
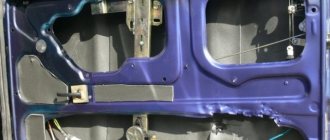
Fastening door activators
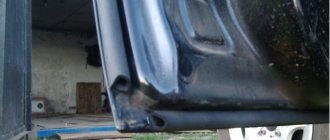
The activators can be attached in different ways, but I would recommend attaching them as shown in my photo. With this type of fastening, you can throw away the metal plate for installation and not carry around extra rattling debris with you. We cut off the excess part of the knitting needle as in the photo.
Attention! Before attaching the activator to the front passenger door, make sure that it does not touch the glass. Most likely, it will have to be turned the other way so that the activator does not interfere with the operation of the window regulator.
Don't forget to thank (LIKE) if the information was useful.