How to tighten the handbrake
Driving a car cannot be called safe if one of its mechanisms does not work or is not working properly.
This fully applies to the parking brake, which is commonly called the handbrake. If the handbrake does not hold the car up, this not only threatens the driver with various problems when parking, but can also come back to haunt you in an emergency on the road, when a timely activated parking brake can help avoid a collision. If the handbrake does not hold the car (or does not hold the car well), this indicates a malfunction. If you have such a problem, it is not necessary to contact the service center. Most often, you can solve the problem on your own by tightening the handbrake. In this article we will look at how to do this.
Where to start replacing
Replacing the handbrake of a VAZ 2110
First of all, replacing the cable begins with the following operations:
- lowering the handbrake lever all the way down;
- removing the brake disc of the wheel on which the replacement is being made;
- removing the muffler from the suspension cushions, and the resonator from the rear suspension;
- lowering the exhaust system;
- unscrewing the locknut and adjusting nut;
- removing the equalizer from the rod.
- remove the end of the cable being replaced from the equalizer;
- remove the tip of its shell from the bracket located on the car body;
- bend the cable fastening brackets;
- remove the rear brake pad and disconnect the cable end from the lever;
- loosen the nut that secures the cable holder to the rear axle;
- remove the cable first from the holder, then from the bracket, and finally from the brake cleat.
The work ends with the new cable being installed in place in the reverse order to its removal. In this case, it is worth paying attention to the location of the cables in the bracket - it should be crosswise. After installing the part, be sure to adjust the handbrake. Now, knowing how to adjust the handbrake of his car and replace its cable with his own hands, the car enthusiast can avoid contacting a service station, and thus save his money, since the cost of repairs is not low. If instructions for performing all this work are not enough, it is quite easy to find on the Internet both photos and videos showing these processes in great detail.
Why do you need a handbrake on a car?
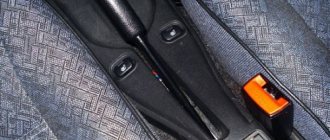
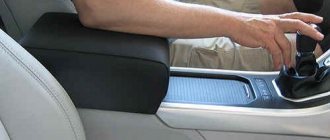
Before moving on to considering the issue of adjusting the handbrake, you need to understand what its task is. Many drivers do not use the car’s handbrake at all, and in some modern cars it is even “hidden”, for example, under the armrest, which is most often lowered for the driver.
The main task of the handbrake is to prevent the spontaneous movement of the car when it is on a hill. For example, this can be useful in a parking lot or in a traffic jam on an uphill slope. In addition, it is much easier to drive uphill or downhill using the handbrake, especially if the car is equipped with a manual transmission.
In addition, the handbrake can be used in case of brake failure. If the car does not respond to normal pedal braking, the parking brake will stop the car, but this will negatively affect the car's braking system.
What does the handbrake consist of?
The task of the handbrake is almost identical to the tasks assigned to conventional brakes. The difference between a handbrake and a service brake system is that it has a mechanical drive. If we consider the simplest design of a parking brake, it is simply a cable, which at one end clings to a lever inside the car, and the other to the brake actuators. When the lever is pulled, the brake pads are compressed, which causes braking. Accordingly, by lowering the handbrake, the driver releases the brake pads.
As you can understand from the design of the handbrake, two main problems can arise with it:
- Stretching of the cable during operation, as a result of which the handbrake has to be raised higher so that its effectiveness in holding the car remains at the same level;
- Reaction to temperature changes. Due to the expansion and contraction of the metal that is part of the parking brake, the handbrake may also begin to work less effectively.
Design features
The adjustment instructions are meaningless if you are not familiar with the parking brake.
Often, when self-adjusting, we are talking about units that are based on a cable and a mechanical drive. With an electronic handbrake, it is better to seek help from a car service center.
We recommend: How to change stabilizer struts with your own hands without problems
The classic handbrake is found on a variety of cars, including:
- Lada Granta;
- Gazelle;
- Opel Zafira;
- Lada Kalina;
- Renault Logan;
- Lada Vesta;
- Chevrolet Lacetti;
- Renault Duster;
- VAZ 2110;
- VAZ 2107;
- Opel Vectra, etc.
Each automaker uses its own components to create the unit responsible for the handbrake.
At the same time, the structural elements are approximately the same everywhere. This allows the suspension a certain line under the bulk of vehicles in the matter of adjusting the handbrake.
As for these same design elements of the parking brake, I would like to highlight 3 main components.
- Lever arm. Serves to turn the handbrake on and off. Located in the vehicle interior, usually in close proximity to the driver, under the right arm;
- Adjustment unit. It includes rods, an equalizer, a fixing and adjusting nut, as well as a rubber boot;
- Drive cable. This is a steel cable located inside a flexible twisted winding. Connects the adjusting unit and the rear brakes on the car.
The rear wheels also contain some braking elements to ensure that the parking handbrake is functional.
How to check the handbrake
Before you begin the rather labor-intensive work of tightening the handbrake, you need to check whether this is really necessary. You can diagnose the parking brake using a special stand in the service center.
The easiest way to check the handbrake is to lift one of the rear wheels of the car, put the car on the handbrake and try to manually turn the wheel. If the wheel spins, it means that the parking brake is not working properly and most likely requires adjustment or replacement of the cable.
There is another way to check the car’s handbrake, but it is more “cruel” in relation to the car’s brake pads and other elements of the braking system. The method is to put the car on the handbrake, then engage first gear and press the gas pedal to the floor. If the handbrake holds the car well, it will jerk slightly and immediately stall.
REASONS FOR ADJUSTING THE PARKING GEAR
The condition of the brakes should be checked once every 30,000 kilometers or monthly. If you suspect that something is wrong with the device, you can check the part more often, especially since there is nothing complicated in such a check, and it goes very quickly.
Diagnostic algorithms:
- You can drive up a steep hill and tighten the handbrake handle well. If the car doesn't start to roll after you release the main pedal, then everything is fine. If the car starts to move, try to tighten the handle more, is it the same? You can safely drive the car into the inspection pit and change consumable parts.
- There is another way to check functionality. Engage the first gear, pull up the handbrake handle and slowly, smoothly, start to move away; if the handbrake is working, nothing will work out for you, and the engine will simply stall. If the car moves, although it is slow, it means that the handbrake needs to be tightened, traffic safety is already at risk. To do this, again drive the car into the pit and inspect the system.
Why the handbrake may not work:
- The cable is very weak.
- The pads are worn out.
- Large gap between the linings and the disc (drum).
How to tighten the handbrake
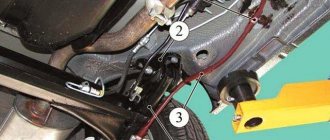
The process of adjusting the handbrake usually does not differ much from car to car. There may be one key difference - adjustments are made under the car or from inside the car. The first option is more common, so it will be discussed in more detail. To pull the handbrake from under the car, you must:
- Raise the handbrake 2-3 clicks (depending on the car model, this indicator may vary);
- Use a jack to raise the car. You can also use an inspection hole to make it more convenient to carry out work;
Loosen the tightening nut on the adjusting unit. Rotate the other nut to tighten the cable. Over time, you will notice that the braking force on the suspended wheel will become greater. When it cannot be turned by hand, this indicates that the cable is sufficiently tensioned;
- Next, lower the handbrake in the cabin to check whether, with it in this position, the wheel will turn without difficulty;
- If everything is fine, try raising the handbrake again; it is recommended to carry out such tests several times;
- Next, it remains to tighten the lock nut, and at this point the process of tightening the handbrake can be considered complete.
As noted above, the handbrake can be adjusted from inside the car. The main difficulty in this case is getting to the necessary adjustment elements. Most often, to get to the adjusting nut, it is enough to remove the panel that covers the handbrake compartment.
Causes
The most common cause of these malfunctions is natural wear and tear of the parking brake element. The cable tends to stretch. Therefore, it is not surprising that from time to time motorists wonder how to tighten the handbrake on the Hyundai Accent and other cars. On foreign cars this unit lasts quite a long time. But on VAZs it can become unusable after 2-3 years. But it all depends on the intensity of use. Experienced motorists put the car “in gear” - this procedure does not harm the car and extends the service life of the parking cable.
The block has its critical wear. If the friction material wears away, the metal part of the lining begins to rub against the surface of the disc or drum. If the problem is ignored, significant scuffs and scratches occur. Only a groove can help save such a situation (and even then not always). Therefore, always check the condition of the pads and replace them according to the regulations.
How to adjust the handbrake
The car has two braking systems - hydraulic and mechanical. Hydraulics are the main means of stopping, interacting with all pairs of pads on the wheels. Mechanics, in turn, are used to fix the position of the machine in place. Hydraulics and mechanics do not interact directly with each other. Over time, the handbrake cable stretches, preventing the lever from pressing the brake pads with enough force to completely lock the wheels. In this case, you will need to adjust the mechanical handbrake. This procedure can be done in a garage environment. The main thing is to understand the principle of adjustment, as well as to have the necessary set of tools with you.
Why you need a working handbrake
The hand brake locks the wheels relative to their axis of rotation, thereby ensuring stability on the surface, including sloping roads. Thanks to a working handbrake, the following functions can be performed.
- Stability of the car on the road when parked, or on a slope.
- Assisting with emergency braking.
- Moving a car using controlled skidding techniques (if you have the appropriate skills).
- Acts as the main brake in case the hydraulics fail.
Note! It is prohibited to use the handbrake as a permanent braking element. The reason is the high risk of skidding, because when stopping in this way, only the rear pair of wheels are engaged.
Why should the handbrake be in good working order?
A hand brake is an element that is part of the braking system of a vehicle. Its main task is to lock the wheels. Thus, the machine becomes motionless, and maintains this state even on a surface that has a slope.
In total, we can highlight several functions and tasks that this node performs:
- Ensures vehicle stability on the road when parking and stopping on slopes;
- Contributes to the performance of maneuvers associated with the need to brake urgently;
- If you have certain skills, it helps in entering controlled drifts;
- If the main brake breaks down, it temporarily acts as a replacement.
Never use the handles as a permanent replacement for the foot brake pedal. There is a main task from which it is not recommended to deviate.
Also, do not jerk the lever sharply while driving, since quickly raising the handbrake will cause the car to skid. Only experienced drivers and racers have the skills of controlled skidding.
When adjustment is necessary
It is necessary to diagnose the parking brake at least once a month, or after 30 thousand kilometers. If there is a suspicion of a malfunction, you will have to check the condition of the unit more often, especially since the procedure is easy to perform.
It is worth tightening the cable in such situations.
- The owner installed new brake pads.
- Due to the poor performance of the rear drums, it was decided to completely replace them.
- Brake discs have been replaced.
- The position of the pads is adjusted according to the parameters specified by the manufacturer.
- The brake cable in the mechanical line has been replaced.
- The adjustment device is installed back in place.
- The lever began to move very strongly, as evidenced by a large number of clicks.
How to understand that the parking brake drive needs adjustment
Experts recommend diagnosing the condition of the parking brake every 30 thousand km or once a year if the car is not used much. In addition, it is necessary to diagnose the operation of the handbrake if there is a suspicion of a malfunction. This is a fairly simple procedure that can be done independently.
How correctly the parking brake drive of your car is adjusted can be checked in two ways.
- The first option involves the presence of a steep slope on which you need to place the car and apply the parking brake. If the handbrake drive is adjusted correctly, the car will not roll. If the car starts to move, you need to try to tighten the parking brake all the way. If this does not help, you need to contact a car service to adjust or repair the handbrake drive.
- The second method for diagnosing the adjustment of the handbrake drive can be used on level ground. To do this, you need to tighten the parking brake, start the engine, engage the gear and smoothly release the clutch. If the engine stalls, then everything is fine with the handbrake. If, with the parking brake fully applied, the car moves, then your car needs qualified repairs.
Symptoms indicating a malfunction of the parking brake actuator:
- Noticeable weakening of the handbrake cable tension.
- Increased wear of brake pads.
- Increased clearance between the brake pads and drums of the rear wheels.
It is necessary to adjust the parking brake drive if:
- The brake pads of the rear wheels have been replaced.
- The drums or brake discs of the rear wheels were replaced.
- Work was carried out to adjust the position of the brake pads of the rear wheels.
- The parking brake cable has been replaced.
- The handbrake adjustment mechanism was reinstalled.
- The stroke of the handbrake lever has increased to 10 teeth.
Checking the condition and adjusting the parking brake drive must be carried out by qualified specialists. If you have the appropriate knowledge about the structure of cars, you can try to solve this problem on your own.
Such work is carried out in a place specially equipped for car repairs in compliance with safety requirements. Before you begin adjusting and repairing the parking brake, you should familiarize yourself with the design of this element on a particular car. You can find the relevant information in the vehicle's operating instructions.
We recommend
How to tighten the handbrake
As a rule, repairing a handbrake involves installing a new cable. But if the adjusting element is in working order, and there are no traces of broken cord on the surface of the cable, the problem can be eliminated by adjustment.
To properly tighten the cable, you must perform the following steps.
- Raise the machine and place it on stands. This will give you access to the bottom.
- Raise the handbrake lever one to three clicks.
- Locate the adjuster locknut in the brake drum hole and loosen it.
- Tighten the adjusting nut and check that the brake cable is tight.
- If the cable tension level has not increased, the system will have to be repaired. It is better to entrust this work to the service center technicians.
- If the tension is successfully increased, you need to make sure that the handbrake is working correctly by pulling the lever towards you. Try to manually turn the wheel forward or backward. Make sure that it does not rotate without applying additional force.
- Retighten the locknut.
- Release the handbrake lever.
- Recheck the behavior of the wheel. Here it should spin freely.
After removing the supports, release the car to the ground and retest the operation of the handbrake. If you suspect a malfunction, try going through the steps described earlier again.
Adjusting the handbrake cable
Complex cable adjustment comes down to changing the tension level between a short cable coming from the handbrake and two cables leading to the left and right rear wheels. The nut for increasing or decreasing the degree of tension is located under the bottom of the car. In some cases, it is located immediately behind the lever - it all depends on the design of the particular machine.
By twisting, the tension of the handbrake cable increases. The procedure is carried out until the wheels are blocked when the lever is raised two or three clicks. If the adjusting nut is soured, it is enough to use a special rust cleaning agent. WD-40, or its substitute, is suitable for this. If there is a large layer of rust, you will have to replace the handbrake cable along with the adjusting nut.
The handbrake doesn't hold
The article and the presented videos are devoted to adjusting the handbrake, but in some cases the handbrake does not hold due to worn brake pads or the absence of a cable. If the handbrake has not worked since you purchased the vehicle, before making adjustments, make sure that the cable has not been broken due to normal wear or loose fitting.
Drum brakes
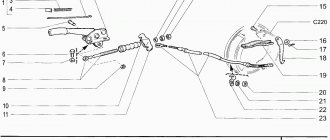
The easiest way to adjust the handbrake is on a drum brake system. Schematic representation of the VAZ 2113-15 hand brake device.
Raising the handbrake lever moves the rod (5), from which cable contours go to each of the wheels under the bottom of the car. Passing through the brake shield, the cables are connected to the levers of the manual drive of the pads. When the handbrake is raised, the cable acts on the lever (13), the upper part of which is fixed to the axis (12). As a result, the force created by the lever is uniformly transmitted through the expansion bar to the brake pads, pressing them against the drums.
In some types of construction, a combination of rods is used instead of cables, but it is the device described above that can be found on all modern cars with rear drum brakes.
How to tighten the cable
The essence of the adjustment is to move the cable equalizer along the rod towards the front of the car. Depending on the design of the car, the adjustment mechanism can be located in the cabin or under the bottom, as is the case with VAZ 2115,2114,2113,2199,2109,2108, Opel Astra F and many other cars.
To access the adjustment mechanism located in the cabin, there is often a special hatch in the central tunnel. In our case, the process is described and shown in the video using the example of a car, where the adjustment is carried out under the bottom, so the car must first be driven onto an overpass or inspection hole. Instructions that will allow you to tighten the cable if the handbrake does not hold.
- Use a wire brush to clean the threads of the adjusting rod.
- Loosen the locknut. In order to stiffen the structure when unscrewing and tightening it back after adjustment, you will need 2 keys - with one you need to hold the adjusting nut while unscrewing, and with the second you need to unscrew the lock nut.
- Move the position of the adjusting nut by tightening it the required number of turns.
- Once adjustment is complete, tighten the lock nut until it is pressed firmly against the adjusting nut.
What degree of tension is considered correct?
In the case of technical inspection, which is not carried out on civilian vehicles in the Russian Federation, the effectiveness of the hand brake is checked in two ways:
Traditional methods
When adjusting the parking brake yourself, you can estimate the tension of the handbrake cable in two ways:
- by the number of clicks. In this case, it is worth looking for information on a specific car model, since, for example, for a Daewoo Matiz the norm will be 7 clicks, and for a VAZ 2106 – 2-4 clicks. The only drawback of the adjustment is that sometimes after replacing the brake drums, pads, and observing the average value for the number of clicks, even with the handbrake lowered, the brake pads can be pressed too hard against the drums. Therefore, after servicing the rear drum brakes, the degree of tension should differ from the average requirements, but after grinding in, the handbrake will need to be tightened;
- according to the degree of pressing of the friction linings. To adjust the handbrake, the rear wheels will need to be lifted. The cable must be tightened to such a state that when the parking brake lever is lowered, the shoes barely touch the brake drums. When rotated by hand, the wheel should rotate quite freely, but at the same time a barely noticeable sound will be felt from the friction linings pressed against the drums (if the pads are worn unevenly, then a characteristic sound during rotation will be in a certain position of the wheel). With this adjustment, after covering 100-200 km, the friction linings will wear off a little, and the gap will become close to ideal.
VAZ owners
On VAZ cars with a front-wheel drive layout, the handbrake may not hold well, even if you tighten the cable in time. This happens due to the design of the cable tip, which limits the amplitude of movement of the manual shoe drive lever. When tightening the handbrake, the return spring hits the limiter too early. To solve this problem, owners cut off several turns of the return spring. In this case, you should be very careful not to damage the handbrake cable itself, and also ensure that the removed sections are of equal length on both sides.
How to replace handbrake cables
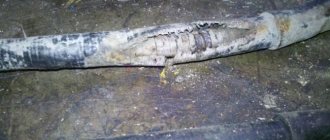
If adjusting the Gazelle hand brake turned out to be insufficiently effective or did not lead to anything at all, therefore, you will have to change the brake pad drive cables. In addition to the critical stretch of the cable, it should be changed if damage is detected during an external inspection. And also an indicator for replacement is corrosion and jamming of the cable in the protective sheath.
In order to successfully complete the task, prepare two “22” wrenches, a “12” socket and pliers. We, in turn, will tell you how to change the handbrake cable on a Gazelle:
- Lift the rear of the car to remove the rear wheels and brake drums and shoes.
- Using a socket on “12”, unscrew the two bolts that secure the protective shell to the brake mechanism.
- After removing the socket cable from the brake shield, you need to move to the cable equalizer and use “22” keys to loosen the lock nut and the adjusting nut.
- Next, you should completely unscrew the outer nut, which will allow you to remove the cable from the bracket slot;
- After this, unsplit the equalizer axle using pliers, then remove the washer and remove the axle.
- Now you need to release the equalizer to remove the drive cable from it.
The second cable is dismantled in the same way. As for installing new parts, you can also use these instructions for this, but in reverse order. After completing the replacement, be sure to adjust the parking brake according to the instructions given in the first part of the article.
How to tighten the handbrake
Handbrake on rear disc brakes
In order to pay more attention to the adjustment process and not go into the intricacies of the operating principle of a mechanically driven parking brake on disc brakes, we will list only the main types of device.
- The brake disc is held by an additional pad, which, when the handbrake is raised, is pressed against the working surface of the disc by means of a rocker arm.
- The brake disc design allows individual brake pads to be placed in the internal cavity. The operating principle is similar to that of drum brakes.
- Design with mechanical support of the working piston. In the cavity of the brake piston there is a ratchet (for automatically bringing the pads together), into which a pin with a trapezoidal thread rests. The curved rod drives the pin by turning the shaft with a concentric groove.
Adjustment
In the case of the most common drum type of design, the handbrake can be adjusted by rotating the adjusting pawl. The regulator itself can be located on the side or bottom of the brake mechanism. Access to it is through a technological hole in the shield, which must be covered with a plug.
In some types of construction, the regulator may be locked by a spring element, so it will have to be bent to release and rotate the “pawl”. The handbrake design on the rear disc brakes and the adjustment mechanism are perfectly shown in the video.
Parking brake device
The main element that activates the brakes is the cable. The cable is better when it consists of a large number of thin veins with a diameter of 0.01 mm. These thin steel wires are twisted and twisted into one rope. If the cable consists of one wire, then its reliability is less, since it is a single-core cable that is easy to break. The cable material is high-strength steel.
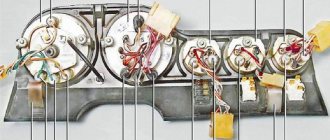
The diagrams show the design of a mechanical parking brake of the mechanical type.
Mechanical type parking brake system drive: 1 – lever fixation button; 2 – parking brake drive lever; 3 – protective cover; 4 – traction; 5 – cable equalizer; 6 – adjusting nut; 7 – lock nut; 8 – cable; 9 – cable sheath Design of the rear wheel drum brake mechanism: 1 – hub fastening nut; 2 – wheel hub; 3 – lower tension spring of the pads; 4 – brake pad; 5 – guide spring; 6 – wheel cylinder; 7 – upper tension spring; 8 – expansion bar; 9 – finger of the parking brake drive lever; 10 – parking brake drive lever; 11 – brake shield
According to the manufacturing technology, the cables are hardened and lubricated in order to minimize the friction force that occurs in the cable casing.
In the last article, I discussed how to replace brake pads with your own hands. Look.
On the outside, the cable is wrapped in metal wire and covered with a polymer material (rubberized plastic). At the ends, the cable shell has special steel shells and sleeves that are pressed into place.
1 — lever; 2 — button; 3 — thrust spring; 4 — latch rod; 5 — cover; 6 — front cable; 7 — rear cable guide; 8 — spacer sleeve; 9 — tension spring; 10 — spacer bar; 11 — lever for manual drive of brake pads; 12 - rear cable.
Working principle of manual mechanical brake with drum brakes:
- The driver raises the brake handle until a certain click is heard. If the cable is tightened, then perhaps you can only put it on the first latch with more force. If it is too weak, then even at the last latch the brake pads will not secure the wheels 100%.
- The rod pulls the main cable, and it pulls the secondary cables through the mounting bracket.
- The lever that is located inside the brake drum begins to turn and the spacer bar equally moves the pads apart, as a result of which the pad linings are pressed against the drum and do not allow it to rotate.
- When the driver lowers the handbrake, the cables are loosened, the springs in the drums return the spacer and the lever (the one in the drum), the pads are compressed and no longer act with their linings on the drum.
On cars with disc rear brakes, the principle of operation of a mechanical handbrake is approximately the same. The cable pulls a lever, which in turn compresses the brake disc. The lever on disc brakes is mounted behind the hub and on the outside.
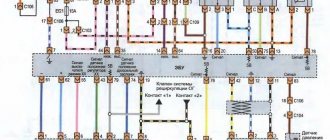
Operating principle of the electronic handbrake:
- The truck driver presses the handbrake button, the electronic unit receives the command.
- The controller includes 2 electric motors with gearboxes that are installed on the rear wheels.
- Electric motors compress the brake pads around the disc. The sensor determines how hard to compress the pads. If the brake pads are worn down, the pads compress with greater force.
- To disable the electromechanical handbrake, just press the button.
Pros of an electronic brake:
- If the driver forgot to turn off the parking brake, then after starting the internal combustion engine while starting the car, the controller will release the pads.
- To unlock the rear wheels, the driver will not be able to release the brake by simply pressing. You must first start the engine, buckle up, put your foot on the brake and press the button.
- On vehicles with electric brakes, there is an Auto Hold anti-recoil button. When the car stops with the internal combustion engine running, the wheel locking is automatically activated immediately. This allows drivers to take off on different inclines.
Electronic brakes are more reliable than mechanical ones, although electric brakes have this disadvantage: they will not work with a dead battery. Mechanical brakes are simple in design, but a common cause of failure or reduced effect is cable contamination, stretching or breakage.
The handbrake doesn't hold
The article and the presented videos are devoted to adjusting the handbrake, but in some cases the handbrake does not hold due to worn brake pads or the absence of a cable. If the handbrake has not worked since you purchased the vehicle, before making adjustments, make sure that the cable has not been broken due to normal wear or loose fitting.
Drum brakes
The easiest way to adjust the handbrake is on a drum brake system. Schematic representation of the VAZ 2113-15 hand brake device.
Raising the handbrake lever moves the rod (5), from which cable contours go to each of the wheels under the bottom of the car. Passing through the brake shield, the cables are connected to the levers of the manual drive of the pads. When the handbrake is raised, the cable acts on the lever (13), the upper part of which is fixed to the axis (12). As a result, the force created by the lever is uniformly transmitted through the expansion bar to the brake pads, pressing them against the drums.
In some types of construction, a combination of rods is used instead of cables, but it is the device described above that can be found on all modern cars with rear drum brakes.
How to tighten the cable
The essence of the adjustment is to move the cable equalizer along the rod towards the front of the car. Depending on the design of the car, the adjustment mechanism can be located in the cabin or under the bottom, as is the case with VAZ 2115,2114,2113,2199,2109,2108, Opel Astra F and many other cars.
To access the adjustment mechanism located in the cabin, there is often a special hatch in the central tunnel. In our case, the process is described and shown in the video using the example of a car, where the adjustment is carried out under the bottom, so the car must first be driven onto an overpass or inspection hole. Instructions that will allow you to tighten the cable if the handbrake does not hold.
- Use a wire brush to clean the threads of the adjusting rod.
- Loosen the locknut. In order to stiffen the structure when unscrewing and tightening it back after adjustment, you will need 2 keys - with one you need to hold the adjusting nut while unscrewing, and with the second you need to unscrew the lock nut.
- Move the position of the adjusting nut by tightening it the required number of turns.
- Once adjustment is complete, tighten the lock nut until it is pressed firmly against the adjusting nut.
What degree of tension is considered correct?
In the case of technical inspection, which is not carried out on civilian vehicles in the Russian Federation, the effectiveness of the hand brake is checked in two ways:
- a vehicle with a full curb weight must be securely secured with a handbrake on a slope of 16º or 25º, depending on current requirements;
- The effect of the handbrake is checked on special drums. In this case, not only the braking force is measured, but also the uniformity of its distribution between the rear wheels.
Traditional methods
When adjusting the parking brake yourself, you can estimate the tension of the handbrake cable in two ways:
- by the number of clicks. In this case, it is worth looking for information on a specific car model, since, for example, for a Daewoo Matiz the norm will be 7 clicks, and for a VAZ 2106 – 2-4 clicks. The only drawback of the adjustment is that sometimes after replacing the brake drums, pads, and observing the average value for the number of clicks, even with the handbrake lowered, the brake pads can be pressed too hard against the drums. Therefore, after servicing the rear drum brakes, the degree of tension should differ from the average requirements, but after grinding in, the handbrake will need to be tightened;
- according to the degree of pressing of the friction linings. To adjust the handbrake, the rear wheels will need to be lifted. The cable must be tightened to such a state that when the parking brake lever is lowered, the shoes barely touch the brake drums. When rotated by hand, the wheel should rotate quite freely, but at the same time a barely noticeable sound will be felt from the friction linings pressed against the drums (if the pads are worn unevenly, then a characteristic sound during rotation will be in a certain position of the wheel). With this adjustment, after covering 100-200 km, the friction linings will wear off a little, and the gap will become close to ideal.
VAZ owners
On VAZ cars with a front-wheel drive layout, the handbrake may not hold well, even if you tighten the cable in time. This happens due to the design of the cable tip, which limits the amplitude of movement of the manual shoe drive lever. When tightening the handbrake, the return spring hits the limiter too early. To solve this problem, owners cut off several turns of the return spring. In this case, you should be very careful not to damage the handbrake cable itself, and also ensure that the removed sections are of equal length on both sides.
Lubrication, replacement
Video: How to lubricate the handbrake cable yourself
If the handbrake does not work due to souring of the cables, you can try to lubricate and develop them. But to do this you will have to remove them from the car. On the VAZ-2109 it is done like this:
- The rear of the car is jacked up and placed on supports. The rear wheels are removed from the car. The brake drums will also have to be removed;
- then the adjusting and locking nuts on the equalizer are unscrewed, and the cable end switches are removed from it;
- then you need to remove the limit switches from the levers in the brake mechanism. To remove it, all that remains is to distribute the cable fastenings to the rear beam and remove them.
To lubricate a soured cable, you can use a syringe and engine oil. You need to pump it until it completely passes through the entire length of the braid, after which you can try to develop the cable, alternately moving it by the end switches.
If the lubricant does not help and the cable moves tightly or during development it feels like it is clinging to the braid, then it is better to replace it. An excessively stretched cable must also be replaced (if, during adjustment, there is nowhere to screw the nut, the cable still sags). Installation of new cables is carried out in the reverse order of removal.
Finally, we note that all maintenance work with the handbrake drive is not complicated and can be easily done independently and in a garage. At the same time, it is better to spend a little time checking and adjusting than to be left without a handbrake, which can seriously help out in an extreme situation.
- Adjusting the handbrake: setting the handbrake correctly
- 1. Why do we need a working handbrake?
- 2. When the hand brake needs to be adjusted
- When do you need to adjust the handbrake?
- 3. Pull the handbrake - your actions
One of the elements of the braking system is the hand (parking) brake or, as motorists call it, the handbrake.
It is this element that keeps the car stationary when necessary. The car owner does not know exactly when he may need to adjust the handbrake (and many do not use it at all). But you should not neglect this element of the brake system, since road safety may depend on it (by the way, you will not be able to pass inspection with a faulty handbrake).
Moreover, the process of adjusting the handbrake is one of the simplest processes of self-repairing a car. To implement it, it is enough to have basic knowledge about the structure of the car.
Handbrake on rear disc brakes
In order to pay more attention to the adjustment process and not go into the intricacies of the operating principle of a mechanically driven parking brake on disc brakes, we will list only the main types of device.
- The brake disc is held by an additional pad, which, when the handbrake is raised, is pressed against the working surface of the disc by means of a rocker arm.
- The brake disc design allows individual brake pads to be placed in the internal cavity. The operating principle is similar to that of drum brakes.
- Design with mechanical support of the working piston. In the cavity of the brake piston there is a ratchet (for automatically bringing the pads together), into which a pin with a trapezoidal thread rests. The curved rod drives the pin by turning the shaft with a concentric groove.
Adjustment
In the case of the most common drum type of design, the handbrake can be adjusted by rotating the adjusting pawl. The regulator itself can be located on the side or bottom of the brake mechanism. Access to it is through a technological hole in the shield, which must be covered with a plug.
In some types of construction, the regulator may be locked by a spring element, so it will have to be bent to release and rotate the “pawl”. The handbrake design on the rear disc brakes and the adjustment mechanism are perfectly shown in the video.
Handbrake adjustment
On this page we will consider such a topic as the correct adjustment of the handbrake. There will also be a video on this topic at the end.
While surfing the Internet, I was surprised at how people adjust the handbrake and teach others how to do it. I was even more surprised when I decided to look at what they wrote about in the Murzilkas. As it turned out, a rather strange algorithm for adjusting the handbrake is also described there.
Okay, on YouTube everyone is ripping each other off and pouring the same thing into the masses, only from different cameras and video cameras, but Murzilkas seem to be supposed to be smart books that people pay money for
I always say that you don’t need to listen to information on the Internet, you just need to listen and leave the final decision to your own brains, not to others.
Okay, enough of the rambling, let's go...