pinout, electrical package control controller and circuit
Almost all modern cars today are equipped with electric windows, which allow you to control the opening of the windows at the touch of a button. And the Russian Priors in this case are no exception. The control device, with the help of which the windows are raised and lowered, as well as many other functions, is called the Priora comfort unit. You can learn more about its structure, as well as repair, from this article.
Description of the electrical package control unit
The electrical package controller in Priora is a device used to control the functionality of the vehicle. This unit is responsible for the operation of turn signals, power windows, control panel lighting, dimensions, fog lights, interior lighting, and rear window heating system. This device also ensures the normal operation of the reversing lights. The fact that the car is equipped with this device makes it even more practical.
Location
The control device on the Priora is located above the electronic engine control unit, at the bottom of the center console, in the middle. In this case, the device is connected using two connectors - power and information. The power output is used to supply voltage to the control unit, and the information output is used to perform the functions of the device. It should also be noted that the control unit is protected from external influences of dirt and moisture.
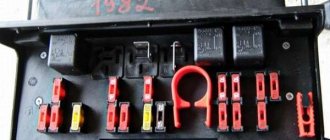
In general, this device is a circuit installed in a plastic case. The board itself includes 15 chips, each of them performing certain functions. This is the entire electrical part of the car, including power windows, door open sensors and a control system for external electric mirrors (the author of the video is the CompsMaster channel).
terms of Use
In order for the node to operate normally, certain conditions must be met:
- the air temperature level in the car interior should be from -45 to +40 degrees;
- the air humidity level in the cabin should be no more than 90%;
- The voltage parameter for normal operation should vary around 9-15 volts;
- The atmospheric pressure level should be up to 800 mm Hg.
As practice shows, malfunctions in the operation of this device often appear as a result of its overheating or disconnection of wires or contacts inside the structure. If you are faced with the problem of a device failure, first of all you need to visually diagnose it. It is quite possible that the reason can be discovered only by looking at the device.
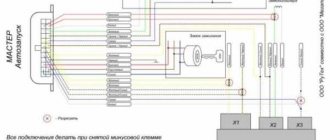
Photo gallery “Connection diagram and designation of controller board elements”
Possible malfunctions and ways to eliminate them
What malfunctions may occur in the operation of the electrical package controller:
- Turn signal failure. First of all, you need to diagnose the serviceability of the fuse, light bulbs, and the steering column switch. It is quite possible that the contact in the switch itself is broken; the problem can be solved by resoldering the contacts or replacing it. If this does not help and the problem really lies in the board, then there are two options - either resoldering it in accordance with the diagram, or replacing it. Usually, soldering is done first, and if it does not help, then the controller itself is changed.
Video “Diagnostics of the electrical package control controller”
How to diagnose the functionality of the electrical package controller in a garage environment - see the video below (the author of the video is Vyacheslav Kravchenko).
Loading .
The procedure for removing and installing the ignition coil on a Lada Priora car with a 16-valve engine
Since the vast majority of cars are equipped with 16-valve engines, the whole process will be shown on this particular power unit.
So, first of all, open the hood of the car and disconnect the “-” terminal from the battery. Then unscrew the filler cap.
Also, disconnect the adsorber purge valve by bending its fastening clamp slightly to the side. This valve is located on the right rear side of the cover (in the direction of travel of the car).
Now you can remove the decorative engine cover, since nothing else holds it.
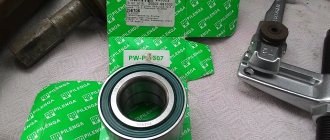
Using a ratchet socket, unscrew the bolt securing the coil we need, as shown in the photo below.
And then we remove this part from the spark plug well.
Since the coil sits quite tightly, you will have to apply at least medium force to remove it from there. And in order to completely release it, it is enough to disconnect the plug with the power wires, after first pressing the latch.
And disconnect it completely, as can be clearly seen in the photo below.
Now you can take a new, known-good ignition coil and install it in the reverse order. The price of a reel for Priora ranges from 900 to 2000 rubles, depending on the manufacturer.
Lada Priora has everything you need for ease of use of the car:
The ignition coil is the most important component of the car, and its failure will cause a huge amount of trouble. Mostly they will be associated with stopping and disturbances in the operation of the engine. The ignition coil is directly related to a unit called the “distributor”.
This is a distributor that receives low-voltage power from the vehicle's on-board network. The process of converting low-voltage into high-voltage power occurs. From the contacts of the distributor, the voltage is sent via a “slider” through a high-voltage wire to the spark plugs. The screwed-in spark plug of each cylinder supplies a spark to the combustion chamber of the fuel mixture, and ignition occurs. For ignition, current must be supplied to all spark plugs, only then will the engine start and the car begin to move. If not, the vehicle will not move.
Sometimes the engine of a Lada Priora car starts to misfire, in other words, the engine does not perform its functions at full capacity. The reason for this behavior lies in the electric ignition coil. The ignition system of this car is unusual. Each spark plug has its own coil, therefore there are 4 of them. This means that the ignition can be slowed down four times more often than on other cars. Once one coil fails, the cylinder associated with it stops working. Individual ignition coils for any cylinder require no adjustment because they have no moving parts. In a Priora car, the ECU informs the driver about a malfunction and monitors the distribution and moment of spark formation. In the cylinders in which the compression strokes end, sparking occurs. Precise pulses are supplied to the ECU from the crankshaft and camshaft position sensors, after which the control unit detects the sequential firing of the ignition coils. The information transmitted to the system allows you to manage the entire process:
If you have problems with the coils, you need to seek help from a specialist. To check the ignition coil on a Priora you need a special tool - a multimeter.
Priora electrical package control controller | PrioraPRO
Lada Priora (VAZ 2170) is one of the few domestically produced cars equipped with such a multifunctional device as an electrical package control controller. However, what is it and what controller is on the Priora?
The power package controller is a device that controls all of the vehicle's electrical functionality. Thus, this regulator is responsible for the operation of the turn signals, power windows, instrument panel lighting, side lights, fog lights, interior lighting, heated rear window, and reversing lights. Equipping a car with such a control unit makes it more practical in terms of using electronics.
The electrical package control controller on the Priora is mounted using brackets in the central, lower part of the dashboard above the engine control unit (ECU). On the Lada Priora, the controller is connected via two connectors: the power connector is responsible for supplying energy to the control unit, and the information connector is responsible for its direct functions. Also, the unit is equipped with protection from moisture and dust.
Essentially, the Priora electrical package controller is a circuit in a plastic case. The board itself (circuit) consists of 15 chips, each of which has its own purpose.
Purpose of parts on the board of the Priora electrical package control unit 2170-3763040.
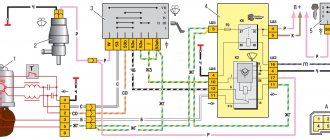
Diagram of the Priora electrical package control unit 2170-3763040.
POS - interior lighting; ZPTO - rear fog lights; BS - low beam; PTF - fog lights; MDV - driver's door module; PUP - turn signal switch; PAS - hazard warning switch; PPD - front right door; PLD - front left door; ZPD - rear right door; ZLD - rear left door; PS - passenger door power window switch; POB - trunk light; ZP - right mirror; ZL - left mirror; GO - side lights; UP - direction indicators.
Ignition system
An experienced car enthusiast who is faced with an engine running on three cylinders immediately begins to diagnose the spark plugs. The Lada Priora must cool well, otherwise there is a risk of getting burned when unscrewing it. If after a few seconds you turn off the ignition and check the spark plugs, one of them will be wet with gasoline. It is also recommended to separately check each part for the presence of a spark.
In the event of a malfunction, the problem is solved. Sometimes it is enough to press down the potentially faulty one with a cap - the machine will resume normal operation. In general, the ignition system in this car is the most problematic part. If the Priora engine (16 valves) is malfunctioning, you can look for the reasons for a very long time, and diagnostics will not yield anything, even if it is done correctly. And only by replacing all elements can a positive result be achieved.
Replacement and repair of the electrical package control unit 2170-3763040 Lada Priora
Priora electrical package control unit 2170-3763040 (Comfort unit) The vehicle equipment, as is sometimes written, does not matter when a unit with this number is installed.
The electrical package controller is a device designed for installation on VAZ 2170 Priora cars. It controls many car functions, for example, turn signals, power windows, instrument panel lights, side lights, low beam, fog lights, reverse lamp, interior lighting, heated rear window.
This controller is installed in the central, lower part of the dashboard above the ECU unit. To remove it, you need to remove the lower sides of the torpedo. Using a socket wrench 10, unscrew the two nuts.
Priora electrical package control unit housing 2170-3763040
Priora electrical package control unit board 2170-3763040
Location of terminals of the Priora electrical package control unit 2170-3763040
Diagram of the Priora electrical package control unit 2170-3763040
Purpose of parts on the board of the Priora electrical package control unit 2170-3763040
POS - interior lighting lamp ZPTO - rear fog lights BS - low beam PTF - fog lights MDV - driver's door module PUP - turn signal switch PAS - hazard warning switch PPD - front right door PLD - front left door ZPD - rear right door ZLD - rear left door PS - passenger door power window switch FOB - trunk light ZP - right mirror ZL - left mirror GO - side lights UP - direction indicators
At this link you can see additional information on the above unit and others: www.chiptuner.ru/content/usp_norma Problem with the electrical package control unit 2170-3763040 Priora:
Priora electrical package control unit 2170-3763040 old
After turning on the heated rear window, a malfunction occurred in the operation of this unit. The IMMO started flashing, the emergency lights came on - it’s impossible to turn it off. After turning off the heating, the turn signals and emergency lights, mirrors stopped functioning, the central locking stopped working, both from the key and from the buttons in the cabin, the tidy went out, and the power windows stopped working.
A new electrical package control unit 2170-3763040 Priora was installed:
Electrical package control unit 2170-3763040 new
The procedure for removing and installing the block is simple. There is no need to retrain the key, everything works. The only thing is that the two-level door opening system stopped working. Now one click opens two doors. or one press and only the driver's door opens, a second press and the passenger door does not open... Strange.
Repair of the electrical package control unit 2170-3763040 Priora: In the old unit, for the sake of experiment, two VN5016AJTR-E power driver microcircuits (SSO-12) were replaced
Resoldering the VN5016AJTR-E chips did not bring any results.
Resoldered chip: MCZ33972EW
Chip MCZ33972EW for replacement.
How to disarm the electrical package unit of LADA PRIORA
What to do if Priora is not removed from the standard alarm!
The hazard warning light blinks, the car does not respond to the ignition key buttons. As a rule, several units are involved here that are synchronized with each other.
- Ignition
- Radio channel module (Located in the driver's door)
- Electrical package block (Comfort block)
- Engine ECU
New blocks come with non-activated codes inside and can be installed on any car without problems, but once you register (train) the keys, a special code is written into all these blocks, which is synchronized with each other and serves as a standard alarm system. (Immobilizer) As soon as you turn the ignition key, within five seconds there is a poll between the key and the units, if the code matches everywhere, then the engine ECU gives permission to start, if the code of at least one device is not recognized, the engine ECU is blocked and the car does not start.
Training a working key is done using a special red training key. I will not describe the procedure for training keys; there is plenty of information on the Internet. In fact, the main key is a red training key; it stores a code that, after training, is written into the working key and other blocks.
I'll try to explain in more detail how it all works:
- The radio channel code that we use to open doors using the key's remote control buttons is written into the driver's door module, where the power window buttons are located. If you replace the comfort unit or engine ECU, the buttons on the key will still work.
- The IMMO (Immobilizer) code has a connection only with the ignition key, the electrical package unit and the ECU unit. If you disconnect the driver's door module, the car will still start.
Determining a faulty ignition coil
An undeniable advantage of cars with an ECM is the possibility of computer diagnostics. But there are some tricks here too. The Priora ignition coil can have three types of malfunction.
- Winding circuit break.
- Winding short circuit.
- Mechanical damage to the tip.
And diagnostics clearly identifies only the first malfunction. In other cases, the computer indifferently reports that leaks have been detected in cylinder No. And here you need knowledge of the features of the Priora ignition system in order to determine the malfunction. The fact is that other breakdowns can also cause gaps. Such:
- Failure of the fuel injector.
- Inoperative spark plug.
- Loss of compression in the cylinder.
How to determine that the ignition coil is not working
This method is not new, but it is very effective and very simple. So, the alarm light came on, “Check.” But there are no diagnostics at hand. What to do? The procedure is as follows:
- Open the hood of the Priora.
- Remove the decorative plastic motor cover.
- Start the engine at idle.
- Remove the connector from the coil of the first cylinder. If this “boiler” is working, then its forced shutdown will cause the motor to work completely inadequately. The vibration will increase significantly, and noticeable interruptions will appear.
- If everything is in order in this cylinder, then the chip is put in place, and you need to move on to the next one. So, all the “boilers” in turn.
- But if the cylinder does not work, then removing the connector will not change anything. The level of work will remain the same, which means it’s all here. Now let’s clarify the degree of fault of the Priora ignition coil.
This is done as follows. The engine must be turned off. Take a 10mm head and a wrench. The spark generator mounting bolt is removed from the suspicious cylinder. Exactly the same from the neighboring one. Then they simply change places. They are fixed and the engine starts again.
Attention! If the signs of a malfunction, that is, the absence of a change in the cleanliness of the engine when turned off, have moved along with the ignition coil to another cylinder, then that’s it, it’s definitely the sparking module. This means that it needs to be changed, and that’s the end of it.
But if all the signs remain in place, then the coil is working properly, and other components need to be checked. But that's a completely different story.
Important! Trying to repair a faulty module is not worth even trying. This is impossible in conditions of even the best-provided service.
It can only be replaced. There are many videos and articles on the Internet about a certain possibility of repairing ignition coils for the ECM. It's really not worth the risk. As a result, you can burn your “brains.”
Two schemes (simple and complex)
First of all, before connecting the alarm, you need to study the instructions included with it. The main unit always has relays installed: one of them closes when the locks are locked, the second acts on opening. The connector to which the relay contacts are connected usually has 6 pins. There is nothing complicated here.
In the first case, we will use only this connector. The second circuit uses another contact, called “signal output for 2-step lock opening”. Find it on the main unit.
We connect the alarm in a simple way
A push-button module is installed in the driver's door of the Lada Priora. The door trim must be removed and the connector for this module must be found:
We will need a brown cord from the connector. It is a signal, and the alarm relay is connected to its break:
Two wires connected to each side of the cut cord will have to be pulled to the main unit. The common contacts of the relay are connected to one of the wires.
It must be remembered that when carrying out any installation work, first disconnect the negative terminal of the battery.
All wiring in the considered circuit is signal, but this does not mean that the connection points need not be isolated. Wires should not touch metal parts of the car. If contact occurs, it is necessary to use additional protection: electrical tape, heat-resistant tube, etc.
The best option for connecting to the central locking system
Having made the connection, as discussed above, you can notice the following: all locks are activated from the key fob for closing, and only one, the driver’s, is activated for unlocking. This defect can be eliminated 100%, which will require 2 or 3 additional relays. First, let's look at where the connection points are:
The block that is visible in the photo is designated BUS-2170. It is equipped with three connectors, but we need one (three-row).
Find three wires in connector X1:
- Sixth (red-black). The cord goes to the actuators and is the power one.
- Thirteenth (green-black). Front right power window control cable.
- Eleventh. Same as “13”, but for the rear window lifter.
How to connect an alarm system to the central locking of a Priora Lux? Three wires are broken (all indicated), and the cables from the break points are pulled to the signaling unit. If you don't have rear power windows, the last cord will be missing. And if there are no power windows at all, cables 3 and 2 do not break (they are still missing).
The BUS unit will be installed behind the dashboard, near the gas pedal. To remove it, dismantle the side panels and unscrew two 10mm nuts. These nuts secure the block on both sides. From each of the break points, a cable is laid to the signaling system, which also applies to the brown cord coming from the door block:
Here we use additional relays (K1-K3), a 15 Ampere fuse and nothing more.
Removing and installing a coil on a Priora
The device in a Priora car may fail if damaged from the inside, resulting in “piercing” into the body. If the ignition coil is working properly, a spark should always jump between the electrodes of the spark plug. If this is not the case, you need to check the power supply and coil control circuits.
Part replacement in progress
All actions are carried out using a socket head at “10”. Disconnect the negative battery, press out the plastic fastener, disconnect the wiring harness block from the coil terminal, unscrew the bolt securing it to the cylinder head cover, and remove the coil from the spark plug block. When carrying out repair work, you need to remember that the Priora is equipped with a microprocessor-based high-energy ignition coil (HEC). High voltage ignition wires produce a voltage of 40 thousand volts. Anyone testing a coil needs to be extremely careful as there is a risk of electric shock. When performing an inspection, wearing rubber gloves will save you from possible negative consequences. You can use pliers with insulated handles.
Spark plugs need to be changed every 30 thousand kilometers. The manufacturer recommends a certain type of spark plug for the Lada Priora, but you can use any with a suitable combustion heat. The diameter of the part is 14 millimeters. After turning the candles out, the wells where they are located are thoroughly cleaned. This procedure is necessary to ensure that no dirt gets in after removing the parts. In preparation for winter, before installing spark plugs, you need to check the gap between the side and central electrodes. If the gap does not correspond to the values of 0.7-0.9 millimeters, adjustment must be made.
Despite the huge amount of criticism against the Lada Priora, this is one of the most popular cars that have come out of the AvtoVAZ assembly line in recent years. The Priora is equipped with a fairly successful engine with good dynamics, and the interior is very comfortable. And the maximum trim levels offer useful options. But at the same time, from time to time the car brings minor problems to its owners. One of the most popular malfunctions is that the Priora engine (16 valves) is tripping. The reasons for this phenomenon are quite unpleasant. And besides, the motor eventually overheats.
When the driver starts his car in the morning, the engine does not run smoothly as before, but intermittently. At this time, dull sounds are heard from the exhaust pipe. At the same time, a persistent and strong smell of unburned fuel is felt. Vibrations are constantly increasing, and this is fraught with cracks in the pillows. So
Notes on implementation of schemes
Let us immediately note: if there are no window lifters, the second diagram will not contain parts K2/K3. Then you only need to cut one wire. Sometimes only the rear windows are missing. This means that relay K3 is excluded. And the diodes connected in parallel with the winding can be absolutely anything.
Now we list the requirements for an element called “relay”:
- Operation voltage – 12 Volts;
- Switching current – 10 A or higher;
- The current consumed by all relay windings should not exceed the value specified in the instructions for the signaling. Usually it is 200-300 mA.
It is the last requirement that is often violated.
In order for “scheme 2” to work, it is necessary not only to assemble it, but also to program the main unit: you need to enable the “2-step unlocking” option. And be that as it may, control impulses cannot be made too long. Use values of 0.7-1.1 seconds.
Power cables (cord X1-6) can only be connected using twists.
The cross-sectional area of the wire must be sufficient to withstand a current of “10 Amps” (this does not apply to signal circuits). A fuse protecting the power circuits must be installed. And of course, before installation, remove the negative terminal of the battery.
Why is everything so difficult?
It would seem that we only need to manage the locks. Why then connect to the window lift motors?
The opening of the passenger doors is carried out by the second impulse (relay K1 is activated). And elements K2 and K3 at this moment block the power windows. If they are not blocked, the windows in the doors will lower during the entire control pulse. And even in 0.8 seconds they will open noticeably.
Of course, connecting the signaling system in a Priora is more difficult than in many domestic cars. At the same time, the “Grant” in the “Norma” configuration uses a similar scheme. Be that as it may, the Lada Priora is the flagship of VAZ. And probably, difficulties with the electrical part should not confuse a competent car owner. It is also known that the standard control unit can be reprogrammed, and then unlocking occurs in one step. In this case, the connection is made according to “Scheme 1”.
Programming the standard control unit
Dear customers, in order to avoid errors when sending the AX-470 connector with wires to the power window and door lock switch block, in the “Comment” line indicate which power window switch block is installed, how many buttons 2 or 4, your car model, year of manufacture.
Most modern cars are equipped with many systems that provide driver comfort, one of which is the “Lux” driver’s door module of the Lada Priora, VAZ 1118, Lada Kalina 2, Granta. It looks attractive, modern, not only fits beautifully into the interior, but is also very easy to use, you don’t need to be distracted from the road, everything is located next to each other, you just need to look a little at the driver’s door module panel.
Driver's door module VAZ 1118 "Lux" for 4 doors, control unit
Contact carrier 2170-3763080 AX with 10 contacts assembled with wires for connecting the power window and door lock switch block 1118-3763080-10 / 2170-3763080 in Lada Kalina 2, Lada Priora cars and their modifications. Can be used to make your own cable. The contacts are already crimped onto the wires (wire length 100 mm) and inserted into the connector according to the pinout, so they can be installed on the car.
The power window switch block, catalog number of the original part (AvtoVAZ): 2170-3763080 / 1118-3763080-10, is designed to control the electric windows of four doors and external electric mirrors, locking car doors and electric windows.
Driver's door module VAZ 2170 Priora "Lux" for 4 doors, control unit
Using these blocks 1118-3763080-10 / 2170-3763080 power window switches for Lada Kalina, Priora “LUX”, the power windows and door locks are controlled using gear motors, by opening/closing and locking buttons, as well as external electric mirrors.
Replacing the AX-470 connector assembly with wires for controlling four doors and external electric mirrors, locking car doors and power windows of the Lada Kalina "Lada Priora" "LUX" car can be done independently, without contacting specialized maintenance services.
Lada Kalina "Lux" MDV Art. 1118-3763080, and for Lada Granta, Kalina 2 “Lux” Art. 1118-3763080-10.
Other articles of the product and its analogues in the catalogues: AX-470, 11180376308010 AX, 217003763080 AX.
VAZ 1117-1119, Lada Priora VAZ 2170, VAZ 2171, VAZ 2172, VAZ 2190, VAZ 2192, VAZ 2194, VAZ 21925.
Any breakdown is not the end of the world, but a completely solvable problem!
How to independently replace the connector for connecting the power window switch block in a Luxury car of the Lada Kalina2, Priora family.
With the online store Discounter AvtoAzbuka, repair costs will be minimal.
Just COMPARE and BE SURE.
Don't forget to share the information you find with your friends and acquaintances, because they may also need it - just click one of the social networking buttons located above.