Steering column switch connection diagram
The switches located under the steering wheel of a VAZ-2107 car, at the first sign of a malfunction, require, first of all, to find the reason why this or that function does not work. The diagram shows which contacts close to each other in different positions. To find the cause, first remove the device and try to determine the problem yourself. If your wipers or washer are not working, go here
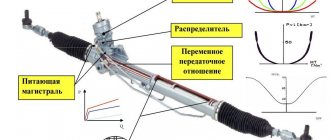
Electric scheme
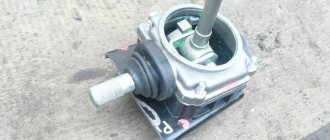
There are not many reasons for the breakdown, but often there is a need to replace the device with a new one. So, in order to determine the reasons for the failure of paddle switches, let’s consider what parts they consist of, and a photo will help us for this. The VAZ-2106 switches differ from the 07 in that they have three fixed positions of the lighting switch: 1) Dimensions; 2) Middle and dimensions; 3) Long range and dimensions.
On the 2107, the dimensions and lights are turned on by a key.
Steering column switch VAZ classic
The design of the switches is non-demountable. If problems arise with the operation of the control levers, disassemble them and try to make repairs. Even if it fails, you can always buy a new component.
Remove the steering column switch on a VAZ-2107 car in the following order:
- Disconnect the vehicle from the power source and remove the steering wheel.
- Next, remove the casing that secures the steering column shaft, on which the control levers are attached. To do this, use a Phillips screwdriver to unscrew the 4 screws and self-tapping screw.
- After removing the housing, we move on to the levers themselves. Disconnect the power cord strip.
- Unscrew the screw holding the switches located at the bottom.
- By loosening the fastening, you can remove the switch without much effort.
Now the device can be repaired after first checking it for damage. If they are not there, clean the contacts in the connector block and bend the sagging springs. Also check if the wire has been unsoldered from the unit. After the repair, you need to check whether you have fixed the problem. To do this, connect the pads and install the terminals on the battery; if all functions work, then the repair was successful.
How to replace a device
If after repair the paddle switch does not work, then there is no way out, you will have to buy a new one. The cost of such a switch on a VAZ-2107 is around 300-500 rubles. This is not too much of an expense for such an important control. Now comes the time for replacement, which consists of removing the old one and installing a new element in its place. How to remove a non-working device is already known, so let’s get down to business. To do this, you need to install the device in place, secure it and connect the power wires. Replacement does not involve any difficulties, after which you check the functionality of the device and install the casing and steering wheel.
Read, it may come in handy: How to repair a faulty VAZ-2107 generator
The process of repairing and replacing switches under the steering wheel takes no more than an hour, after which the device will work as if the car had just arrived from the showroom.
Connecting a steering wheel with buttons
So, a block with wires is already connected to the steering wheel, so maintaining a given speed and the limiter will work immediately after installing the multi-steering wheel (left button panel).
To activate control of the radio or multimedia system (right button panel), you will have to modify the design. We add 5 wires to the block (which already has wires for cruise control), and put a miniISO block on the other end and insert it into the radio (how to remove it).
Wiring diagrams for the Vesta multifunction steering wheel (radio control):
As a result, using the buttons on Vesta’s steering wheel, it will be possible to control the radio, cruise control and speed limiter, and the button backlight will also work.
The only difference from the standard implementation is that there will be no indication of cruise control operation on the instrument cluster. To do this you need to flash it or activate it via ELM327
By the way, during the panel test, pay attention to the cruise control indicators (icons in the speedometer well at about 140 and 160 km/h), if they are on, then the firmware is suitable
Here is the cruise control indication on Vesta, which has a multifunction steering wheel from the factory:
Let us remind you that the “Multimedia” option package includes not only a multifunction steering wheel, but also a rear view camera. We looked at how to connect a camera to a multimedia system earlier. By the way, another way to modify Vesta is to install fog lights.
Photo: logbook vlad21074
Keywords: Lada Vesta steering wheel | cassette player Lada Vesta
7
Found an error? Select it and press Ctrl+Enter..
LADA included in the “CAR DEALER OF THE YEAR 2020” rating
Modification of the frill (installation of a mesh to protect the filter) on the Lada Priora
Drawings for moving the generator to the top Lada 4×4 (VAZ 21213, 21214)
We are improving the work of the wipers on the Lada Vesta
Another way to replace the switch
The car uses a three-lever paddle shifter mounted on the steering column. The turn signal, high beam, headlight washers and cleaner switches have a common housing.
Procedure for replacing steering column switches and hazard warning switch
Remove the cover using a screwdriver
2. Using a 24mm wrench, loosen the nut holding the steering wheel, leaving it flush on the shaft.
3. Knock the steering wheel out of the shaft splines by hitting the rim with your palm.
4. if it cannot be removed in this way, press your knee on the steering wheel rim from below, knock it down by striking the shaft with a soft metal pin.
Finally, unscrew the nut and remove the steering wheel.
5. Using a Phillips screwdriver, loosen the four bolts on each side of the steering column housing halves.
6. ...and one self-tapping screw securing the lower half to the column.
7. Remove the bottom cover by cutting through the plastic clamp securing the wiring harness to it.
8. When removing the top cover, do not lose the rubber ring from the ignition switch.
9. To replace the hazard warning light switch, disconnect it from the connector block and install a new one. Remove the instrument panel (see Removing the Instrument Panel).
10. Inside the instrument panel, disconnect the wiring harness connectors supplying voltage to the steering column switches:
11. ...six and two connectors.
12. Remove them from the bottom of the dashboard.
13. Remove the mounting bolt on the 8-inch blades.
14. ...And remove them together with the wiring harnesses from the steering column, sliding them up along the axis.
Install new parts in the reverse order of removal. When placing the wiring harnesses in the lower housing, be sure to secure them with a plastic clamp and ensure they do not contact the steering shaft u-joint.
Replacing the turn switch
To figure out how to install steering column switches from a Niva Chevrolet on another car, you must first understand how to change them on your “native” car. The Lada Kalina car also has keys of this modification.
Switches for light alarms and windshield wipers of the VAZ 2131 (Lada Kalina) are considered quite reliable products and function flawlessly for many years. The first problems with them were recorded after a run of 120 thousand km. This does not take into account operation in extreme conditions on dusty dirt roads, where all electrical parts wear out faster.
A failure of the turn switch on a Chevrolet Niva is often confused with a breakdown of the relay responsible for the operation of the corresponding light signals. The relay also fails rarely, but is cheaper than the keys. Therefore, in the event of a failure, it is better to start troubleshooting with the relay, provided that the fuse is in order. The statement is also true for the windshield wiper mode switch.
If, as a result of diagnostics, it turns out that one of the steering column switches has failed, you need to purchase a new part (catalog number 21230-3709330-00-0 or 2123-3709330) and install it on the car, following this algorithm:
Necessary tools and step-by-step photos
The steering wheel switch in VAZ cars of the classic family, including the VAZ 2107, is designed to turn on electrical appliances such as:
- windshield wipers and washers
- low and high beam
The design of this switch is quite durable, but from time to time this part still has to be replaced. There is nothing complicated in this procedure, and even a beginner can cope with this repair on his own; it is enough to have an 8-mm socket with a wrench or ratchet, as well as a small extension on hand:
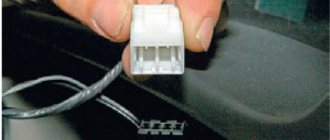
However, before you begin this operation, you must first remove the steering wheel and steering column cover. Once this is done, the switch will be free to access and you can begin removing it. First disconnect the wiring harness:
Then we take a wrench and unscrew the screw that secures this part. You can see this more clearly in the image below:
Read, it may be useful: Links to electrical circuit diagrams.
Yes, you can see it on the side a little lower:
Then we take the switch from above and remove it from the steering shaft of the VAZ 2107:
The final result of the work done is shown in the photo below:
The cost of this part is not so high and, for about 300 rubles, it can probably be found, if not in a store, then certainly in a car dismantling place. Replacement is done in reverse order and there should be no problems.
Wiper
To clean the windshield and provide the driver with good visibility, the car is equipped with an electrically driven windshield wiper on two arms with brushes. The windshield wiper electric motor with gearbox and drive arm system is located under the hood.
The windshield wiper is controlled by a steering column switch. The switch has the following positions: off, low speed, high speed, intermittent operation and combined operation with the windshield washer.
We repair the device
The switches located under the steering wheel of a VAZ-2107 car, at the first sign of a malfunction, require first of all to find the reason why this or that function does not work. To find the cause, first remove the device and try to determine the problem yourself. There are not many reasons for the breakdown, but often there is a need to replace the device with a new one. So, in order to determine the reasons for the failure of paddle switches, let’s consider what parts they consist of, and a photo will help us for this.
The design of the switches is non-demountable. If problems arise with the operation of the control levers, disassemble them and try to make repairs. Even if it fails, you can always buy a new component.
Remove the steering column switch on a VAZ-2107 car in the following order:
- Disconnect the vehicle from the power source and remove the steering wheel.
- Next, remove the casing that secures the steering column shaft, on which the control levers are attached. To do this, use a Phillips screwdriver to unscrew the 4 screws and self-tapping screw.
- After removing the housing, we move on to the levers themselves. Disconnect the power cord strip.
- Unscrew the screw holding the switches located at the bottom.
- By loosening the fastening, you can remove the switch without much effort.
Now the device can be repaired after first checking it for damage. If they are not there, clean the contacts in the connector block and bend the sagging springs. Also check if the wire has been unsoldered from the unit. After the repair, you need to check whether you have fixed the problem. To do this, connect the pads and install the terminals on the battery; if all functions work, then the repair was successful.
How to replace a broken device
If after repair the paddle switch does not work, then there is no way out, you will have to buy a new one. The cost of such a switch on a VAZ-2107 is around 300-500 rubles. This is not too much of an expense for such an important control. Now comes the time for replacement, which consists of removing the old one and installing a new element in its place. How to remove a non-working device is already known, so let’s get down to business. To do this, you need to install the device in place, secure it and connect the power wires. Replacement does not involve any difficulties, after which you check the functionality of the device and install the casing and steering wheel.
The process of repairing and replacing switches under the steering wheel takes no more than an hour, after which the device will work as if the car had just left the showroom.
Sources
- https://motorchina-online.ru/avto-lada-drugoe/podrulevoj-pereklyuchatel-vaz-2107.html
- https://motorchina-online.ru/avto-lada-remont/dvornikov-vaz-2107.html
- https://lemzspb.ru/zamena-podrulevogo-vyklyuchatelya-2107/
- https://inkam-auto.ru/raznoe/kak-razobrat-pereklyuchatel-povorotov-na-vaz-2107.html
[collapse]
Characteristics of the headlight switch
What is a central light switch (CDS) for, how can a plug-in light switch be used, and what is its wiring diagram? First, let's look at the purpose and operating principle of the device.
Purpose and principle of operation
We won't talk much about the appointment. Everyone knows how important high-quality road surface lighting is in poor visibility conditions. The light of headlights largely determines the safety of a motorist behind the wheel; in its absence, driving a vehicle at night is prohibited. After all, without a vehicle designation, not only the offender, but also the drivers of other cars may suffer.
So, the steering column headlight switch is designed for:
- ensuring safe movement at night thanks to the ability to activate lighting;
- indicating vehicle dimensions in the dark.
The steering column light switch is removed.
The steering column switch is used to turn on:
- side lights;
- low beam lighting;
- high beam;
- turning lights when turning the car.
Long-distance lighting is usually used in conditions of poor visibility, as well as when driving on an unlit section of the road.
As for the principle of operation, everything is also simple here:
- At a certain moment, the driver presses a button on the switch.
- The switch sends the generated pulse to the control unit or directly to the optics, depending on the design of the vehicle.
- The block processes this impulse and determines what type of lighting needs to be turned on - side, near or far. The corresponding impulse is transmitted to the optics.
- In accordance with the received signal, the light is activated.
Scheme
If you are interested in the switch connection diagram, it is provided below.
Connection diagram of the switch to the on-board network
Types
There can be several types of devices for switching lighting. The most popular type is a mechanical device; in this case, switching is carried out as a result of the mechanical action of the driver’s hand on the device. A person selects the type of lighting needed at the moment and, in accordance with this, selects a mode on the device. A more modern type of device for activating optics is the automatic light switching system.
The system automatically determines when to turn on and what light, based on certain parameters:
- poor level of illumination of the road surface;
- exceeding the vehicle speed threshold (high beams turn on);
- no other vehicles or obstacles ahead;
- when driving outside a populated area.
Malfunctions
Now let's briefly talk about the malfunctions.
Two types of malfunctions can occur in the operation of the switch:
- Mechanical, caused by mechanical failure of elements. Such a malfunction may manifest itself in the form that when you press the corresponding button, the vehicle lighting does not work. Or, after turning on the turn signal, the device, instead of returning to its place with the return of the steering wheel, continues to remain in this position until the driver himself returns it to its place.
- Electric. Such a malfunction can be caused by a breakdown of the circuit inside the device, disconnection or oxidation of the contacts. If the problem lies in the contacts, then simply clean them, replace them, or re-solder them. If the essence of the malfunction lies in the circuit, then it will be easier to completely replace the device than to repair it (the author of the video about repairing the mechanism with your own hands is the SamaraRovenki channel).
Installation on other vehicles
To install beautiful switches on a regular Niva or Oka, you will have to tinker a lot. There are several installation methods, but some of them should be discarded as unaesthetic, and to implement the rest you need electrical skills or a familiar auto electrician who can connect everything according to the diagram.
It is necessary to take into account that it is better to replace the “original” steering column casing with another one from a Chevrolet Niva. To keep the old one, you will have to cut a large opening in it, which will not make the driver’s seat look any more beautiful. Ideally, you should also change the steering wheel - install a wheel from a VAZ 2131, then all the parts will fit perfectly. What you need to buy:
If adapter 2105 cannot be found, then you will have to fit a thin-walled pipe of the same diameter by cutting a longitudinal groove at least 5 mm wide in its wall. To replace it, you need to disassemble the steering column assembly and remove the steering wheel itself, after which an adapter (or a pipe with a clamp) is installed on the shaft in the right place.
The clutch assembly with switches should be positioned so that the contacts are at the very top. Then the pads are connected and electrical wiring is done, at the end the steering wheel and a new casing are installed.
On the Oka, the coupling with switches from the Chevrolet Niva fits without an adapter, but for the sound signal to work, you will need to change the contacts on the steering wheel. First, the assembly is disassembled, the wiring harness is cut off from the “original” switch, and the switch itself is removed. The new control unit is pushed onto the steel shaft casing until it stops. The ends of the cut wires must be soldered to the connectors in accordance with the pinout diagram. You can also connect wires from the rear wiper button there, which is controlled separately in Oka.
The modification of the signal contacts on the steering wheel is so that they reach the corresponding terminals on the steering column switch from the Chevrolet Niva. You will have to remove the inner plastic ring, rotate the contact plate, drill and tap two new holes in the steering hub. The part is now secured with screws in the new position and aligned with the contacts on the switch. After this, the assembly can be assembled by slightly modifying the plastic panels of the steering column casing.
Sometimes, after such a replacement, fuse No. 2 on the Oka constantly blows out when the windshield wipers operate continuously. The fact is that some cars used a relay that was incompatible with the VAZ 2131 switch. The issue is resolved by replacing the corresponding relay with a new one.
Source
Replacing the turn switch
To figure out how to install steering column switches from a Niva Chevrolet on another car, you must first understand how to change them on your “native” car. The Lada Kalina car also has keys of this modification.
Switches for light alarms and windshield wipers of the VAZ 2131 (Lada Kalina) are considered quite reliable products and function flawlessly for many years. The first problems with them were recorded after a run of 120 thousand km. This does not take into account operation in extreme conditions on dusty dirt roads, where all electrical parts wear out faster.
A failure of the turn switch on a Chevrolet Niva is often confused with a breakdown of the relay responsible for the operation of the corresponding light signals. The relay also fails rarely, but is cheaper than the keys. Therefore, in the event of a failure, it is better to start troubleshooting with the relay, provided that the fuse is in order. The statement is also true for the windshield wiper mode switch.
If, as a result of diagnostics, it turns out that one of the steering column switches has failed, you need to purchase a new part (catalog number 21230-3709330-00-0 or 2123-3709330) and install it on the car, following this algorithm:
Possible causes of wiper malfunction
The causes of windshield wiper malfunction can be either mechanical or electrical. We start troubleshooting first with the fuse, and then we disassemble the rest.
Mechanical problems may include the following symptoms:
- When the windshield wiper is turned on, you can hear the wiper motor running, but the blades do not move. This may primarily be caused by a loose or loose nut that secures the crank to the gearbox axle.
- If the brushes do not work synchronously, the reason may be the driver - its fastening nut has become loose.
Windshield wiper diagram for VAZ 2110
Electrical faults have the following symptoms:
- The brushes do not occupy an extreme position, they stop anywhere and move slowly. The cause may be the ring switch. In this case, you need to bend the contacts. If this does not help, you need to replace the wiper motor assembly, as it is sold with a gearbox.
- The intermittent mode is turned on, and the brushes work continuously, then the problem is in the relay, it needs to be replaced. If the replacement does not help, then it is likely that the contacts on the limit switch have oxidized or burnt.
- If, when you turn on the windshield wiper, the windshield wipers and armature do not work, then the blades may have frozen. Another reason could be a burnt anchor.
- The electric motor does not work, but the fuses are good. In this case, it is necessary to check the contacts that the wiper drive has, as well as the motor. It is possible that the VAZ windshield wiper blades are stuck or the armature is burnt out.
Do-it-yourself modification and replacement of wipers
Which wipers are better is up to the car owner to decide. Those installed on the VAZ 2110, as well as on the UAZ, do their job well from the factory, but it can be modified with washers from other companies that are of higher quality. Many people are attracted to frameless brushes - this is a good option. They are compact in size and equipped with a special leash mechanism. True, they do not look very attractive on the VAZ 2110, since the fastener to the standard washer arm turns out to be massive. Therefore they need improvement.
Frameless car washers
To perform a replacement or modification, you must perform the following steps:
- First you need to disconnect the negative terminal on the battery.
- Then you need to tilt the mount towards you and remove the brush.
- If there is a decorative trim, it must be removed.
- By unscrewing the bolt, you can remove the old brush.
- Before replacing parts, be sure to check the dimensions of the new washer with the old one. It is advisable that the new one does not exceed the size of the old one by more than 2 cm.
- Installation of the new kit is carried out in the reverse order.
After upgrading, you should check the functionality of the unit: whether the brushes creak, how they work when switching modes. At high speeds of the windshield wiper motor, the wipers should work quickly, at low speeds - slowly. In addition, they must support intermittent operation.
Sorry, there are no surveys available at this time.
Replacing windshield wipers on a VAZ 2110 on your own
Windshield wiper VAZ 2110, its repair and replacement
You can evaluate the performance of the wipers in a simple way using a small test. You need to take a glass of water and pour it on the windshield, then turn on the wipers. If, after one or two passes of the windshield wiper blades, streaks or streaks are noticeable on the glass, the windshield wiper blades must be urgently replaced. Replacing windshield wipers on a VAZ 2110 is a necessary process. If this is neglected, in heavy rain there will be poor visibility, which in frequent cases becomes the cause of accidents. In this article we will look at how to replace the windshield wiper of a VAZ 2110 with your own hands.