The arrangement of fuses in a Lada family car is typical for Lada Kalina, Priora, Vesta, Grant.
In the engine compartment and in the cabin
Where are the fuses on the Lada Vesta:
- the main unit in the car interior, to the left of the steering wheel;
- additional module in the engine compartment, on the right behind the battery.
Total quantity: 12 relays - breakers, 50 fuses.
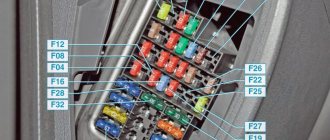
Schematic location of the Lada Vesta fuse box in the cabin
| Numbers/current | Functionality / where they are located |
| P(F-1) / 20 | Windshield washer |
| P(F-2) / 5 | Understeering's shifter |
| P(F-3) / 10 | High beam (left headlight) |
| P(F-4) / 10 | Steering column switch (left) |
| P(F-5) / 20 | Heated seats |
| P(F-6) / 30 | parking lights |
| P(F-7) / 30 | Rear dimensions |
| P(F-8) / 7.5 | Rear fog lights |
| P(F-9) / 10 | Right turn signal repeaters |
| P(F-10) / 10 | Automated gearbox selector |
| P(F-11) / 10 | Low beam (left side) |
| P(F-12) / 10 | Direction indicators |
| P(F-13) / 30 | Power circuit |
| P(F-14) / 30 | Stop signals |
| P(F-15) / 10 | Rain sensor, external lighting, hydraulic headlight range control |
| P(F-16) / 15 | Fuel pump, charging |
| P(F-17) / 15 | Illumination of the glove box, thresholds |
| P(F-18) / 10 | Turn signal repeaters (left) |
| P(F-19) / 10 | Low beam (right) |
| P(F-20) / 10 | Heated mirrors (external) |
| P(F-21) / 5 | Instrument panel (panel) |
| P(F-22) / 5 | central locking |
| P(F-23) / 5 | Canister, air flow sensor, timing valve |
| P(F-24) / 5 | ERA GLONASS |
| P(F-25) / 5 | Radio tape recorder |
| P(F-26) / 5 | Gasoline pump |
| P(F-27) / 20 | Parktronic |
| P(F-28) / 15 | Electric power steering |
| P(F-29) / 15 | Line output to tow hitch |
| P(F-30) / 20 | Reversing light |
| P(F-31) / 15 | Anti-theft alarm |
| P(F-32) / 15 | Illumination of the engine compartment, interior |
| P(F-33) / 5 | Window lifters |
| P(F-34) / 15 | Steering wheel rotation sensor |
| P(F-35) / 5 | Door program block |
| P(F-36) / 15 | Radio, diagnostic connector |
| P(F-37) / 15 | Generator |
| P(F-38) / 15 | Beep (optional) |
| P(F-39) / 15 | Daytime Running Lights |
| P(F-40) / 20 | High beam (right) |
| P(F-41) / 20 | Standard cigarette lighter |
| P(F-42) / 20 | Bus power |
| P(F-43) / 20 | Door locks, ABS, airbag |
| P(F-44) / 20 | Window lifters |
| P(F-45) / 20 | Heater fan (interior) |
| P(F-46) / 20 | Windshield wiper (windshield wipers) |
| P(F-47) / 15 | Air conditioner |
| P(F-48) / 15 | Windshield wiper (optional) |
| P(F-49) / 15 | Heated rear window |
| P(F-50) / 15 | Stability Program (ESP) |
Lada Vesta mounting block in the car interior
The mounting block is located in a familiar place - near the driver’s left foot. To access the relays and fuses:
- turn the plastic handles (3 pieces) holding the unit cover from below;
- remove the lock on the upper right side of the cover;
- Pull the bottom of the cover, disconnect its upper holders to the instrument panel and remove the unit cover.
Fuse diagram (Fuse, Rating, Circuit, Purpose, Fuse type)
- F1 15A K15R Windshield washer mini
- F2 30A*1/5A*2 K15R Left steering column switch (not luxury/lux) mini
- F3 10A*1 Left high beam headlight (not luxury) mini
- F4 30A*1/5A*2 K30S Left steering column switch (not luxury/lux) mini
- F5 15A K15R Heated seats mini
- F6 7.5A*1 K30S Right side lights mini
- F7 10A*1 K30S Left side lights mini
- F8 5A*1 K30S Rear fog lights mini
- F9 3A Direction indicator (turn signals) in the right mini mirror
- F10 5A K15S AMT mini robotic gearbox selector
- F11 10A*1 Left low beam headlight (not luxury) mini
- F12 15A K30S BCM controller (turn signals) mini
- F13 10A K30S BCM controller (own power supply) mini
- F14 10A K30S Mini brake pedal switch off
- F15 5A BTP Power supply for D&O (rain and light sensor), mini headlight range control
- F16 5A BTP Mini brake pedal switch off
- F17 5A BTP Lighting (canopy) for the glove box, trunk, thresholds mini
- F18 3A Direction indicator (turn signals) in the left mini mirror
- F19 10A*1 Right low beam headlight (not luxury) mini
- F20 5A Heated exterior mirrors mini
- F21 15A K15S BU SNPB mini
- F22 5A K15S Gearbox (instrument cluster) mini
- F23 5A K30S Gearbox (instrument cluster) mini
- F24 5A ACC ERA GLONASS, radio mini
- F25 5A VTR Controller ESP9.1 mini
- F26 15A K30S Power supply for mini fuel pump module
- F27 5A K15S Power supply for parking sensors mini
- F28 5A K15S EURU controller (electric power steering) mini
- F29 10A*1/5A*2 K30S Power supply for mini trailer lighting
- F30 5A K15S Controller ERA GLONASS mini
- F31 5A K30S Controller ERA GLONASS mini
- F32 10A K15S Bus power supply K15M (engine compartment) mini
- F33 5A BTP Window control mini
- F34 5A VTR Power supply for steering angle sensor, mini steering wheel button block
- F35 5A BTP Switch block in the driver's door mini
- F36 15A K30S Radio, mini diagnostic connector
- F37 7.5A K30S Stop lamps right mini
- F38 7.5A K30S Stop lamps left mini
- F39 10A*1 K15R DRL (daytime running lights) not luxury mini
- F40 10A*1 K15R High beam headlight right (not luxury) mini
- F41 20A ACC 12V socket (power supply for additional devices), cigarette lighter JCase
- F42 20A K30S BCM controller (BTP bus power supply) JCase
- F43 20A K30S BCM controller (door locks) JCase
- F44 30A K30S Electric windows (ESP) JCase
- F45 30A K30S Interior heater fan (heater) JCase
- F46 30A*1 K15R Power supply for windshield wipers JCase
- F47 25A*2 K30S EMM controller (PDS, LBS, LGO)
- F48 30A*2 K30S EMM controller (window cleaning)
- F49 25A*2 K30S EMM controller (PTF, ZPTO, license plate)
- F50 25A*1 K30S EMM controller (LDS, PBS, PGO)
In a variant:
Relay diagram:
| K2 (30A) | Free |
| K3 (30A) | Heated rear window |
| K4 (30A) | Front windows |
| K5 (40A) | Interior heater fan |
| K6 (30A) | Rear window lifter |
| K7 (20A) | Fuel pump module |
| K8 (20A) | ACC (12V socket power supply) |
*1 — for Classic and Comfort trim levels
*2 - for Luxe trim levels
In a variant:
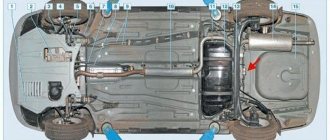
Schematic location in the engine compartment
| Name | Block pinout |
| RP 1 | Lighting, seat heating |
| RP 2 | Responsible for the cigarette lighter |
| RP 3 | Heated rear window |
| RP 4 | Front windows |
| RP 5 | Interior heater (stove) |
| RP 6 | Window lifter for rear doors |
| RP 7 | Gasoline pump |
| RP 8 | Car socket (powered by 12 Volts) |
| RP 9 | Heated windshield |
| RP10 | Heating relay |
| RP11 | Starter |
| RP12 | Cruise control |
Lada Vesta relay diagram
| Relay number (current, A) | Relay name |
| K1 (70A*1/50A*2), circuit K15R | Power supply for lighting and seat heating (not luxury/luxury) |
| K2 (30A) | Free |
| K3 (30A) | Heated rear window |
| K4 (30A) | Front windows |
| K5 (40A) | Interior heater fan |
| K6 (30A) | Rear window lifter |
| K7 (20A) | Fuel pump module |
| K8 (20A) | ACC (12V socket power supply) |
*1 - for Classic and Comfort trim levels
*2 - for Luxe trim levels
Review of Manufacturer Prices
| Name/article | Price in rubles |
| Housing cover Lada Vesta 8450007436 | From 300 |
| Jcase | From 180 / piece |
| Mini | From 140 / piece |
| EMM-T4 231A03142 (Renault) | From 170 / piece |
| PF895652A2 (Japan) | From 220 / piece |
*price indicated as of March 28, 2019.
Conclusion
Installing new power modules requires careful attention on the part of the technician. It is unacceptable to violate the current range. The exact data for each of the fuses is indicated in the operating instructions for the technical device. If difficulties arise, contact service station specialists for help.
Reviews
| № | Positive |
| 1. | Georgy Nikolaevich , 42 years old (drive2.ru): the car has been three years old since purchase, I haven’t made any investments, only scheduled maintenance. The fuses are all standard, nothing has been changed. |
| 2. | Mikhail , 48 years old (prom.ua): in two years I replaced two power modules once. I didn’t contact the service, I limited myself to my experience and skills. |
| 3. | Sasha , 38 years old (autotoday.com): There are no complaints about the standard power modules yet, the car is only a year old, but I heard that you can install a unit from Renault Duster, Logan of the second generation. |
| 4. | Kirill , 45 years old (rozetka.ua): mileage 75,000 km, only recently replaced five power modules with new ones. I believe that a resource of 75,000 km is more than enough for domestic transport. Of course, there is still a long way to go to reach foreign brands, but this is progress. |
| 5. | Petrovich , 44 years old, (avtoflit.com): I bought the car second-hand, good condition, five years old. I didn’t do anything to the power system, the units are operating normally. |
| 6. | Nikolaevich , 45 years old, (autotoday.com): I am satisfied with the quality of manufacturing and assembly of the Lada Vesta, no comments. I fix minor damage myself. |
| 7. | Vasilievich , 41 years old, (drive2.ru): the car is four years old, only recently replaced three relays - breakers in the engine compartment. Good build quality Lada. |
| Negative | |
| 8. | Nikiforovich , 49 years old (prom.ua): problems with the power system began after buying the car. I repeatedly contacted the service station due to burnt-out power modules. The problem is still not resolved. |
| 9. | Nikolai Semenovich , 46 years old, (avtoflit.com): I do not recommend standard fuse blocks for the Lada Vesta. If possible, replace with new ones from Renault Duster, Logan of the second generation. |
| 10. | Vyacheslav Petrovich , 47 years old, (drive2.ru): the car is new, but the weak points are inherited from previous generations. |
| 11. | Stanislav Vasilyevich , 39 years old, (autotoday.com): after two years of operation, the car began to crumble in the literal sense of the word. The build quality is still raw and needs improvement. |
Diagnostics
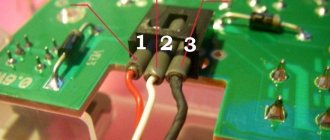
Consistent diagnostics of this defect will help to identify the cause of the malfunction. First of all, you should make sure that the fuse responsible for the heated seats is intact. To do this, open the fuse box located in the lower left part of the instrument panel. Find fuse F5 15A (see photo), remove it and make sure it is intact.
If it is in order, you should make sure the button is working. When the ignition is turned on, the indicator should light up. As a rule, buttons very rarely fail, so if the indicator lights up, move on.
For the next step, you will need a multimeter and the ability to handle it. Almost all such devices have a function for testing electrical circuits. Now you need to get to the plugs that connect the car's wiring and the connectors on the bottom of the seat.
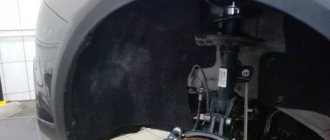
To facilitate access to the connections, it is recommended to unscrew the seat and tilt it in the desired direction.
After disconnecting the plug, you need to make sure that power is supplied to the car wiring wire when you press the button. Then “ring” the connector on the seat if the heating element of the whole device makes a characteristic sound.