How to remove the radiator grille of a Lada Granta without removing the bumper?
» Other »
Question for experts: Is it possible to remove the radiator grill of a Lada Granta without removing the bumper??
Answers from experts
First unscrew the bumper, then unscrew the grille
Gorbunov Alexander Sergeevich:
As promised, I am writing based on the results of how to remove the grilles (there are two halves on top) of the Pajero Sport radiator from the 12th year. I am writing in great detail, both for blondes and for people like me (apparently “without hands”, which are advised to remove here..) The purpose of removing the grilles was to screw decorative and at the same time protective linings from stainless steel tubes onto them. So :Open the hood lock - the lever is in the cabin, to the left of the steering wheel below you need to pull.
Lifting the hood itself, I felt under it in the middle for a latch, which I pressed and then completely opened the hood and secured it in the open state with a special spacer, which “is snapped in from below. In the middle I saw two halves of the radiator grille, connected at the top by an elastic seal. Each half is attached to the body with two “ "pistons" made of plastic, into which screws are screwed in for a Phillips screwdriver. You need to very carefully select a screwdriver for them or, as I did, a screwdriver attachment.
Of the four cross attachments, different in size, only this one fit, somewhere in the middle
I especially draw attention to this because these screws are made of aluminum, simply painted black, and unscrewing them with an unsuitable screwdriver will cause them to deteriorate! When you manage to unscrew and pull out this screw, you need to remove the piston from which it was unscrewed by prying it either with your nails, or with a nail file. You can cut it with a knife, but that's the same thing.
spoil.
Having taken out the screw and piston, looking carefully, we see empty holes on the body very close to each other, into which it is very convenient to temporarily insert them so as not to drop or lose them. I was shooting the grille in the snow and it was very relevant. But even on the asphalt it’s not fun to crawl and look. We remove all 4 screws with caps according to this scheme. Now the top of both halves of the grate will move freely. But as I already wrote, they are connected by an elastic band glued on top.
At first it seemed to me that these halves were also screwed on from the bottom from the inside. They can be seen by shining a flashlight and “theoretically you can reach them with a very long screwdriver. But I didn’t have one, and while I was trying to find it, I read on the Internet that it was not so. But the grilles are actually fastened with latches and these screws have nothing to do with it. Therefore, the next step is to grab one half of the grille with both hands closer to each edge and pull it towards you.
On the second attempt, the latch, first one, and then the second, clicked and one half separated from the machine and I hold it in my hands, and the elastic band “connects it with the second “not yet removed” half. At this stage, so as not to inadvertently tear it off It’s better to ask for the help of an elastic band, even if it’s a child or mother-in-law, who has someone on hand, to hold the first half while you disconnect the second half in the same way..
So I managed it myself and I hope I explained it to you.
pipe insulation s new-granta /delaem-pravilnoe-zimnee-uteplenie-na-lada-granta/
A working car does not need this tripper. I had a Lada like this when I was 30, without any cortons in my shirt, I drove in it
If it heats up before the working one and does not reset while driving, then there is no need to close it, otherwise, immediately after the radiator, at least hang a cardboard
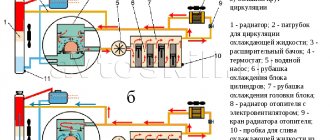
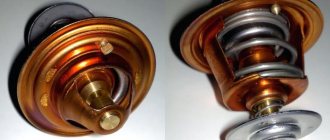
What's the point? So that the radiator doesn't freeze? So for this you need to fill in a non-freezing liquid, “antifreeze” is called. Or to make it warmer in the cabin? This is unlikely to happen. In the engine cooling system there is such a tricky piece of hardware called a “thermostat”. It is designed to maintain a stable engine temperature.
When starting, even in summer, the coolant is driven by the pump in a small circle, without going to the radiator. And only when the temperature reaches 80° the thermostat opens the pipe valve to the radiator. That is, no matter what you cover, if the interior heating stove is powered by the engine, then the temperature in it will be the same as the engine, i.e.
e 80° stable.
If you really get too confused, they sell plastic radiator grilles (solid)
I drove Zhiguli and Moskvich cars in the far north for 20 years and did not install any cardboard or flaps, even in the 70-80s. And modern cars don’t even need this if the engine is working properly.
Granta seems to be a modern car. Why does she need cardboard? If it does not heat up to operating temperature, most likely the thermostat is closed. I covered the inside of my Volga with cardboard in front of the radiator so that Carlson wouldn’t blow. It began to warm up faster. But, this is the Volga! Moreover, she is 18 years old. So she's forgiven)
if there is not enough heat, then you just need to change the thermostat insert to a higher temperature one
Sew a curtain and tie it with strings from the outside to the radiator grille.
s otvet.mail /question/203902741
Why put a mesh on the radiator grille?
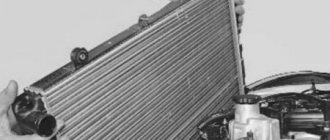
In the vast majority of passenger cars, the radiator of the engine cooling system is installed at the front, where it is intensively blown by the oncoming air flow. But, in addition to the air stream, various foreign objects inevitably enter the heat exchanger:
- insects of various sizes;
- poplar fluff and foliage;
- road dust, fine sand and dirt;
- gravel, pebbles from under the wheels of oncoming cars.
Radiator honeycomb clogged with insects and dust
Cooling of the liquid in the radiator occurs due to its heat exchange with the air flow passing between the metal fins. When these openings become clogged with debris and insects, their flow area decreases and eventually becomes completely clogged. The intensity of heat exchange decreases, the radiator ceases to perform its function, and the engine begins to overheat.
Standard grilles installed by manufacturers protect the unit only from large stones, letting everything else through. That is why installing an additional protective mesh brings considerable benefits, increasing the service life of the radiator and the engine, which is not subject to overheating. A dirty mesh can always be cleaned and washed; this is more difficult to do with radiator honeycombs.
Car with intercooler for turbocharging
Modifications of protective nets on Lada Granta Liftback
- metal mesh with a perimeter frame made of polymer;
- all-metal mesh;
- all-metal with chrome inserts along the outer perimeter.
Each of the presented models has its own advantages and disadvantages. Let's look at them. Plastic frames are susceptible to the negative effects of direct rays of the sun and high/low ambient temperatures. Loose fit, vibration, metal knocking are the first signs of deformation.
The all-metal mesh on the radiator grill is more resistant to overheating. At the same time, even the slightest blow to the metal can deform the fasteners. As a result, driving a car is accompanied by knocking and vibration in the area where the radiator grille is located.
Metal with chrome inserts - more aesthetics than practicality. This is how you can briefly describe the accessory. Poor manufacturing is the first factor contributing to the destruction of the spray layer.
When choosing and purchasing “protection”, pay attention to the cell diameter. Too large will allow the passage of leaves, fluff, and small stones. A cell that is too small will quickly become clogged and interfere with natural air flow. Premature overheating of the power unit is not excluded. The original protection is equipped with a solid rubber plug for use in winter. Thus, using the accessory, there is no need to dismantle the metal grill for the winter.
Manufacturing and installation
Now, you need to take a fine mesh and fold it in half, so that the edge fits under the edge and it folds more tightly. The edges of the galvanized mesh are incredibly sharp and tenacious, so protect your hands with gloves. After the mesh is folded as tightly as possible, we temporarily fix it with ties in the four corners. Next, we put the same layout on this grid and cut out the future grid. The most convenient way to cut such a mesh is with metal scissors.
The second step is to place the mesh on the frame. To use as a base, a mesh with larger cells will serve. According to the layout, you should cut out the desired outline from it. Then we place a piece of fine-mesh mesh on top of it, and align the edges so that they match perfectly. If you use a model when cutting out parts, be careful and attentive, then all three parts will be the same size and, when placed on top of each other, will give a smooth, perfect, three-layer edge. If everything is correct, we fix our parts in this position, tightly tightening them together with ties
It is important to place the ties in compliance with a certain pattern - either in a checkerboard pattern, or every even row, with distances of three cells. The accuracy of geometric shapes is always fascinating and after final decoration, the view will be even more transformed
Our hand-made mesh for the radiator grille turned out to be much stronger than the factory one and much denser, however, it is perfectly ventilated and does not create any obstacles to the air flow. Now you need to process the edges of the finished lattice. To do this, we take the car door seal, and carefully, slowly - so as not to tear it by accidentally catching on the sharp edge of the mesh, “put it on” it. Starting from the bottom right corner, millimeter by millimeter, it isolates the sharp edges of the grille edge, plunging them into the depth of the seal. Having completed a full circle, we will return to the starting point, now we can trim off the excess.
In fact, the grille is already ready for use, but it would be nice to give it a more presentable look. Tuning the radiator grille with your own hands is also a completely feasible task, and you need very little to do it. First of all, you should cut off all the hanging “tails” of the ties - not remove them completely, but rather cut off the excess, hanging part. Now place the grid on a clean sheet of paper, face up. Shake the can of paint well and start painting.
First, standing on the right, then, after waiting a little (an hour or an hour and a half), standing on the left of the grate. Such a coloring that “crosses” the directions of the jet will more thoroughly cover the entire surface of the craft.
If you approach the question of how to make a radiator grill with your own hands, you can get a high-quality and reliable grille within just a few hours.
How to make and install an outdoor version with your own hands?
To manufacture a protective element designed for external installation, you should purchase the following materials:
- aluminum fine mesh;
- universal glue;
- a piece of thick electrical cable 2-3 m long;
- tape and clothespins;
- a sheet of cardboard (mesh packaging works well);
- plastic clamps, preferably transparent or black, to match the color of the grille.
Materials and tools for DIY
Note. The amount of aluminum mesh and cable length are determined by the dimensions of one or more grilles installed on your vehicle. The cable insulation will serve as the edging of the future protective element.
To make a mesh frame and place it on the car, prepare a set of tools:
- stationery knife;
- regular scissors and for cutting metal;
- tape measure, ruler;
- marker.
A device for safely cutting the cable is made from a knife and a strip
Since this simple design is attached to the radiator grille from the outside with clamps, no tools are required to disassemble the bumper.
Advice. If the radiator grille on your car can be easily removed, then it is recommended to dismantle it and use it as a template, which will make the task easier for yourself.
The cable is cut lengthwise to remove the insulation
The production and installation of the outer mesh is carried out in the following sequence:
- Take a sheet of cardboard, apply it to the car grille and carefully cut out a template that exactly repeats its shape. If necessary, modify the template with scissors, achieving maximum coincidence of the contours.
- Place the template on the mesh and trace with a marker, then cut out the workpiece with metal scissors. Try it on the radiator on your car.
- Tape a utility knife to a wooden plank as shown in the photo. Using this tool, make a longitudinal cut in the cable insulation and pull out all the conductors from inside.
- Form the edging of the element by placing the cut and gutted insulation on the ends of the previously made workpiece. Fill it from the inside with glue at several points and clamp tightly with clothespins.
This is what a homemade external mesh looks like on a car
When the glue has completely dried, the clothespins can be removed and the mesh can be installed on the car. If you did everything correctly, it will fit tightly to the grille from the outside. All that remains is to tighten and secure the resulting element with plastic clamps. After tightening, cut off their ends and turn them so that the clamp clamps are inside and do not stick out in plain sight. When you need to remove the protective element, just cut the puffs with wire cutters.
The order of work in the photo
Video on installing external radiator protection
Radiator grille for Granta
The Lada Granta is attractive in every way, because in addition to its economical price and great demand, it looks more than decent in appearance. The designers did a good job not only on the body, but also on its additional elements, in particular I would like to highlight the modern Grant radiator grille.
However, it doesn’t stop there, because tuning fans are increasingly resorting to modernizing the interior of the car and its exterior to their own taste. Moreover, the potential for creativity is inexhaustible.
Based on the reviews of the owners, we can conclude that the Lada Granta contains defects that can be redone and corrected.
Lada Granta, relevance of tuning
Styling or the more popular word tuning can be heard more and more often from the mouths of car enthusiasts. This is the name given to the process or result of modernizing the appearance of a car.
It is possible to change your car almost beyond recognition. In addition, now this can be done much easier than before, because there are more and more tuning centers and specialized online stores. There are even ready-made body kits available that allow you to change the car body to suit a certain style. Lada Granta was no exception.
However, for sure, installing a ready-made body kit purchased in a store is not as interesting as doing it yourself. After all, tuning is a creative process.
Many will agree that the most spectacular external components of the body, by which it becomes clear what kind of car is in front of us, are headlights, wheels, all kinds of optics and a radiator grille.
In the Lada Granta, at first glance, the grille is not such a significant body detail, but it provides many opportunities for tuning. In addition, in the Lada Granta, tuning the radiator grille can be done without much difficulty. In addition, this spare part can be made manually.
It is not necessary to have special skills for this. To perform this operation we will need standard tools and consumables.
Installation of chain-link mesh on the radiator grille
If you want to give your Lada Granta a brutal look, you don’t have to look for a special body kit at a tuning studio. Correct this situation yourself. Let's start with the radiator grille on the Grant.
The most popular material used to replace a factory part with an updated one is a fine-mesh mesh called chain-link. A mesh is formed from various materials, including steel and even plastic.
You can easily purchase the necessary consumables in many specialized stores at a very low cost. In addition, a hand-made radiator grill on a Grant is always curious and interesting.
To perform the operation, we will need special tools: a file, a hacksaw, a needle file, sandpaper, cold welding and fasteners.
Before tuning the Grant's radiator grill to your taste, you need to dismantle the factory grille of the Grant's Lada, especially since this is done quite simply.
To perform high-quality tuning, you must strictly follow the order of the necessary operations and be extremely careful. To remove the Lada Granta radiator grille, we will need: a Phillips screwdriver, an “8” wrench, a “10” socket, as well as a T20 TORX wrench and a needle file. After this, we proceed directly to dismantling.
We lift and fix the hood of the car, after which we remove the bumper from it, inside of which we see 9 nuts. We unscrew them. Then we pull off the fasteners on both sides of the grille. Next, the radiator grill on the Lada Granta is simply removed. If necessary, unscrew three more nuts.
More tuning for Grants
Please note that for the Lada Granta in our hypermarket there are more than 100 interesting accessories and parts, for example the following:
- Eco-leather central armrest
- Soft door armrests - front and rear
- Rear window frill without stitching
- Trunk lid upholstery for sedan
- Roof rails Grants
- Organizer for spare wheel niche on Granta
- Towbar (removable American square)
- Gas hood struts for Granta and Granta FL
- Carpet covers (front, rear, tunnel) to protect the interior from dirt
- Covers for door openings and rear bumper
and many more useful tunings! Call or write to us and we will help you select the necessary elements for your Grant!
Installation of decorative radiator grille for Lada Granta
The grille, of course, is beautiful, but there will be problems with installation - it’s not factory?! This is a common misconception when choosing a radiator grille. We can immediately say that all the tuning is not factory-made, which means that in order to install it, you often have to modify something. But in the case of our gratings, this point is also taken into account. All grilles are divided into 2 types: factory-based and not. With grilles made on the basis of factory ones, everything is very clear. The original grille was modified, but the body and mounting points remained the same. This means that its installation will be no more difficult than replacing a wheel, i.e. We remove the factory grille, having first unscrewed all the nuts, then put on the new one in the reverse order.
With grilles that are not made on a factory basis, the situation is no more difficult, believe me. Due to the fact that such a grille has the same body size and the same seats, its installation is complicated only by the fact that you need to make the holes for attaching the bolts yourself. Even if at this stage you mess up a little, in terms of burrs and other things, then all these irregularities will be hidden and it will not be visible when the hood is closed. Therefore, it is impossible to install such a grille somehow incorrectly. Everything falls into place without any extra effort.
Grant's radiator grilles will delight fans of the people's car. Now everyone will choose their own design, unlike others
A true car enthusiast is distinguished by attention to detail, so appearance will always come first. Parts from LADA Tuning make it possible to forever change the feeling of your Granta
With custom radiator grilles for Grant, high-quality tuning becomes accessible. Lada Granta will become not only a favorite, but also an impressive car.
Granta radiator grille
Lada GRANTA was released as a budget car in 2011. The queue for it was huge, and this is understandable. For the people of our country, such a car is an excellent alternative to expensive foreign cars. But some shortcomings were made during development. One of them is the unprotected Granta radiator grille. For some reason, it does not have a mesh to protect it from dust, midges and flying pebbles when moving. Car enthusiasts have always found a way out of such situations. There are already several ways to improve both the protective properties and appearance of vehicles.
Types of gratings
Several types of front grille have been developed for this Lada model. For car owners, there are a variety of configurations with which you can change your car beyond recognition. Changing the appearance is nothing more than a stylish tuning that attracts attention and glances. A variety of fashionable “clothes” for your favorite car are presented in online stores and car markets. It’s not difficult to choose the option you like and install a new grille on the front.
There are several popular types that have proven themselves on the positive side, and with these grilles the car looks new.
The most popular option is “Hulk”. Three wide ribs create powerful, imposing front features. The car looks bigger and more massive. Adherents of the classics will also like the Phoenix - it does not violate the concept of the car and protects the radiator well. Owners of cars participating in racing tend to buy sports pads. A special hole prevents overheating.
The many options for radiator grilles for the “Gad Grant” provide a huge choice available to every car enthusiast. By purchasing such a body kit, you can install it by entrusting the car to the specialists at the service station. But for true connoisseurs, this process becomes creative, and installation yourself is a matter of honor. Moreover, every owner wants to spend an extra hour with his “iron horse”.
Radiator grille "Hulk"
Tuning and protection
It’s quite easy to create protection and a “new face” for vehicles with your own hands. It is not necessary to run to the store and buy a grille of a different configuration. To make a grant radiator grille and tune it, you don’t need any super-expensive and fashionable materials. A regular mesh with a fine mesh is perfect for this process. It can be either plastic or steel. It can be purchased at a regular hardware or hardware store. The price will be minimal, because not so much mesh will be needed. It is necessary to measure the distance that you plan to close and buy as much as you need.
Radiator protection LADA Granta 2018-2020 (restyling)
| Mesh - Material | Aluminum, thickness 1 mm., mesh cell 3x7 mm. |
| Mesh coating | Polymer powder + protective varnish (protection against chipping and corrosion). |
| Edging - Material | Rubber, black, square section 10x5 mm. |
| Fastenings - Material | Plastic, latches - L-shaped (clings to the inside of the bumper, not noticeable after installation) |
The fastenings along the perimeter of the protective mesh are located at a minimum of 6 points, which ensures maximum fit of the mesh, repeating all the bends of the factory grille and securely and efficiently fixes the mesh in place.
Radiator protective mesh for Lada Granta
restyling 2021, 2021, 2021.
- will reliably protect the vital organ of the car, the radiator of the cooling system and air conditioning from external environmental influences (stones, reagents, birds and other debris).
The size of the cells of the radiator protective mesh is optimal for protecting the radiator 3x7 mm. It will protect the car air conditioner radiator and the cooling system radiator from damage, preventing overheating.
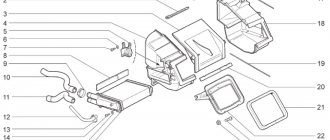
The photo shows options (examples) of STANDARD radiator protection mounts; some may differ from the mounts for a specific make and year of manufacture of the car.
Winter insert - a plug made of thick plastic (black, multiple installation and removal) in the size of the protective mesh with special fastenings (plastic pistons), installed only on top of the radiator protective meshes. It will retain heat under the hood and protect the cooling system from hypothermia in winter.
The photo shows an example of installing a winter insert; the shape and dimensions may vary.
ATTENTION! Winter radiator protection for Lada Granta restyling 2018-2020. “WINTER INSERTION” - installation is not possible without a protective mesh
(the winter insert is placed on top of the radiator protection with special fastenings for the protective mesh).
Product warranty 12 months.
Set:
1. Radiator protective mesh for Lada Granta 2018-2020. restyling
2.Installation tool
3.Installation instructions and box
Courier delivery in Moscow, Moscow region and Yekaterinburg. By courier on the day of order, if the goods are in stock and the order is confirmed before 14:00 (Moscow time), payment upon receipt. Orders confirmed after 14:00 (Moscow time) are delivered the next day. More details in the “DELIVERY AND PAYMENT”
1. Delivery by Post within the Russian Federation (any region) with payment upon receipt:
— The cost of sending an order is 300 rubles. (remote regions from 400 rubles. More details in the “DELIVERY AND PAYMENT”
Total: cost of goods + shipping 300 rubles. +% for “Cash on Delivery” transfer
2. Delivery by Post within the Russian Federation (any region) 100% prepayment
— The cost of sending an order is 300 rubles. (specific regions from 400 rub.)
Total: cost of goods + shipping 300 rub. (there are no commissions because the order has already been paid)
Delivery times 5-7 and maximum 11-13 days (remote regions)
and etc.
3. Delivery by transport company, fast and comfortable delivery! — (100% prepayment of goods is required, payment on the website or by transfer to a Sberbank of Russia card or other electronic payments)
Delivery times from 2 days (dimensions, weight of the ordered goods and additional “door to door” service increase the cost of delivery)
The cost of delivery "TK" of your order will be informed to you by our manager at the time of confirmation of the order (manager's call).
4. Delivery of orders by transport company with payment upon receipt is carried out by TC SDEK.
Read more "DELIVERY AND PAYMENT"
If you have questions about the product, purchase, delivery, call our hotline right now
The call is free from any phone within the Russian Federation 8 800-7000-356
Reviews
| № | Positive |
| 1. | Vasily: I bought a metal grille for the radiator at a car dealership and installed it myself. The procedure is not complicated, every car owner can do it. I wanted to take one with chrome plating, but since I live on the periphery, it makes no sense. |
| 2. | Victor: It’s a pity that the model is not equipped with a mesh as standard. I had to contact the service center for installation, since there was no free time due to my busy schedule. I've been using it for two months now, no complaints. |
| 3. | Konstantin: My comrades recommended that I “protect” the radiator. In the store, the seller provided three modifications of the accessory from different manufacturers. I didn’t buy one with chrome plating, since I often drive on gravel roads; I settled on metal with a plastic edging. |
| 4. | Sergey: I want to leave my positive review about the original protection of the Lada Granta radiator grille. Catalog number: 99999219004100 in a metal frame. Many thanks to the manager for his practical advice. |
| 5. | Vyacheslav: I bought the car six months ago from a dealership, everything was fine, but the net was missing. I ordered installation from the auto service center at the store, and the technicians completed the installation within 10 minutes. Satisfied, my recommendations to car enthusiasts. |
| 6. | Alexander: I’ve heard negative reviews about metal protection, I can’t confirm it. I installed it myself two months ago, still no knock. Perhaps the reason was a violation of installation technology or the purchase of non-original products. |
| 7. | Vitaly: Let's hope that subsequent modifications of the Lada Granta Liftback will already be equipped with metal protection. In the meantime, I installed it myself, I didn’t find anything complicated in the process. My recommendations to car owners. |
| 8. | Egor: I ordered an accessory from China, the quality was pleasantly surprising, I expected the worst. The entire installation process took no more than 15 minutes. So far there are no complaints, the mesh is fixed tightly, there is no play or creaking. |
| Negative | |
| 1. | Victor: I can’t speak positively about the quality of the protection. Already after the first thousand mileage, play and knocking on uneven roads appeared. To eliminate this, I bent the nylon ties. How long will it last? |
| 2. | Vasily: I bought original accessories, but it’s not clear why the protection is loose. I can’t speak positively. I'll try to visit a service station for re-installation. |
Conclusion Protection of the radiator grille is extremely important, especially for the Lada Granta Liftback. Considering the design of the standard bumper, where there are 3 large openings, flying gravel and stone can damage the paintwork and the honeycomb of the radiator of the cooling system. Another question is the number of such nets installed. Not everyone agrees with fixing three at the same time. For some, one is enough, in the lowest contour of the bumper. However, this opinion is erroneous, since gravel bounces to a greater extent in the middle part than in the lower perimeter.
Read more: Regional traffic police Tver schedule telephone
| Video - Installing a mesh on the Lada Granta bumper without removing the bumper. |
Video - Installing a mesh on the Lada Granta radiator grille
Share the link with a friend
Radiator protection for LADA GRANTA I restyling 2021, 2021. Installation video. Experience in the production of protective nets since 2006. Installing radiator protection from Strelka11 will save you from unnecessary hassle and expense. Correct selection of aluminum mesh cells, which ideally protects the radiator without compromising engine cooling. Made of aluminum mesh with a cell size of 3*7mm. With a standard, diamond-shaped pattern. Protects the car radiator from small stones, insects and other small debris entering it without impeding air flow (without compromising engine cooling).
READ How to install a VAZ engine on a Moskvich 412
The radiator protection edging is made of soft black plastic, placed around the entire perimeter of the mesh exactly repeats the geometry of the seat in the bumper, prevents scratches and chips on the bumper during operation of the radiator protective mesh, giving a finished, aesthetic appearance to the entire product.
Specially designed fastening elements are not visible from the outside and do not spoil the appearance of the product; they are made of 2 mm black plastic, taking into account all the design features of this car model, reliably fixing the radiator protection in the seat.
The winter package is designed to protect the radiator from dirt, winter chemicals, slush and retain heat in the engine compartment. The winter bag is made of ABS plastic, 1 mm thick, repeats the shape of the radiator protection, and is attached with plastic screws to the cell of the Strelka 11 radiator protective mesh without damaging the polymer coating.
Winter package installation example: Video
Video installation instructions
Radiator grille Lada Granta
In any car, the radiator grille is one of those elements that catches your eye when you first look at the car. It is located on the front of the car and is therefore so noticeable. The “facial expression” of a car also very much depends on how the radiator grill looks.
It is for this reason that many car owners change it or perform tuning to give their car some individuality. The Lada Granta radiator grill is no exception. You can see many attempts to improve it in various ways.
Many owners complain that this model has virtually no protection for the radiator from dust and dirt entering from the outside. Proper tuning helps eliminate this problem.
Tuning the radiator grille of Lada Granta
How to remove the radiator grille of a Lada Granta
Before tuning this element, let's figure out how it can be removed from the car.
The Lada Granta radiator grill can be removed in 2 ways. According to the classical method, you need to proceed as follows:
- remove the front bumper;
- on its inner side, unscrew the nuts securing the grille, there are 9 of them;
- Click to open 2 locks under the headlights.
Removing the radiator grille along with the bumper on the Lada Granta The second method makes it possible to do without dismantling the front bumper. The algorithm looks like this:
- Unscrew 6 bolts from the top of the grille;
- bend it, stick your hand in, find by touch 4 bolts at the top and 5 nuts at the bottom - for this you will need a figure eight wrench;
- Under the headlights, use a screwdriver to open the 2 clamps.
After dismantling, you can begin tuning. After this, installation is performed in reverse order.
Tuning using a utility net
Tuning the front part of a Lada Granta car using a Chain-link mesh is very common. Such a mesh can be bought at any hardware store - it can be metal or plastic.
Choose the option with small cells
This is important to avoid excess dust getting under the hood of the car.
Fine mesh netting for making radiator grilles
Next you need to follow a simple algorithm:
- using one of the methods described above to remove the radiator grille;
- cut off all horizontal and vertical jumpers, leaving only the outer frame;
- using cold welding, seal all the holes that were created after the jumpers were cut off;
- clean the surface from all irregularities and burrs;
- Cut the mesh to size and attach it to the frame. If the mesh is plastic, you can simply glue it. If it is made of metal, heat the frame so that it does not burst, and screw the mesh with self-tapping screws;
- paint and wait for it to dry. At this point the tuning can be considered complete.
Tuning the radiator grill using mesh on the Lada Granta
Installing a radiator grille on a Lada Granta car
After tuning is completed, the Lada Granta radiator grill is installed back. To do this, the finished part is placed in the standard opening in front of the radiator and secured with nuts, bolts and clamps. Next, you need to check how correctly the fit is made and inspect the front part of the machine for irregularities, burrs and protrusions. If any are found, clean them with a file or fine sandpaper.
Installing a bumper with a radiator grill for Lada Granta
Conclusion
Tuning the radiator grille is a good way to make the appearance of a car more attractive, make it stand out from the crowd, and add originality. This can significantly change the visual perception of your car when looking at it from the front.
The car will acquire a more modern, stylish and attractive exterior. It is precisely these considerations that drive those car owners who decide on tuning.
In the case of the Lada Granta car, the argument in favor of alterations of this type is the actual lack of protection of the engine compartment from particles of dirt, dust and moisture entering from the front. This is unlikely to benefit the car. Therefore, many car enthusiasts resort to making radiator protection with their own hands.
okuzove.ru
Installing a radiator grille on a Lada Granta car
After tuning is completed, the Lada Granta radiator grill is installed back. To do this, the finished part is placed in the standard opening in front of the radiator and secured with nuts, bolts and clamps. Next, you need to check how correctly the fit is made and inspect the front part of the machine for irregularities, burrs and protrusions. If any are found, clean them with a file or fine sandpaper.
Installing a bumper with a radiator grill for Lada Granta
Experts' recommendations for choosing a radiator protective mesh
- Regardless of the modification of the accessory, always buy only from certified points of sale and official representative offices;
- any quality-made part will last longer than a cheap fake;
- if the car is often used in rough terrain, with poor road surfaces, it is not rational to install chrome-plated protection for aesthetic reasons;
- To visually distinguish the original from the fake, look at the method of fixing the grille to the body. The presence of nylon ties will indicate a factory type of manufacture, while typical plastic latches indicate a handicraft production.
How to solder a bumper using improvised tools?
Even a bumper that has burst in two halves can be repaired. Moreover, for this you will need only the most basic things: a soldering iron, a mesh (graph paper), scissors, a flat-head screwdriver and a little patience.
To properly solder the bumper, it is advisable to remove it from the car and sequentially perform the following steps:
- Turn on the soldering iron (100-watt) until it reaches maximum temperature;
- Place the bumper on a rack or table;
- Connect the broken parts as evenly as possible and solder the plastic on the front side;
- Use scissors to cut the mesh (choose the size depending on the damage, you can, for example, cut pieces of 10x10 mm or 10x5 mm);
- Turn over the plastic part (it is advisable to first lay a soft cloth on the rack so as not to scratch the paint);
- Place the mesh on the plastic and heat it with a soldering iron, then press it in with a screwdriver;
- If the damage to the bumper is significant, then solder the front part with mesh. This will further strengthen the seam;
- Use a blade to cut off any burrs left after soldering.
Harm or benefit? The decision is yours!
The radiator grille not only has a protective function: it improves the appearance of the car. At the same time, many owners find it more attractive and personable. In addition, during the cold season, you can install a “winter kit” on the radiator: thanks to the ABC plastic plug on the grille, the inside of your car will be warmer in winter because it helps the engine retain heat longer.
With all of the above, after installing any additional mesh, the cooling of the radiator by the flow of incoming air will deteriorate somewhat - there is no doubt about it. Accordingly, the thermal operating conditions of the motor will change somewhat. However, this is an expected phenomenon. It is clear that a very fine-mesh mesh will indeed “cut off the oxygen,” but real “original” meshes behave quite adequately. Especially when the car does not drive in the Sahara.
Painting the mesh
If you were unable to choose the mesh material to match the color of the car, then there are 2 options left:
- install unpainted aluminum mesh;
- take aluminum or plastic material and repaint it in the desired color.
Varnishes and paints in aerosol cans In the first case, you will receive a minimum of worries, but over time, the aluminum will oxidize and darken, which will ruin the appearance of the car, especially when installing the grille externally. Therefore, it is better to spend 2 hours and apply paint to the element according to all the rules. To do this you will need:
- white spirit or other degreaser;
- primer for aluminum or plastic;
- paint of the desired color;
- protective varnish;
- antistatic wipes.
Painting the mesh from a spray can For ease of processing and painting, it is best to hang the mesh on a wire from the ceiling. A less aesthetic option is to place it on the floor covered with old newspapers. Then the process of applying paint will be delayed, because the element will have to be turned over. The procedure is as follows:
- Using wipes and white spirit, thoroughly degrease the mesh material.
- Shake the primer in an aerosol can and apply 2 coats with a break of 10-15 minutes. Hold the container vertically at a distance of 20-30 cm from the surface to be painted.
- Apply a base coat of paint, wait 15 minutes and repeat the operation. Make sure that there are no drips, and that each subsequent strip, when applied, half overlaps the previous one.
- After the base has dried, coat the mesh with three layers of protective varnish at intervals of 10 minutes.
Installation using a glue gun When the paintwork has completely hardened, proceed to install the mesh on the car, as described in the previous sections.
How to make and paint an internal protective mesh - video
You will have to spend from 2 to 8 hours making and installing a protective mesh with your own hands, depending on the installation method you choose and the difficulties with removing the bumper. How much money you can save depends on the make of the car and the price of the finished kit for it. Add here the cost of installing mesh elements at a service station. But, by taking on the work yourself, you can choose the appropriate material and repaint it if necessary. And the procedure is not so complicated that you need to go to a car repair shop for this service.
How to make and apply removable tinting on car windows
How to make a subwoofer for a car with your own hands
Mesh outside and inside the grille - pros and cons
Both methods have the right to life and are equally successfully used by car enthusiasts. But each of them has a negative and a positive side. Installing a mesh behind the radiator grille provides the following advantages:
- The mounting points are not visible from the outside, so it is easier to install protection, although you often have to dismantle the bumper;
- installation work is carried out once for the entire period of operation of the mesh material;
- you can use an inexpensive mesh and not pay much attention to the appearance, because it is difficult to see behind the standard grille;
- Implementation of this option will be cheaper.
The light mesh does not catch the eye when standing behind a dark grille
The disadvantage of this method is the difficulty of cleaning fine-mesh material. It’s good if in your car model the decorative grille is removed from the bumper, making it easier to access the mesh to be cleaned. Otherwise, for a major wash, the front body kit will have to be dismantled or you will have to go to a specialized car wash and pay money.
Note. When you begin internal installation, you risk encountering such difficulties as removing the front bumper. On Russian VAZs the work is done relatively simply, but with some foreign cars you need to tinker a lot.
Removing a bumper on a foreign car can be quite difficult
The option with external installation has more advantages:
- the protective element is easy to install and remove when necessary;
- to install the net, you do not need to disassemble the car;
- washing is carried out from the outside without removing fine-mesh material;
- the front part looks much nicer when the mesh is matched to the color of the car or painted.