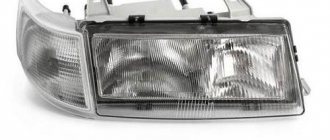
Even with a perfectly adjusted high and low beam light beam, you often have to adjust the angle of the headlight reflector. This is primarily due to the loading of the car. If, according to the rules for adjusting the headlights of the VAZ-2110, we start from the load of the driver + front passenger, then in real life, when the cabin is fully loaded, our adjustment will leave no stone unturned. The rear of the car will squat, the front will rise and the light beam will blind oncoming drivers. To quickly adjust the angle of the headlight reflector, a hydraulic corrector is installed in all VAZ-2110s.
The principle of operation of the VAZ-2110 headlight hydraulic corrector
Its purpose is clear - without leaving the cabin, the driver can change the angle of the light beam relative to the road. The device must work correctly with two headlights at once and have a sufficient range of adjustment - to maximize the angle of the reflector when the rear part of the body is fully loaded, and also reduce the adjustment to zero when the load is minimal.
The principle of operation of the headlight hydrocorrector.
The VAZ-2110 hydraulic corrector, installed as standard, consists of:
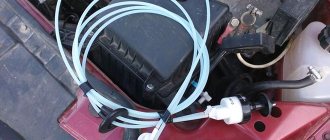
- main hydraulic cylinder and switch, both of them are assembled in a single block and installed to the left of the steering wheel on the front panel;
- hydraulic drive system, line - tubes that connect the elements of the system;
- working hydraulic cylinders, actuators that raise or lower the headlight reflector;
- working non-freezing liquid.
The low-pressure hydraulic system allows you to change the working pressure and move the rod of the working cylinders within 6–7.5 mm .
In theory, this is enough to change the angle of installation of the reflector from minimum to maximum and, accordingly, change the direction of the angle of the light beam.
Hydrocorrector
In the article “Why the headlight range control does not work,” we examined the main malfunctions of the system, as well as the repair method by completely replacing all components of the system. However, in most cases the hydraulic corrector is perfectly repairable. In order for the hydraulic corrector to stop working normally, the loss of even a small amount of working fluid is sufficient. You can make up for the loss with regular antifreeze.
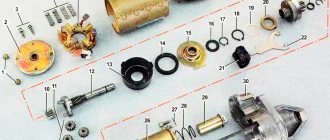
6 – knob for adjusting the light beam; 1 – main adjustment mechanism; 2 – working cylinders with a rod acting on the headlight reflector.
Barbaric repair method
Many drivers do not burden themselves with either repair or replacement of the hydraulic corrector. When the headlights begin to shine downwards, they simply screw in screws from the back of the working cylinder. Adjustment of the position of the rod and the level of tilt of the headlights is carried out by screwing in and unscrewing the screws.
After such a repair, the concept of a headlight range control is no longer applicable to the system, since the possibility of quickly adjusting the angle of the headlight reflector from the passenger compartment disappears. But such repairs have a right to life if the malfunction caught you on the road and there is simply no other way to raise the headlights.
Recovery without removal
- Pull the actuators out of the headlight assembly.
- Remove the tubes from their seats, and then secure the tubes so that the remaining working fluid does not leak out of them. It is better to preheat the landing site, but you can simply cut the tubes at the edge of the landing sites. Check the stroke of the actuator cylinders by moving them by the rod using pliers. The pistons should move without jamming.
- Each actuator has a plug for bleeding the system, which must first be pulled out.
- Turn the switch on the dashboard to position O. Fill the tubes with antifreeze so that a small drop remains on top, then put them on the fittings of the actuators.
- Position the slave cylinder bodies so that the bleeder hole is the highest point.
- Holding the rod in the maximum retracted position, fill the working cylinder with liquid until a small “hill” forms above the bleeder hole.
- Close the plug.
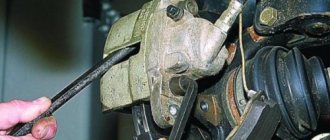
Article on the topic: Rear caliper repair
The system should work, but since the seals of the connections at the main cylinder, the regulator at the dashboard and the seals of the working cylinders were not checked, one cannot be sure of the long service life of the hydraulic corrector after such repairs. This restoration method will not work if the system is airy at the master cylinder in the cabin.
Restoration of headlight hydraulic corrector
You need to know where the headlight hydraulic corrector is located and how to remove it, since for a complete troubleshooting you will need to dismantle the working cylinders and the main adjustment mechanism. Take 2 small pieces of tube to connect the working cylinders to the main mechanism after removal, fill the system with water. If the device is operational, set the switch to the maximum headlight raise mode and leave the mechanisms in this position for several hours. If no leaks have appeared during this time, the system can be filled with antifreeze and installed on the car. If the leak does not appear in the pipe connections, it is better to replace the hydraulic corrector with a new one or install an electric corrector instead.
Only new coolant should be used so that dirt particles do not interfere with the normal movement of the pistons. Remember that the system must be completely filled with working fluid. To restore, you will need a syringe and a blunt needle so as not to damage the cylinder seals. Do-it-yourself repairs, the assembly and disassembly process are perfectly shown in the video.
Malfunctions and diagnostics of hydraulic corrector
Despite the simplest design, the hydraulic corrector is considered one of the most unreliable systems in cars of the tenth family. Design flaws, quality of materials and workmanship force us to return to the problem of adjusting headlights almost every year.
In this case, neither the working nor the main cylinders can be repaired and require replacement if they fail.
The signs of a malfunction are clear - the headlights do not respond to the corrector knob and are frozen in one position . The most common problem is depressurization of the hydraulic system. This trouble can be easily calculated by the leakage of liquid from the system, and it is also easy to eliminate. It is enough to seal the joints (on the cylinders) of the hydraulic system and check its operation again.
Another problem is fluid leakage through the cuffs of the working cylinders . No one is going to repair cheap plastic cylinders; they are replaced with new ones. By the way, the price of a new hydraulic corrector for the VAZ-2110 and all cars of the family (article 2110–3718010 and 2110-3718010-10 ) is 450–550 rubles, depending on the manufacturer. The difference between them is the stroke of the working cylinder rod. For tens in a station wagon, a larger load and a larger adjustment angle are provided. Accordingly, a larger stroke of the cylinder rod.
You can check the operation of the headlight hydraulic adjustment system by measuring the working stroke of each of the working cylinder rods:
- 2110–3718010 — working stroke 6–7.5 mm for sedan and hatch;
- 2110-3718010-10 — working stroke 6–8.5 mm for a station wagon.
If the hydraulic cylinders do not work or the working stroke does not correspond to the nominal values, we replace them and install a previously purchased new hydraulic corrector of the appropriate modification.
Hydrocorrector malfunctions
Among the most likely causes of a non-working headlight hydrocorrector is depressurization of the joints of tubes and sealing cuffs. The consequence of loose connections is loss of working fluid and air being sucked into the system. For the working pistons to move properly, the system must be completely filled with liquid. The manufacturer does not suggest repairing the hydraulic corrector, so if the system fails, the assembly is replaced. Nevertheless, the article “Repairing a hydraulic corrector” shows that the system can be troubleshooted and restored.
Where is the lamp hydraulic corrector located? Each headlight unit has an actuator that acts on a reflector, from which 2 tubes go into the cabin. Through a technological hole in the engine shield, the tubes go to the master cylinder and the switch on the dashboard.
Reasons for failure of the hydraulic regulator
If, when turning the headlight adjustment knob, the light beam does not change direction, this indicates a failure of the hydraulic corrector. There are several reasons for the malfunction:
- One of the working cylinders is jammed. In this case, the corresponding reflector will not rotate.
- The connecting tubes were damaged and the system depressurized.
- Failure of sealing due to damage or wear of seals.
If the system is depressurized, it is impossible to regulate both lamps. Most often, they lower and take a lower position, as a result, the headlights only illuminate the road next to the car. At night, this increases the risk of an emergency. You can try adjusting the hydraulic device rod.
Manufacturers of hydraulic correctors did not provide for the repair of the closed system as a whole and individual elements. Therefore, if the device fails, it is necessary to either install a new hydraulic regulator or replace the hydraulic device with an electric one.
Some car enthusiasts try to repair the regulator, but this does not bring long-term results. For example, they replace the working rod with a self-tapping screw of a suitable diameter with the sharp end removed. This makes it possible to fix the reflectors in a certain position. It will be impossible to make adjustments from the interior.
If, during a visual inspection of the hydraulic regulator, cracks are found in the connecting tubes, the repair will consist of eliminating them. The cause of cracks is temperature changes in the engine compartment of the car. If the crack is close to the main or working cylinder, cut off the cracked end. The tube damaged in the middle is completely replaced by pumping with antifreeze.
Replacing hydraulic corrector VAZ-2110
There shouldn’t be any difficulties during replacement; we only need standard tools for the job, and we can change the hydraulic corrector even in the field.
The only thing that will make it easier to unscrew the hydraulic corrector switch mounting nut is ordinary tweezers.
Let's get started:
- Open the hood, loosen the clamps, and release the hydraulic drive line pipes.
- Remove the working cylinders by releasing the clamps using a flat-head screwdriver.
Open the hood and remove the actuator cylinders from the inside of the headlights.
As you can see, replacing the system is not at all difficult and it will not take much time. But the new hydraulic corrector will only work for a year or two , after which the operation will have to be repeated. By the way, there are electric headlight levelers on the market (from 3.6 thousand rubles) and electromechanical automatic ones (from 6–8 thousand). Their service life is much longer, and the adjustment accuracy is better than that of a hydraulic system.
Good luck with your choice and bright, accurate headlights on night roads!
Features of operation
The new corrector will last a long time and will not need repairs for a long time if the replacement is done correctly. During operation, the corrector must be checked regarding the integrity of the pipeline. If a leak is detected, the entire set must be replaced again.
Depending on how loaded the vehicle is, the headlights can be directed higher or lower. To adjust the light flux, special devices are used - hydrocorrectors. If the car is loaded, the headlights should be turned down so that the flow of light is directed not upward, but onto the road. This ensures the necessary illumination of the road surface and prevents the driver of an oncoming car from being dazzled. In the case of a minimal vehicle load, when the rear part of the frame is raised, the headlights should be turned upward.
Repair of hydraulic corrector for VAZ 2110 headlights
Adjusting the light beam happens quite often, especially when the trunk of the car is heavily loaded; the light shines directly into the eyes of drivers of cars moving towards you. If the reflector has dropped and the adjustment does not work, our instructions will help you repair the headlight hydraulic corrector of the VAZ 2110; the repair will take very little time.
VAZ 2110 headlights Kirzhach - hydrocorrector repair
- Unscrew the headlight fasteners and remove them;
- We disassemble the headlights: carefully remove the glass, then the metal clips (6 pieces);
- Using a knife, clean the glass from the sealant;
- We cut off the convex profile (in the shape of the letter P) on the glass;
- Unscrew the screws (there are 3 of them) from the reverse side;
- Take out the paper reflector;
- Next to the hydraulic corrector hole inside the light housing there is a spring that must be removed;
- We perform the same actions with two plastic rosettes from two “turntables” securing the reflector.
Note: The hydraulic corrector ball snaps into a plastic groove, and the metal bobbin snaps into the second groove. It stops the adjustment, preventing it from being unscrewed further than itself. If you press the hydraulic corrector when adjusting the headlights, the metal latch will break. The ball will pop out of the plastic and then the headlight will “fall”;
- The repair will consist of replacing the broken latch with a gasket , which will not make it clear that the adjustment has reached the extreme position;
Broken iron latch of hydraulic corrector
Rubber gasket to replace a broken latch
- As a result, there is a high probability that the corrector will be compressed again;
- The correct solution is to improve the fastening by inserting a cotter pin made of solid wire between the petals of the plastic thing.
For the VAZ 2110, the repair of the headlight hydrocorrector has been completed. We assemble the headlights in the reverse order of disassembly. We first clean the old sealant, then apply a new one.
Second repair method
- We cut threads on the adjustment screws (metric 3);
- We screw them into the illuminator itself, then put on the washers;
- We take out the plastic fasteners;
- We put on the bar with the high beam and low beam modules located on it;
- We put a washer on top, a spring washer, and another washer on top of the spring. The use of a lock nut is recommended;
- We twist everything;
- We fix the structure using anaerobic sealant.
Replacement procedure
For inexperienced drivers, replacing the corrector often causes difficulties, as evidenced by numerous discussions on VAZ owner forums. And yet, changing the hydraulic corrector is not so difficult. This is done in this order:
- Fastenings. First you need to disconnect all the clamps securing the hydraulic corrector tubes to the body;
- Cabin management. Remove the corrector switch handle located on the panel in the passenger compartment. To do this, just pull it towards you;
- Space for renovation. In the VAZ 2110, repairing the headlight hydraulic corrector is difficult precisely because of the inconvenient location of the hole through which the corrector tubes are threaded. At this stage, the whole process “slows down” for many. To get to the hole, you need to somehow remove the antifreeze reservoir. You just need to clear the “approach” from above so that you can work;
- We take out the cylinder. Further repairs take place from the interior. On the panel you need to sharply pull the switch towards you (pull it off), it will come off. Then unscrew the cylinder using the “22” socket. Open the cover with the fuses located there and, pulling, pull out the cylinder so that it hangs on the hoses;
- We take out the hydraulic corrector. The hydraulic corrector has a latch for the actuator cylinder; you need to press it. Then turn clockwise until it stops (90°) and remove it from the socket. Do the same steps with the other headlight;
- Push it inside the cabin and remove the hydraulic corrector;
- The new corrector is installed in the reverse order;
- Control. Check how the new hydraulic corrector works. Be sure to test whether the new device changes the angle of the headlights. If the repair is successful, then the luminous flux will be optimal and obedient to your adjustments.
We repair the light fixture without disassembling it
You can snap the ball into place without removing the glass, through the holes of the light bulbs on the back side of the illuminator:
- We drill a hole exactly opposite the latch at the top of the headlight;
- Insert a screwdriver into the hole;
- Attach the collet to the corrector ball;
- We seal the hole we drilled;
- We attach a hinged loop from a furniture cabinet (hinges 5-6 centimeters long, with mounting holes and a cutout on top on which it is attached) to each broken corrector unit;
- We insert the canopy into the slot of the adjustment screw;
- We move the screw so that the slot is in a narrow place of the canopy;
- Holding the canopy, unscrew the screw until it stops with force. This is how the canopy is fixed, which needs to be placed in a horizontal position;
- Using an electric drill, using a 3 mm drill, we make a hole in the base of the light where there is a hole on the canopy;
- We screw a shortened screw into the hole so that it does not reach the high beam reflector. This slot secures the adjustment screw securely; it can be broken again.
Eliminating headlight shake
Many owners of the VAZ 2110 find that the light flickers when the car is moving. Such a breakdown most often occurs in Kirzhach headlights, but in Bosch parts such a breakdown rarely occurs. There is only one reason: reflector rattling. To eliminate light flicker, check:
- Is the reflector in place in the latch;
- The presence of an adjusting bolt rod;
- The emphasis is on the seating recess of the hydraulic corrector rod;
- We check the sagging of the thread (swap the high beam and low beam bulbs);
- Integrity of the tube in the hydraulic corrector (it may fray).
Adjustment algorithm
We sequentially perform the following:
- Cover the right headlight with cardboard or other material that does not transmit light;
- Turn the hydraulic corrector to the first position (I);
- Open the hood, find the screws used for adjustment, and turn them. At the same time, if the left headlight is adjusted, then it will be correct if its light at the top reaches the line N, and at the bottom – P;
- Having adjusted one, the adjustment of the other begins, closing the previous one.
Remember, if the headlights shine too low, they need to be raised, otherwise you may not notice the pedestrian in time, especially if there is slush on the street and he is wearing black clothes. If the light is set high, that is, you deign to raise them high, oncoming drivers will not thank you because you will blind them. Therefore, do-it-yourself adjustment on the VAZ must be done very carefully.
Replacing a VAZ 2110 headlight
Sometimes the entire headlight needs to be replaced. The work is done without any problems:
- Disconnect the negative terminal from the battery;
- We take out the radiator trim;
- Remove the block along with the wires;
- Press the latch of the hydraulic corrector cylinder and turn it clockwise 90 degrees until it stops;
- We take it out of the recess without disconnecting it from the hoses;
We take out the block with the wires, take out the hydraulic corrector
- We unscrew the bolts securing the headlight (shown in the photo with white arrows) and push the headlight itself back;
Unscrew the bolts securing the headlight
- We move the trim about four centimeters to the center of the car so that its hook comes out of the mount with the wing;
- To move the pad, loosen the tension of the bolts securing the buffer from above, push the buffer forward;
Loosen the screws securing the buffer
- We press on half of the lining so that the flange comes out of the mount, and take out the lining;
- Unscrew the nut securing the illuminator from the bottom;
Unscrew the nut from the bottom
- Disconnect the block from the turn signal lamp, pull the illuminator towards you and take it out;
- Unscrew the fastening screws to disassemble the illuminator;
- Separate the headlight from the turn signal;
Separate the headlight from the turn signal
- On the body of this pointer, unhook two hooks from the body of the optics part;
- We assemble in the reverse order to this and install the headlight assembly.
Congratulations! Do-it-yourself headlight replacement is complete, if anything remains unclear to you, I recommend watching the video on request VAZ 2110 headlight repair.
Preparing for adjustment
To get started, we recommend watching a video on adjusting headlights on a VAZ 2110. Training lessons will allow you to understand the nuances of the procedure in more detail and pay attention to the important points of the operation.
Everything is not as complicated as it might seem at first glance. First, prepare the car appropriately for adjusting the optics.
- Wash your car headlights to keep them as clean as possible.
- Examine the condition of the optic glass. In some cases you will have to polish it. The procedure is not complicated, but requires a careful and careful approach.
- Now check the reflector for defects or damage. If they are, it is better to immediately replace it with a new one.
- If the car has been in use for a long time, then the existing lamps are unlikely to be modern and highly efficient. Experts recommend using modern halogen bulbs, which do an excellent job of illuminating the road surface.
- Pay attention to the standard indicators specified in the owner's manual for your vehicle. Before adjusting the headlights on a VAZ 2110, you must: fill the fuel tank, inflate the wheels to the required levels, and check the spare wheel.
Having completed the preparation to obtain the necessary conditions, you can proceed directly to the settings.
Changing the type of optics (tuning)
Car enthusiasts often tune their car headlights to improve their appearance. High-quality tuning gives the car a fashionable look and beauty. If you choose the right accessory, the appearance of dozens will change completely . The most popular among car enthusiasts is tuning headlights in the form of tinting. It is carried out in a variety of ways that have virtually no effect on the brightness and quality of road lighting. Types of headlight tinting:
- Painting of the headlight mask;
- Glass painting;
- Glass tinting film.
The process of such tinting is best shown in a video. For those who don't want to paint or tint their headlights themselves, there are ProSport headlights. They are already sold in black or chrome. You just need to install them instead of the standard headlights. Only they cannot boast of high quality or bright light.
Depending on how loaded the vehicle is, the headlights can be directed higher or lower. To adjust the light flux, special devices are used - hydrocorrectors. If the car is loaded, the headlights should be turned down so that the flow of light is directed not upward, but onto the road. This ensures the necessary illumination of the road surface and prevents the driver of an oncoming car from being dazzled. In the case of a minimal vehicle load, when the rear part of the frame is raised, the headlights should be turned upward.
Rules for adjusting headlights
Often, adjustment of VAZ 2110 headlights takes place without removing such devices from the car. At a car service station, adjustment of VAZ 2110 headlights is carried out using stands on which there are markings applied to the individual car model. At home, setting up VAZ 2110 headlights requires a homemade template. It is made from sheets of plywood. If possible, markings are applied directly on the wall. The position of the devices is changed using 2 regulators. One of them is responsible for changing the position of the headlights horizontally, and the other vertically.
On a VAZ 2110 car, adjusting the headlights is necessary so that the flow of light from incorrectly adjusted devices does not blind drivers of oncoming cars. It consists of the main stage and several preparatory stages:
- preparation of the car, site and stand;
- inspection of adjustable elements;
- adjustment process.
Preparing the car, site and stand
Understanding how to adjust the headlights on a VAZ 2110, you also need to know about the rules for carrying out preparatory work:
- The reliability of the corrector's operation is checked.
- A flat area is selected on which the car is installed. It is first checked by level. Small slopes will result in significant errors when carrying out work. A good option would be a site located in front of the garage door.
- Knowing how to adjust the headlights on a VAZ 2110, in order for the work to be done correctly, you need to fully fill the fuel tank, bring the tire pressure to normal, and place a person equal to the driver’s weight in the driver’s seat.
- Mark on a template or wall. To do this, a vertical line is drawn on it, corresponding to the projection of the car’s axis. Stepping back to the sides, draw 2 more lines that correspond to the centers of the car's headlights. The distance between them is 1108 mm. A horizontal line is drawn along the height of the center of the headlights. Stepping back 75 mm from it, another horizontal line is drawn.
Geometric indicators of the location of the cut-off boundary of the low-beam headlight beam on a matte screen, depending on the height of the headlights and the distance to the screen.
| Distance from the optical center of the headlight to the plane of the working platform n, mm | Nominal angle of inclination of the headlight beam in the vertical plane | Distance R from the projection of the optical center to the cut-off boundary of the headlight on a screen 10 m away, mm | |
| ang. min | percent | ||
| Up to 600 | 34 | 1.00 | 100 |
| From 600 to 700 | 45 | 1.30 | 130 |
| From 700 to 800 | 52 | 1.50 | 150 |
| From 800 to 900 | 60 | 1.76 | 176 |
| From 900 to 1000 | 69 | 2.00 | 200 |
| From 1000 to 1200 | 75 | 2.20 | 220 |
| From 1200 to 1500 | 100 | 2.90 | 290 |
Headlight intensity in low beam mode
| Headlight type | Luminous intensity in the direction of the optical axis of the headlight, cd, no more | Luminous intensity in direction 52 down from the left side of the light border, cd. no less |
| C:CR | 800 | 1600* |
| NS; HCR; DC; DCR | 950 | 2200* |
* In case of discrepancy between the parameters obtained with the engine not running, measurements are carried out with the engine running.
Headlight inspection
Before adjusting the headlights on the VAZ 2110 with your own hands, you need to work with the lighting devices:
- Using a detergent, all dirt is washed off the glass.
- The headlight is inspected visually. If scratches are noticeable on it, they are removed by polishing. It is better to carry out such work at a service center.
- Lenses and reflectors are also checked. If they have cracks, they must be replaced.
- If the lamps have been in use for a long time, they are replaced with new elements. When installing light sources, you should not use high-power lamps. This is accompanied by excessive heating of the unit, which leads to its breakdown.
DIY adjustment process
The instructions provide a step-by-step process on how to adjust the headlights on a VAZ 2110 with your own hands:
- To carry out the correct adjustment of the VAZ 2110 headlights with your own hands, the distance from the stand to the location of the car must be 5 m. The car is located at right angles to the markings.
- Instead of the driver, a load weighing around 75 kg is placed on the front seat. The assistant driver can also sit in this seat if he has the same weight.
- To properly adjust the headlights of the VAZ 2110, it is necessary to install the springs and shock absorbers in their natural, working position. This is done by rolling the car by the wing.
- The hood opens. The right headlight is covered. The corrector is set to position 1.
- Before lowering the headlight on the VAZ 2110, you need to find the adjusting screw. If the device shines upward, then it must be lowered by rotating the screw until the beam of light hits the second horizontal line. When the beam is strongly lowered, it, on the contrary, requires lifting.
- The same manipulation is carried out with the right headlight.
Location of adjusting screws and sections on the left headlight unit: 1 - screw for adjusting the light beam in the vertical plane; 2 — screw for adjusting the light beam in the horizontal plane; 3 — cover of the high beam section of the headlights; 4 — cover of the low beam section of the headlights.
Note. On the right headlight, all elements are located symmetrically.
To understand how to adjust the high beam headlights on a VAZ 2110, you need to use another instruction:
- The car is also installed from the stand at a distance of 5 m.
- The regulator is now fixed in position 4.
- The adjustment is carried out according to the same principle as for the low beam. The difference is that the beam is directed 25 mm below the top horizontal.
Screen layout diagram for adjusting headlights on a car
- A - vertical line indicating the location of the low beam lamp of the left headlight;
- B — vertical line indicating the location of the low beam lamp on the right headlight block;
- C - horizontal line indicating the location of the low beam headlights;
- D - line indicating the height of the rise of the horizontal border of the light beams;
- O - center line;
- l — distance between low-beam headlight lamps;
- A is the distance from the surface of the site on which the car is installed to the low beam headlights.
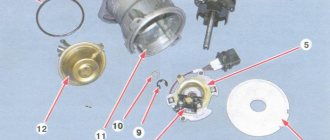
Design of headlight hydraulic correctors
As a rule, the following components are included in the design of a hydraulic corrector:
- master cylinder mounted on the dashboard;
- actuator cylinders mounted on the headlights;
- connecting pipelines that are fixed with clamps;
- working fluid with increased frost resistance.
Typically, hydraulic correctors are made in the form of a non-removable structure that cannot be repaired. Therefore, if, for example, the hydraulic corrector of the VAZ-2114 headlights fails, it is repaired by replacing it with a new set.
The manufacturer provides a maximum operating pressure in the normal state of the corrector. To direct the luminous flux of the headlight downwards, the pressure in the system is reduced, as a result of which the actuator cylinder rod is retracted and the optics are rotated downwards. Thus, most of the time the device is under increased pressure.
Quite often, when temperature changes occur, especially in winter, the structure of the seals is damaged due to the poor quality of the rubber, which leads to leakage of the working fluid. In turn, this leads to jamming of the cylinder pistons in one of the positions.
Structurally, all hydraulic correctors that are installed on VAZ vehicles are made according to a similar design, with the exception of some differences in size, layout of cylinder fastenings and pipelines. Today the following modifications of hydraulic correctors are supplied to the market:
- “2105-3718010” - for VAZ 2105-2107;
- “2108-3718010” - for VAZ 2108-21099;
- “2110-3718010” and “2110-3718010-10” - for VAZ 2110-2112;
- “2114-3718010” - for VAZ 2113-2115;
- “21213-3718010” - for 21213 “Niva”.
What does a hydraulic corrector consist of and how does it work?
The design of the adjustment device is non-separable and simple; the hydrocorrector of the Lada Granta headlights consists of the following elements:
- the main cylinder located under the dashboard;
- a working cylinder located on each headlamp;
- reflector regulating mechanisms;
- connecting components.
A knob for controlling modes is displayed on the instrument panel, helping the owner change the pressure in the master cylinder. A change in pressure causes the reflector to rotate, and therefore the direction of the light flux.
The peculiarity of the hydrocorrector is its tightness and closedness. If a visual inspection reveals places where fluid is leaking or there are cracks, the connecting tubes require replacement.
The change in pressure in the main cylinder is transmitted to the working elements, causing the pistons to rotate, changing the angle of inclination of the reflector. Electrical correctors operate using on-board electricity and therefore do not depend on the ambient temperature. More reliable devices of this type are more expensive.
Operating principle of the VAZ 2110 hydraulic corrector
The corrector works on a fairly simple principle. The driver, by switching the knob located on the instrument panel, changes the fluid pressure in the main cylinder, which is immediately transmitted through the connecting tubes to the working mechanisms. In the cylinders located in the headlight units, this leads to a change in the length of the rods rigidly connected to the pistons. The rod pushes the lever, which exerts force on the reflector, which as a result takes the corresponding position.
All this happens when the system is closed and sealed. In the event of depressurization, the headlight hydraulic corrector stops functioning.
Manual headlight adjustment
How to repair a hydraulic corrector on a VAZ 2110 – 2115
Repair of the VAZ-2110 headlight hydraulic corrector is not provided by the manufacturer. Therefore, if it fails, the entire device, complete with pipelines and cylinders, is replaced.
If the angle of inclination of the optics is not adjustable when the vehicle load changes and it is not possible to achieve the optimal luminous flux using the adjusting screws on the headlights, you should check the functionality of the corrector as follows:
- First of all, it is necessary to inspect the device for the integrity of the pipelines and the absence of liquid leakage.
- If after these measures no malfunction is detected, we proceed to checking the performance of the actuator cylinders. To do this, remove them from the headlight unit and measure the stroke of the rods. Normal operation of the cylinders is ensured when the rod stroke is within the range of 6.5-7.5 mm.
- Since repair of the VAZ-2110 headlight range control is not structurally provided for, we replace the non-working device with a new device included in the kit.
Instructions for installing headlight range control yourself
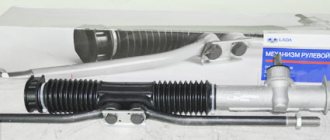
Do-it-yourself preparation and installation of electric power steering on a VAZ 2110
If the system breaks down, the device must be removed and repaired. If the mechanism cannot be repaired, it may need to be replaced.
Brief instructions on how to install an automatic corrector with dismantling the electromechanical device (using the Halla model as an example):
- First of all, the electromechanical corrector is removed and removed.
- Next, you will need to slightly enlarge the technological hole for installing an automatic device, if the dimensions do not match and this is necessary.
- The new socket for fixing the device should be secured with glue or sealant.
- After this, the device is installed in the mounting location.
- The connection diagram for the headlight range control involves the use of ground clearance controllers; we mount them on the rear of the underbody.
- Now all you have to do is install the wiring from the sensor; for this you can use existing tubes. The control module is mounted in any convenient place and connected to the battery.
Adjusting the headlight range control rod
Sometimes a malfunction of the headlight adjustment system can be caused by a misalignment of the adjustment lever with the lampshade rod. Therefore, if, for example, the hydrocorrector of the VAZ-2112 headlights does not work, do not rush to repair it by replacing it. First, make sure that the connection between the lever and the rod matches the operating position.
The rod of the corrector actuator cylinder rests on the lever, which, in turn, acts on a similar rod rigidly fixed to the headlight dome. The lever passes through the adjusting bolt, which is its fulcrum. The adjustment mechanism works on the principle of a swing. The corrector swings the lampshade, and the adjusting bolt allows you to raise or lower the support point of this swing. If the bolt is turned to the maximum position, the reverse end of the lever in the form of a ball may slip out of engagement with the lampshade rod.
In order for the VAZ-2115 headlight hydraulic corrector to work again, the device must be repaired by returning the lever to a special recess on the rod. To do this, first tighten the adjusting bolt until it stops, then press the lampshade down and insert the lever ball into the desired position.
Repair without replacing the corrector
The hydraulic corrector should be replaced only in case of fluid leaks. Also if it cannot push the slave cylinder, for some reason. Most often due to faulty tubes. But sometimes the cause of failure is not the cylinder itself. Then repairs can be made without replacing this part. The correction mechanism itself is located in the headlight unit. It consists of:
- Metal ball;
- Plastic clip;
- Bobbins;
- Limiting groove on the headlight housing;
- Return spring.
The working cylinder, resting against the bobbin, moves the ball along the groove, thus lowering the headlight. When the cylinder piston moves back to its original position, the spring pushes the cage with the ball back. It often happens that during adjustment a plastic part cracks or a spring bursts. This can be easily fixed without replacing the entire system.
To do this you will have to remove the headlight. Remove the light bulbs from it. Remove the glass. It is attached with sealant and 6 metal clips. Next, the spring is removed from the reflector and, after unscrewing a couple of screws, it is removed. After this, the damaged parts are replaced. Reassemble in reverse order.
Replacing the hydraulic corrector for VAZ 2110, 2111, 2112 headlights
Replacing a faulty corrector yourself is not difficult. The replacement sequence is as follows:
- unscrew the screws securing the pipeline clamps to the mounting brackets;
- remove the handle from the master cylinder;
- Unscrew the nut securing the master cylinder to the dashboard;
- We disconnect the actuator cylinders from the headlamp;
- we push the actuator cylinders together with the seals inside the cabin;
- install the new unit in reverse order.
Many car enthusiasts, instead of the standard hydraulic corrector provided by the manufacturer, install a more practical and efficient electric headlight corrector. Its difference from a hydraulic device is that electric motors are used as a drive. For VAZ cars, a standard electrical corrector of the Silich-Zenit series is provided. It is easily mounted in the same places as a conventional hydraulic corrector. The installation procedure for the electrical corrector is as follows:
- disconnect the negative terminal from the AC;
- turn the master cylinder counterclockwise and remove it;
- replace the o-ring;
- install the electric corrector in place of the main cylinder;
- dismantle the master cylinder lever in the cabin;
- We connect the positive terminal of the corrector to the socket of block No. 20;
- We attach the negative terminal to one of the body studs under the dashboard;
- we lay the corrector wiring instead of pipelines or along the power supply harness;
- connect the corrector's electrical wiring to the actuators;
- connect the negative terminal to the battery;
- We check the functionality of the corrector.
After installing the corrector yourself, you will have an idea of how this device works. If necessary, repairing the electrical corrector will not be difficult.
Installation of electric corrector
The hydraulic corrector is not very reliable. Therefore, many car enthusiasts replace it with an electric analogue. This is done as follows:
- The battery turns off;
- Next, the hydraulic corrector is dismantled;
- A new seal is installed;
- Remove the corrector adjustment knob and connect a new electrical device to it. To do this, use the key 22;
- Connect the positive wire to the mounting block, you need to connect to socket 20, block Ш2;
- The minus is attached to the nearest body stud;
- A new actuator is installed in the headlight unit;
- The wires can be pulled along the location of the old tube;
- The pads are connected to the main mechanism. The operation of the device is checked.
An electric corrector costs slightly more than a regular one. But it is more reliable. You won't have to replace this part with a new one every few months.
Conclusion
. Proper operation of headlights is extremely important for traffic safety. Thus, the work of a proofreader is a necessity. Repairing the headlight hydraulic corrector on a VAZ 2110 with your own hands is within the capabilities of every motorist. Some difficulties are more than compensated for by travel comfort.
Features of restoration of hydraulic correctors for VAZ 2107—2109
As a rule, on cars of the VAZ 2107-2108 series, a manual hydraulic headlight leveler is installed. With it, the driver can manually change the direction of the light flux depending on the load of the car, moving the headlights up or down within small limits.
The design does not provide for repair of the VAZ-2107 headlight hydraulic corrector, therefore, if it fails, it is replaced with a new device. The only thing you can try to do if it is impossible to adjust the angle of the headlights is to adjust the operation of the corrector in the order indicated above.
There are no fundamental differences in the optics adjustment device in the “nine” compared to other models. Therefore, the VAZ-2109 headlight hydraulic corrector is repaired using the replacement method.
>
How to repair a device
During the DIY repair process, you will need to make some parts and consumables yourself.
Tools
From the tool you need to prepare:
- Screwdrivers.
- Metalworking machine.
- Plastic dowels that will serve as a cap.
- Washers.
- Anaerobic sealant.
Description of the repair process with photos
Repairs vary depending on the type of fault. In most cases, factory headlight mounts are replaced with homemade ones, and the cylinder rod is also lengthened .
- We cut the metric thread into 3 on the adjustment screws.
The adjustment screws have metric threads.
Remove the plastic fasteners from the hydraulic corrector bolt
Using 2 washers and a spring, we make a reliable mount for the hydraulic corrector
How to extend the stem
If you want to expand the lighting of the road next to your car, it makes sense to lengthen the rod. This will allow you to change the position of the headlight. You will need to use a plastic tip 7-8 mm long. We recommend using a regular dowel of a suitable diameter. It is secured to the top of the stem with glue or sealant.