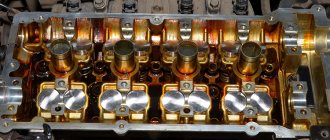
DSC_9815_cr
Remove the low beam lamp from the headlight housing.
Attention! Low and high beam lamps are halogen. Do not touch their glass bulb , as fingerprints will cause the lamp to darken when heated. You can remove dirt from the flask with a clean rag soaked in alcohol.
We install the new H7 lamp in the reverse order.
To replace the high beam lamp, turn and remove the cover located closer to the side of the car.
Step-by-step instruction
The right and left lamps change according to the same principle, but there is a slight difference. It is better to replace the low beam on the left by removing the battery. This will make it easier to get to the headlights in the engine compartment.
Running lights
On the Lada Vesta, these lamps are combined with side lighting and have two spirals. One of them has a power of 21, and the other - 5 watts.
- To remove the running light, turn the cartridge body counterclockwise. There is a flag on the chuck for rotation. See the direction of rotation when looking from behind the headlight.
- Pull the cartridge out along with the connected wires.
- Remove the burnt out bulb and insert the new one as far as it will go.
- Inspect the rubber seal on the cartridge. If it is damaged, replace it with a new one, otherwise dust and dirt will get inside the headlight.
- Install the chuck and turn until it stops.
Turn signal lamps
On Vesta, the turn signal bulbs have a single spiral with a power of 21 watts.
- Similar to the running lights, rotate and remove the socket.
- Push the bulb in, then twist and pull it out of the socket.
- Insert a new one, making sure that the protrusions coincide with the grooves of the cartridge.
- Check the serviceability of the rubber gasket, replace if necessary.
- Install the cartridge.
The glass of the turn signal light is orange, so it needs to be replaced with a similar model.
What kind of bulbs are in the headlights?
Which bulbs in the headlights of Vesta and XRAY are indicated in Appendix No. 2 of the car’s operating manual:
- high beam lamp - H1;
- low beam lamp - H7;
- turn signal lamp - PY21W;
- Vesta's DRL and parking light lamp is W21/5W. The XRAY DRLs have LEDs; if they burn out, you will have to replace the headlight assembly.
- fog lamp (FTF) - H16
- Brake and side light lamp - P21/5W
- reverse lamp - W16W
- rear turn signal lamp - WY16W (Vesta), PY21W (XRAY)
- rear fog lamp XRAY - W21W
- turn signal lamp in the outside rear view mirror XRAY - WY5W
- license plate lamp - W5W
- glove compartment lamp - W5W
- trunk light bulb - W5W
- front door threshold lamp - W5W
Installing LEDs in DRLs on Lada Granta
In accordance with the regulations on the operation of vehicles, every car on the road must be marked with a daytime running light or low beam headlights if there is no daytime running light.
This is done, first of all, for safety, because even under conditions of excellent visibility, the running lights of a car traveling in traffic attract the attention of other road users, reducing accidents on the road. Lada cars of the entire model range are standardly equipped from the factory with a running light, most often this is an ordinary incandescent lamp located in the headlight unit or designed as a separate module
Lada cars of the entire model range are standardly equipped from the factory with a running light, most often this is an ordinary incandescent lamp placed in the headlight unit or designed as a separate module.
Another important parameter for many is that LEDs have a pure and white tint; the installation of LEDs or lighting devices other than yellow or white is prohibited by the regulations on the operation of vehicles. The use of unauthorized lighting equipment may result in deprivation of the right to drive a vehicle and sending it to a parking fine.
The peculiarity of the daytime running light of the Lada Grant and Lada Kalina is that the wiring uses a rather rare pinout of the SRSK connector, which is used more in imported cars.
As a result, good lamps that we would advise you to install are very expensive, sometimes tens of times more expensive than an incandescent lamp. However, if the price does not scare you, choose high-quality lamps with an appropriate power supply and install them according to the instructions.
It is not safe to use lamps of a different power supply principle for car wiring and they will not work correctly or will not work at all.
The new lamp is inserted tightly until it stops.
The peculiarity of the SRSK pinout used on Lada cars is that the “plus” and “minus” of the power supply are located separately from each other on each side and if the lamp is not bipolar, then it will only work if it is installed on a certain side. We advise you to turn on the side light so as not to make a mistake when installing a new lamp; if installed correctly, it will work immediately.
On the driver's side, replacing the lamp is complicated by the presence of an air filter housing in front of the lamp base, but this will not make the process much more difficult.
Pull up the rubber mushrooms that secure the filter housing to the housing and move it to the side, providing access to the lamp base. The replacement process itself is similar to the lamp on the other side.
But the qualitative improvement in lighting is especially noticeable when working in the dimensions mode. LED lamps are more than 300% more efficient in this operating mode. It is difficult to overestimate the contribution to safety when a car is on the road with a side light clearly indicating it.
At the same time, the load on the on-board power supply network has decreased significantly. If a standard incandescent lamp consumes one 21 Watt of power in daytime running mode, then a brighter LED lamp consumes only 7 Watts, which is only 2 Watts more than the consumption of incandescent lamps in the side light mode.
(2 ratings)Loading…
Replacement instructions
Replacing the left and right bulbs is done in the same way, however, for the convenience of performing the operation on the left side, it is recommended to disconnect and remove the battery.
Reinstalling the daytime running lamp
- To dismantle the daytime running light bulb, you need to turn the socket in a counterclockwise direction, using the special flag that is attached to it.
- After this you need to remove the cartridge.
- We take the lamp out of it and attach a new one.
- We perform the reverse steps, sealing the cartridge with a gasket; if the gasket is damaged, it should be replaced with an analogue one.
Reinstalling the turn signal lamp
- Also, using the flag, we turn the cartridge in a counterclockwise direction.
- We take it out, then you need to press the light bulb and scroll it counterclockwise, then remove it.
Light inside turn signals
The turn signal light of the Lada Vesta is built into the socket, so before you begin replacing it, you need to turn it to the left and then carefully pull it out. To do this, use a flag attached directly to the cartridge. To unscrew the light bulb itself, you need to press it a little and at the same time turn it counterclockwise. It will come out of the socket, and you can install new lighting. After replacing in the reverse order, the cartridge must be secured with a sealing gasket. After replacing any light bulb in the headlight unit, it is recommended to check compliance with the technical instructions. If necessary, lighting should be adjusted.
DRL lamps and dimensions
The 2180's daytime running and side lights use LED bulbs. Their undoubted advantages include high brightness and low electricity consumption. This allows you to significantly reduce the load on the car's generator. LED lights are resistant to impacts: shaking, vibration on the road.
The rear light has lamps:
• dimensions on the trunk - W5W • dimensions - 5W • brake light - P21
To replace burnt out tail light bulbs:
- Disconnect the ground;
- We gain access to the headlight by unscrewing part of the inner trunk lining opposite the rear lights;
- We disconnect the wires from the cartridge we need, remove it by turning clockwise;
- We remove the burnt out light bulbs;
- The entire rear optics are removed after unscrewing the fastening nuts with a size 8 wrench.
- Reassemble in reverse order.
What lamps are installed in the PTF Lada Vesta
The fog lights of Lada Vesta use lamps with an H16 socket, 12 volts, and a power of 19 watts. The manufacturer installed lamps from the manufacturer Osram, but lamps from other manufacturers can be installed, the main thing is that the base is H16.
Manufacturer Article number Cost, rub.
OSRAM64219 L750Philips12361C1550MTF LightHS1216650
All of the bulbs listed above are suitable for replacement in “foglights” on Vesta. In addition to ordinary lamps, you can install LED lamps with an H16 socket. But with all this, you need to be careful and it is better to consult with a specialist in advance about whether it is possible to install a certain LED lamp in your “fog lights”. Often, incorrectly selected LED lamps blind other road users.
Replacing the side light bulb of Lada Vesta
Replacing the side light bulb on a Lada Vesta is also not particularly difficult and can be done in just one minute.
We find the size lamp socket in the headlight unit. We turn it counterclockwise by the special flag and take it out.
We take out the burnt out light bulb and insert a new one in its place. For replacement, a W21/5W type lamp is used.
Replacing the turn signal lamp on a Lada Vesta is carried out in a similar way, so we will not describe this procedure in detail. Just see the photo below.
Lamps used on the vest
All optics on the Lada vesta comply with established international standards and perfectly complement the appearance of the car. As mentioned earlier, halogen bulbs of standard H1 and H7 are used for high and low beam. The H7 model is 20% brighter than the H1, but their light output does not blind oncoming drivers.
Daytime running lights for Lada vesta use 5W, and side lights use W21. These are baseless two-pin incandescent lamps. The brake light also shows a two-pin light fixture, but with a metal socket. The model of this lighting fixture is P21. Reverse gear is indicated by the W16W lamp. The most commonly used lamps for 2180 are Osram, BOSCH, and Philips. You can purchase them yourself in spare parts stores, and then replace them without turning to service centers. This will significantly reduce the time and money spent on servicing the 2180 car.
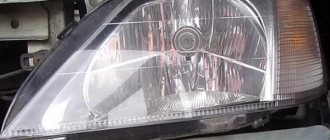
Reasons for dim headlights on Vesta
Over time, the headlights on the Vesta no longer illuminate the road as well as before. Wiping the headlamp itself from splashes, dust and dirt, which has already become habitual, does not give any tangible result.
PTF lenses
Below are the main reasons why the headlights on the Lada Vesta dim:
- Lamp aging. Tungsten, the material from which the filament is made, gradually evaporates and settles on the walls of the lamp, which greatly affects the brightness. The inside of the light bulb is filled with gas - halogen, which prevents clouding, but up to a certain point. In this case, it is possible to improve the light on Vesta only by replacing the lamp with a new one.
- Damage to the headlight reflector. The manufacturing plant very accurately calculates every aspect of the car's operation, including how bright the headlights should be. When installing headlights that are not intended for a given car (xenon is now popular), over time the reflector (the device responsible for forming a powerful beam of light) loses its shine, and the headlights sharply lose their former brightness. In this case, only installing a new headlight will help improve brightness.
- The headlight reflector is dirty. Occasionally, depressurization of the headlight unit itself may occur, with further particles of dust and dirt getting inside, which leads to clouding of both the reflector and the glass itself. In such situations, the inside of the headlight is cleaned with a warm soapy solution, which has a positive effect on improving the light on the Vesta.
- Cloudy glass. Glass is now rarely used by automakers; plastic is more often used. Due to frequent mechanical microdamages (flying dust, dirt from under the wheels of the car in front, and simply wiping the headlights), the plastic material wears out, gets scratched, becomes yellow and cloudy. Specialized polishing of the headlights at a car service center will help you cope with this problem, after which they will become as good as new.
- Poor electrical contact. This happens extremely rarely, but it is also worth mentioning. Corrosion of electrical connections causes a significant loss of power output, and lower voltage reaches the lighting fixture than intended. As a result, the light bulb burns a rich yellow light and is much less bright. In such cases, cleaning all contacts and connectors will help increase the brightness of the headlights.
Any reason for the dim light of the lamps can be eliminated either by cleaning (polishing) the already installed spare parts, or by replacing them with new ones.
Owner reviews
| № | Positive |
| 1. | Dmitry Vasilyevich , 41 years old (drive2.ru): the car is three years old, the low beam relay, lighting fixtures have never been changed, they work as usual. |
| 2. | Georgiy , 39 years old (prom.ua): VAZs have good lighting, before Vesta I had a Granta, so I have something to compare with. |
| 3. | Kirill , 28 years old (autotoday.com): after the winter, the glass of the optics began to fog up, I changed the seals, the problem disappeared. |
| 4. | Maxim Petrovich , 44 years old (rozetka.ua): The BS is good, but the long-range one is rather weak. On the recommendation of my friends, I installed halogen lamps. I'm pleased with the quality of lighting. |
| 5. | Petr Nikolaevich , 43 years old, (avtoflit.com): my positive review of the standard lighting system, no complaints. |
| 6. | Sergey Mikhailovich , 41 years old, (autotoday.com): This is my second year driving a Lada Vesta, there are no comments on the lighting. I have heard complaints from drivers that the BS often does not work and the lights do not turn on. I believe that the reason is failure to comply with maintenance deadlines. |
| 7. | Kirill Stepanovich , 30 years old, (drive2.ru): I’m pleased with the standard lighting system of the model, the road surface is widely visible, covering the edge of the curb. |
| Negative | |
| 8. | Mikhail Stepanovich , 39 years old (prom.ua): in the second year of using the car, the low beam suddenly stopped working. It turned out that the cause was a fuse that had blown. |
| 9. | Stepan Nikolaevich , 40 years old, (avtoflit.com): extremely dissatisfied with the optics, the BS is weak. On the recommendation of my friends, I installed additional lighting. |
| 10. | Sergey Mikhailovich , 43 years old, (drive2.ru): after driving through puddles, the BS disappeared, the technicians quickly found the cause - the relay. |
| 11. | Semenovich , 39 years old, (autotoday.com): after two years of using the car, he replaced the lamps with imported ones. The quality of domestic ones still lags behind their foreign analogues. At times the light glitched, dimmed, and periodically disappeared. |
Replacing low beam bulbs on a Lada Vesta
Lada Vesta. Replacing lamps - part 1
For normal operation of the lighting and light signaling system, use the lamps specified in Appendix 2,
Note. You can replace the lamps yourself using the methods described below. If replacement seems difficult, it is recommended to contact your dealer.
Before replacing a lamp, make sure the associated signal light is turned off.
To remove the low beam lamp, do the following:
— remove cover 2 (Fig. 11) by turning it counterclockwise;
— disconnect the wire block 7 from the lamp;
— remove the antenna 8 of the spring clamp from the groove;
— Install the new lamp in the reverse order.
To remove the high beam lamp, do the following:
— remove cover 1 by turning it counterclockwise;
— disconnect wire block 6 from the lamp;
— remove the antenna 5 of the spring clamp from the groove;
— Install the new lamp in the reverse order.
To remove the turn signal lamp, do the following:
— turn socket 4 counterclockwise and remove it from the seat assembled with the lamp;
— remove the lamp from the socket by turning it counterclockwise;
— Install the new lamp in the reverse order.
To remove the daytime running light and side light bulbs, do the following:
— turn socket 3 counterclockwise and remove it from the seat assembled with the lamp;
— remove the lamp from the socket;
— Install the new lamp in the reverse order.
Rice. 11. Headlamp
Replacing the turn signal and brake/side light bulbs on the exterior fender light.
To replace the turn signal lamp 4 you must:
— open the trunk trim hatch located in the rear light installation area, providing access to the socket connector 4 of the turn signal lamp;
— turn patron-connector 4 counterclockwise and remove it from the seat assembled with the lamp;
— remove the lamp from the socket by pulling it towards you.
Reinstall the cartridge connector in the reverse order.
To replace the brake/side light bulb 3 you must:
— open the trunk trim flap located in the rear light installation area, providing access to the socket-socket 3 of the brake signal/side light lamp;
— turn the socket-socket 3 counterclockwise and remove it from the seat assembled with the lamp;
— remove the lamp from the socket by turning it counterclockwise.
How to change the lamps yourself?
Before you start replacing lamps in Lada Vesta, you must study the separate instructions for each lamp. Different lamps are replaced in different ways because the mounts and sockets are different.
Failure to follow the recommendations may cause breakage of the fragile plastic elements of the headlight unit. By the way, the instrument panel can report a malfunction of some lamps. For example, about problems with brake lights.
There is no need to remove the bumper and terminals from the battery!
If after replacing the lamp the lamp still does not turn on, then it makes sense to check the fuses.
Replacing headlight bulbs
In the front headlight unit, the procedure is performed as follows:
- Low beam - remove the rubber plug (closer to the center). Disconnect the electrical connector and bend the spring clip. After this, the old light bulb is pulled out, and a new light source is installed in its place.
- High beam - dismantled in the same way as in the low beam. However, the light source itself is closer to the edge of the car. There will be only one terminal on the electrical connector.
- There is a separate socket for the turn indicators on the headlight. To remove it, you need to turn the plastic flag counterclockwise. Then pull out and dismantle the light source, turning it inside the socket in the same way. Installation of a new spare part is carried out in the same way as removal, only in the reverse order.
- DRL. The Lada Vesta car has a combined side light with daylight. The lamp is double-filament. To replace it, you need to do the same manipulations as with the light source in the direction indicators.
There is no need to remove the headlight from the car. The most important thing is not to touch the glass flask with your hands so as not to leave greasy marks. Otherwise, the lamp will not last long.
How to change light bulbs in PTF?
If the equipment supports the presence of fog lights, then the lamps in them will have to be changed. This is a little more difficult to do than with a block headlight. It is better to use a lift, pit or overpass for these purposes. The procedure is performed as follows:
- Turn the wheel in the opposite direction from the faulty PTF.
- Remove the plastic “hatch” on the fender liner.
- To remove the PTF lamp, you need to turn it counterclockwise and then remove the connector from it.
- Installing a new light source is performed in the reverse order.
If desired, this operation can be performed without using a pit or lift.
Side turn signal
It is installed in the side rear view mirror. To remove it, there are two ways. First, dismantle the mirror element and unfasten the trim fasteners from the inside or immediately remove the mirror trim.
It is recommended to use a plastic tool to avoid scratching the paintwork and damaging the parts. Everything should be done extremely carefully. After removing the mirror covering, you need to pull out the repeater lamp. Next, forcefully remove the socket and the old lamp and install the new one in reverse order. After this you need to assemble the mirror.
If the cladding falls into place with gaps, it is recommended to remove them using double-sided tape around the perimeter of the mirror.
The process of replacing bulbs in the taillights
They are located on the sides of the trunk and its lid. Therefore, replacing light bulbs is divided into separate stages:
- In the wing. It is necessary to remove part of the trim covering the rear light. Then grab the desired connector and turn it to the left together with the socket. Remove it from the lamp socket and replace the lamp by simply removing it from the socket. The sources of the side lights and brake lights change in a similar way.
- In the trunk lid. You need to remove the clips on the cover. After this, the decorative cladding is dismantled. There are two cartridges installed here - for clearance and reverse. To remove both lamps, the sockets must be turned counterclockwise and pulled out. To replace the reverse lamp, simply turn it to the left and pull it up. As for the size, the light source is simply removed from the base, and a new one is installed in its place.
Number plate illumination
Everything is much simpler here - using a plastic tool, remove the lamp from the trunk lid by prying it off from the left. Then turn left, remove the old light source and install the new one. It does not have a base and can be removed by simply pulling it up.
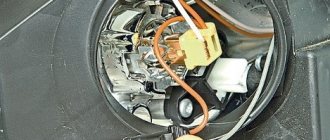
Interior lighting
The front and rear lamps are non-separable, as they have solid LED boards.
The lamps in them can only be changed by re-soldering, but in other cases the lamp is changed entirely. To do this, it is necessary, for both the front and rear lamps, to remove the lining, unscrew the fastening screws and dismantle the lamp. After this, remove the electrical connector and install the new lamp in the reverse order.
To replace the lamps in the glove compartment lighting and luggage compartment lamp, you need to pry the lamp with a flat screwdriver. Then carefully remove and replace the faulty lamp by simply removing it from the base.
Head optics Lada Vesta
To replace the main lighting of the Lada 2180, daytime running lights and dimensions, you will need to dismantle the headlights and front bumper. To do this, first remove the bolts and screws of the bumper. After removing the bumper, loosen the clamp on the negative terminal of the battery using a 10mm wrench and turn off the electricity completely. The last step before replacing bulbs is to remove the headlights. To do this, unscrew the fixing bolts and disconnect all the plugs. Afterwards, you can completely remove the headlight unit and replace the lamps.
Replacing Lada Vesta lamps - high beam, low beam, PTF. Instructions with photos and videos
Despite the fact that the Lada Vesta car is a new product in the domestic automobile industry and was released quite recently, it is structurally similar to most Korean cars. Even replacing the Lada Vesta lamps is similar and is performed in approximately the same way. To independently change the headlight bulbs on a Lada Vesta, you do not need to have any special skills, but just a little time and strictly follow our instructions with photographs.
- turn the cartridge (No. 3) counterclockwise;
- remove the socket together with the lamp;
- remove the lamp from the socket by turning it counterclockwise.
To remove the lamp:
- turn the cartridge (No. 4) counterclockwise;
- remove the socket together with the lamp;
- remove the lamp from the socket.
The process of replacing lamps is also shown in the video:
Installing new lamps in the headlight is done in the reverse order. Have you ever had to change the bulbs in the Vesta/XRAY headlights? What difficulties did you experience, perhaps did you notice any peculiarities during the work?