Tuning and repair of VAZ 2110
In this article we will look at such a process as removing the VAZ 2110 radiator fan. Why remove it? Well, there can be many reasons - starting from problems with the fan itself, ending with getting to the radiator.
What will be required for such a repair? Just a 10mm wrench and a Phillips screwdriver.
First of all, we prepare the car for removing the fan, for this:
- We partially drain the antifreeze so that you can unscrew the upper radiator pipe and prevent coolant from flowing out of it.
- Unscrew the terminals from the battery and remove it.
- We tear off the air filter housing from the rubber clips. For convenience, so that it does not interfere at all, unscrew the clamp of the pipe connecting to it and disconnect the folded corrugation from below.
4. Disconnect the fan power terminal.
5. Next, we will need an open-end or socket wrench “10”. Unscrew the nut of the lower fan mounting.
6. Now the top one. (In some VAZ 2110 models there are 2 nuts for fastening the fan. In 16-valve models there is one nut at the top and on the side).
7. Next, loosen the clamp on the upper radiator pipe and remove the pipe.
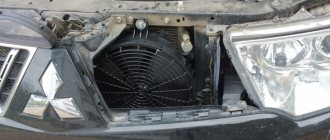
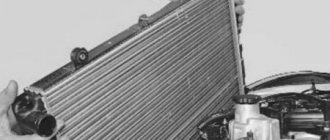
8. Now you can lift the fan up.
This completes the process of removing the VAZ 2110 radiator fan.
Next, let's look at the process of disassembling the radiator fan.
For this type of work, in addition to a “10” wrench and a screwdriver, you will need a “13” wrench.
- Using a 10mm wrench, unscrew the fan motor from the plastic casing.
2. Remove the clip that holds the wiring harness.
3. Next, using a “13” wrench, unscrew the impeller fastening nut. At the same time, hold the impeller so that it does not rotate.
So we removed the VAZ 2110 radiator fan from the car and disassembled it.
Source
Replacing the cooling fan and radiator on VAZ 2110, VAZ 2111, VAZ 2112
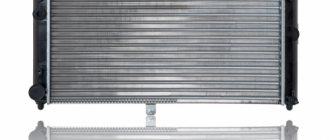
The engine cooling fan plays a very important role, since it cools the radiator, which in turn circulates coolant through the system and all of this together is a cooling system, but the fan sometimes fails, and the radiator sometimes gets punctured by pebbles, which causes it to start Coolant leaks and it needs to be replaced.
We recommend: How to remove the instrument panel on a VAZ-2114 in 12 steps? Features and detailed instructions
Note! To replace both of these units, you will need to stock up on: Wrenches, as well as a socket wrench, in addition, you will need a small container (it should be wide) into which you will drain the coolant from the radiator of the cooling system, and you will also need a screwdriver!
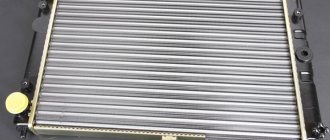
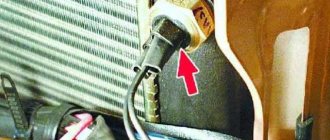
Where are the radiator and cooling fan located? Both of these units are located in the front of the car, you won’t be able to see them so easily, because they are large and therefore you can only see parts of them, for example, to see the fan you will only need to look under the TV of the car (The TV is its front part on which the headlights, bumper and other parts are located, the wings no longer belong to it) and you will see a fan thanks to which the car’s engine is cooled (For clarity, the fan is indicated by a red arrow, and the air filter housing has already been removed since it is very in the way review), and in order to see the radiator itself, you can also look under the same TV or look through the radiator grill (The radiator will be visible through it).
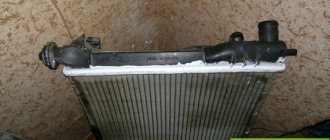
When do you need to change the radiator and cooling fan? The radiator, as mentioned earlier, needs to be changed when a hole or holes appear on it, which may appear due to a pebble getting into it (this happens through the radiator grille) or due to strong pressure in the cooling system, which may appear due to a valve malfunction in the cap of the expansion tank or in the radiator cap, if these valves or only one valve fails, the pressure in the system increases, and therefore the increased pressure in the expansion tank (Tank cap valve has failed) will ultimately lead to the fact that the tank is in in the literal sense of the word, it will explode, as for the radiator relief valve, it is still located on the same cap (On the radiator cap we mean) and when this valve fails, the pressure in the radiator begins to increase, and therefore it begins to leak from all the cracks of the radiator The fluid and radiator will eventually (if you drive at high pressure for a very long time) become unusable.
Note! To prevent this from happening, change the radiator cap and the expansion tank cap once every year or two, buy these things after making sure that the valve works, and then in the future you will have fewer problems with this! (For information on how to check the functionality of the expansion tank cap valve, see the video below and always remember this thing: the valve must keep the pressure within 1.1 - 1.5 kgf/cm2 and then the cap can be said to be working properly)
A couple more words about the radiator, in fact, you can check whether there are holes in it or not, they are just usually small and it can be quite difficult to notice them, so in order to find them they use a very cunning method, which is as follows: Take the radiator and all the pipes that go from it and on which the hoses are put on are closed with plugs (you can close them with anything, the most important thing is to make the radiator sealed so that no water gets into it) and then lowered into water (in the bath is easiest), after Once the radiator is in the water, figure out how you can pump air into it, after you come up with an idea, supply air to the radiator at a pressure of 2 kgf/cm2 (You can pump this pressure into the radiator with a compressor, or you can try with a regular pump) and after that you will immediately you will see whether there are holes in the radiator or not (If there are, then air bubbles will come out from there), for clarity, how to check the radiator for serviceability, look at the video clip located just below:
Note! If the holes are small, then buying a new radiator does not make any sense, because small holes can be closed, for example, using a special substance that is sold in a car shop and which will need to be moved with coolant, this substance will clog into the hole and thereby prevent the penetration of liquid through it, also a not very large hole in the radiator can be removed by soldering or welding, but we do not recommend that you remove large holes, so in this case it is better to go to an auto store and buy a new radiator!
Work progress:
- Partially drain the coolant (to a level so that it does not flow out through the upper radiator pipe)
- Removing the battery
- Removing the air filter housing
Then you need to disconnect the electrical fan wiring harness connectors
After this, take a 10mm socket wrench and unscrew 1 fan mounting nut from the bottom.
Unscrew the 2 nuts of the upper fan mounting
- Loosen the clamp on the upper radiator pipe and remove the hose
- Now you can remove the fan
Heater fan replacement work
Please note that for self-removal you will need a certain set of tools.
Required tool:
- 10mm deep head;
- a Phillips screwdriver, regular and short;
- ratchet with extension.
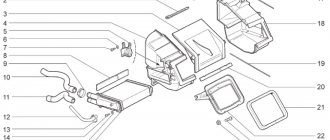
To get to the heater motor, you need to perform some preparatory steps, namely:
- Remove the wipers along with their arms.
- Remove the top plastic trim of the windshield (frill).
- Remove the hood seal and the insulation that covers the heater housing.
After this you should see the following picture:
To understand everything, it is better to watch the special video instructions that I prepared for this article. There are other videos on the network with detailed descriptions of the main stove breakdowns and how to fix them.
Disassembling the cooling fan
To disassemble the electric fan, do the following:
- Take a 10 mm socket wrench and unscrew the 3 nuts securing the electric motor to the fan casing
Next, use a screwdriver to pry up the wiring harness and disconnect it from the casing, then remove the casing itself.
Take a 13mm socket wrench and, holding the impeller with your hand, unscrew the impeller fastening nut
After this, remove the impeller itself
Installation is carried out in reverse order.
Source
Stories from our readers
“Fucking basin. "
Hi all! My name is Mikhail, now I’ll tell you a story about how I managed to exchange my two-wheeler for a 2010 Camry. It all started with the fact that I began to be wildly irritated by the breakdowns of the two-wheeler, it seemed like nothing serious was broken, but damn it, there were so many little things that really started to irritate me. This is where the idea arose that it was time to change the car to a foreign car. The choice fell on the melting Camry of the tenth years.
Yes, I had matured morally, but financially I just couldn’t handle it. I’ll say right away that I am against loans and taking a car, especially not a new one, on credit is unreasonable. My salary is 24k a month, so collecting 600-700 thousand is almost impossible for me. I started looking for different ways to make money on the Internet. You can’t imagine how many scams there are, what I haven’t tried: sports betting, network marketing, and even the volcano casino, where I successfully lost about 10 thousand ((The only direction in which it seemed to me that I could make money was currency trading on the stock exchange, they call it Forex. But when I started delving into it, I realized that it was very difficult for me. I continued to dig further and came across binary options. The essence is the same as in Forex, but it’s much easier to understand. I started reading forums, studying trading strategies. I tried it on a demo account, then opened a real account. To be honest, I didn’t manage to start earning money right away, until I understood all the mechanics of options, I lost about 3,000 rubles, but as it turned out, it was a precious experience. Now I earn 5-7 thousand rubles a day. I managed to get the car buy after half a year, but in my opinion this is a good result, and it’s not about the car, my life has changed, I naturally quit my job, I have more free time for myself and my family. You’ll laugh, but I work directly on the phone)) If If you want to change your life like me, then here’s what I advise you to do right now: 1. Register on the site 2. Practice on a Demo account (it’s free). 3. As soon as you get something on the Demo account, top up your REAL ACCOUNT and go to REAL MONEY! I also advise you to download the application to your phone, it’s much more convenient to work from your phone. Download here.
Let's look at these reasons in order, starting with the simplest:
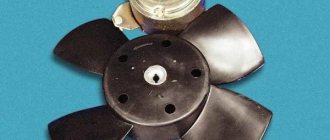
- The bolt that attaches the plastic fan itself to the motor pulley was simply unscrewed.
- The radiator is simply not inserted into its socket and the radiator lies on the suspension cross member.
- Part of the fan impeller blade broke off and as a result there was an imbalance. (replacing the fan impeller)
- Dirt on the impeller and, as a result, imbalance. (needs to be cleaned, washed)
- The cushions are compressed and do not hold the engine properly and there is vibration. (Change pillows, make rubber gaskets)
- The fan is making a loud noise and there is no lubrication. (lubricate the electric motor)
- Broken bearing. Usually due to an imbalance in the impeller, which has been vibrating for quite a long time. (replace bearing)
How to balance a fan impeller? Option 1: We wind the wire around the valve blades and see where the imbalance is stronger and gradually level it to conditional silence. Option 2: You need to insert an axis (for example, a drill) that exactly matches the diameter into the hole, place the impeller with its axis on 2 horizontal supports (the impeller between the supports), for example on 2 identical tables with space between them. If there is an imbalance and the impeller constantly strives to occupy a certain position in space, this can be eliminated by turning the blades or gluing a weight inside the cylindrical base of the impeller.
If you have gone through all of the above reasons and the problem of vibration, noise and Carlson hum remains , then try changing the fan impeller to an 8-blade one (4 blades are originally supplied from the factory). I’ll say right away that after replacing with an 8-blade fan it will definitely not get any worse!