Modification of the crankcase ventilation system Kalina 8 valves
This system could be improved a little. One of the 3 pipes supplies crankcase gases directly to the throttle valve assembly next to the IAC. If they contain oil, it will definitely settle there. This is how the IAC becomes clogged. So, to avoid this, you can embed a regular fuel filter right in the middle of this pipe.
It will trap oil particles contained in crankcase gases. After a few hundred kilometers, you will see for yourself. Monitor the condition of this filter and promptly change it to a new one. On average, as practice shows, it needs to be changed every 1000 kilometers.
USR system management
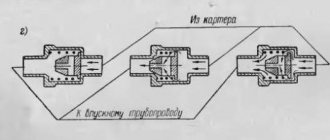
recirculation system is controlled by the electronic engine control unit. And the command to open or close the EGR valve can be given based on:
- coolant temperature sensor;
- crankshaft sensor;
- throttle position sensor;
Read
In various car models, either all of the listed sensors are used to control the USR valve, or some of them, and in some cases, only the coolant temperature sensor.
What does the EGR valve look like on a Chevrolet Lacetti?
One way or another, the operation of the USR valve is always controlled by automotive electronics. And while this system functions normally, the driver practically does not feel its operation at all. The useful work of the USR system outside of environmental issues is very unnoticeable. This system allows you to save about three percent of fuel on gasoline engines. Also, in some cases, the USR system prevents fuel detonation in the engine. But this phenomenon in itself is rare and extraordinary. As for diesel units, if they have a properly functioning EGR system, they operate more smoothly, softly, and quietly. In addition, in diesel engines, the formation of soot is reduced through the USR. That's all the bonuses that the exhaust gas recirculation system provides the owner.
What is an EGR valve and what is an exhaust gas recirculation system for?
REAL TAXI DRIVER A huge flaw in the design.
EGR (Exhaust Gas Recirculation) System - Evil or Good?
In this video I explained in Russian why the EGR valve is needed
, but to jam it or not, draw your own conclusions.
Crankcase ventilation system Kalina 8kl
Today we’ll talk about the crankcase on Kalina with an 8-valve engine. And to be more precise, about cleaning this system. Crankcase gases straight from the crankcase (hence the name) are sent mixed with air to the intake manifold for re-burning, thus saving a certain percentage of fuel. So, along with the gases, oil particles enter the system and clog it.
It is this oil that needs to be cleaned from the crankcase ventilation system. Over time, plaque forms on the walls of the hoses, which impedes the passage of gases.
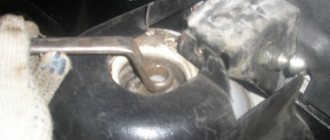
In the Kalinovsky engine, in the valve cover, there is a special separator that separates crankcase gases from the oil. It gets clogged the most. So, let's get started. The entire ventilation system consists of 3 pipes. We need to unscrew them.
Then remove the valve cover. There are two bolts on the back side, unscrew them and get to the separator.
The easiest way to clean it from oil and deposits is in a bath of gasoline or solvent.
While the separator is acidifying, you can work on the pipes. In general, if they are heavily soiled, it is advisable to replace them with new ones. In my case, I replaced only one - coming from the valve cover to the air filter pipe. The rest were washed with carburetor cleaning fluid (great stuff, it corrodes absolutely everything). The separator itself can also be washed a second time with this thing.
We wipe everything with a clean cloth and put it back together as it was. Pay attention to the condition of the valve cover gasket. It is considered disposable and it is better to replace it with a new one each time you remove it in order to avoid oil leaks.
Operating principle of the engine ventilation system
The design of older models of internal combustion engines included the simplest ventilation system designs; they included only one breather, which was located in the crankcase. It was a link connecting the inside of the cylinder block with the atmosphere, and crankcase gases escaped through it.
This scheme had a significant drawback: the exhaust gases contained oil particles, which were dispersed in the external environment. The negative effect led to significant losses of lubricants and was also a serious factor polluting the atmosphere.
Modern diesel and turbo engines are equipped with closed ventilation systems. A special pipe is connected to the breather, through which exhaust gases are discharged into the cavity of the intake manifold or to the air filter for further movement into the cylinders to participate in the combustion process.
Purpose of the adsorber purge valve
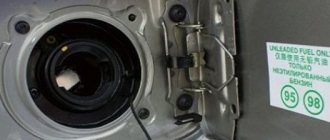
In the Lada Kalina model, as in principle in any other car equipped with distributed fuel injection, an adsorbing system is necessary to localize the resulting gasoline vapors. They accumulate inside the tank after the engine stops, and after a certain time necessary for the transformation of these vapors into a condensation state, they turn back into liquid fuel. The remaining volume of vapor that failed to return to the tank moves to the adsorber, where it is retained by two valves. The first (gravity type) is necessary to prevent fuel spillage when the LADA Kalina body turns over (in an accident, etc.), and with the help of the 2nd, the pressure indicator inside the tank is monitored.
Principle of operation
Why does it drive and squeeze oil out of the breather? To answer this question, let's figure it out. How the breather works and why it spits oil. As many people know, gases accumulate in the engine crater during operation. To remove them, a special ventilation system called a breather is used. This allows the pressure inside the engine to be relieved. Since the crankcase constantly contains a suspension of air and small droplets of oil, it is not surprising that part of the lubricant gets into the breather along with the air.
There is an oil catch mesh here. But some of the droplets still fly further. Therefore, slight contamination (closer to the end of operation) of the air filter is quite normal. When there is too much oil, it makes sense to start looking for the cause.
Cleaning the crankcase ventilation system of VAZ (Lada) Kalina 1118
Tools:
- Open-end wrench 10 mm
- Open-end wrench 13 mm
- Open-end wrench 17 mm
- Medium Phillips screwdriver
Parts and consumables:
- Gasoline/kerosene
- Rags
- Sealant
- Automotive compressor
- Cylinder head cover gasket (if replacement is needed) -2108-1003270-10
Notes:
The crankcase ventilation system of the VAZ Lada Kalina 1118 tends to accumulate tarry deposits from crankcase gases, which make it difficult to remove these gases into the engine cylinders for combustion. Because of this, the gas pressure inside the engine increases and oil leaks through the seals appear. We recommend cleaning the crankcase ventilation system before each oil change.
1. Remove the decorative plastic engine cover.
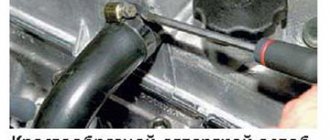
2. Loosen the clamp and disconnect the hose of the large branch of the crankcase ventilation system from the air supply pipe.
3. Disconnect the second end of the large crankcase ventilation system hose from the fitting on the cylinder head cover and remove the hose.
4. Similarly, remove the hose of the small branch of the crankcase ventilation system by disconnecting it from the fittings of the throttle assembly and the cylinder head cover.
5. Remove the supply hose of the crankcase ventilation system by disconnecting it from the fittings of the cylinder block and the cylinder head cover.
6. Rinse the hoses with gasoline or kerosene, blow with compressed air and dry. Clean the holes in the fittings and pipes for connecting the hoses.
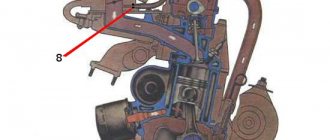
7. Unscrew the two fastening nuts and remove the cylinder head cover.
8. Unscrew the long 1 and short 2 bolts securing the oil separator from the inside of the cylinder head cover and remove the washers.
9. Remove the oil separator housing.
10. Remove the mesh pack from the cylinder head cover.
11. Thoroughly rinse the screens, oil separator housing and cylinder head cover with kerosene.
12. Turn the meshes in the bag so that they are oriented in the same way, and install the bag in the lid so that on one side it rests against the protrusions in the lid, and on the other side you can see the hole for the bolt that secures the oil separator of the VAZ Lada Kalina 1118.
13. Install the oil separator housing and tighten its mounting bolts.
14. Check the condition of the cylinder head cover gasket and replace if necessary.
15. The hoses of the crankcase ventilation system and the cylinder head cover of the VAZ Lada Kalina 1118 are installed in the reverse order of removal.
The article is missing:
- Photo of the instrument
- Photos of parts and consumables
- High-quality photos of repairs
Source
Carrying out diagnostics of lubricant output
To identify the causes of a defect in the flow of lubrication through the breather of a diesel and turbo diesel engine, it is necessary to conduct a comprehensive check of the power unit. This does not require disassembling the engine. Experienced craftsmen measure certain parameters and visually assess the condition of the elements included in the ventilation system.
If plaque and oil deposits are detected in the intake manifold, it is concluded that there is a lubricant outlet through the diesel breather seals. To carry out diagnostics, you will need a set of tools consisting of open-end wrenches, screwdrivers, and a compression tester.
Algorithm of verification activities:
- Analysis of the state of exhaust gases. This turns on the engine and checks the color of the exhaust. A black or bluish tint indicates that oil is getting into the cylinders, because there is wear and sticking of the oil scraper rings, and there are also problems in the operation of the gas distribution mechanism.
- Check compression in each cylinder. The compression value, equal to 11 - 13 MPa, indicates proper operation of the cylinders and pistons. The difference between compressions in the cylinders should not exceed one megapascal. Low compression of one of the cylinders may cause lubricant leakage.
- Using a glow plug, the specific cause of the defect in a given cylinder is determined. The spark plug is removed and checked for strong traces of carbon deposits, which indicate defects in the cylinder-piston group.
- The absence of carbon deposits on the spark plug indicates that the valves need to be checked.
- If compression is normal in all cylinders, it is necessary to further check and clean the elements of the ventilation system. All incoming devices must be dismantled and thoroughly washed, dried, and then reinstalled.
First option
Modification of crankcase ventilation can be done in several ways. For example, on the M50 you can install an oil separator unit from the M52 model. However. This manipulation does not solve the problem of having a container for draining liquid, external aesthetics and the need to place a water seal.
One of the current solutions to the problem under consideration would be the installation of a HEPA filter, which contains wire and filament components that make it possible to adjust as accurately as possible the amount of gases released. The inside of the oil separator is filled with copper wire wool. In the standard version, the packing should protrude slightly beyond the base of the lid. The corrugated inlet and throttle assembly are thoroughly wiped. After performing the manipulations, the element is checked by mechanical purging for changes in air flow.
As practice shows
, operating a car with an improved crankcase ventilation system does not give you any reason to worry about excessive oil separation. The modification carried out according to the “NERA” principle, after a run of 15 thousand kilometers, shows that the appearance of oil stains in the system has disappeared, and the corrugation remains absolutely dry. The throttle block is also clean. Impurities settle on the wire packing, which, according to the laws of physics, move towards the oil separator cover. The filler periodically requires cleaning by performing a simple procedure of removing the cover and rinsing it with gasoline.
Easy to fix oil leaks from the gearbox
An attentive driver who cares for the car can quickly detect an oil leak. Measurements are taken of oil droplets on the asphalt surface. The appearance of oil indicates that there is a problem that needs to be solved. Ignoring the problem in the future will cost a lot of time and money.
Oil leaks appear on the surface of the gearbox housing. If you don't look closely, they are hard to notice. As the amount of oil increases, droplets appear.
After parking the car, small black oily puddles form on the asphalt. You need to drive the car onto a viewing hole or lift. It will make it possible to quickly find the location of the leak and fix the problem.
The main easily repairable oil leaks from the gearbox:
Loose nut on transmission oil drain.
A common cause of oil leaks, it can be eliminated in less than 5 minutes. When changing the oil in the gearbox, they were in a hurry and did not act carefully. After a while, a loose nut is discovered. Oil oozes through the drain hole and leaves marks on the road surface.
Vibration increases the leak, as the nut moves away more and allows more oil to pass through. Some unlucky drivers managed to completely pour the oil onto the ground during the day. If you don't notice the problem in time, you can end up with a jammed transmission.
The oil dipstick is not inserted correctly.
Drivers do not pay attention to the correct installation of the oil dipstick in vain. Often causes oil leaks. A skewed dipstick does not close the channel tightly enough. When heated, oil leaks out.
If leaks are found on the gearbox housing, you need to carefully inspect the position of the dipstick. To eliminate the leak, it must be corrected.
Reverse sensor.
It is mounted in the gearbox and causes oil leakage if not tightened sufficiently. The driver’s actions are the same as when the nut on the drain is not tightly tightened. You need to tighten the reverse sensor and all the leaks will stop.
Excessive amount of oil.
Experts say that overfilling the gearbox with oil is much worse than underfilling it. An excess amount of oil fluid creates excess pressure in a confined space.
The sealing elements of the gearbox receive additional stress. They cannot withstand the pressure of oil if they are worn out. Excess oil comes out. The problem can be solved by draining the excess amount.
Leaking through the lid.
The cause of the malfunction is wear of the sealing material. To eliminate oil leaks from the gearbox, change the gasket. If chips and cracks are found, use epoxy resin. Levels any damaged surfaces.
The above reasons can be simply and easily eliminated if they are detected in a timely manner. Does not require material costs.
Cost of the KG ventilation valve
The cost of KVKG can be completely different; the price largely depends on the car model and the engine itself. For example, an original valve for an M54 (BMW) internal combustion engine costs about 2200-2400 rubles; this device is also suitable for M52 series engines and is installed on E39 5-series cars, X3, X5, BMW Compact. For Ford cars (Duratec HE engines), a ventilation valve can be purchased at an average price of 1300-1800 rubles, the cost depends on the seller - custom parts are cheaper if the parts are not needed urgently.
There are original parts that are quite expensive, and besides, they cannot always be found on sale, so it makes sense to buy contract spare parts - they are much cheaper and more accessible. For example, even a contract Mitsubishi KVKG for the 4G94 engine from Vladivostok will cost about 3 thousand rubles; it is difficult to say how much the new mechanism costs. You can also search for more details in car dismantling yards and various advertisements on the Internet.
Where is the engine breather located?
From engine to engine, different car manufacturers may place the breather in different places. But in most cases it is located on the valve cover, next to the filler neck. Although there may be options: it is better to clarify in the description instructions for the car or find out on thematic forums.
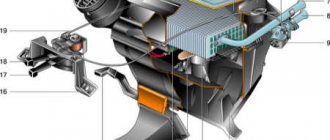
In the picture on the right is the crankcase ventilation system of the VAZ 2111 engine, which includes a breather:
- Crankcase.
- Breather.
- Hose from the breather to the valve cover pipe.
- Oil separator under the valve cover.
- A thin hose from the valve cover to the fitting with the throttle body nozzle.
- Fitting with jet on the throttle valve block.
- Thick hose from the valve cover to the intake pipe..
But the breather is installed not only in internal combustion engines. It is in:
- Gearbox. Otherwise, the gearbox would begin to operate jerkily, and the wear of the gears on the secondary shaft would increase many times over. Something similar is observed when the breather becomes clogged and ceases to perform its function.
- If the design of the car provides for a separate transfer case, then a similar mechanism may be in it.
- Front, and in rear-/all-wheel drive vehicles - in the rear axle. Moreover, this inconspicuous detail not only equalizes pressure, it protects the mechanisms from dirt and moisture when overcoming water obstacles.
However, even their appearance is often similar, and often identical: they perform the same function.
Changing transmission oil
The design of the cable transmission includes a drain plug, which is typical for all manual transmissions. The control and filler hole here is closed with a separate plug, but you can fill liquid into the crankcase not only through it.
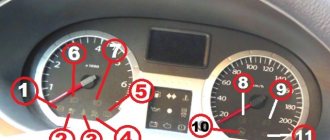
A reverse switch is attached to the top of the unit body (see figure). And if this part can be unscrewed, then the replacement will be easier than according to the standard AvtoVAZ manual.
Cable gearbox VAZ
In the figure the numbers indicate:
In reality, the details listed here look like this:
Both of these screws are easy to unscrew
There is no need to unscrew the control plug trying to get to it from the bottom of the car. As a last resort, you can perform the operation together using additional lighting.
The procedure for changing gearbox oil will look standard:
According to reviews, the VAZ-2181 box holds 2300 ml of transmission fluid. C, and the recommended replacement interval is 75,000 km.
Advice: before replacing, it is recommended to warm up the old oil. It will be enough to drive the car for about 2-3 km, trying to vary the engine speed.
see also
Comments 78
I had the idea of putting it
Good day! As I understand it, you have a 21127 engine with a variable geometry receiver. I have a Priora 2014. with the same motor. You can find out more about the modification. Did you just install a PCV valve in the small circuit break of the ventilation system?
Good morning! Yes, motor 21127, the valve was installed in the gap of the small ventilation circle!
And what kind of firmware did you use? And didn’t you observe the effect of choking or even trimming when you sharply but lightly press the gas pedal when idling?
The firmware was originally sewn by a “super specialist” from Stavropol, who promised mountains of gold in the form of increased dynamics, reduced consumption, etc., etc. but in the end there was only detonation, the car stalled at idle with the air conditioning running, the engine did not run at temperatures above 85 degrees! After some time, I met Dima from Orenburg, a person who is responsible for his every word, is not just a flasher, but actually rolls back and makes firmware himself! After I uploaded the firmware from Dima, all the problems with the engine went away, the engine started working at full capacity and I am happy as an elephant!
The engine air filter should not interfere
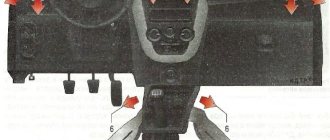
The air filter box in Granta and Kalina-2 cars is secured with three rubber stops. It will not be difficult to dismantle them, but first you will need to disconnect all the connectors attached to the box from the outside. You will also need to remove the adsorber valve. And only then, without fear of damaging anything, the plastic box is taken to the side.
The cylinder to which the corrugation is attached is the mass air flow sensor module. This module has one connector. Disconnect it, and it is better to leave the clamp holding the corrugation in its original form.
The result of all the work done looks like this:
The filter box is simply folded back
The steps mentioned above are listed here in order:
The connector that needs to be disconnected in “step 2” will not be available in configurations with motor 21127.
The second method of upgrading crankcase ventilation
The meaning of the following is to transfer the small ventilation circuit from the throttle part to the receiver, which helps reduce differences when switching modes. To complete this design, you will need to perform the following manipulations:
- The thin crankcase ventilation hose is disconnected from the throttle;
- The free end is connected to the free inlet fitting on the receiver, with preliminary removal of the plug;
- The free opening of the remote control is blocked by installing a plug;
- As a result, the flow of air mass increases, eliminating the possibility of a sharp response of the throttle valve to a jerk of the engine;
- In addition, crankcase ventilation increases and additional draft appears in the lower part of the mechanism.
What is the EGR valve for?
We should start with the fact that the USR system is installed on most diesel engines and gasoline, naturally aspirated units. The essence of this system is that at certain moments the valve
EGR and a portion of
exhaust gases
.
Schematic representation of the operation of the USR system.
Thus, the amount of oxygen in the fuel mixture is reduced, which in turn reduces its combustion temperature. And at a lower combustion temperature, the amount of nitrogen oxides in car exhaust decreases quite significantly. If the engine is turbocharged, then the range of application of the USR is significantly narrowed, which makes its installation irrational. In such cases, other solutions are used to reduce the amount of harmful components of automobile exhaust.
Exhaust Gas Recirculation does not work at idle speed, it is not used when the engine is cold, and the EGR valve closes when the throttle valve is wide open.
SIGNS OF OIL RUTTER.
There are not many of them. In a carburetor engine, these may be leaks of lubricant inside the air filter housing and significant traces of oil on the filter element itself.
As for injection engines, the problem manifests itself in the form of deposits on the throttle body and the internal surfaces of the intake manifold. In this case, there may be a drop in engine power and an increase in fuel consumption.
EGR system malfunctions
Diagnosing problems with the described system is not as simple a task as it might seem at first glance. The trouble is that there are no pronounced symptoms characteristic of EGR problems. The engine seems to be running rough, it seems to be malfunctioning, but it doesn’t seem to be. And only a professional can suspect the exhaust gas recirculation of such unstable engine operation. But before that, various sensors, components and systems of the car are checked. Actually, what problems may arise here:
- deposits of soot and other elements on the parts of the EGR valve, leading to it jamming in any position;
- burnout of the EGR valve;
- clogging of the USR line itself;
- violation of electronic control systems for the USR valve;
If a valve or line is simply clogged, cleaning them, in general, is not difficult, although in some cases such cleaning is simply impossible. Well, if the valve burns out, then you will have to change it, and this, as already mentioned, is by no means cheap.
There are virtually no symptoms specific to problems with the EGR valve. This is, for example, unstable engine operation at idle speed, unmotivated dips in power, lack of pronounced acceleration when the throttle valve is fully opened, and other signs of disturbances in engine operation.
One way or another, do not rush to change the EGR valve or turn it off if there is no obvious damage to the valve and its parts. Perhaps the problem here is not entirely in the USR, because this system is closely interconnected with other components and systems for regulating air supply and exhaust gas removal.
Changing the purge valve on Kalina
The replacement procedure itself is not a complex undertaking. To perform this, the owner will need to acquire a regular Phillips screwdriver and know where the valve is located.
Below we provide an algorithm of actions that allows you to quickly and efficiently complete this procedure.
- Disconnect the corresponding terminal from the negative terminal of the battery.
- You will need to disconnect the power connector from the valve itself.
- For ease of access to the unit, we move the suction pipe of the intake system slightly to the side together with the “Max Air Mass Airflow” sensor. For this purpose, use the indicated screwdriver to loosen the clamp of the pipe and perform the action.
- Now we proceed to dismantling the unit. To do this, disconnect a pair of fittings located on the sides of the product. One of the fastening elements is fixed with a latch and to dismantle it, you will need to recess the latch, then lift the antennae and finally tighten the fitting to the side.
- Before installing a new component, we check that the markings on both valves match and make sure that they are identical.
- Installation and fixation of the product is carried out in the reverse order.
The canister purge valve has been replaced.
Difficult to eliminate causes of oil leakage from the gearbox
Replacing oil seals.
If the obvious causes of oil leakage have been eliminated, but leaks continue to appear with enviable frequency, the seals are examined.
Special rubber seal in a metal frame. Serves to prevent leaks and oil on the moving elements of the engine and gearbox.
Long-term use of the oil seal wears out the rubber base. Oil pressure does not hold. If the oil seals have been replaced recently, you need to think about the quality of the oil used.
The replacement procedure is as follows:
It is better for two people to carry out the work, as the process of replacing oil seals is accelerated. It takes about two hours to complete the job.
Replacing the breather.
The purpose of the transmission breather is to remove excess pressure. Formed during transmission operation. Allows you to maintain the pressure inside the transmission at an optimal level.
The main problem with the breather is that as a result of prolonged use, the channels for removing excess air become clogged.
The effectiveness of releasing excess pressure is reduced. The pressure cannot be released, and the oil begins to attack the sealing elements. To eliminate oil leaks, the breather is cleaned and the throughput is restored.
Procedure:
Sealing element on the drive.
It is impossible to replace the seal on the drive yourself. The gearbox must be removed and special equipment is required. To carry out the work, contact service station specialists. A short video will tell you about stopping a leak on the way from the gearbox.
Oil leaks from the gearbox can be eliminated on your own. It is necessary to accurately determine the cause of the leak. Every driver is interested in solving the problem so as not to tempt fate and risk the transmission.
Changing the gearbox oil on a VAZ 21099
It should be noted that changing the oil in gearbox is one of the important points of car care. The oil ensures uniform lubrication of the rubbing parts of the box and also serves as a coolant, removing temperature from the heated surfaces of the parts.
The oil change in the gearbox on a VAZ 21099 should be done every 75 thousand kilometers or at least every four to five years. Do-it-yourself gearbox repair on a VAZ 2110 (photo, video. Note that 3.3 liters of oil can be poured into a 5-speed gearbox, and 3.0 liters into a 4-speed gearbox. The factory provides direct advice on using oil in the gearbox .