When is injector cleaning necessary?
In order to understand the condition of the injectors, you need to clearly listen to the “whispering” of your engine:
- increased fuel consumption (consumption rates),
- "triple" of the engine,
- unstable operation at idle,
- breakdowns during engine operation.
These symptoms should alert you and make you think about the stable operation of the system as a whole.
Frequency of cleaning injectors
There is no specific point in time that would indicate the frequency of their cleaning. Remember that if nothing bothers you about the operation of the engine, then there is definitely nothing that needs to be repaired. However, if symptoms appear, it is best to first carry out an analysis and determine the exact cause of the problem.
What will cleaning do?
When the injectors are cleaned, you will immediately feel changes in the operation of the engine. However, note that this depends on the amount of carbon deposits and instability before the cleaning process. Therefore, the more contaminants there are, the better the cleaning is done, the greater the chance of getting serviceable injectors.
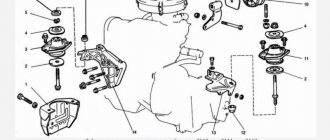
Replacing injectors for VAZ 2110–2112 cars
Failure of injectors causes interruptions in the supply of fuel to the cylinders and a violation of the proportions of the combustible mixture. These consequences are reflected in the vehicle's movement pattern, ignition operation, fuel consumption, idle speed stability and CO content in the exhaust.
Table: malfunctions of injectors of injection engines
To replace injectors you will need the following tool:
To get to these parts, you must remove the fuel rail. The dismantling sequence for eight and sixteen-valve engines is different.
Removing the fuel rail of an eight-valve VAZ-2111 engine
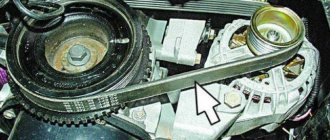
Loosen the gasoline supply and drain fittings and release the pressure. Unscrew the fuel lines
Disconnect the rack electrical connector
Unscrew and remove the bracket securing the supply and drain pipes
Cleaning engine injectors
This method is not the actual cleaning of the injectors, but it fully allows you to get rid of deposits on them without resorting to dismantling them.
First of all, this is much faster, but on the other hand, the result is not always effective. However, as VAZ-2112 car owners say, in some cases, this really helps.
Work process
- A compressor is connected to the system, similar to that described earlier, which is capable of increasing the pressure in the ramp to 3.2 atmospheres. In parallel, we connect a purifier in a container of at least 1 liter. (Most often, special injector cleaners are used in metal containers - approx.).
- Next, we start the engine and let it run for 10 minutes, after which we stop and let it rest for the same amount of time.
- Then we start it again and, by re-gassing, pass the entire liter of liquid through the injectors.
- When the engine stalls, change the spark plugs, which will become covered with soot.
The entire process of work in this way should not exceed one hour.
By the way, such work can render spark plugs unusable, so clean the injectors on the engine using old or spare spark plugs. Or guess the moment when you will change the spark plugs. We have already talked about the choice of spark plugs for 16-valve engines.
Troubleshooting
Diagnostics of injectors using a stand
After you remove the injectors, proceed to carefully inspect them. When the removal of the VAZ 2110 injectors is completed, you can see that one of them remains in the inner pipe of the engine. It will be necessary to replace its retainer and the rings responsible for the seal. In addition, injectors are also replaced when the rings lose the elasticity of their coating or when there are cracks.
Check how the injectors spray. Connect the harnesses and attach everything to the battery. Then place the nozzle in a glass container and turn on the starter to see if the gasoline is spraying correctly. Each nozzle must have at least 4 jets, in addition, the gasoline that is carried through them in containers must be at the same level. If the sprayer begins to leak, the nozzle needs to be replaced.
If it does not spray at all, you need to check whether the nozzle is receiving power. If it does not pass gasoline, disconnect the wires leading from the block and connect the battery directly with the ignition on. If it starts spraying gasoline, it means there is a problem in the electrical circuit. After the injectors have been replaced or cleaned, they will need to be reassembled, but before that, lubricate each ring with gasoline.
Cleaning injectors with ultrasound
And another method that can be easily used to clean them is ultrasound.
Pros and cons of using ultrasound
There is still debate about how useful this method is, and there is no consensus on this. Some say that this method harms the injectors due to the destruction of the mesh, and that such work should only be combined with washing and dismantling. Others say that such work has a very good effect on the condition of the injectors and does not harm them in any way; moreover, the condition of ultrasonic cleaned injectors is comparable to new parts.
In any case, it is up to you to decide whether to use this method. The cost of such work at a car service is 2,000 rubles and takes about 4 hours.
Basic principles and nuances of injector flushing
VAZ 2110, wash the injector yourself
- First, you should disconnect the air filter pipe and the air filter itself;
- then disconnect the connection of the fuel level sensor from the air pipe;
- then the work moves on to the throttle assembly, since it is necessary to disconnect the wiring from it;
- now you need to free the injector itself from the wiring harness;
- then unscrew the two bolts that connect the fuel rail and the cylinder head;
- remove the holder by first unscrewing it from the fuel pipes;
- the fuel rail and the injector are contained in the cylinder head; they must be removed;
- Having unfastened the injector brackets, you need to remove it from the fuel rail.
When to flush the injector of a VAZ 2110
Components that are necessary to flush the injector:
- carburetor cleaner in an aerosol bottle;
- O-rings for injector;
- non-latching button;
- a special chip that allows you to connect the wiring to the injector;
- two light bulbs of 12 and 21 watts, respectively;
- medical syringe for 20 cubic meters;
- several small tubes.
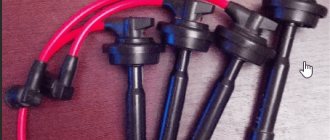
Professional injector cleaning kit
Injector flushing algorithm:
- First of all, you need to remove the needle from the syringe, and insert a small tube in its place; in order for it to fit tightly, you need to use a seal;
- then place the syringe directly on the nozzle itself;
- after which, you need to connect the terminals to the nozzle;
Prices for cleaning injectors
- In order to clean the injectors that have been removed and fixed on the ramp, you will need a total cost of about 500 rubles .
- And to clean them in the service, you will pay about 2000 rubles , and this is the same as when cleaning with ultrasound.
Since such work does not pose any difficulty, it is much easier to do everything yourself.
Injector prices
If, after the cleaning and diagnostic procedure, you come to the conclusion that it is completely faulty and needs to be replaced, then it is worth noting that you should buy a strictly analog nozzle, with the part number indicated on its body. The average price for them is in the range of 1000-1500 rubles.
Replacement technology
On VAZ 2110 cars, replacing injectors is carried out as follows. The first step is to disconnect the battery. Then you will need to remove the air filter. After this, disconnect the vacuum hose from the fuel pressure regulator. Next, press the plastic latch of the throttle position sensor connector and disconnect this connector. The same is done with the connector going to the idle air control regulator.
Now you need to unscrew the two bolts that secure the fuel rail, as well as the screw securing the fuel pipe holders. Then remove the holder itself. The fuel rail will need to be carefully moved along the axis of the injectors. The ramp should be removed from under the receiver with extreme care, as there is a risk of damaging the injectors.
The next stage of work is to check the condition of the injectors. It is best to place them in transparent containers, first connecting them to the battery via wires. Next, you will need to turn on the starter and check the atomization of the fuel injectors. Each of them should spray the same amount. If one of the nozzles sprays less than the others, then most likely it needs replacement. In addition, it will be necessary to conduct a thorough inspection of the remaining devices for leaks.
A fuel injector that does not spray fuel needs further inspection. Perhaps it simply does not receive electrical power. It is necessary to disconnect the connector with wires from it. After this, you should directly connect the battery to the injector contacts and turn on the ignition. If in this situation the device begins to spray fuel, this will mean that the malfunction is hidden in the electrical circuit.
Experts advise measuring the resistance of the device windings. It should be in the range of eleven to fifteen ohms. Otherwise, such a fuel injector for VAZ 2110 vehicles is faulty. She needs replacement.
The process begins by reducing the pressure in the power system. Disconnect the wire connector from the fuel pump, and then turn on the starter and crank the engine with it. The starter is turned off when the fuel stops spraying. After this, the battery is disconnected on VAZ cars. Next, disconnect the connector with wires from the injector that needs replacement. Then move its lock to the side and remove the injector from the fuel rail.
Procedure for removing oil injectors
Before you begin removing injectors from any car of the tenth VAZ family, you will need to relieve the pressure in the fuel system. Removing any element that is under pressure in any way can result in personal injury.
How to get rid of excess fuel
To relieve the existing fuel pressure, you need to turn off the fuel pump and exhaust the remaining gasoline:
- Fold down the cushion from the back row of seats.
- Below it is the fuel tank hatch.
- Unscrew the screws securing the hatch.
- Disconnect the wiring harness from the pump housing (the wires supply power).
After this, start the engine and wait until it stalls. It is recommended to turn the ignition on several times to ensure that there is no gasoline left in the system.
Next, you can begin to remove the injectors. It is recommended to prepare the necessary tools in advance:
- open-end wrench 17;
- a flat screwdriver with a narrow blade;
- Phillips screwdriver;
- hex key 6;
- rags.
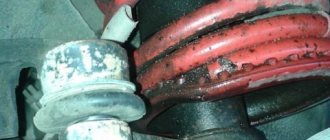
All elements of the repair kit are usually at hand for any driver
How to remove parts from the engine
- Remove the air filter box (it will interfere with free access to the engine).
- Remove the wiring harnesses from the injectors.
- Then you will need to disconnect the wires from the idle speed control and from the throttle sensor.
- Next, remove the vacuum seal from the pressure regulator (it has a white braid).
- Using a 17 key, unscrew the bolts that secure the fuel frame to the body. To make it more convenient, you can remove the gas cable.
- It is better to unscrew the fasteners of the plate with which the ramp is pressed using a hexagon.
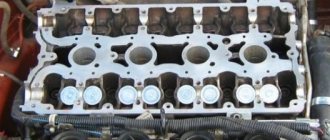
- The fuel rail must be removed very carefully, with the nozzles facing up.
- On a 16-valve engine, dismantling will take longer, since the ramp has a more complex structure and several types of fasteners.
- Next, you can remove the injectors themselves - to do this, disconnect the fastening brackets of the electrical connector with your finger, and then the injector bracket. During removal, gasoline may leak; it is recommended to place a cloth under the ramp.
To install a new injector, the socket is first thoroughly cleaned of dirt and fuel, and only then can the product be screwed in. It is better to drop a few drops of gasoline onto the rubber ring before installation - this will make the nozzle fit into the mounting hole more easily. All work is then carried out in reverse order.
Symptoms of a problem
With proper care, the injectors on the VAZ 2110 can last quite a long time. But when the first signs of malfunction appear, it is recommended to immediately clean the elements. What are the symptoms?
- The engine starts with certain difficulties;
- Fuel consumption increases;
- Power and thrust drop;
- In winter, the car sometimes jerks;
- The engine starts to stall, etc.
If you notice at least one of the symptoms, be sure to check the injectors and decide whether to clean or replace.
We recommend: Preparing a car for sale: how to clean the car interior