How to replace fender liners and how to install new ones on all VAZ cars?
Note! Before you start, remember a few important things that you should know when working with this protective material, namely, before installing a new fender liner, be sure to lubricate the upper part of the wing with some anti-corrosion material to protect it from moisture, but before you start lubricating, water or Whatever else you do (it’s most convenient to use a Karcher) clean the entire inside of the wing from any dirt stuck to it and only after cleaning proceed to lubricating this part of the wing!
Guide to replacing the front wing on a VAZ 2107
Owners of all old sevens sooner or later are faced with the need to replace the front wing on a VAZ 2107. Buying a new wing in an auto shop for any VAZ models will not be difficult. It is better to buy body parts from a reliable manufacturer. After all, if the dimensions are slightly off, then it won’t be possible to fit the new part perfectly into place. Let's discuss how to replace the wing on a VAZ in a garage.
- In what cases are body parts replaced?
- Removing the old wing on a VAZ
- How to install a new wing on a VAZ
In what cases are body parts replaced?
There are two common reasons for the failure of any body part:
- Over time, traces of corrosion appear, which develop into through holes. The automaker tries to use only high-quality metal. Additionally, the body undergoes anti-corrosion treatment. However, constant exposure to moisture, dirt, and chemicals takes its toll. The paintwork and steel gradually deteriorate.
- Unfortunately, sometimes people get into accidents. Even a minor accident inevitably leads to damage to body parts. The front fenders on VAZs are especially at risk. Sometimes they can be straightened. But in some cases it is much cheaper and easier to supply a new part.
To carry out the replacement in your own garage, you need to have a drill, a welding machine for a carbon dioxide environment and a grinder.
What you need
So, you have decided to do this simple task and are thinking about how to take on this task, that is, how to install the fender liners? But everything is simple. In order to do this job we will need 4 fender liners, anti-corrosion agent, brush, degreaser, rag, self-tapping screws and a screwdriver. First you need to wash the arches with water under pressure. It would be better to do this at a car wash. Then you go to the garage or other place where no one will bother you for the next couple of hours.
First of all, we remove all the wheels one by one, and put the car on trestles or bricks. Now pour degreaser onto a rag and thoroughly wash the wheel arch so that the anti-corrosive agent adheres to the surface of the arch as best as possible. It’s better to do it this way: wash one arch with a degreaser and move on to the other. After the last arch is washed, the first one will already dry.
Now we apply anticorrosive. It is better to use a brush for this rather than a spray bottle.
Note! If you paint with a brush, then do not skimp on the anticorrosive agent. The thicker the layer, the longer it will last and the longer the guarantee that the arches of your car will not be eaten away by corrosion. If you have time and resources, it would be better to paint in two layers. The application scheme is the same. We painted one arch and moved on to another. By the time you paint the last one, the first one will already be dry.
Removing the old wing on a VAZ
First you need to make sure that you have all the necessary tools:
- spanners;
- impact screwdriver;
- Bulgarian;
- drill;
- hammer;
- chisel.
Before dismantling, you need to temporarily remove parts that may interfere with operation:
- front door;
- hood;
- wheel under the wing;
- bumper;
- block headlight.
Generally, the mounting screws are fairly tight, so it will be easier to remove them with an impact driver. First you need to spray the threads with WD-40 and let it sit for a few minutes.
The remaining elements unscrew more easily.
The wings themselves are attached to the body by welding. To remove them you will have to use a sander.
Before you begin the cutting process, we recommend sealing the door opening with polyethylene or tape. This will protect the interior from large amounts of metal dust and sawdust getting into it. It's also a good idea to cover your windshield to protect it from hot sparks and abrasives.
Dismantling is carried out in four stages:
- Cut or chop off any weld points that secure the fender to the drain channel.
- Back off two to three millimeters and cut off the connection near the headlamp.
- About five millimeters from the bend line, cut off the connection to the side post.
- Using a grinder, remove the remaining parts of the wing and clean the landing areas.
After dismantling, you need to make sure that the body cavities are thoroughly cleaned and washed. If there are pockets of corrosion, prime and clean them. Treat them with zinc chromate primer and also apply Movil. This will protect the new wing from the appearance of new foci of corrosion.
Installing rear fender liners on Kalina
| It is no secret that the factory installs fender liners on Kalina only on the front part of the car, while the rear arches are left without such protection. In this article we will tell you how to install rear lockers with your own hands. |
Kalina's front lockers are secured perfectly, but in order to install the rear fender liners, holes are often deliberately drilled in the body, damaging the factory paint, anti-corrosion and galvanization. As a result, after installing the wheel arch liners, dirt from the wheel collects in a poorly ventilated cavity and turns the locker attachment points into centers of corrosion.
To prevent drilling of the body, it is proposed to use a special profile rubber seal that secures the front locker to the bend of the wheel arch. (catalog number: “Flat seal” 11180-8403370-00).
Preparation for installation : The installation process begins with washing the arches from dirt. After this, you need to remove the plastic shields that form the rear of the wheel arch and cover the bumper from dirt. Then unscrew the screws that secure the bumper to the arch.
Installing the rear locker : The length of the elastic is exactly equal to the length of the “metal” part of the wheel arch. The remaining part of the locker will need to be tucked under the rear bumper. At the locker, we partially cut off the flange that forms the edge of the wheel arch, leaving about 70mm. Due to the resulting edge, the elastic band will stick to the locker. On the part of the fender liner that will be tucked under the bumper, cut off the flange. We cut out the area where the bumper and wing meet. We put on an elastic band and put on a locker.
The rubber band should fit tightly on the metal flanging of the arch, the rest of the locker should fit into the gap between the bumper and the metal of the arch. We drive the awl into the holes in the bumper and make holes in the fender liner. We attach the rear bumper to the arch. We install a plastic shield that forms the back of the arch. In the hired version, the upper part of the shield pressed the lower part of the locker to the arch - it sits tightly.
To secure the front inner part of the locker, which is not adjacent to the side member, you should drill a hole and tighten it with a self-tapping screw. To prevent the formation of rust in the drilled hole, we apply silicone sealant around it and in the places where the locker adheres to the arch.
In the area of the mudguard, everything is done on the basis of its internal attachment to the arch. You can place the edge of the fender liner under the mudguard and tighten it, or install a large diameter washer or plate. It turns out that the shield seal simultaneously holds the locker with one edge and clings to the wing flange with the other.
Thus, the rear fender liners on the Lada Kalina protect the arches from dirt, and also create acoustic comfort in the car interior (the noise from the rear wheels has decreased). By the way, to improve this effect, it is recommended to soundproof the fender liners.
Source
How to install a new wing on a VAZ
To install the wing, you need to know how to work with a welding machine. Gas or semi-automatic welding is suitable. It is better, of course, to use the second option. This will prevent the use of explosive gas containers.
Before installing the new wing, replace all other previously removed body elements: bumper, headlight, door and hood. This is done temporarily to fit the new wing and set the gaps.
Now you can get started:
- align the part, observing the gaps with other body parts;
- secure it with clamps;
- dismantle the previously installed body elements again;
- temporarily weld the wing in several places so that it does not move with the clamps removed;
- make sure that the part is installed correctly;
- finally secure it in place using spot welding.
After the work has been completed, finally install the removed body elements, clean the welded areas, prime them and paint them.
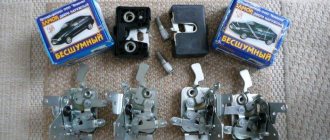
Correct installation of lockers
Many cars have factory mounting locations for fender liners. Special plastic “bugs” are used as fastening elements. The use of self-tapping screws is permissible when attaching lockers to plastic elements (decorative threshold trim, bumpers). If processed correctly, self-tapping screws can be used as fasteners at the bottom of the internal cavity of the mudguard.
Never use self-tapping screws to attach the fender liner to the edge of the wing. Moisture is trapped between the plastic casing and the wing. In the place where the metal is exposed, rusting will inevitably begin, which, moving upward, will destroy the paintwork.
When you can't do without self-tapping screws
If another installation method is not possible or if holes have already been drilled in the wing before you, the metal must be protected. If there are no traces of rye in the area where the paintwork is damaged, prime the area with epoxy primer and paint it with acrylic paint from a spray can. Rusted areas must first be cleaned and treated with a rust converter. After drying, treat the inner cavity of the wing and the edge adjacent to the fender liner with anti-corrosion mastic (for example, Movilya). Also soak the self-tapping screw in mastic before screwing it in.
Nuances of choice
- The fender liners are attached to the car's wings using self-tapping screws. Depending on the kit, either standard holes will fit, or you will have to make new ones. Therefore, it is important to check whether you will have to drill the body, or you will get by with a little blood.
- Versatility. Let’s say right away that there are no universal fender liners, so you should look specifically for fender liners for the VAZ 2114. Moreover, any other VAZ fender liners will not be suitable for your specific model. Well, unless you are going to cut something there, file it, and so on.
- Arched structures are made of high quality polyethylene. This is due to the fact that this material is practically unaffected by aggressive environments and chemical components. Plus, polyethylene is plastic, durable, and does not crack under low temperatures.
- If you choose the right and high-quality fender liners, you definitely won’t have any problems installing them. Installation does not require the use of any special tools. And the procedure itself takes a little time. It is not at all necessary to be a professional in the field of car repair.
Fixed fender liner
Advice from experienced drivers
- To eliminate the relief discrepancy, during installation, individual sections of the plastic are deformed by heating them with a high-temperature hair dryer. If the fastening is done correctly, the tire should not touch the wheel arch protection even at maximum wheel inversion.
- If the area of the wheel arches is already rusty, then after cleaning it needs to be primed with anti-corrosion agents, for example “ML”, “Movil”. The composition protects exposed metal in holes from the corrosion process. For the same purpose, during installation, screws should be screwed in, having previously treated them with sealant.
Read more: Import of tires from Finland
Most products have point protrusions - this greatly simplifies installation, which can be done without distortions. If the fasteners are not performed correctly, some areas of the body will remain unprotected. According to reviews from consumers and sellers, the warranty on fender liners corresponds to their shelf life - 5-8 years.
Hi all.
Denis and I decided to install fender liners from the 14 for me. I couldn’t find any information about the installation on the Internet.
I decided to share my personal experience with you, maybe it will be useful to someone.
Today Denis and I completed the installation of fender liners on my car.
We installed standard wheel arch liners from 14 in 2109. There seemed to be no difficulties with the installation. The installation took three evenings for two hours. First evening.
I went to the car wash, washed the whole car, special emphasis was placed on washing under the wings. After washing, I went to put the car in the garage. That same evening I removed the front wings. To wash off any remaining dirt, dry everything. Apply a little mastic in the right places if required.
Why change fender liners?
There are several reasons that may prompt you to replace the wheel arch liners on your VAZ 2114.
- Old car wheel arch liners have lost their effectiveness and burst. They simply fell into disrepair, so new arched elements are simply necessary.
- These are products that perform the role of protecting the body from corrosion and premature rust formation.
- The fender liners additionally protect the underbody, or rather the wheel arches. This is perhaps the weakest point of the car's underbody.
- The so-called sandblasting effect is reduced. Sand is an integral part of any road. There is a certain amount of it almost everywhere. This sand, falling under the car, increases the speed of its wheels. As a result, sand literally hits the car from below, destroying all protective redoubts over time.
- Reagent protection. As you know, in winter the roads are covered with snow and ice. To prevent multiple accidents and accidents, roads need to be cleared. Ordinary shovels and tractors are not enough here, since a layer of snow still remains. Special reagents or even ordinary salt dissolve snow and ice, making roads safe and non-slippery. Unfortunately, these reagents have a negative effect on car bodies, leading to corrosion and rust formation. The fender liners protect the car from them quite effectively.