A simple cleaning method
Both operations take approximately 2-3 hours, but cost several hundred rubles. This is ten times cheaper than replacement and about the same amount more affordable than service stations.
After cleaning the injectors, check their operation. If this does not work, you will have to change it.
Source
Removing the fuel rail (step by step)
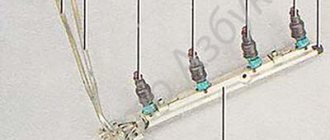
Fuel rail Car injectors on the VAZ 2109 are located on the fuel rail.
There are four of them here, this is due to the fact that a separate nozzle sprays fuel onto a separate cylinder. And since the nine has four cylinders, we can conclude that the number of injectors is logical. The fuel rail is the bar where the injectors are installed. It is fixed to the inlet pipe using bolts. To the left of it is a fuel pressure control fitting. It is worth noting that removing the fuel rail is the most problematic step in cleaning or replacing injectors. Removing the fuel rail Disconnect the wire block To remove the fuel rail you need:
Checking injectors for functionality on VAZ 2108, VAZ 2109, VAZ 21099
Welcome! Do you want to know how to check whether a fuel injector is working or not? If you want, in this case, with the help of this article, you can find out for yourself how to properly check the fuel injector for functionality. The injector check will be carried out on fuel-injected cars of the Samara family.
When should injectors be checked for functionality? They are subject to verification if:
How to check the injectors for performance on a VAZ 2108-VAZ 21099?
Checking all injectors for functionality:
Note! It will be easier to do the job of checking the injectors with an assistant, but you can do it alone!
1) First, to check them, you will have to remove the fuel rail with the injectors installed on it from the car. (For how to remove the rail correctly, see the article: “Replacing the fuel rail”)
2) When the ramp is removed and moved out of an awkward position, connect the wire block and the ramp harness together.
Note! After connecting the block and the wiring harness, put the “-” terminal on the battery if it was previously removed!
3) Next, again connect both fuel pipes to each other and then tighten the fittings that secure them using a wrench.
4) Now place four measuring cups under each nozzle, or if you don’t have any, then place any container under them that has a measuring cup on it.
Note! While you hold the fuel rail in your hands with measuring cups placed under it, let the second person crank the engine with the starter!
5) After your assistant cranks the engine with the starter, at this time you make sure that all the injectors are working well. And also make sure that fuel flows out of the spray part of the nozzle smoothly without deviations and in four jets, as shown in the figure below:
Note! After the measuring cups are filled to the required level, ask an assistant to turn off the ignition, while you look through all the measuring cups and make sure that the amount of fuel in them matches. If the amount of fuel does not match, this will indicate that one of all four injectors is faulty and requires replacement. (You can read how to replace an injector in the article: “Replacing fuel injectors”). In some cases, the injector can simply be cleaned and engine operation will also return to normal! (How to clean a fuel injector from dirt, see the article: “Cleaning injectors”)
6) When the ignition is turned off, carefully inspect all four injectors for defects.
Note! When the ignition is turned off, there should not be any noticeable leaks of fuel from the spray part of the injectors, because this indicates that the fuel injector is not sealed and requires replacement!
Checking the power supply to the injectors:
The check must be carried out if any injector does not work at all after turning on the ignition.
1) First, disconnect the wire block from the injector you need.
2) After disconnecting the block, connect two ends of the wires to the battery and touch the injector contacts with the other end of these wires, and then turn on the ignition.
Note! If the injector starts spraying fuel, then you have a malfunction in the electrical circuit of this injector!
Checking the resistance of the injector windings:
1) To do this, first disconnect the “-” terminal from the battery, and then disconnect the block with wires from the injector itself.
2) Next, connect the contacts of the “ohmmeter” to the electrical connector of the fuel injector and check what resistance it shows.
Note! For the fuel injector to work correctly, in this case the “ohmmeter” should show a resistance of 11–15 ohms. If the resistance is higher or lower, then replace the injector!
Additional video materials: Just below we have prepared a short video clip especially for you.
Which washing is better: ultrasonic or liquid?
We have repeatedly noticed disputes over which is better: washing injectors with additives or ultrasonic washing of injectors using specialized equipment. To be fair, it will be said that ultrasonic cleaning is usually carried out if there are corresponding serious problems (unclear engine idling, etc.). Liquid washing of injector nozzles is good because it carries out preventive cleaning of the entire engine (it is good at removing carbon deposits from the valves). However, liquid washing of injectors works great only with the first stage of injector clogging, but problems may arise with subsequent and more serious problems. It is carried out “blindly” as a preventive measure, which means it is not capable of targeting a specific source of pollution.
But the “ultrasonic” method of exposure is most often used when detailed diagnostics are needed to determine the throughput of the sensors of the actuators (usually carried out in workshops using computer calculations). While cleaning much more and better, this type of flushing costs 2-3 times more than its liquid counterpart. However, you should be careful, since old nozzles, damaged by time and improper operation, can completely deteriorate under the influence of cavitation and lose their original tightness (leak during operation).
Pro tips: how to choose new good quality injectors
All four injectors are removed and installed identically, so we will consider replacing only one injector. The dismantling of the injectors was described in detail above, so we move on to the next stage - replacement.
To select high-quality injectors, give preference to original parts. It is necessary to select injectors for the VAZ 2109 by catalog number, since they come in different sizes and performance.
Source
Removing the fuel rail (step by step)
Fuel rail Car injectors on the VAZ 2109 are located on the fuel rail.
There are four of them here, this is due to the fact that a separate nozzle sprays fuel onto a separate cylinder. And since the nine has four cylinders, we can conclude that the number of injectors is logical. The fuel rail is the bar where the injectors are installed. It is fixed to the inlet pipe using bolts. To the left of it is a fuel pressure control fitting. It is worth noting that removing the fuel rail is the most problematic step in cleaning or replacing injectors.
Removing the fuel rail Disconnect the wire block To remove the fuel rail you need:
How to Clean Injectors on a VAZ 21099 Injector
How to remove and clean the injectors on a VAZ 2109 (injector)?
It is often necessary to remove injectors on a VAZ 2109 from an injection machine. Of course, contact the car service where our client stayed to do it for your money, or take up the craft, gaining invaluable experience and saving an impressive part of your own budget. Make a choice for yourself.
Appearance of devices
Residence
You can't start annotating to remove attachments without first talking about the location of the object you want.
VAZ 2109 car injectors are installed on fuel. They are all 4. This is justified by the fact that any injector sprays fuel onto one very large cylinder. Since nine have four cylinders, we conclude that the number of nozzles is logical.
When Changes Are Needed
There are several signs that indicate the need to remove and check the condition of the fuel injectors. Then a decision is made to clean or replace parts.
Look at the behavior of your car and the engine itself. They will tell you if there is something wrong with the attachments. This can be done as follows:
READ Do-It-Yourself Modification of the VAZ 2110
Delete and change
Now we will directly tell you how to properly remove and replace old injectors that have lost their suitability for new units.
The process for removing all 4 injectors is the same, so there will be no difference in the process.
Perhaps the more problematic step in changing the injector cleaning process is removing the fuel rail. Therefore, we will separately explain how to remove such a node.
Fuel rail. This is the rod where the injectors are needed. It is secured with a pair of bolts on the intake pipe. To the left of the ramp is the fuel pressure control fitting. To remove it you need to:
Real injector cleaning!
Do you want to know in detail what to remove?
fuel nozzle
for injections
VAZ
2108-
VAZ 21099
? Our client remains.
Cleaning nozzles VAZ 2108 21099 2109
cleaning injector
READ How to Remove Europanel VAZ 2112
Please note that under the fuel rail bolts there are washers that must be replaced during reassembly, as it is called, exchange for similar new ones.
READ How to Open the Trunk Using a Starline A61 Key Fob
Disconnect the wire block
Rarely, when changing injectors, this is the only and optimal way to restore the performance of fuel injectors. Try cleaning them. It's not a complicated business, but the savings are impressive. .
cleaning
see also
Steering rack lubricant
- 17 1 20k
Knocking sound when turning the steering wheel
- 24 0 27k
Steering rack malfunctions
- 10 2 23k
Why is the steering rack knocking?
- 58 2 106k
How to eliminate steering rack knocking
- 43 1 63k
This photo report shows in detail how to replace the steering rack on a VAZ 2109 and 21099. Symptoms that indicate a faulty steering rack vary.
You can check this : set the wheels to the neutral position, then if, after sharply turning the steering wheel to the left or right, you hear a knocking or crackling sound in the area of the steering rack, then it’s time for replacement. You can also try tightening the steering rack nut, although this does not always help, and this can also lead to increased resistance when turning the steering wheel.
Or try to repair the steering rack, but this requires skills in carrying out such a procedure, and whoever is interested can just practice on the old one that was removed.
The necessary tools are: a tie rod puller, WD-40, a pair of flathead screwdrivers and a very ordinary set of wrenches.
If you also replaced the steering rods, do not forget to do the wheel alignment.
Pro tips: how to choose new good quality injectors
All four injectors are removed and installed identically, so we will consider replacing only one injector. The dismantling of the injectors was described in detail above, so we move on to the next stage - replacement.
To select high-quality injectors, give preference to original parts. It is necessary to select injectors for the VAZ 2109 by catalog number, since they come in different sizes and performance.
Source
Rail pressure VAZ 2109 injector
Fuel pressure in the car system is one of the important parameters that is used in engine diagnostics. The behavior of the car in various operating modes depends on the pressure. We answer the questions: how to measure the pressure in the fuel rail and how to use it to determine a car malfunction.
To provide information more conveniently, we will divide the article into two large parts:
How to measure the pressure in the fuel system with your own hands
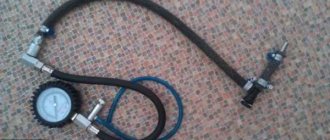
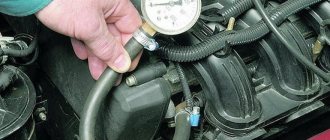
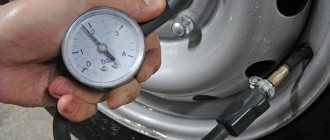
to find out the pressure in the fuel rail . For example, buy a device to check fuel pressure. A kit with a fuel pressure gauge, adapter and drain will cost you 1200-1300 rubles. Pay RUB 300 to the service station and take measurements there. You can also measure the pressure in the fuel system with an air pressure gauge . which is used to measure tire pressure. This is where I will dwell in more detail. Since the site is dedicated to cars of the tenth family, then further figures and some nuances will relate specifically to the VAZ 2110. Otherwise, the procedure is similar to any other car.
I’ll make a small digression right away. The peculiarity of pressure gauges is that their initial scale values have relative inaccuracy. What does it mean. If the air pressure gauge has a scale of up to 16-20 atm (when the measurement limit for fuel is 5-7 atm), then pressure measurements will not be accurate due to this error, which will fall within the initial values of the instrument scale. Therefore, it is correct to check the fuel pressure with a fuel pressure gauge with a limit of 6-7 atm.
Take a pressure gauge (in the photo a device for measuring tire pressure). We wind the foam (plumbing flax) under the pipe and put on an oxygen hose with an internal diameter of 9 mm. Secure with clamps. Place a rag on the generator (so as not to start a fire under the hood). Unscrew the plastic cap on the fuel rail.
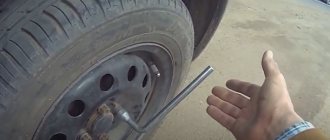
Under the cap there is a hole with a nipple. Unscrew it from the wheel cap. Due to the residual pressure in the rail after removing the nipple, gasoline will splash out.
If desired, you can relieve the pressure in the vehicle's fuel system . To do this, you need to remove the fuel pump fuse (under the right trim of the center console near the ECU, where there are 3 relays and 3 fuses. Usually the fuel pump fuse is on the far left) and wait until the car is running and does not stall.
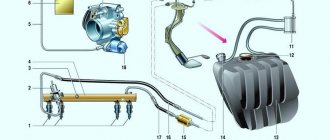
1 – fitting for checking the pressure in the power system; 2 – fuel rail; 3 – nozzles; 4 – fuel line; 5 – fuel tank; 6 – fuel pump module (in the fuel tank); 7 – fuel filter; 8 – tee.
Video showing the process of checking the pressure in the fuel system of a car:
Car diagnostics using fuel pressure
Problems in the operation of the car's fuel system are expressed by failures at high speeds, jerking of the car, or the car does not move when you need to accelerate sharply, and sometimes it simply stalls. Now knowing how to check the pressure in the fuel system of a car, we can diagnose the car ourselves. We can determine which component of the fuel system has failed (fuel pump, fuel pressure regulator (FPR), injectors, filters, etc.), but first we need to understand how the fuel system works: The fuel pump continuously pumps fuel while the engine is running. Excess gasoline is stupidly dumped through the RTD into the return line. The pressure in the ramp changes (increases) not so much with the speed, but at the moment of accelerating (this is clearly visible in the video), because at this moment, the vacuum (vacuum) in the receiver drops and the RTD adds pressure to the ramp. If you turn off the engine, the pressure in the ramp will slowly begin to decrease exponentially. The rate of decline (from several minutes to several hours) depends on the quality of the check valve, which is located on the back of the fuel pump motor.
When diagnosing, pressure measurements in the system are made in different ways:
Checking the fuel pump “for a plug” is quite simple; you need to pinch the return line with pliers (for 2-3 seconds) with the car running and watch the pressure gauge readings.
Another way to check the fuel pump: smoothly raise the engine speed to 3000 rpm. If the pressure gradually drops, then this is a sign of a “dead” pump.
Conclusion
Now, if you stalled far from the city, then diagnosing the car yourself in the field is not a problem for you. Intense acceleration of the car without failures or jerking is the first sign of a serviceable fuel system of the car. If after such a diagnosis the problems remain, then pay attention to other points (compression in the cylinders, ignition module, TPS, etc.).
≡ 4 November 2015 Category: Repair
Methods for cleaning and flushing the injector
The most widely used methods for flushing the injector are:
We recommend: Checking compression in engine cylinders - methods with and without a device
Let's take a closer look at each of them.
Gasoline additives for injector flushing
Additives for flushing the injector are the cheapest and easiest way to clean it from contaminants. Such additives are available in the range of many auto chemical manufacturers. They are most effective when added regularly to the gas tank.
When the first signs of injector contamination appear, you can apply a shock dose of such additives, but provided that the gas tank and pipelines are relatively clean. Otherwise, all the dirt will end up in the electric fuel pump and fine fuel filter, which obviously will not add durability to these components.
Flushing the injector without removing the injectors from the engine
Cleaning and washing the injector without removing the injectors from the engine is carried out using a simple washing unit:
The washing ability of this composition is very high and it easily washes away all deposits (for an example, see the video at the end of the article).
Washing and cleaning the injector with ultrasound
Ultrasonic injector cleaning is by far the most effective cleaning method. To do this, the injectors are removed from the engine and placed in an ultrasonic unit with a special solvent.
The operating principle of the installation is as follows:
The time for such injector flushing usually ranges from half an hour to an hour. The advantages of this method include the uselessness of an expensive solvent, however, a fairly large amount of work is required to remove and reinstall the injectors on the engine.
Checking the pressure in the fuel rail on VAZ and Lada cars with an injection engine
The article will describe a testing technique that does not require special devices.
From the tool you will need:
1. We took a regular gas pressure gauge with a scale of up to 1.0 MPa. It has a threaded connection and screws perfectly onto a 9 mm oxygen hose. You can use a mechanical one to check tire pressure. They are usually inserted into the fuel hoses by 8 mm.
2. Screw it into the hose and tighten it with a clamp:
3. Unscrew the plastic cap from the fuel rail. It should unscrew by hand, but if it hasn’t been touched for a long time, you may need pliers:
4. If the car has just been turned off, then the gas in the ramp is under pressure. First, it is recommended to release the pressure by pressing on the spool and placing a rag or a plastic “bottle” with the neck cut off. It is more convenient to bleed using a wheel cap.
5. Unscrew the nipple with the cap. It is similar to a wheel nipple:
6. We put a hose with a pressure gauge on the threaded part and tighten the connection with a clamp:
7. Start the car and first of all make sure that there are no gasoline leaks from the connections. Then we look at the pressure gauge readings.
8. For fuel systems with “return” (a pressure regulator is installed on the fuel rail, from which a tube goes back to the tank), a pressure of 2.7 atm is considered normal (when re-gasping it should jump up to 3 atmospheres). However, a pressure of 2.5 atm is also acceptable. If the pressure is less, then the fuel system is faulty. Pressure pulsation (0.2 atm) indicates a clogged coarse mesh (located in the tank with the fuel pump).
9. Next, we check the pressure regulator. To check, disconnect the hose going from the regulator to the intake manifold. The fuel pressure should increase to 3.2 atm (at 2.7 initial). Up to 3.0 atm is also acceptable. If the pressure has not changed or changed only slightly (0.1-0.2 atm), then you need to check the fuel pump.
Replacing the VAZ steering rack boot 04/27/17
The purpose of the boot is to prevent dust, liquid or any other dirt from entering the main mechanism, which can cause it to fail.
Over the course of service, this element, like any other, can wear out. The process of removing the boot without dismantling the rack:
- remove the carburetor (injector) from the air filter;
- remove the rubber pipe located above the rail, which performs the function of draining rainwater;
- unscrew the rack protector;
- get rid of steering rods;
- release the rack clamp from the body;
- bite off the cover ties with a tool and remove it;
- clean the surface of the rack and lubricate it with CV joint or regular graphite;
- Before installing a new element, it must be thoroughly lubricated, since its middle part is used while the car is moving;
- After putting on the boot, make sure that it slides easily;
- insert the rods and tighten the bolts;
- clamp the clamps in place and the ties at the edges of the new part;
- perform the remaining manipulations that were performed to provide access to the boot in reverse order.
You need to do the work without balancing, but if you rotated the steering wheel, you will need to set the moving part of the rack to the desired position.
Pressure in the fuel line VAZ 2114
The pressure in the fuel line of an injection engine is an important parameter - if it is low, normal injection by injectors into the cylinders of an internal combustion engine (ICE) will not be ensured. And its high degree is also dangerous - fuel can flood the entire engine compartment, and then a fire will occur.
Car owners may have a question about how to check the pressure in the fuel rail, within what limits should the readings be, what is used to check it, and how to determine what may be faulty in the fuel line? So, in order.
First you should know how the fuel system (TS) works and what elements it consists of. The vehicle includes (elements in order, starting from gasoline intake to its direct injection):
All elements are connected to each other by a fuel line, and in the entire chain, after the pressure regulator (RDT), there is also a return hose through which excess gasoline is discharged into the tank. After the ignition is turned on, fuel passes through the system to the injectors (therefore, there is pressure in the system even when the ignition is on), and when the engine starts, the electronics send a command to the injectors, and gasoline enters the cylinders.
How and with what to check the pressure in a vehicle
They check the pressure in the fuel rail of the VAZ 2114 with a pressure gauge - it is most convenient to connect it on the ramp, and not somewhere else in the line. At the rear of the ramp, in the direction of travel of the car, there is a fitting with a thread and a valve, closed with a plastic cap. When measuring, the pressure gauge adapter is screwed onto the fitting. The pressure gauge is easy to assemble yourself. For this you will need:
We assemble all the elements, tighten the clamps, and the pressure gauge is ready for use. That's it, now you can take measurements. To do this you will need tools:
To measure the pressure in the fuel rail, you need to:
Basic faults
Modern manufacturers produce injectors with a tolerance of 1 micron, that is, the product is capable of performing about a billion operating cycles of fuel dosing and supply. However, they usually fail before their deadline, since their productivity can be sharply reduced due to contamination. The quality of the fuel directly affects the service life of the part.
The main cause of pollution is the inevitable presence of heavy particles in gasoline or diesel fuel.
In this case, the accumulation of dirt mainly occurs immediately after the trip, that is, as soon as the driver turns off the engine. At this moment, the nozzle is very hot from the engine, and the coolant no longer flows because the engine is not running. Light particles of fuel that remain in the body evaporate, and heavy ones settle.
Signs of trouble
The car owner can independently diagnose injector malfunctions. To do this, you need to carefully monitor any changes in engine operation. So, the following signs indicate a problem on any fuel-injected car:
In this case, problems are easiest to notice in the winter: if the injectors are heavily dirty or the rubber seals are worn out, the engine will be very difficult to start “in cold weather”.
Test stand and equipment
Most often, having noticed the above signs, the car owner turns to a service station to check the functionality of the injectors. There are special stands that allow you to quickly find a malfunction. The latest generation equipment is equipped with sensors and modulators that provide high diagnostic accuracy.
The equipment allows you to quickly identify any problems in the operation of injectors
The test stand allows you to test from one to six pieces at a time, while work is carried out in several directions at once:
Inspection usually requires removing them from the engine. The owner does not always have time to complete this procedure, so service centers also offer alternative verification methods. For example, today service stations use instruments for testing directly on the engine. The compact device quickly and accurately detects the efficiency of the injector and signals its malfunction.
Allows you to diagnose problems in each injector in turn
Why might the injector knock?
Sometimes after replacing or repairing an injector, the car owner may hear a knocking sound. Why does it knock if a new product has just been installed? It's all about tightening the connections. It is necessary to securely fix the part with a nut, but do not pinch it. The rubber seal quickly fails, so the body begins to knock loudly when driving.
What to do if diesel fuel is leaking
In some cases, during prolonged use, you may notice that one or more injectors begin to leak. That is, small accumulations of fuel form at the exit from the cylinder head. On car enthusiast forums, the question is often asked what to do in such cases, and car owners usually do the following:
wipe dry the injector and the nut securing the fuel pipe, and the place where the injector is screwed into the head of the internal combustion engine. With ordinary chalk, cover (rub) the indicated places and parts. (If the chalk has darkened, wipe again and cover with chalk again until it remains white) Turn the engine over with the starter 2–5 seconds. If it starts right away, turn it off. Look where it’s leaking. If it’s from under the nut of the fuel pipe, only replacing the pipe or restoring it, an inspection will show. If the injector body is sweating or leaking, then dismantle it and go to the fuel manifold (on the eve of winter, it won’t hurt if you remove all injectors and for diagnostics) if it sweats or leaks between the injector and the head, just remove the injector and change the copper o-ring
Yuri Pobeda
https://www.offroadmaster.com/topic/39398-%D1%82%D0%B5%D1%87%D0%B5%D1%82-%D1%84%D0%BE%D1%80%D1% 81%D1%83%D0%BD%D0%BA%D0%B0-%D0%BD%D0%B0-%D0%B4%D0%B8%D0%B7%D0%B5%D0%BB%D0% B5-%D1%87%D1%82%D0%BE-%D0%BF%D1%80%D0%B8%D0%B4%D1%83%D0%BC%D0%B0%D1%82%D1% 8C/
No fuel supply
If there is no gasoline in the engine, it is not only the injectors that are to blame. It is necessary to check the capacity of the fuel lines. If the hoses are not clogged or leaking, then the problem is with the fuel pump.