The principle of operation of the VAZ 2107 speed sensor
The operation of the speed sensor is based on the Hall effect, which describes the occurrence of electrical impulses when a conductor with direct current is placed in a magnetic field. The sensor generates pulses during the rotation of the output shaft of the VAZ 2107 gearbox. During the time the car travels a kilometer, the VAZ 2107 speed sensor generates about 6000 pulses, the frequency of which allows you to determine the current speed.
Where is the VAZ 2107 speed sensor located?
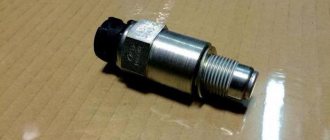
The sensor is mounted on the gearbox in the speedometer cable drive mechanism. To remove and check it, you will have to disconnect the gearbox speedometer cable.
Symptoms of a problem
The main sign of problems in the operation of the sensor is the issuance of the corresponding error code by the on-board computer. Malfunctions may manifest themselves in other signs:
- increased fuel consumption;
- poor engine thrust;
- speedometer not working or working with a large error;
- unstable idle.
Attention! These four symptoms can be caused by problems with other parts of the car.
Signs of breakdown
The car itself can tell you that the DS is out of order. To do this, you just need to look for the appropriate signs of a similar breakdown:
- The speedometer does not work at all or provides incorrect information about the current speed;
- Idling behavior is unstable;
- Gasoline consumption increases;
- The motor does not produce full power.
READ How to make a signal on a VAZ 2107
The practice of VAZ 2109 owners indicates that a more trivial sign of a breakdown of the DS is the engine stopping at idle while coasting, or the engine stopping when the clutch is pressed to change speed.
If the engine breaks down, the “Check Engine” light on the dashboard should light up. If the car is equipped with an on-board computer, then the error code corresponding to the malfunction is 24.
Causes of sensor malfunction
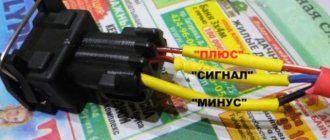
The design of the sensor is quite reliable. The cause of the breakdown is usually oxidized contacts on the sensor or broken wires that go from the sensor to the engine ECU. The contacts should be inspected, if necessary, cleaned and lubricated with “Lithol”. It is better to start searching for broken wires from places close to the plug. There they bend more often and, accordingly, fray and break. At the same time, it is worth checking the grounding of the sensor. The resistance in its network should be about 1 Ohm. If no fault is identified, you need to check the speed sensor itself. To do this you will have to remove it from the car.
Replacing the seven speedometer drive
- in order to remove the part from the box, you need to lower it a little by unscrewing the nut 13 securing the box;
- use a 10mm wrench to unscrew the drive;
- Pull it out a little and turn it to disconnect the connector and unscrew the speed sensor.
- We pull out the part to the end.
Unscrew the box fastening
Unscrew the speedometer cable
Unscrew the speed sensor
Assembly is carried out in reverse order.
Reinstalling the speedometer drive
Note
Now there are still enough fakes on the market, and in order not to buy a low-quality part, check it at least a little. To do this, grab the gear on one side and the output on the other and try to turn it. If the engagement slips, it is better to refrain from such a purchase.
Removing the VAZ 2107 speedometer cable
The procedure for removing the speedometer drive is as follows:
- place the car on a lift or inspection hole;
- disconnect the ground wire from the battery;
- dismantle the instrument panel;
- unscrew the nut securing the cable to the speedometer mechanism and uncouple it;
- tie a wire to the eye of the nut;
- Unscrew the nut securing the flexible drive to the gearbox;
- disconnect the speedometer cable from the box;
- pull the cable out of the car so that the attached guide wire remains in it;
- untie the wire from the nut.
How to check the VAZ speed sensor
A failed speedometer sensor in a VAZ car is easily determined - in this case, the speedometer stops working, and it may also show some signs of life, but display incorrect information.
Useful: VAZ-2104 diagram
Using a tube, pliers or other available tools, rotate the sensor axis. In this case, you should see the voltmeter readings changing: the higher the speed, the higher the voltage (from 0.5 to 10 V). If this does not happen, the sensor requires replacement.
Replacing the speedometer cable on a VAZ 2101-VAZ 2107
Welcome! Speedometer cable - it is responsible for transmitting speed from the gearbox to the instrument panel of the car's speedometer. One end of this cable is connected to the drive gearbox, which is located on the gearbox, and the other end is connected to the speedometer mechanism itself, which in turn is located on the instrument panel.
Note! To replace the cable, you will need to stock up on the following set of tools: First, be sure to stock up on basic tools, such as a screwdriver and wrenches. Next, you will need to take pliers, and also a wire approximately 2 meters long and with a diameter of 0.2-0.5 mm to make it easier to replace the cable!
Where is the speedometer cable located? It is located near the bottom of the gearbox housing and is attached to the gearbox. For clarity, so that you have at least the slightest idea of where the cable is located, look at the photo below, where the arrow indicates the cable:
When should you change the speedometer cable? It must be replaced if:
- Failure, and therefore the speedometer will not show any values on the instrument panel.
- And also when it is deformed and when the nut that secures it to the gearbox or to the speedometer mechanism breaks.
Note! If you have a nut securing the cable to the gearbox, or to the speedometer, then the speedometer needle will jump sharply when driving!
How to replace the speedometer cable on a VAZ 2101-VAZ 2107?
Note! The cable must be replaced on a lift or inspection pit!
Removal: 1) At the beginning of the operation, you will need to remove the instrument panel from the car. (How to remove the instrument panel from a VAZ 2106 car, see the article: “Replacing the instrument panel”) (How to remove the instrument panel on a VAZ 2104 and VAZ 2107, see the article: “Replacing the instrument panel”)
Note! Unfortunately, instructions for removing the instrument panel on other cars of the classic family cannot be found on the Internet, so remove the panel on your car following the example of removing the panel from a VAZ 2104, VAZ 2106, VAZ 2107!
2) Next, using pliers, completely unscrew the nut that secures the cable to the mechanism, and after unscrewing, disconnect the cable.
Note! After disconnecting the cable, tie a 2 meter long wire to the cable nut by the eyes!
3) Then move to the bottom of the car, and there, unscrew the nut that secures the cable to the gearbox (it is indicated by the arrow), and after unscrewing the nut, disconnect the cable.
4) Now take the cable in your hands and pull it out of the car.
Note! Pull out the cable carefully; the wire that is connected to the cable nut should not be completely stretched out and, as a result, removed from the car!
5) Finally, untie the wire from the nut.
Note! To extend the life of the cable, you can lubricate its surface with a special lubricant called “Litol-24”; to do this, before installing a new cable, first pull it out of the sheath starting from the side that is connected to the gearbox gearbox, and then lubricate it for “2/3 of the length”. lubricate it!
Do the entire installation of the cable in the reverse order of removal, but for clarity we will show you a small part of the installation:
1) First, take the new cable in your hands and tie the wire previously untied from the old cable to its nut.
2) Then sit in the passenger compartment and, pulling the wire, extend one end of the cable into the vehicle interior.
Note! To prevent you from getting confused, remember one important thing: The end of the cable that is connected to the gearbox located on the box is equipped with a protective cover, so install the cable correctly!
3) And at the end of the operation, use a screwdriver to tuck the cover into place.
Note! After installing the cable, check it, make sure that it is not bent in any places, and only then start the engine and drive it to see how it works!
Additional video clip: You can clearly see the second method of replacing the speedometer cable in a video clip prepared especially for you, in which everything is described and shown in detail.
Video on the topic
Hi all! I came across this article, maybe it will be useful to someone, or maybe it will refresh someone’s memory!))))) Sensors on injection engines.
? MAF (Mass Air Flow Sensor) Usually installed on the air filter housing and measures the amount of air intake (counted in kilograms per hour). It is IMPOSSIBLE to say that it constantly breaks down, but the reliability is at a fairly high level. However, it can still fail due to moisture, oil, grains of sand or dust; this happens if a filter of zero resistance is installed (or there is no filter at all). Another big MINUS - if you tune the engine and pump the standard VAZ to 150 - 160 hp, then it cannot calculate the amount of air more, because it is simply not designed for this. PROBLEMS: Over-indication. At idle speed of 10-20% - unstable operation, constantly floating speed, poor start. Understatement of readings. At high speeds, the engine becomes dull and fuel consumption increases.
? TPS (Throttle Position Sensor) It is installed on the side of the throttle itself and on the same axis with the throttle valve. Reads readings of opening or closing, respectively, pressing the gas pedal. At one time there were many fakes that did not last even a month, so you should choose time-tested ones, preferably those that were installed at the factory. There were also cases when they were knocked down or broken by a high-pressure jet at car washes. If these rules are taken into account, they can live quite a long time. Malfunctions: Dips appear when pressing the gas pedal. Increase in speed (for no reason) at idle. Jerks and dips under load
? DTOZH (Coolant Temperature Sensor) ON VAZ is installed between the block head and the thermostat. The structure has two contacts (it should be noted that a single-contact one for the instrument panel is often attached next to it - they cannot be confused). The main task is to regulate the fuel mixture. Here you can draw an analogy with a carburetor, there you do it by suction, but here everything is done automatically using this sensor. The colder the engine, the richer the fuel mixture. Essentially, it is a resistor (thermistor) whose resistance changes depending on the temperature. Standard values for a VAZ are 100 degrees Celsius - resistance is about 176 Ohms, “25 deg.” – 2795 Ohm, “0gr.” – 9420 Ohm, “-20” degrees Celsius – 28680 Ohm. It should be noted that the coolant temperature affects almost all engine control characteristics. Structurally, the sensor is very reliable, there is essentially nothing to break. The main problems may be related to: Loss of contact inside the sensor, which occurs due to VERY long operation. Broken insulation or broken wiring to it. If it fails: Turning on the fan on a cold engine Does not turn on when it’s hot (maximum temperatures) Difficulty starting a hot engine Increased gasoline consumption
? DD (Knock Sensor) Usually installed on the cylinder block, between the second and third cylinders. At the moment there are two options: Detonation-resonance (similar to a barrel). Broadband (looks like a tablet) They are not interchangeable; they cannot be used instead of another, because they work according to slightly different algorithms. Structurally, it is very reliable (again, there is nothing special to break). The principle of operation is this - (can be compared with a piezo lighter for a stove), the more the motor oscillates (impacts), the more it increases the voltage. Thus, detonation knocks are monitored. The ECU reads the readings and sets the ignition timing. There is a large detonation - a later ignition is installed. PROBLEMS: If it fails, the engine does not develop power (stalls), operation is not smooth, and fuel consumption also increases.
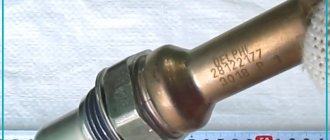
? DK (Oxygen Sensor) - lambda - umbrella Installed either next to the catalyst or on the exhaust pipe of the muffler. Some foreign cars have two of them (before the catalyst and after). The main task is to determine the remaining oxygen in the exhaust. If detected, the fuel mixture is lean; if not detected, the fuel mixture is rich. The readings, as usual, are sent to the ECU and used to adjust the fuel supply. This is a fairly reliable electrochemical design, however, it can also fail. If it breaks, fuel consumption increases, as well as emissions of harmful substances.
? DPKV (Crankshaft Position Sensor) It should be noted that this is one of the main sensors that is needed for the operation of the entire engine as a whole. Generates an electrical signal when the angular position of a special toothed disk, which is mounted on the crankshaft, changes. A very durable and very simple element. Installed on the oil pump cover, it is structurally similar to a piece of magnet with a coil of thin wire. Designed to determine the cylinder, fuel supply time, and spark supply time. FAILURE: If it fails, the motor stops working! It also happens that the engine speed is limited to around 3000 - 5000.
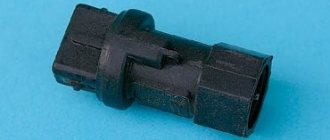
? DS (Speed Sensor) Generates pulses in the ECU, the number of which per unit time is proportional to the speed of the vehicle. Installed on the gearbox, it sees the rotation of the shafts, and thus the speed is calculated. Needed to develop optimal engine operating mode. The sensor itself can work for a long time, but the contacts or connectors often oxidize. Failure leads to deterioration in driving characteristics; the ECU simply cannot understand whether the car is stationary or moving and at what speed. FAULTS: Reduced idle speed, drops in speed during heavy braking, the engine becomes a little dull. Driving may not be possible on some Chevrolet vehicles.
? DF (Phase Sensor) or CPRV (Camshaft Position Sensor) Determines the angular position of the camshaft. For eight-valve engines, it is fixed at the end of the block head. On a sixteen-valve engine there is about 1 cylinder on the block head. Until about 2005, it was not installed on 8-valve engines, which means that fuel injection into the intake manifold will be carried out in pairs-parallel mode. That is, two injectors open at once. The power units in which it is installed are characterized by phased injection, that is, only one injector nozzle opens into which fuel should be injected. FAULTS: If it fails, the car automatically switches to pairwise-parallel mode, which leads to excess fuel consumption of 10-15%.
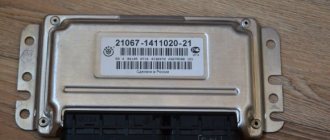
While the vehicle is moving, the VAZ 2107 speed sensor (injector) generates speed data sent to the electronic engine control unit. Its breakdown causes injection control errors and leads to a drop in engine power and an increase in fuel consumption. You can check and replace the sensor yourself. To do this, you will need a garage with an inspection hole, a slotted screwdriver, a 22 mm wrench and a multimeter or test lamp.
- The principle of operation of the VAZ 2107 speed sensor
- Where is the VAZ 2107 speed sensor located?
- Symptoms of a problem
- Causes of sensor malfunction
- How to remove the speed sensor VAZ 2107
- Checking the speed sensor
VAZ sensors - the main sensors on injection VAZ cars
So, dear visitors, today we will tell you about the main sensors on the VAZ. Since the operating principle of injection engines in the AvtoVAZ line is the same, in principle we have put together a manual on the sensors that are installed on injection VAZs by the manufacturer, and have prepared a brief description of the operating principles and purpose of each of the sensors below. Indeed, in essence, the very principle of operation of an injection engine is the interconnected work of the “brains” (ECU) and various kinds of sensors; there is a constant exchange of information between them and, depending on the totality of certain indicators of the sensors, the controller prepares the mixture and ensures stable and correct operation of the engine.
So let's start with the crankshaft position sensor DPKV . (pictured above)
Without this extremely important sensor and if it malfunctions, the car simply will not start. DPKV generates signals to the ECU using a special toothed disk, on which, upon careful examination, you can see what appears to be a “missing” tooth; this disk is installed directly on the crankshaft. DPKV on VAZs is located on the oil pump cover. The sensor is quite reliable and its failure is rare. But nevertheless, if it fails, you will have problems. We recommend carrying it with you in the glove compartment just in case.
Let's move on. Another important sensor is the throttle position sensor TPS .
This sensor works in conjunction with the idle air control valve to determine how open the throttle valve is. If this sensor begins to fail or fails altogether, then we will not see a stable idle and the engine speed will live its own life. Dips may also be felt, the engine will pull jerkily, in general it is not pleasant.
Now we are presented with a phase sensor, or camshaft position sensor DPRV .
It determines the position of the camshaft. Not used on 8 valve engines of early injection VAZs. Participates in the formation of phased injection, that is, the desired injector of a particular cylinder works at the right moment. If the sensor is faulty, then the system works as if it were not there, and fuel is supplied in pairs-parallel mode, which leads to excessive consumption of gasoline with all that it entails. That is, you can drive, but it is not necessary; it is better to replace the faulty sensor.
Now let's look at the DD Knock Sensor .
It is installed directly on the engine block between the third and second cylinders. There are two types - resonant and broadband. These two types of sensors are not interchangeable. It corresponds entirely to its name, monitors engine detonation and, depending on the presence and strength of detonation, helps the “brains” adjust the ignition timing (ignition timing). If the sensor fails, the engine will slow down and gas consumption will increase.
Correctly removing the speed sensor from a VAZ-2107 is not difficult
To do this, you need to perform the following actions: – place the car above the inspection ditch or lift it on a lift; – when using an inspection ditch, we fix the wheels with a parking brake and install anti-roll devices; – use a screwdriver to unscrew the speedometer cable fixing screw; – pull out the cable from the drive socket;
– disconnect the plastic clamp of the wiring harness; – pressing the clamp springs, unhook the speed sensor connector; – using a 22 mm wrench, unscrew the sensor and remove it.
To assemble the unit, we will perform all the work in reverse order.
Replacement
Before repairs, it is necessary to do preparatory work. Firstly, you will need a pit, overpass or lift. Secondly, you will need a tool: a powerful flat-head screwdriver and a 22mm open-end wrench. The sequence for removing the speed sensor on an injection VAZ 2107 is as follows:
- Unscrew the speedometer cable nut and remove it.
- Press the connector lock and disconnect the connection.
- Use a 22 mm wrench to unscrew the sensor itself.
Assembly of the unit is carried out in the reverse order. After replacement, most likely, a check light will light up on the instrument panel. This is a circuit fault. To fix the problem, you need to clear the error through the application.
How to replace a VAZ 2110 speed sensor with your own hands - step-by-step guide
- Keys for “21”, “14”, “10”.
- Sealant.
- New speed sensor for VAZ 2110.
2. Next, unscrew the sensor. To unscrew the VAZ 2110 speed sensor you do not need keys; this is done by hand in a counterclockwise direction. If problems arise, use the key to “21”.
3. After the old speed sensor is removed, take the new one and put it on the drive.
5. Using a “10” wrench, unscrew the nut along with the washer and pull it out. If you fail to do this, then using the key at “14”, try to loosen it a little and try again.
6. Now you can replace the rubber seal in the form of a ring. Since the rod is not fixed in the drive itself, it must be lubricated with sealant.
One of the key elements of the contactless ignition system is the Hall sensor of the VAZ 2107. If this element breaks down, operation of the car is practically impossible, since the switch will not produce impulses for sparking. Let's figure out how this sensor works, how its malfunctions manifest themselves, and how you can replace the Hall sensor with your own hands.
How to replace the speedometer cable on a VAZ 2101-VAZ 2107?
Note!
The cable must be replaced on a lift or inspection pit! Removal: 1) At the beginning of the operation, you will need to remove the instrument panel from the car. (How to remove the instrument panel from a VAZ 2106 car, see the article: “”) (How to remove the instrument panel from a VAZ 2104 and VAZ 2107, see the article: “”)
Note! Unfortunately, instructions for removing the instrument panel on other cars of the classic family cannot be found on the Internet, so remove the panel on your car following the example of removing the panel from a VAZ 2104, VAZ 2106, VAZ 2107!
2) Next, using pliers, completely unscrew the nut that secures the cable to the mechanism, and after unscrewing, disconnect the cable.
Note! After disconnecting the cable, tie a 2-meter long wire to the cable nut by the eyes!
3) Then move to the bottom of the car, and there, unscrew the nut that secures the cable to the gearbox (it is indicated by the arrow), and after unscrewing the nut, disconnect the cable.
4) Now take the cable in your hands and pull it out of the car.
Note! Pull out the cable carefully; the wire that is connected to the cable nut should not be completely stretched out and, as a result, removed from the car!
5) Finally, untie the wire from the nut.
Installation:
Note! To extend the life of the cable, you can lubricate its surface with a special lubricant called “Litol-24”; to do this, before installing a new cable, first pull it out of the sheath starting from the side that is connected to the gearbox gearbox, and then lubricate it for “2/3 of the length”. lubricate it!
Do the entire installation of the cable in the reverse order of removal, but for clarity we will show you a small part of the installation:
1) First, take the new cable in your hands and tie the wire previously untied from the old cable to its nut.
2) Then sit in the passenger compartment and, pulling the wire, extend one end of the cable into the vehicle interior.
Note! To prevent you from getting confused, remember one important thing: The end of the cable that is connected to the gearbox located on the box is equipped with a protective cover, so install the cable correctly!
3) And at the end of the operation, use a screwdriver to tuck the cover into place.
Note! After installing the cable, check it, make sure that it is not bent in any places, and only then start the engine and drive it to see how it works!
Additional video clip: You can clearly see the second method of replacing the speedometer cable in a video clip prepared especially for you, in which everything is described and shown in detail.
Instrument panel in the injection VAZ 21074
The instrument panel of the VAZ 21074 contains the most important vehicle operation indicators. There are not very many of them, but every car enthusiast must know them in order to promptly pay attention to this or that malfunction.
Drivers with extensive driving experience when moving constantly pay attention to the instrument panel to evaluate the functioning of the vehicle systems, and if the need arises, they can adjust their actions.
Therefore, today we will talk in more detail about the dashboard of a VAZ 21074 car with an injector engine.
VAZ 21074
So, this article provides answers to these fairly common questions:
- What is the instrument panel of the VAZ 21074 on an injector engine?
- What is needed when repairing a speedometer?
- How to easily dismantle the instrument panel of a VAZ 21074 on an injector type engine?
- How to repair the speed sensor of a VAZ 21074 car yourself?
Speedometer repair
Today, a car is probably the most comfortable way to travel. A car has many advantages over public transport, but each of these advantages is in one way or another associated with the cost of money and your time. Naturally, one way or another, you will have to set aside time to care for your vehicle, because you cannot do without breakdowns. A fairly common problem with the instrument panel is a malfunction of the speedometer. Naturally, experienced motorists can quite easily determine the speed of a car by eye, but inexperienced drivers will not be able to do this. To avoid dangerous situations on the roads, every driver must be able to repair the dashboard.
So, to repair the speed sensor on a VAZ 21074 car you will need:
- Set of tools;
- Instructions for using the vehicle;
- Sealant;
- Plastic fork.
Instrument panel VAZ 21074
Naturally, not every owner of a VAZ 21074 car has instructions for using the vehicle, but if you have one, then first study it, and only then start repairing the speedometer. The instructions for using the car contain a huge number of useful tips that it is advisable to take into account when traveling by car. Probably, many people now have a question, how to determine a malfunction of the speed sensor, which measures the maximum speed of the car. So, here are a few main signs of a malfunctioning speedometer:
- The speedometer needle moves regularly.
- When the arrows are in one location, they stop moving altogether.
After diagnosing a malfunction of the speedometer, the following actions must be taken:
- The teeth on the gears of the speed sensor, which are located on the back of the instrument panel, are worn out or worn out.
- The speed sensor cable has broken. In this case, it is necessary to completely replace the sensor.
- The shape of the arrow that measures the speed of the car has changed. In this case, it is necessary to replace the arrow, and to do this you need to carefully pry off the damaged part using a plastic fork and install a new arrow.
Having diagnosed the cause of the speedometer malfunction, replace the broken part, but if you were unable to find the cause of the breakdown, then simply try to correct the arrow; perhaps it is simply stuck. After carrying out repair work, carefully reassemble everything in the reverse order, because careless assembly may affect the functioning of the vehicle.
Installing a VAZ 2107 speedometer cable
Before installing a new cable, it must be pulled out of the casing, lubricated with Litol grease and inserted into place.
Next, you need to tie the guide wire to the nut securing the cable to the speedometer and pull it from the bottom of the car into the interior.
Further actions are performed in the reverse order of removing the speedometer cable.
After installing the cable, you must insert the rubber protective cover located on the braid. into a hole in the car body. through which the cable passes into the cabin.
This completes the repair of the VAZ 2107 speedometer
In order for the driver to be able to control the speed of the vehicle, a speedometer or speed indicator is provided in the design of the instrument panel. Few people think about how it works until it malfunctions. The drive mechanism is responsible for its operation, for which the VAZ 2107 uses a cable. This speedometer cable on the VAZ 2107 is far from eternal, so if a malfunction occurs, it will need to be replaced.
- The speedometer on the VAZ 21099 injector does not work
DPKV (Crankshaft Position Sensor)
It should be noted that this is one of the main sensors that is needed for the operation of the entire engine as a whole.
Generates an electrical signal when the angular position of a special toothed disk, which is mounted on the crankshaft, changes. A very durable and very simple element. Installed on the oil pump cover, it is structurally similar to a piece of magnet with a coil of thin wire. Designed to determine the cylinder, fuel supply time, and spark supply time.
Product delivery options
Note! Below are the shipping methods available specifically for this product. Payment options may vary depending on the shipping method. Detailed information can be found on the “Delivery and Payment” page.
Parcel by Russian Post
Available payment methods:
- Cash on delivery (payment upon receipt)
- Using cards Sberbank, VTB, Post Bank, Tinkoff
- Yandex money
- QIWI
- ROBOKASSA
Shipping throughout Russia. Delivery time is from 5 to 12 days.
Parcel by Russian Post 1st class
Available payment methods:
- Cash on delivery (payment upon receipt)
- Using cards Sberbank, VTB, Post Bank, Tinkoff
- Yandex money
- QIWI
- ROBOKASSA
Shipping throughout Russia. Delivery time is from 2 to 5 days. More expensive than regular delivery by Russian Post, approximately 50%. Parcel weight up to 2.5 kg
Express Parcel EMS
Available payment methods:
- Cash on delivery (payment upon receipt)
- Using cards Sberbank, VTB, Post Bank, Tinkoff
- Yandex money
- QIWI
- ROBOKASSA
Shipping throughout Russia. Delivery time is from 3 to 7 days. More expensive than regular delivery by Russian Post, approximately 100%.
Transport companies
Available payment methods:
- Using cards Sberbank, VTB, Post Bank, Tinkoff
- Yandex money
- QIWI
- ROBOKASSA
Delivery is possible to any locality where there is a representative office of the transport company. Delivery time is from 2 to 10 days. Sending large parcels is approximately 50% more profitable than by Russian Post.