Main directions of modernization
Supercharger compressor
Installing a supercharger compressor on a Lada Priora with your own hands will not be difficult; it is fixed with standard fastening units, the drive is carried out by putting a belt on the crankshaft pulley, thereby increasing engine productivity. After installing a supercharger on their car, car owners noted an increase in power by a maximum of 50%, but fuel consumption also increased after such actions.
Turbocharging
Installing a turbocharger is a more advantageous way to increase engine efficiency compared to a supercharger compressor, because it operates using exhaust gases. But it should be noted that turbocharging is more finicky in operation compared to a mechanical supercharger, since it needs to be constantly cooled and the oil must be changed frequently.
Engine rechip
Chip tuning is aimed at reducing fuel consumption and increasing the dynamic performance of the engine by reprogramming the ECU parameters.
Such tuning does not imply changes in the engine design, only the settings of the control unit change, after which the control unit changes the engine operating mode. Tuning cars this way has long been not uncommon. More and more car enthusiasts are trying to start with this tuning, since there are no serious interventions in the engine design, and new settings can always be reset and returned to factory settings.
Cylinder boring
By increasing the working volume of the cylinders by boring them and polishing their walls, you can significantly increase the power of the power unit, but at the same time, fuel consumption will also increase.
The positive effect of increasing power from this procedure is due to the fact that the force acting on the pistons increases, and their friction against the cylinder walls decreases.
Piston group and crankshaft
Increasing the productivity of the Lada Priora engine can be achieved by replacing the piston group and crankshaft. This requires the selection of special low pistons and a crankshaft with increased lift.
The replacement allows the pistons to be raised and lowered to maximum levels, which contributes to better filling of the combustible mixture with oxygen and its complete combustion.
Engine cylinder head
Another popular way to increase the power of a power unit is to modify the cylinder head.
First of all, the inlet and outlet channels of the cylinder head are subject to modernization. This is done to improve cylinder filling by reducing losses in the channels of the cylinder block. It is important to take into account that the gas mixture in the channels moves at high speeds and any local irregularities will lead to a slowdown in flow, which means worse filling and loss of power.
To achieve good results when upgrading in this way, you need to perform the following steps:
Carrying out this work on engine tuning is a delicate and painstaking matter. But as a result, the power will increase by 15%.
So we looked at the main directions of tuning the Priora engine, which can be done either with your own hands or by turning to a car service center for help.
Lada Priora is an excellent modern high-speed domestic car that will give its owner driving pleasure with proper care and after proper tuning.
Source
How to check a coil
The device can be tested in three different ways:
- visually inspecting;
- measuring the resistance at the winding contacts;
- by disconnecting the terminals one by one while the engine is running.
The first method is the simplest
. We disconnect the part and visually inspect it. The body must be intact, free of carbon deposits and melting. It wouldn’t hurt to smell the device – it shouldn’t smell like burning. It’s a good idea to compare a serviceable part with one that is suspected of being broken.
Second way
involves measuring the resistance of both windings with a multimeter. It is the most reliable because it provides the driver with precise coil winding parameters. To check the first probe of the device is placed on the input terminals. How much should the measurement result be? Readings should be between 0.4 and 2 ohms. To measure the resistance of the secondary, one probe is connected to the contact, the second to the spring, which goes directly to the winding. The result will differ for different part models. Typically it is in the range from 6 to 20 kOhm. If the measurements show less, this is a cause for concern.
Third way
suitable only for individual or four-lead coils will require the following steps:
- start the engine;
- disconnect the wires from the coils one by one;
- observe changes in the operation of the cylinder.
If no changes occur during the next disconnection, the part from which the wire was disconnected is faulty. The operation of the cylinder is checked primarily by ear. With minor deviations in the voltage supplied to the spark plugs, it is often quite difficult to feel the difference. Therefore, this method cannot be called accurate.
Tuning the Priora 126 engine for 20-30 thousand rubles
In the comments they asked a question about Priora. What can be done for 20-30 thousand rubles. with a motor to make it go better.
Let's first consider the situation for 30,000, and then the minimum for 20,000.
For 30,000 you can bore the channels, throw in the shafts , change the throttle valve, injectors and calibrate the engine.
Now let’s look at how much each position costs. First, let's go through the material. 16-valve shafts cost from 6500 and above. I would eventually install some turbo shafts. Because the engine will spin no more than 7000, the engine is quite low and in the future it will seem to you that the increase is not enough, you will get tuning disease and will continue to charge the engine. In order to have the most important foundation for development, you buy turbo shafts, say 9.6, and 10.1 for the intake and exhaust. In principle, a small overlap is very good for a low-end motor. They cost approximately 6800 from the manufacturer. By the exhaust. Install a spider that simply replaces the catalyst. It costs around 1500 rubles. You can also change the throttle valve . It costs about 1000 rubles, with a diameter of 54 for a standard receiver. Further, Bosch 107 injectors cost from 2000 rubles, depending on the store where you buy them. You will also need consumables in the region of 1000 rubles. There are all sorts of gaskets. Valves, light T-shaped ones, cost from 3500 depending on who the manufacturer is. This is all the material you have to buy. Now let's look at the work. Boring of channels starts from about 3500. Removing and installing the cylinder head head and assembling and disassembling it around 5000. You can find it cheaper, it doesn’t require high qualifications. Lay the shafts, i.e. make a cut for cams from 1000 rubles. It is advisable to have a more experienced person do this. Calibrate the motor. Naturally, when you have done all this, bored out the channels, installed valves, exhaust, throttle valve, injectors, now you can tune the engine, otherwise the car won’t really drive, there will be failures with an enriched mixture. In general, calibration costs from 5000. A fairly simple configuration. Don’t skimp on this because the calibrators will determine everything optimally.
Let's consider the option for 20,000 rubles.
We simply bore out the channels and install the spider exhaust we talked about. We change the injectors because the standard ones are not enough in any case. We also take into account work expenses. You need to remove, install, calibrate. Basically everything.
In the first case, the costs were 30,500 rubles, in the second case, 19,000. In the first case, you will get about 140 hp, in the second case, about 120 hp. with normal torque and resource. Also in the first case with shafts. I recommend bottom shafts. There are no sliding gears required. It will be possible to install factory ones if the phases are made a little wider, naturally the ride will be a little better, but there will be costs for sliding gears. Why exactly this motor configuration, why do I recommend doing this? In a sense, you have prepared the foundation and the engine is almost ready. All that remains is to change the piston, intake manifold and install the turbine. If you are not a supporter of turbo, but a supporter of aspirated engines. You just need to change the hard springs, install a normal Opel direct-flow exhaust, a receiver and you will get a motor with more powerful performance. There is a standard Priorovskaya piston. All work was done head on.
Types of ignition coils
The structure of the coils of different car models may differ. Let's look at a few different types.
According to the principle of operation, ignition coils can be divided into two main types: single-spark and double-spark.
- Single-spark technology - each spark plug has its own coil.
- Double-spark technology - one ignition coil controls the ignition of the mixture in two cylinders.
Depending on the structure and operating features, there are four types of ignition coils.
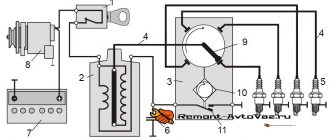
Ignition coil with distributor. In modern cars, such ignition coils are no longer used. However, they can still be found in older cars, where they were used until the 1990s. Such coils create a high voltage pulse that passes through the ignition wire to the mechanical ignition distributor (distributor). This in turn transmits a high voltage pulse to the corresponding ignition wire, through which voltage is supplied to the desired cylinder.
Ignition module. The ignition module consists of several ignition coils that create high voltage pulses for the spark plugs. These impulses are supplied to the spark plugs through the corresponding high-voltage terminals and ignition wires. There are single-spark and double-spark ignition modules.
Individual ignition coil. Individual (plug-in) ignition coils do not require the use of high-voltage wires. They are installed directly on the spark plugs, creating a high voltage pulse directly at the spark plug. The advantage of this solution is that there is no voltage loss in the wires
In addition, this compact design saves space, which is especially important for modern cars.
System (“rack”) of ignition coils. This type consists of several coils combined in a single compact housing.
Engine tuning VAZ 21126 1.6 16 cells, installation on Lada Priora sedan.
On November 1, we began a project for a motor for installation on the Priora. The task was set by the customer as follows: “The engine should start, but when you want to drive slowly - so that it is comfortable, without fuss, it starts without problems even from autostart in the cold.” Since the customer lives 2000 km away. from us, it was necessary to prepare the engine for its arrival to us and then promptly install it. Accordingly, we needed a donor engine, on the basis of which we could build a new engine. It was decided to build a motor based on the VAZ 21126 engine. There was no point in taking a new one, so we began searching for a used one. After a little searching we found an option for 20,000 rubles.
He looked something like that, did not inspire confidence.
There was nothing attached to it. We turned the flywheel, it turned, the engine sneezed, according to the seller it was working, we decided to take it.
We brought the engine to our place and began to disassemble it. In a word - lucky. The motor turned out to be no surprises. The piston was no longer original, the valves were changed. But what we needed from it was intact - the head and block, the rest was thrown into the trash. The crankshaft appeared to be in good condition, but later began to run out and was thrown into the bin.
First of all, we sent the block and head to the wash, after which the channels were cleaned. For beauty, the block was painted blue. The block had to be bored to the first repair size. And we sent the block head to our friends, they bored out the inlet and outlet channels on a specialized CNC machine.
At the same time, we began purchasing the necessary spare parts. parts. We ordered forged pistons 82.5 with rings, took a special set, they don’t rattle when cold. Lightweight valves, receiver, camshafts 9.76, Volgov injectors, throttle at 54 and then on little things. They didn’t trust the cooling system with the technical pump; they installed an imported one, which we had already tested. We selected a timing belt with rollers similar to VAZ ones, but which are installed on foreign cars and accordingly ordered them through a dealer. We went this way because... It is very difficult to find an original kit outside the factory, but this way we get proven quality. The crankshaft was taken from the factory.
When the block and head were ready and all the iron was collected, assembly began.
This is how the head turned out.
And this is already assembled with the block.
They brought us a fancy receiver, but the valve cover had to be slightly modified to accommodate it.
This is how handsome he turned out.
The engine was ready when the customer arrived. We immediately began installing and connecting the engine. At the same time, the gearbox was removed, because it also needed to be improved. We disassembled it, replaced consumables, installed a row of 104 and a main pair of 4.1. We also installed a 6 kg screw lock. We assembled it, rolled it out on the stand and for installation. The correct spider was already installed on the customer's car; they did not touch it.
As soon as everything was installed on the car, they started it right away. The engine started, but it worked without enthusiasm. It was necessary to write a program for this motor. Why did we turn to our friend from AvtoVAZ? Calibration took six hours. A professional, you can see right away. After which the engine started moving.
So he drove off, pedal to the metal.
And that's how it sounded at idle.
This is the engine compartment of this car.
Of course, later they put things in order in the engine compartment, laid out the wires nicely, etc.
The motor turned out great. We had great pleasure driving the car. During the races, the emotions of those in the car went off scale, and it was impossible to do without a strong word. And the customer is happy, everything turned out as he wanted. When necessary, the engine stalls. And at the same time, you can comfortably move around the city at speeds of up to 80 km/h, without jolts or jerks, in high gears. In cold weather, the engine started easily from autostart.
The car was handed over to the owner and he drove home with a satisfied expression on his face.
We express our gratitude to our workshop colleagues who helped us with the construction of the motor.
McSystem › Blog › To the blog: Will a spark ignite a flame? Not always!
This modification will be useful in almost the entire line of VAZ injection engines, regardless of the type and composition of the ECM equipment and the ignition system in particular.
Immediately a warning - based on the results of comments and questions.! ! ! Intervening and making changes to the electrical circuit of a car requires at least basic skills in electrical engineering and awareness of the actions being performed! ! !If you feel that the electrical circuits and electrics of the car are not your profile, contact a more qualified person or an experienced auto electrician. This is in your best interests. And it will save you from unpredictable consequences.
Updates and additions are at the end of the article. A detailed detailed analysis of changes in the ignition system after modifications are described here:
Part two.
Expanded results In order. Engine VAZ 21124. 1.6 liters, 16 valves. Individual ignition coils (or dual module with high-voltage wires). Everything is beautiful. And at first glance, it seems that everything is thought out, so it should work clearly and reliably. It turns out that this is far from true. This is a VAZ!
Quite a lot has been written about ignition problems on this engine - about the choice of spark plugs, replacement and selection of individual ignition coils (hereinafter - IKZ).
So I came face to face with this problem. The main manifestations are the engine rotates unevenly at idle (speeds dance in the range of approximately 720-840 rpm), sluggish acceleration with twitching, increased consumption. In principle, most people understand - misfires, rare , but there is.
The ECU doesn't see them directly. Last year, one coil clearly started to fail - the ECU saw it. I replaced it and it started to loosen up a bit. But still the engine was missing something. What a good spark! Here's about this in detail. From the versions: - replacing the spark plugs (the current NGKs lasted only 7 tons km) with something more expensive from the "platinum, iridium" series, etc. - a costly option. - changing the IKZ, but for them a little more than 7 years (the original BOSH ones are there, the mileage is 75 tkm) - it’s a little expensive (the cost of one IKZ is around 540 UAH ($22), and there are four of them) and there is no confidence that the problem will go away. - Mass air flow sensor, which is also not fun... - look into ECU for serviceability of keys, current-limiting resistors, etc. Acting at random or based on assumptions is not my method or my approach.
Reading the ECU showed: 1.
Speed jumps2. Injection time jumps, slightly3. OZ jumps at XX (9-15 degrees) - a bit much4. Power supply, mass air flow sensor, air sensing sensor - everything is stable and beautiful.5. The ECU masses are all ideal (previous modifications and correct wiring were made) Verdict - unstable sparking.
The ICP parameters were measured - the resistance of the primary winding, inductance, the resistance of the secondary winding (taking into account the diode in the high-voltage circuit), checking for the absence of short-circuited turns - the norm.
The coils have a minimal (± 2%) spread and nothing alarming in the parameters. More on this later. On the hastily assembled “stand” there is a normal spark, a little weaker in appearance than on a classic with a contactless ignition system, but still clear throughout the entire range of rotational speeds (2 - 45 Hz), with an accumulation time of 2.0 ms. The coils are alive. The rubber caps in the explosive part of the coil have been replaced. To complete the picture, I decided to look at the diagrams on the coils with an oscilloscope on the engine, pulled out my C1-65A - a reliable, proven workhorse to the car and off we go. The ignition is on. The engine is running. On board the network (to the battery) 14.35V, which at XX, one hundred at 2000 rpm is stable. Amazing! Let's see. As usual, I start with power to the coils (+12V from the ignition switch) and I am HORROR! On the coils, as well as on the IKZ harness connector, the ripple is exactly 2.5V. I was not mistaken, I measured it in 2 modes (and the oscilloscope has been an everyday tool for many years and not the only working tool - there is no room for doubt). I apologize for the bad photos - the scan is slow and the shutter speed in the camera is short.
source
Tags: tuning
Comments 36
don’t be fooled by all sorts of links 33 sports where as many as 143 horses are removed on rollers 9.12 277), you will need shafts of at least 9.8 306 as the best option Stolniks, split gears, a larger receiver with short channels, but not a bad option 128 receiver, worse Stinger 3.3 liter, DZ 54 mm, Volgo injectors, spider 4-2-1 of course and further forward flow, January 7.2 to skate this whole thing online, about 140-150 forces should come out of this config, but these forces will be revealed at rpm 7000-8000, while at the low end it will be a little difficult to move around the city, to compensate for the low end it is necessary to increase the engine volume due to a larger piston stroke, in general, this whole thing is not cheap, is it worth it?
Priora engine characteristics
Years of production – (2007 – present day) Cylinder block material – cast iron Power system – injector Type – in-line Number of cylinders – 4 Valves per cylinder – 4 Piston stroke – 75.6 mm Cylinder diameter – 82 mm Compression ratio – 11 Priora engine volume – 1597 cm3 .cube Engine power of the Lada Priora is 98 hp. /5600 rpm Torque - 145 Nm / 4000 rpm Fuel - AI95 Fuel consumption - city 9.8 l. | track 5.4 l. | mixed 7.2 l/100 km Oil consumption in the Priora engine - 50 g/1000 km Weight of the Priora engine - 115 kg Geometric dimensions of the Priora 21126 engine (LxWxH), mm - Oil in the Lada Priora 21126 engine: 5W-30 5W-40 10W- 40 15W40 How much oil is in the Priors engine: 3.5 l. When digging, pour 3-3.2 liters.
Priora engine life: 1. According to the plant – 200 thousand km 2. In practice – 200 thousand km
TUNING Potential – 400+ hp. Without loss of resource - up to 120 hp.
General characteristics
Initially, the car was equipped with an 8-valve engine from the VAZ 2114, about which car enthusiasts in practice know all the characteristics, in particular, what kind of service life it has in different modes. Therefore, the first “Priors” did not receive rave reviews from customers.
Subsequently, the car was equipped with its own 16-valve unit modification 21126 with a displacement of 1.6 liters and a power of 98 horsepower, which made the VAZ 2170 truly competitive. Dynamic performance has been improved, emissions into the environment and fuel consumption have been reduced. Relatively recently, an updated version of the 21127 engine with a power of 106 hp appeared. which has been installed on Priora since 2013. Comparative characteristics of all three units are given in Table 1.
Selected aspects of technical operation
UAZ contact ignition system, composition and general structure, diagrams of the contact ignition system.
procedure for installing the ignition on a UAZ car; wiring diagram for electronic ignition on a UAZ. Many inexperienced drivers, not understanding the essence of the breakdown, decide that an expensive replacement of the ignition switch or the wiring as a whole is necessary. Experienced drivers advise not to rush to conclusions. If, due to various circumstances, the ignition coil fails, the corresponding indicator lights up on the dashboard. The first thing the driver should do in such a situation is to drive the car into the garage and open the hood.
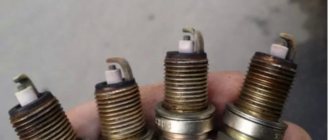
Often spark plugs fail due to a power surge or short circuit. As a result, the spark does not travel properly throughout the system. A number of other circumstances can cause a similar problem:
- the car was damaged in an accident;
- replacement of spark plugs may be required after lightning strikes the car;
- poor-quality previous repairs;
- use of non-original spare parts;
- failure to comply with technical inspection deadlines at the service center.
The ignition system can be damaged in any part of the circuit, so monitoring must be careful. It all starts with checking that the winding is properly connected to ground. It is necessary to carefully insert the contacts, focusing on the indicators of the device. Then one of the contact terminals of the device is connected to the central contact of the spark plug coil. In this case, the second contact is attached to ground.
If an infinity symbol is visible on the multimeter screen, this indicates that there is no short circuit in this area. This should tell the car owner that the ignition circuit is in perfect order. Car owners without sufficient experience in car maintenance should be guided by the following fact. If, in addition to the infinity icon, there remains a “1” on the monitor, which was there before connection, this indicates that the section is working properly.
Replacement of spark plugs may be required if there is an open ignition in the primary circuits of the module. The device is connected to the module contacts located at the edges. In this case, the stability of the indicators on the device screen indicates that there is a problem in the Kalina ignition switch
If the fault could not be detected here, then at the next stage the car owner should pay attention to the secondary winding of the module
Take a 16-cell ignition module. and rotates so that both wire ends are facing you. A diagnostic tool is connected to the terminals of the 4th and 1st cylinders. If the faults do not manifest themselves here, then it is necessary to check the 2nd and 3rd cylinders in the same way.
Malfunctions and repairs of the Priora 21126 engine
In 2021, production of the NFR sports engine began, called 21126-81, which used the 21126 base. And from 2021, cars with 1.8 liter engines 21179, which also used the 126th block, are available.
The most basic malfunctions of the 126 engine
Let's move on to the malfunctions and shortcomings, what to do if the Priora engine is running rough, sometimes flushing the injectors solves the problem, it may be the spark plugs or the ignition coil, but the usual thing in this case is to measure the compression in order to eliminate the problem of valve burnout. But the cheapest option is to go to a service center for diagnostics. Another common problem is when the engine speed of the Priora 21126 fluctuates and the engine runs unevenly, a common disease of VAZ sixteen valves, your mass air flow sensor is dead! Not dead? Then clean the throttle valve, there is a possibility that the TPS (throttle position sensor) needs to be replaced, perhaps the IAC (idle air regulator) has arrived. What to do if the car does not warm up to operating temperature, there may be a problem with the thermostat or the frost is too severe, then you will have to put cardboard on the radiator grill
Source
What can be put on the classics from the existing MPSZ
Among the most well-known microprocessor systems, Maya, Secu 3 or Mikas MPSZ are most often used. Assembling any of them is not difficult, if you have the skills to correctly see and read the instructions with the diagram, and follow the sequence of installation actions. When choosing a microprocessor system, you should not be intimidated by the fancy circuitry that product sellers like to show off, offering the services of a familiar electrician for “guaranteed high-quality installation for pennies.” All components can be installed on the classic with your own hands.
When choosing, pay attention to the quality of the block itself. It is considered good form if there is no warping of the plastic parts of the burrs or microcracks. The second indicator is the presence of a large scattering surface in the form of an aluminum base
The microprocessor remains the most capricious part and the choice of place under the hood or in the cabin must be taken very seriously
The second indicator is the presence of a large scattering surface in the form of an aluminum base. The microprocessor remains the most capricious part and the choice of place under the hood or in the cabin must be taken very seriously.
The ignition coils can be separated into a separate unit; alternatively, they can be mounted directly next to the spark plugs on the head cover.
Main directions of modernization
Supercharger compressor
Installing a supercharger compressor on a Lada Priora with your own hands will not be difficult; it is fixed with standard fastening units, the drive is carried out by putting a belt on the crankshaft pulley, thereby increasing engine productivity. After installing a supercharger on their car, car owners noted an increase in power by a maximum of 50%, but fuel consumption also increased after such actions.
Turbocharging
Installing a turbocharger is a more advantageous way to increase engine efficiency compared to a supercharger compressor, because it operates using exhaust gases. But it should be noted that turbocharging is more finicky in operation compared to a mechanical supercharger, since it needs to be constantly cooled and the oil must be changed frequently.
Engine rechip
Chip tuning is aimed at reducing fuel consumption and increasing the dynamic performance of the engine by reprogramming the ECU parameters.
Such tuning does not imply changes in the engine design, only the settings of the control unit change, after which the control unit changes the engine operating mode. Tuning cars this way has long been not uncommon. More and more car enthusiasts are trying to start with this tuning, since there are no serious interventions in the engine design, and new settings can always be reset and returned to factory settings.
Cylinder boring
By increasing the working volume of the cylinders by boring them and polishing their walls, you can significantly increase the power of the power unit, but at the same time, fuel consumption will also increase.
The positive effect of increasing power from this procedure is due to the fact that the force acting on the pistons increases, and their friction against the cylinder walls decreases.
Piston group and crankshaft
Increasing the productivity of the Lada Priora engine can be achieved by replacing the piston group and crankshaft. This requires the selection of special low pistons and a crankshaft with increased lift.
The replacement allows the pistons to be raised and lowered to maximum levels, which contributes to better filling of the combustible mixture with oxygen and its complete combustion.
Engine ignition system, difference between diesel and gasoline engines
Due to these differences in the process of ignition of gasoline and diesel fuel in the engine, a difference can also be noted in the structure of the ignition. It is at least obvious that there is no such system as in a gasoline car, consisting of a distributor-distributor, a switch or pulse sensors, in a diesel car. However, in winter it is sometimes difficult to start a diesel engine because the air is too cold, so they install a special preheating system to increase the temperature of the air in the combustion chamber.
We can say that installing the ignition on a diesel engine is nothing more than choosing the fuel injection timing. And this is achieved by adjusting the position of the piston at the moment of injecting “diesel” into the cylinder
This is very important, since if the angle is chosen incorrectly, the injection will be untimely and, as a result, the fuel will not burn completely. And this will negatively affect the coordinated operation of the cylinders
Making a minor mistake, just one degree, can cause failure of the entire power unit, which will require major repairs.
Tuning the Priora 126 engine for 20-30 thousand rubles
In the comments they asked a question about Priora. What can be done for 20-30 thousand rubles. with a motor to make it go better.
Let's first consider the situation for 30,000, and then the minimum for 20,000.
For 30,000 you can bore the channels, throw in the shafts , change the throttle valve, injectors and calibrate the engine.
Now let’s look at how much each position costs. First, let's go through the material. 16-valve shafts cost from 6500 and above. I would eventually install some turbo shafts. Because the engine will spin no more than 7000, the engine is quite low and in the future it will seem to you that the increase is not enough, you will get tuning disease and will continue to charge the engine. In order to have the most important foundation for development, you buy turbo shafts, say 9.6, and 10.1 for the intake and exhaust. In principle, a small overlap is very good for a low-end motor. They cost approximately 6800 from the manufacturer. By the exhaust. Install a spider that simply replaces the catalyst. It costs around 1500 rubles. You can also change the throttle valve . It costs about 1000 rubles, with a diameter of 54 for a standard receiver. Further, Bosch 107 injectors cost from 2000 rubles, depending on the store where you buy them. You will also need consumables in the region of 1000 rubles. There are all sorts of gaskets. Valves, light T-shaped ones, cost from 3500 depending on who the manufacturer is. This is all the material you have to buy. Now let's look at the work. Boring of channels starts from about 3500. Removing and installing the cylinder head head and assembling and disassembling it around 5000. You can find it cheaper, it doesn’t require high qualifications. Lay the shafts, i.e. make a cut for cams from 1000 rubles. It is advisable to have a more experienced person do this. Calibrate the motor. Naturally, when you have done all this, bored out the channels, installed valves, exhaust, throttle valve, injectors, now you can tune the engine, otherwise the car won’t really drive, there will be failures with an enriched mixture. In general, calibration costs from 5000. A fairly simple configuration. Don’t skimp on this because the calibrators will determine everything optimally.
Let's consider the option for 20,000 rubles.
We simply bore out the channels and install the spider exhaust we talked about. We change the injectors because the standard ones are not enough in any case. We also take into account work expenses. You need to remove, install, calibrate. Basically everything.
In the first case, the costs were 30,500 rubles, in the second case, 19,000. In the first case, you will get about 140 hp, in the second case, about 120 hp. with normal torque and resource. Also in the first case with shafts. I recommend bottom shafts. There are no sliding gears required. It will be possible to install factory ones if the phases are made a little wider, naturally the ride will be a little better, but there will be costs for sliding gears. Why exactly this motor configuration, why do I recommend doing this? In a sense, you have prepared the foundation and the engine is almost ready. All that remains is to change the piston, intake manifold and install the turbine. If you are not a supporter of turbo, but a supporter of aspirated engines. You just need to change the hard springs, install a normal Opel direct-flow exhaust, a receiver and you will get a motor with more powerful performance. There is a standard Priorovskaya piston. All work was done head on.
Also, for this motor, I would recommend that you change the main pair. At least do some work on the box. Just change the main pair 4.1 or 4.3. Make the gear shorter because the operating speed has increased from 5600 to 6600. Make the gear ratios shorter. The easiest way is to place the main pair. What kind of cars can you make? Well, I think you will do everything with 2-liter naturally aspirated ones. If you want something more, you need to look further. Either make a more angry aggressive atmosphere, or make it more turbo. For atmosphere, of course, the shafts will need to be changed. Put more revving ones.
So that's all in a nutshell. If you have any questions, ask them in the comments. Dispute always gives birth to truth. It is advisable not to insult each other and not to be clever.
I wanted to immediately explain why we are installing a throttle valve of a larger diameter, although it would be logically more correct to install a factory one. The fact is that when you squander the channels, the lows will increase. Naturally, to increase power you need to install a larger damper. Your low end will already be emphasized more than on a regular stock, and the throttle will already emphasize the high end. Why do we install the usual 4.1 spider, which simply replaces the standard spider with a catalyst. Because it is cheap and cheerful and makes the purging better and leaves practically only one exhaust because we install ordinary turbo downstream shafts, which are not critical in terms of exhaust due to the fact that the overlap angles are small. Our complex is completely interconnected. In our case, a bored channel helps to raise the bottom, and narrow phases on the shafts also help to raise the bottom. We align the entire shelf of moments. The factory receiver to the bottom also remains, the regular exhaust is matched to the shafts. In principle, the motor turns out to be quite good. That's why I recommended all of these positions. Another advantage of turbo shafts is that they can always be sold. Nowadays turbo has become very fashionable. If you sell atmospheric shafts, then there is better, but there is walking. The turbo shafts are all more or less the same in principle. There are not many of them on sale, and they are in demand.
How to check the ignition coil of a VAZ
If the ignition coil is faulty, the engine will not start. A characteristic sign of a faulty coil is its increased temperature when the ignition is turned off. This is easy to determine by touch.
Signs of a faulty ignition module may include the following:
- hesitant engine starting or failure to start;
- failures during sudden changes in speed;
- high fuel consumption;
- two cylinders do not work, the engine is feverish;
- lack of dynamics;
- a sharp drop in power;
- drop in power and thrust after warming up.
These symptoms may not only be caused by the ignition module. To determine the malfunction, it is enough to spend a few minutes diagnosing spark plugs, high-voltage wires and caps. This will eliminate the remaining elements of the ignition system and make sure that it is the ignition module that is faulty.
Checking the ignition coil is performed in one of 2 ways. The simplest one is to remove the central wire from the breaker-distributor, bring it to the motor housing and turn it with the starter, and a running spark should appear. After this, we check the energy supply to a separate spark plug, for which we unscrew the working spark plug, bring its contact to ground and attempt to start the engine. In this case, the spark should come from the wire to ground. If it is absent, the reason will be a malfunction of a system element such as the ignition coil.
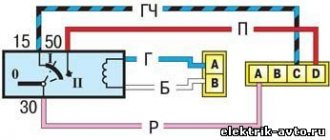
To check the module in the second way, we only need a multimeter, then follow the step-by-step instructions:
- We check the power supply and the presence of pulses supplied from the ECU. We check the power between the central terminal (15) of the wire block connected to the module and the engine ground. When the ignition is on, the voltage should not be less than 12 V. Otherwise, either the battery is dead or the ECU does not work.
- We check the pulses from the ECU on the wiring block. We install one tester probe on connector 15, the second on the far right, then on the far left. The assistant cranks the engine with the starter, and at this time we record short-term voltage surges with a tester. If there are no impulses from the ECU, it is he who is to blame.
- We check the resistance on the secondary windings of the coils. We put the tester in resistance measurement mode and measure it at the high-voltage terminals of the module cover. Between pins 1 and 4 and pins 2-3, the resistance should be 5.4 kOhm. Otherwise, the module must be replaced.
- We check the resistance of the primary windings between contacts 15 and the rightmost, then the leftmost terminals. Nominal - 0.5 Ohm. Deviation is not allowed.
- Check the module for a short circuit. In ohmmeter mode, install one multimeter probe on the central terminal, the second on the metal body. There shouldn't be any resistance. If the device detects at least some resistance (other than unity or infinity), the module must be replaced.
Cooling
The motor has a liquid cooling system. This allows it to be used under high loads regardless of ambient temperature. The cylinder block has a cooling jacket. It consists of channels through which coolant circulates.
The movement of liquid is carried out forcibly using a pump. The water pump is belt driven from the crankshaft of the power unit. The liquid is cooled in the radiator. The forced movement of air mass through the radiator honeycombs is carried out by a fan.
IMPORTANT: To avoid the occurrence of excess pressure as a result of increased coolant temperature, the cooling system is equipped with an expansion tank.
To quickly warm up the power plant in the winter, the cooling system is equipped with a thermostat.
At low coolant temperatures, it blocks a large circulation circle. After reaching the required temperature, the thermostat opens a large circulation circle.
Adjusting the ignition of a diesel engine - instructions for the determined
You can also adjust the ignition of a diesel engine yourself. First you need to lift the hood lid and fix it on the support post. At the top left of the rear of the engine, you need to find the flywheel (massive wheel), on the casing of which a mechanical device is located. The rod of this device must first be raised and rotated 90 degrees, then lowered into the slot located on the body.
Now remove the mudguard; to do this, use a 17 mm wrench to unscrew two bolts on the flywheel housing (it’s easier to get to this place from under the car). Insert a metal rod into the hole in the flywheel through the slot in the casing and turn the engine crankshaft. It must be directed from left to right until its movement is stopped by the locking rod at the top.
Now is the time to look at the fuel pump drive shaft; it is located on top of the cylinder block camber (the axis from which the cylinder banks diverge). If the installation scale of the drive coupling (flange that serves to transmit rotation from the drive shaft) of the high pressure fuel pump is turned upward, then in this case the mark on the fuel pump flange should be aligned with the zero mark of the drive and tighten the two mounting bolts. If the drive clutch setting scale is not turned up, then you will need to lift the stopper and turn the engine crankshaft one turn, and then all the above steps must be repeated in the same order.
Once the drive clutch bolts are tightened, you need to lift the flywheel stopper up, rotate it 90 degrees and lower it into the groove. On the bottom of the flywheel housing, you can return the dirt shield to its place (fastened with bolts). Now it’s time to close the car hood, the work is finished. All that remains is to start the car and check that the system operates correctly.
Description of Lada Priora
Lada Priora is a family from AvtoVAZ, including the VAZ 2170 sedan, VAZ 2171 station wagon and VAZ 2172 hatchback. The Priora was released in 2007 and replaced the tired, by that time, VAZ 2110. The station wagon replaced the VAZ 2111, and the hatchback, beloved by the people, came to replace the VAZ 2112. The rare 2112 Coupe model was replaced by the even less common Priora Coupe.
The Priora was based on the Lada 110 platform; the exterior and interior of this car were changed, and the technical part also changed in some places.
In 2021, Lada Priora was replaced by a new model - Lada Vesta.
The engines on the Priora are 1.6 liter 98 hp, known as 21126. Since 2013, the most expensive Prioras come with a new engine 21127 106 hp. Less popular among the people are Priory models in budget versions, with 1.6 8 valves (21116). At the facilities of JSC "Super-Auto", even more powerful versions with a 1.8 liter 128 engine are produced, which were restyled in 2014.
Which engine in Priora is more reliable, more powerful, better? Priora engines, in general, have proven themselves well, and are also easy to tune, which has made the Lada Priora quite a popular car among young people. Below is all the most necessary information for Priora owners and potential buyers: malfunctions, why the Priora engine knocks, troits, its tuning, what oil to pour and how much, characteristics and much more
Rules for using the lock
- Position 0 is fixed. The ignition key can be removed from this position. In this position, external lighting devices can operate, including fog lights, illuminating the road ahead of the car. The hazard warning system works, you can use high and low beams, and turn on the audio system.
- Position 1 is fixed. The key cannot be removed from this position. The ignition is on. In this case, electrical power is supplied to all energy consumers of the vehicle, with the exception of the starter. Leaving the key in this position for a long time can drain the battery. Before turning on the starter, it is recommended to hold the key in this position for several seconds. During these seconds, the electric fuel pump will create the required pressure in the fuel system, which will greatly facilitate starting the engine, especially when it is cold.
- Position 2—turn on the starter. The key does not lock in this position. When released, it returns to position 1.
Do not hold the key in the starter position for more than 10 seconds. If the engine does not start, you need to take a break for 10-15 seconds and try again. Do not hold the key in this position while the engine is running. While Kalina’s car is moving, it is prohibited to remove the key from the lock. If you do this, steering failure will occur due to locking of the steering column and a sharp deterioration in the functioning of the braking system.
If during operation of the car the key remains in the lock, then when the driver's door is open, a continuous trill will be heard, signaling this. If the ignition is completely turned off and the key is removed from the hole, but the side lights are on, short beeps will be heard when the driver's door is open. The lock is capable of blocking the starter from turning on while the engine is running.
- directly from the ignition key;
- key for trunk and all door locks;
- remote control;
- immobilizer key APS-6.
- ignition;
- trunk and door lock key;
- APS-6 immobilizer learning key.
Gas distribution mechanism
The gas distribution mechanism is made in the form of 16 valves and two camshafts. The valves close the channels in the cylinder head through which the working mixture is supplied or exhaust gases are discharged.
The valve mechanism is controlled by camshafts. They have cams offset from the axis. As the cam rotates, it presses on the valve stem, thereby opening it. In the opposite direction, the valve moves under the action of a power spring. The camshafts are driven by the crankshaft. A toothed belt is provided for this purpose.
CAUTION: If the timing belt breaks, the pistons will bend the open valves. To avoid this, the timing belt must be changed regularly.
The valve mechanism is equipped with hydraulic compensators. This design eliminates the need to adjust the thermal gap. The valve cover is made of aluminum alloy. To prevent lubricant leakage, a gasket is installed between the cover and the cylinder head.
Types and differences of VAZ ignition coils
A car's gasoline engine operates by burning fuel. To ensure ignition, an electric spark is required, which is formed between the electrodes of the glow plug. They have a small gap that the spark must overcome. This is feasible when high voltage (tens of thousands of volts) is applied to the spark plug.
The vehicle's on-board system is not designed for such loads, and the equipment that supplies electricity is not capable of producing such values.
To solve this problem, a coil is introduced into the car's ignition system, creating a high voltage. A component of the vehicle's ignition system converts low voltage to high voltage (depending on the characteristics of the part from 6-12 V to 35,000 V). The tasks performed by the coil are determined by the structural features of the element. It consists of primary and secondary windings, which are housed in an insulated housing.
Attention! If malfunctions occur, it is recommended to check all engine components: from the valves and cylinder block to the ignition coil or module
Engine tuning Priora 21126 1.6 16V
Chip tuning of the Priora engine
For fun, you can play with the sports firmware, but there will be no obvious improvement; see how to properly increase the power below.
Priora engine tuning for the city
There are legends that the Priora’s engine produces 105, 110 and even 120 hp, and the power was underestimated to reduce taxes, various measurements were even taken in which the car produced similar power... what everyone decides to believe, let’s focus on the indicators declared by the manufacturer. So, how to increase the power of a Priora engine, how to charge it without resorting to anything special, for a small increase you need to let the engine breathe freely. We install a receiver, a 4-2-1 exhaust, a 54-56 mm throttle body, and we get about 120 hp, which is quite good for the city. Boosting the Priora engine will not be complete without sports camshafts, for example, STI-3 camshafts with the configuration described above will provide about 140 hp. and it will be fast, an excellent city motor. The refinement of the Priora engine goes further, sawn cylinder head, Stolnikov 9.15 316 shafts, light valves, 440cc injectors and your car easily produces more than 150-160 hp.
Compressor for Priora
Boring the Priora engine or how to increase the volume
Let's start with how you don't need to increase the volume, an example would be the famous VAZ 21128 engine, don't do that)). One of the easiest options to increase volume is to install a motorcycle kit, for example STI, we choose it for our 197.1 mm block, but do not forget about the jambs of the 128 engine, do not rush to install a long-stroke elbow. You can go the other way and purchase a high block 199.5 mm Priora, 80 mm crankshaft, bore the cylinders to 84 mm and a connecting rod 135.1 mm pin 19 mm, this will give a total of 1.8 volume and without damage to R/S, the engine can be twist freely, install evil shafts and squeeze out more power than a regular 1.6l. To spin your engine even more, you can build up a standard block with a plate, how to do this, how it spins on a 4-throttle intake and wide shafts, and most importantly, how it runs is shown in the video below, watch:
Priora on throttles
Priora turbo engine
There are many methods for building a turbo Prior, let's look at the urban version as it is more suitable for use. Such options are most often built on a TD04L turbine, Niva pistons with grooves, ideally Stolnikov 8.9 shafts, USA 9.12 or similar, 440cc injectors, 128 receiver, 56 damper, exhaust on a 63 mm pipe. All this junk will give more than 250 hp, and how it will go, watch the video
What about the serious Valilov? To build such engines, we leave the bottom the same on a reinforced block, sawn head, Nuzhdin 9.6 shafts or similar, rigid studs from the 8th valve, pump more than 300 l/h, injectors plus or minus 800cc, install the turbine TD05, direct-flow exhaust on the 63rd pipe. This set of iron will be able to pump 400-420 hp into your Prior motor; for a light car weighing a little more than a ton, this is enough to fly into space)
ENGINE RATING: 3+
Operation in various conditions
Many inexperienced drivers, not understanding the essence of the breakdown, decide that an expensive replacement of the ignition switch or the wiring as a whole is necessary. Experienced drivers advise not to rush to conclusions. If, due to various circumstances, the ignition coil fails, the corresponding indicator lights up on the dashboard. The first thing the driver should do in such a situation is to drive the car into the garage and open the hood.
Often spark plugs fail due to a power surge or short circuit. As a result, the spark does not travel properly throughout the system. A number of other circumstances can cause a similar problem:
- the car was damaged in an accident;
- replacement of spark plugs may be required after lightning strikes the car;
- poor-quality previous repairs;
- use of non-original spare parts;
- failure to comply with technical inspection deadlines at the service center.
Regardless of the reason, the ignition circuit needs a full analysis. Often the problem is complex. That is why, if the driver does not have enough technical experience, the first decision that comes to mind should not be accepted as the only correct one.