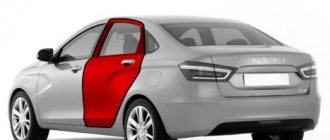
Without electricity, nothing will work. So on a car, the voltage in the on-board network is maintained by a generator. You need to understand how many amperes you need in the on-board network.
It all depends on the amount of attachments, air conditioning, heating, etc. Depending on the configuration, a generator is also selected. Read the article to the end and we will cover this topic. Removing and replacing the generator on a Lada Priora car depends on the attachments; if the car does not have air conditioning, then the unit can be removed in 6 steps. If the air conditioner costs 9 steps, we will talk about them in the article. This part on Priora comes in 3 types. Their prices are also different.
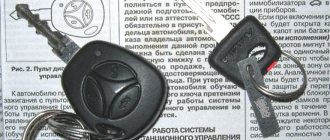
Standard generator on Priora - article number and price, where it is
The installation location may vary for different car brands and models. You should look for it in the engine compartment, near the rubber cushion on which the engine is mounted. 90A article 3282.3771, is a source of energy in the electronic equipment system of 2170-72 Priora cars.
Generator for Priora produced by BATE price from 4120 rubles
Characteristics:
- Weight 5.5 kg
- LxHxW 200x170x200 mm
- Rectified current 90 A
- Power 0.98 kW
- Voltage 14 V 100 A
It has article number 5132.3771 and is a source of energy in the electronic equipment system of 2170-72 Priora cars.
Generator for Lada Priora with air conditioning manufactured by Pramo price from 4200 rub.
Characteristics:
- Maximum rectifier current 100 A
- Weight 5.3 kg
- Voltage 14 V
- Power 233 W/kg
- Internal cooling
- Stator diameter 125 mm
- 115 A
It has article number 9402.3701-14 and is a source of energy in the electronic equipment system of 2170-72 Priora cars.
Article number - 2170-3701010-10 has a KZATE generator for the Lada Priora car, its price starts from 5300 rubles, and Bosch - 2170 3701010 13
Device manufactured by LKD - price from 4400 RUR
Characteristics:
- Maximum rectifier current 115 A
- Weight 5.2 kg
- Nominal voltage 14 V
- Power 1610 W
- Stator diameter 125 mm
- Length 188 mm
- 115 A
It has article number 9402-14 and is a source of energy in the electronic equipment system of 2170-72 Priora cars.
120 A Has article number 9402-3701-14P, is a source of energy in the electronic equipment system of 2170-72 Priora cars.
Characteristics:
- Maximum rectifier current 120 A
- Weight 6 kg
- Nominal voltage 14 V
Manufacturer ATE-1 cost from 4000 rub.
The generator tension roller 2170 serves to tension the belt. One of the important tips for beginners: if you unscrew any bolt when changing a part, lubricate it with graphite grease, this will greatly facilitate repairs in the future.
How to change the alternator belt on a Lada Priora with your own hands: instructions with photos
Loosen the nut that secures the generator to the guide bar and move it towards the engine. Remove the old belt and put on the new one. Move the generator away from the engine and tighten the nut a little. Tighten the tension bolt and from time to time press the belt with one finger in the middle between the generator and crankshaft pulleys.
Remove the belt, then install a new one. Do not confuse the order in which the belt passes through the pulley and rollers. Install the tension roller and adjust the belt tension as described above.
The new version of Lada-Priora really attracted domestic car enthusiasts. But, like any other car, it needs timely service. For example, the Priora alternator belt must be changed after a certain mileage, and its condition must be checked regularly.
In versions with power steering or air conditioning, the belt is longer when compared with the regular version of the car. As a result, we will look at how the change occurs in the first and second cases on models 16 and 8 valves.
Car Lada Priora
This video shows the generator drive whistling.
The instructions that come with the car indicate that the alternator belt should be replaced every 60 thousand km. If the car is used infrequently, then replacement should be carried out every two years.
Do-it-yourself replacement work on a Priora without power steering (EUR) and air conditioning is more convenient to carry out in the inspection pit.
Tools
- a set of keys;
- fender liner removal device;
- balloon wrench.
- First, loosen the nut with a wrench of the appropriate size.
- Unscrew the adjusting bolt.
- We move the generator towards the power plant.
- Remove the right front wheel.
- We remove the fender liner and get access to the old belt.
- We replace it with a new one and do not forget to tighten it.
- Checking the tension. It should not be weak, but tightening it on a model with power steering (EUR) is also dangerous. The generator bearings may be the first to suffer.
Since the power steering pulley in this modification is at a low height, the creators ran the generator belt around the engine mount. This makes it a little more difficult to do the DIY change.
Tools
- tension key;
- a set of keys;
- jack;
- set of heads;
- WD40 liquid.
- Use WD40 to moisten the bolts that secure the motor mount and bracket.
After about a quarter of an hour, you can begin to unscrew the bracket nut. Let's jack up the wheel. Next, we place some object under the motor and remove the wheel. We lower the car a little. Unscrew the tension roller. Bend the belt. Now you can unscrew the bolts that secure the pillow. Read further: Which battery is suitable for Skoda cars, rules, elections and advice from a specialist with photos and videos These bolts need to be unscrewed
Next, we lower the car so that the engine begins to hang out. The cushion moves towards the motor. Move the pillow Now you can change it. Next, we lift the car with a jack so that the power unit lowers
We do this carefully so that the belt and pillow do not move. Tighten the bolts and nuts. We put on the wheel and lower the car.
At this point, work on the model with power steering can be considered completed.
The belt in Lada Priora is tensioned as follows:
- The first step is to loosen the roller nut; to do this, the cage is held with a wrench.
- We rotate the roller cage by rotating the key.
- We tighten the roller nut.
- The tension is checked on the longest section between the pulleys.
- When pressed, the alternator belt should bend approximately 10 millimeters.
- On a model with power steering, the tension should be a little tighter. You can also test it by ear. If the tension is insufficient, a whistle will be heard and you need to tighten it. If it is too much, you will hear the hum of the bearings and the tightening will need to be loosened.
Roller key
The work is not difficult, but a little troublesome due to the need to dismantle some components in models with power steering and air conditioning with your own hands, but it is doable even for a novice car enthusiast. But calculate how much such work costs at a service station and whether it would be better to use this money for other purposes.
How to replace the timing belt on a Priora with your own hands Diagnosis and replacement of the speed sensor on a Priora with your own hands The process and procedure for tightening the cylinder head bolts on a Priora
The principle of operation, what it consists of and the main malfunctions
The generator converts the mechanical energy coming from the engine into electrical energy. The principle of operation and its design are the same for all cars. The difference lies only in the quality, dimensions and location of the connecting nodes.
What it consists of:
- Pulley - transmits mechanical energy through the belt from the engine to the generator.
- The body is presented in the form of two covers. The starter is attached to them and the rotor supports are placed. The back cover contains external terminals for connecting to electrical equipment, a voltage regulator, a rectifier and a brush assembly.
- Stator - produces power. It is made of steel sheets and has the shape of a pipe. A three-phase winding is installed in the stator slots.
- The rotor is the moving part of the unit. When the engine starts, the rotor begins to rotate, and voltage is supplied to its exciting winding from the battery. The steel core becomes electromagnetic, creating an alternating magnetic field when rotated.
- Voltage regulator - maintains voltage stability in the on-board network when the ambient temperature and rotor speed changes.
- Assembly with rectifier diodes
- Diode module cover
- The brush assembly is a removable structure where brushes are installed that interact with the rotor rings.
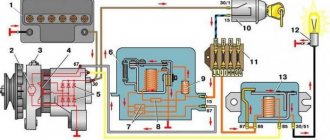
Design and principle of operation of the generator
This device converts the mechanical energy received from the crankshaft into electricity. Thanks to the generator, power is supplied to the electrical appliances of the car. It powers the ignition, recharges the battery and other systems. When the driver starts the engine, the largest amount of electricity is consumed by the starter. At this moment, power to electrical consumers is supplied only from the battery. Naturally, the battery may drain quickly. To prevent this from happening, it must be powered by a generator.
The generator consists of an aluminum housing, inside of which there is a rotor on bearings and a coil. There is a stationary stator between the back and front covers. A belt connected to the crankshaft causes the rotor to rotate. To rectify the current in terms of voltage and strength, a diode rectifier is used.
Generator device
The transmitting link is brushes - sliding contacts. They carry control current from the voltage stabilizer. Due to the stabilizer, the generator creates a voltage of about 14 Volts, regardless of the engine speed. It is important that the regulator remains in good working order, otherwise optimal voltage parameters will not be maintained. In this case, the auto electrician may fail.
The temperature of the operating generator is reduced by fans. The device is attached to the brackets using four bolts. It can be seen if you open the hood. The mounting points are located on the covers.
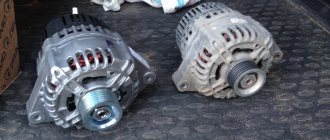
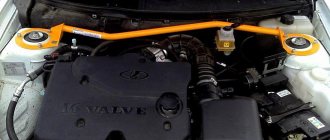
Appearance of the generator for Priora
It is important to promptly identify problems with the power supply. The first symptoms are the flashing of the headlights and the appearance of a warning light on the dashboard. If the generator breaks down or fails completely, the battery quickly runs out of power. In this case, it is impossible to even start the engine. The car cannot move.
This is interesting: VAZ 2104 fuses: where they are, replacement
Principle of operation
When you turn the ignition on, current from the battery enters the field winding through the brush assembly, where a magnetic field appears. When the crankshaft rotates, the rotor goes into rotation. The magnetic field passes through the stator winding and an alternating voltage is generated at the output. Having reached a certain rotation speed, the excitation winding begins to be powered directly from the generator.
The alternating voltage is changed to constant thanks to the rectifier unit. Now the generator charges the battery and powers consumers. When the rotation speed changes, the voltage regulator is connected to the operation.
Basic faults
Why does the generator not charge the Lada Priora car? There may be several reasons:
- the diode bridge is damaged;
- the turns of the stator winding are closed;
- slip rings wear out;
- the pulley is damaged or worn out;
- the wires of the charging circuit are damaged;
- the bearing is destroyed or worn out;
- the voltage regulator is damaged;
- The current collecting brushes wear out.
In all of the above cases, repair of the Lada Priora generator will be required.
Generator Lada Priora
The main function of the generator is to provide continuous power to all electrical equipment while driving.
The failure of a node will lead to the failure of the entire system, so its condition should be monitored especially carefully. Let's consider the main characteristics of the factory generator installed on the Lada Priora car, as well as similar models.
Selection of components
The original generator, installed on a car with a 16-valve engine at the factory, is marked with article number 5102.377. Its cost, as a rule, fluctuates around six to seven thousand.
Carefully check the generator itself and its packaging before purchasing so as not to encounter a counterfeit
It is important that the part is free from unevenness, chips and paint drips, as well as foreign markings.
To avoid overpayments, you can purchase a similar original spare part. The following devices are suitable for installation on Lada Priora:
- VAZ (power 120/115a);
- KZATE (115a);
- BATE (90a);
- BOSCH (120a).
The price of analogues can be either higher or lower than that of the original. As a rule, it is in the region of 3500-6000 rubles. We choose a generator device with a large power reserve so that it lasts longer.
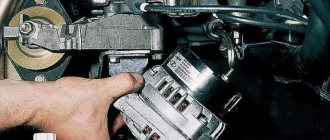
Removing and installing the generator
For the owner of a vehicle manufactured by AvtoVAZ, which is equipped with air conditioning, the question of how to remove the generator from a Lada Priora car will be more difficult.
Tight installation of components and assemblies under the hood will complicate the procedure. Installation of a new unit is carried out in the reverse order of the removal procedure. After replacing, do not forget to tighten the timing belt.
How to remove a generator on a Priora with air conditioning:
- Remove the protection on the engine.
- We loosen the tension of the drive belt roller.
- The upper mounting bolt can be easily unscrewed with a 13 mm socket wrench.
- The bolts that hold the air conditioning compressor are unscrewed.
- The Lada Priora alternator belt going to the compressor is being replaced.
- The part should be moved slightly towards the battery. This will give you access to the bolt that secures the air conditioning compressor.
- After unscrewing the last fastener, the compressor is hung. There is no need to fix it.
- Now the bolts securing the part are unscrewed.
- The terminals are disconnected and the alternator belt of a Lada Priora car with air conditioning is replaced.
Without air conditioning
- Disconnect the terminals from the generator connectors.
- Remove the drive belt. To do this, you need to loosen its tension.
- Unscrew the generator bracket bolts. Top and then bottom. The bottom bolt is unscrewed from under the car.
- We turn out the adjusting bolt.
- Remove the bottom bar.
- We remove the part.
Replacing the Priora diode bridge without removing the generator unit
The diode bridge can often be the cause of generator malfunction, and replacement does not require removing this entire unit.
Replacing the Priora diode bridge without removing the generator unit
The procedure for replacing the diode bridge is simple:
- Remove the negative terminal from the battery.
- Remove the rubber cover and unscrew the power cable nut.
- Unhook the control wire's Euro plug.
- Remove the plastic cover.
- Remove the regulator relay.
- Unscrew the nuts holding the bridge.
- We take out the part that needs to be replaced.
- We reassemble in reverse order.
As you can see, replacing the diode bridge is not difficult, it can be done quite quickly. It is impractical to repair the bridge - it is better to replace it with a new one, since in the near future it will fail again.
With some skill, replacing the Lada Priora generator is not difficult. This will save you a budget and also give you invaluable experience in servicing your car yourself. This unit is quite reliable and does not require any intervention for a long time.
Alternator bearings for Lada Priora: diagnostics, signs of malfunction and replacement
The following circumstances indicate the need to replace the bearing:
Malfunctions of electrical equipment;
Extraneous noises, whistling and humming when starting up;
Slow or insufficient battery charging;
Distinct beating due to uneven rotation of the shaft;
Diagnosis of the malfunction is carried out using the following steps:
- We remove the belt.
- We start the engine and listen carefully. If the extraneous sound disappears, it means the ball bearing was humming.
- We move the pulley. If there is play, the bearing needs to be replaced.
What kind of bearing is needed
Depending on the year of manufacture of the car, the generator can be old or new. They differ in shaft diameter: the new one is 17 mm, and the old one is 15 mm.
- For a 17 mm shaft, bearing No. 303 is suitable.
- Bearing No. 302 is suitable for a 15 mm shaft.
- They have the same rear bearing No.202.
Bearing replacement
For work you will need: Phillips and flathead screwdrivers, 8 and 10 wrenches, 8 and 24 socket wrenches, a hammer. First you will need to remove the generator of the Lada Priora car, and then follow the sequence:
- Remove the voltage regulator.
- Remove the generator cover and remove the stator from it.
- Using a spanner, unscrew the nut holding the shaft from turning.
- Remove the pulley with the spring washer of the generator rotor shaft.
- Press the rotor shaft out of the bearing.
- Remove the 4 screws holding the bearing thrust washer.
- Using a 24mm socket wrench and a hammer, press in the bearing.
Reassemble the product in the reverse order, starting with pressing the new bearing into the generator cover.
Alternator belt - article price, how to tension
In stores you can find 2 types of belts for the Lada Priora 6rk1115 and 6rk1125. To avoid making the wrong choice, inspect the old belt to see if the size is still the same. If there is no size, take 2 belts, taking into account the possibility of returning one of them.
- 6р1115 — approximate price 242 rubles;
- 6р1125 — approximate price 345 rubles;
Tips and tricks
Generators and brushes come in four types, depending on the year of manufacture of the Lada Priora. Typically, removing the air conditioner is required in cars with a 127 engine. In this case, the air conditioner pipes are located below the radiator. These tubes completely cover the gap between the radiator and the block. Therefore, dismantling without removing the compressor will be quite problematic. First you have to disconnect the air conditioner pump from the brackets.
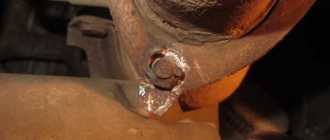
It is also not easy to remove the bolt that is screwed to the generator from below. The bolt can be unscrewed if it is on the side opposite the motor. Otherwise, the bolt will be located next to the engine mount, and you will have to cut it off with a circular saw. This operation will take an extra 10 minutes. It is better to position the new fastener with the head in the desired direction so that there are no more problems when unscrewing.
If the compressor is already unscrewed, it does not need to be attached. It will cling to surrounding elements. When screwing the air conditioner into its old place, you must first install all the bolts, and only then screw them in. It is also advisable to start the engine after assembly and check how the generator operates. Only then can the bottom be screwed on.
How to tension the alternator belt
When checking whether the belt is tensioned on a Priora car, keep in mind that marks are applied to the camshaft pulleys. Rotate the crankshaft until the marks on the camshaft pulleys coincide with the cutouts on the reverse side of the drive.
With normal timing tension, the protrusion of the inner sleeve of the tensioner pulley should coincide with the opening of the outer race. If the belt is in good condition and the marks do not match 1/2 of the reach width, the tension should be adjusted.
- Loosen the bolt holding the tension roller.
- Make sure the cutout of the roller aligns exactly with the protrusion on the back of the roller bushing.
- Using wrench 15, tighten the tensioner pulley bolt.
- Simply put, to tension the belt, the generator roller needs to be turned in the opposite direction clockwise.
Necessary actions and tools for work
To remove the unit you will need, as mentioned above:
- crane or jack;
- a complete set of locksmith keys;
- special wrench for the belt tension roller.
Place the jack under the pallet and, using special inserts from the kit, slightly lift the engine or lift it, securing it to the crane beam. Using a 17mm wrench, unscrew the roller lock nut. Remove the belt from the generator roller and pulley. Loosen the DOP pipes and move them a little. Loosen the generator fasteners. Unscrew the nuts on the engine mounts, slightly lift the engine to remove it from the mount rods. Carefully move the Priora engine towards the interior wall. Disconnect the connection wires, completely unscrew the mounting bolts and nuts and remove the generator. Further, depending on the circumstances, either install a new one or repair the old one. Although lately, repair of components has become less and less common. More often, the global practice of replacing entire units is used. Well, after putting the unit in place, carry out the installation in the reverse order.
This is how the entire process of removing the generator takes place with the additional options installed.
Reasons for replacing the belt on a Priora and how to change it
The serpentine belt of the Lada Priora 2170 generator with air conditioning has a size of 742 mm, without air conditioning with power steering - 1125 mm. It must be replaced every time after 60,000 km of the vehicle, or two years after its installation. When the timing belt wears out, the valves may meet the pistons, which will lead to engine repair. An unscheduled replacement of the alternator belt of a Lada Priora 16 valve car with air conditioning may be required in the following cases:
- delamination or cracks of the rubber surface;
- folds and cracks on the inner surface of the teeth;
- delamination of the end surface;
- traces of technical fluids on the surface of the belt;
- prolonged operation of a tightened belt.
What signs will indicate that the generator brushes are faulty?
alternator brushesPriore
- length of the element being inspected;
- if upon inspection it is discovered that the length of the brushes is less than 5 mm, they must be replaced;
- Replacement will also be required if the appearance of the brushes indicates uneven wear, that is, one element is heavily worn out, and the second is brand new. To replace the alternator belt on a Priora, replace the lights on a Priora with your own hands;. Replacing the alternator belt on a Priora 16-cl. Replacing the alternator belt on a Priora. Replacing the air conditioner with a dual-zone climate. Without air conditioning and power steering. Of course, if there are no auxiliary units, then this repair will be somewhat easier to carry out, but in this case it requires an experienced one. Uneven wear of these elements will certainly negatively affect the operation of the generator, so experts recommend replacing them without fail.
The cost of new components for the Priora does not exceed 150 rubles; of course, you can also find cheaper brushes for the generator, but it is unlikely that such elements will serve faithfully for a long period of time, and such savings will lead to a repeated procedure for replacing these components.
If the replacement of worn brushes is carried out correctly, and the problem with charging the battery was precisely the wear of these components, then the car owner will solve this issue, and without the help of service station employees, which will save a lot of his own money. The replacement process itself is quite simple, but if difficulties arise during the work, you can watch the training video on the Internet resource at any time, which is provided by professionals, choosing the most suitable time for viewing.
Replacing the drive belt on a car with air conditioning
- The replacement process looks a little different on a car with air conditioning.
- VD40 is used to process engine mounts and part bracket bolts.
- The right front wheel is removed or turned out.
- The generator roller is unscrewed. The belt is moved to the side and the engine mount bolts are unscrewed.
- The Lada Priora needs to be jacked up so as to hang the engine.
- We replace the old belt with a new one.
- We lift the car with a jack, the engine is lowered and you will be able to tighten all the bolts.
What makes it difficult to remove the generator?
Unlike an engine with an 8-valve system, on a 16-valve VAZ Priora engine the distance between the radiator and the head is smaller. When installing power steering or air conditioning on a car, the place of the generator is taken by either a compressor or a pump, the dynamo is placed higher. The inconvenience is that even when the fastening bolts and nuts are loosened, the unit cannot be removed by a short distance, and it rests against the cooling radiator.
In addition, the pipes coming out of both the air conditioning compressor and the power steering pump greatly interfere. It is especially dangerous to risk the air conditioner pipes. They are made of aluminum and are designed to hold pretty decent pressure. Repairing them in case of damage is also expensive.