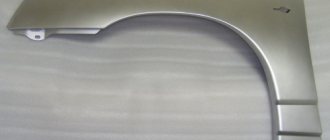
Step-by-step instructions for removing the front wing on a Lada Kalina
After long-term use of a vehicle, rust affects the fenders of the car. When it is minor, it can be puttied and painted over, but if the corrosion has grown, the part will have to be replaced. We have prepared a step-by-step algorithm to make it easier to understand how to remove the front wing on Kalina, which also includes purchasing a new element for the VAZ 1117 and preparing the necessary equipment.
Reason for removal, cost of spare parts
Repairing a sedan yourself is a labor-intensive procedure that requires some skill. Withdrawal will be required if:
- rust appears;
- the part has been dismantled and requires straightening;
- requires dismantling for painting;
- Kalina's front wing needs to be replaced;
- access to machine components is required;
- a foreign object has become lodged between the wheelbase spacers.
The average price for this body fragment of a Lada Kalina, Cross or station wagon varies from 4,000 to 5,000 rubles.
It is important to understand that the cost does not include painting the part. A product with anti-corrosion treatment will cost more, but you should not skimp on quality. Handicraft painting leads to the rapid appearance of corrosion spots on new products.
Required tools and materials
Before starting dismantling, you should choose a place for repair work and remove everything unnecessary. The room should be clean, dry, well lit. Inventory set:
- socket wrench 8, 10;
- jack;
- Phillips screwdriver;
- key to 19;
- rag;
- sharp knife.
Replacing the wing on Kalina involves intervention in the structure, so the wires from the battery are disconnected and a place is prepared for laying out the main fasteners.
Algorithm for removing the wing
When purchasing a vehicle, an instruction manual is provided. It describes the location of fasteners. It is better to take the document with you so as not to get confused during removal and installation. Removal of individual spare parts is carried out using socket wrenches. Before removal, the body is raised with a jack. Step-by-step instruction:
- Use a screwdriver to loosen the mounting bolts.
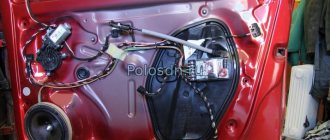
- After this, access to the apron is open, which can be removed using a key 8.
- The car's bumper is unscrewed to remove the Kalina's front fender. After the bolts are twisted, you need to pull the left edge of the part, then the right one will come out of the grooves. The bumper structure should be removed first, then access to the body fragment will open.
- The dirt protection cover is removed.
- The headlight unit, the contacts of the block on the direction indicator of the car's wing, and the hood buffer are disconnected.
- The place where the metal meets the body is cleared of mastic. A knife is used for this.
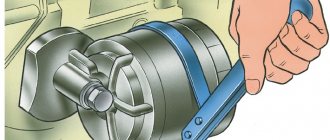
- Using a 19mm wrench, unscrew 2 screws that secure the body fragment at the front and 3 bolts that secure it at the top. Then the screw hidden between the wing and the door is turned out. This procedure can only be carried out with the door open. Then 1 bolt is removed from the bottom of the structure.
Before starting work
Obviously, before the dismantling procedure, it is necessary to familiarize yourself with the distinctive features of installing the front wing. So, before installing a new part, you should carefully study the operating instructions for the car, which are provided to the car owner when purchasing a vehicle. This is necessary in order to get an idea of the location of the fasteners. It is advisable to take the document with you so as not to get confused during the removal and installation process.
In addition, the car owner will need to take care of preparing the place for repairs. It is best if it is a dry room, protected from direct sunlight. Of course, you need to remove everything unnecessary.
It should also be noted that before starting work, it is necessary to “de-energize” the car, that is, disconnect the terminals from the battery.
Recommendations for installing a new element
We looked at how to remove the wing on Kalina, but before dismantling you should study the features of installing a new part. Step-by-step instruction:
- All adjacent fragments around the perimeter of the surface are cleaned. There may be traces of sealant, technical fluid, and remnants of insulating layers. Remove them with a sharp knife.
- The flange and spring fasteners are removed. Before reinstalling it, the parts are cleaned.
- The entire surface is degreased, then a primer layer is applied. The insulating layer is restored. Experts advise using compositions that contain vibroacoustic components.
- The new wing is leaned against the opening, and the flange and spring nuts are screwed into place.
- They install a mudguard, a mudguard and install decorated linings.
Removing the front fender of Lada Kalina
Dismantling a body element is a labor-intensive task for any car owner. First of all, difficulties are associated with adequate fitting of the element and the abundance of fasteners. The wing is no exception in this aspect. Dismantling or replacing the front wing on Kalina is required in a number of cases:
- dismantling to replace the element;
- removal for body repair or painting;
- dismantling for access to vehicle components.
It is worth noting that purchasing a new wing will cost the car owner 4,000 rubles. Painted parts cost a thousand rubles more. If you plan to install a new body part, then it is better to buy it painted, since handicraft anti-corrosion treatment or painting leads to the rapid appearance of corrosion spots on the new wing.
Causes of wing corrosion
Among the causes of wing corrosion, the most common are the following:
- 1. There is no factory anti-corrosion treatment at all, or its insufficiency becomes obvious. We have to admit that nothing can be done about this, we can only accept it as a fact.
- 2. Accumulation of dirt in the lower segment of the wing. It is worth understanding that the cleaner the car (not only on the front side, but also in hard-to-see areas), the lower the likelihood of corrosion.
Wing replacement work
Before changing the front fender on Kalina, study the vehicle's instruction manual to remember the location of the fasteners. The owner is required to prepare the site for repair work. It is advisable that this be a dry, clean room, protected from direct sunlight.
Before removing the front fender on a Kalina, a car enthusiast should prepare the following set of tools:
- open-end wrench set to “10”;
- open-end wrench set to “8”;
- jack;
- Phillips screwdriver;
- key set to “19” - to remove the front wheel;
- a small piece of clean rags;
- container for collecting fasteners of the front fender.
Before starting installation/dismantling work, it is necessary to “de-energize” the car by disconnecting the terminals from the battery.
Algorithm for removing the wing
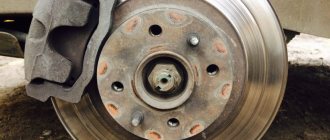
- Hang your Kalina up, and then loosen the front wheel mounting bolts on the desired side. Remove the wheel;
- Having removed the wheel, the car owner gains access to the front fender apron, which must be removed using a Phillips screwdriver, a wrench, and an “8” wrench;
- Unscrew the protective cover. To do this, unscrew the three screws that secure the casing to the bumper and the three screws that hold the casing to the body;
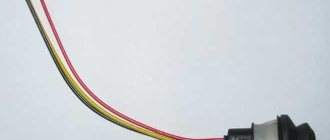
- Remove the right/left turn signal, having first disconnected the wiring from it;
- Remove the front bumper (in the factory operating manual there is a section dedicated to the bumper and its installation. See the sequence of installation/disassembly steps there);
- Remove the front headlight from the desired side. Remove the two bolts from the headlight bracket. From there we additionally remove the mounting screw;
- Removing the front fender bracket. The bracket is removed by removing two bolts using an “8” wrench.
- Wing dismantling is complete.
Features of replacing the wing on a VAZ 2114
The cars coming off the VAZ assembly line were distinguished by fairly durable body elements.
This was explained by the fact that domestic designers, taking into account the operating features of such machines, made every effort to give all components characteristics that ensure uninterrupted operation for a long time. Over time, the development of technology has made it possible to use new materials that significantly reduce the overall weight of the car. However, this point had some negative impact on the strength of body elements.
So, for example, on a VAZ 2114, the front wings are the parts that are most often damaged during operation.
The causes of such damage may be:
- car accidents;
- consequences of unsuccessful parking maneuvers;
- natural wear and tear, etc.
That is why it will not be superfluous for car owners of such models to learn how to change the front fender on a VAZ 2114. This information will allow you to easily repair the car with your own hands, as well as competently carry out its maintenance.
Regardless of what was the reason for removing the wing (its straightening or replacement), it is important to properly prepare for the procedure.
When the wing of a VAZ 2110 requires replacement
The wings of the VAZ 2110 are among the most vulnerable parts of the body, along with the sills and wheel arches. Parts are in constant contact with flying gravel and precipitation. Spending the night in the open air and aggressive reagents that clog into hidden cavities affect the condition of the metal.
Dismantling of the part and subsequent repairs will be required in the following cases:
- The appearance of corrosion, but before removing the wing of the VAZ 2110, it is necessary to inspect the part for the degree of rust damage. If a small spot is found on the outside of the part and corrosion has occurred at the site of the paint chip, then you can limit yourself to minor repairs, clean, prime and paint the element without removing it from the car.
- If corrosion spreads from a rotten wheel arch, the wing must be removed and the part must be rewelded or completely replaced.
- Electrochemical corrosion can occur in the mounting areas of the left and right amplifier; during repairs, the places must be inspected.
- The element will need to be removed if there is significant deformation after an accident. Straightening and subsequent processing are carried out on a table or a special machine; if the metal is torn, then in 60% of cases a complete replacement is carried out.
The cost of the front wings on a VAZ 2110 from the manufacturer is from 2000 rubles, the price of the rear fenders starts from 7500 rubles. As an option, you can install a plastic wing instead of the original metal one, which is 50-70% cheaper.
The advantage of the plastic element is obvious, since the part is not subject to corrosion. But with such an advantage, plastic also has a drawback: with a medium impact, the element cracks and cannot be repaired.
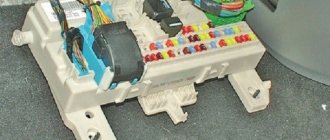
Required tools and materials
Before removing the front wing on a VAZ 2110, it is necessary to carry out preparatory work and prepare tools. During the factory assembly of the body, the wings were welded to the cross members and struts at points. If a non-original wing is being removed, you should check how the part is installed. If there are welding points, they must be drilled out and then cut out. Tools for work:
- chisel with a sharp and wide edge;
- semi-automatic welding;
- key for 8 and 13;
- Phillips and flat screwdriver;
- grinder and circles for stripping metal;
- sandpaper R-80;
- automotive primer;
- end cutters;
- putty, rubber spatula;
- auto enamel;
- anticorrosive based on bitumen or rubber-bitumen.
This is interesting: Installing the rear wing on a VAZ 2110 in the garage
Before dismantling the part, it is necessary to prepare the car:
- Place the Lada on a flat surface with the handbrake.
- Drain the fuel as welding is involved in the repair.
- Disconnect or remove the battery.
Mounted body parts, sidelights, etc. are dismantled during the work. If you need to replace the original part after an accident, it is recommended to buy a replica from the manufacturer and take measurements. In half of the cases, spare parts from the manufacturer require additional adjustment.
Lada Kalina sedan K-Line › Logbook › Repair of front wings. Getting rid of rust. Painting
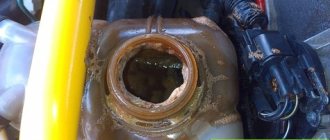
7 years of operation of the car makes itself felt by “saffron milk caps” on the bottom of the front fenders.
1. On one side, the paint is rubbing on the front mudguards. Nowadays, cars come from the factory with a film installed at the point where the mudguards come into contact with the paintwork. At least their brains worked in the right direction.
2. On the other side, a huge pile of dirt collects from the inside of the wing from below, you just can’t imagine what a pile it is, regardless of whether the front fender liners are installed or not. (I have front fender liners installed)
3. From the inside of the wing at the bottom there is a round zero anticorrosive in this place.
Well? I looked at this picture and suffered.
Patience has run out, we need to do something about it.
Option 1. Buy a new wing and have it painted.
Option 2. Buy a new wing and paint it yourself.
Option 3. Treat the existing wing. This is the option I chose
There were a lot of other options, like leaving it like that and others, which just don’t fit into my system.
Evening of the first day. Start
The main thing is to start, and whether you like it or not, you have to bring it to its logical conclusion. The wing was in trouble, it was rotten from the inside out. Sadness, sadness...
What to do? Take off your wings and think further. The front end was tossed around.
We evaluate the “cleanliness” of the wing. There is a huge pile of dirt. You also have this kind of crap collected in this place.
We pick it out and wash away the dirt. I feel like a doctor who saves a patient. And the less land in the wing, the more alive the “patient”.
On the second side of the wing the situation is less sad.
The evening was not wasted. I disassembled the front end, removed the wings, washed them and prepared them for further work. You can leave your car overnight with a clear conscience.
Second day. Continuation
We clean all the saffron milk caps. From inside, we pick out all the rust that could fall off. We go through the rust converter several times. Dry it.
Degrease with solvent and apply fiberglass putty.
We smooth it with 220-grade waterproof sandpaper, naturally with water, apply universal putty, and dry it.
We do the same with the second wing.
The wing is almost ready for primer application. I worked on both wings alternately, while the putty was drying on one wing, I sanded the second wing.
We dry the wing with a compressor, degrease it with a solvent and apply a primer from the inside of the wing
Now we apply the primer to the front side of the wing. An electric heater came to my aid to speed up drying. Apply the primer in several layers (2-4e) with drying between layers for 5-10 minutes (more is possible)
After the finishing layer of primer has dried, we go over it with 1000-grit waterproof sandpaper and water to make it even before applying paint. Paint in 3-4 layers, drying for about 10 minutes between layers.
After the last layer of paint has dried, apply colorless car varnish in several layers. My varnish turned out to be long-drying (since 2004, the jar had been in the bins, so that would be the varnish).
After drying, we put everything in its rightful place, except for the mudguards. First you need to apply a transparent film to the wing near the mudguard.
I bought 1.7 kg of bitumen mastic for 180 rubles. Half a can was enough for the front arches, left for the rear arches and grease the bottom where required.
For convenience, I removed the front wheels so that I could stick my head under the fender and assess the condition of the coating))) I applied mastic at lunchtime, and in the evening I put the fender liners in place.
How long will such manipulation last?
Time will show. Then it will be possible to change the wings. I'm satisfied with the work done) My conscience has calmed down a little, it's clear
PS: I used a brush to touch up the chips on the bumper while the bumper was removed and lay to the side, not bothering anyone.
Plans: paint the radiator grille in the color of the car)
We repair the front wing of Lada Kalina with our own hands
Factory anti-corrosion treatment of VAZ cars, unfortunately, still leaves much to be desired. As a rule, corrosion begins in the lower parts of the wings, and quickly leads to the spread of unpleasant marks throughout the body. This picture is hardly motivating, so it’s better to get rid of rust as soon as possible.
The work on repairing the front wing of the Lada Kalina takes place in several stages:
- Remove the mudguard from the side where the damage is most noticeable. Most likely, the work will have to be repeated on the other side.
- If you are planning such work, it is best to wash the car in advance, and as thoroughly as possible, and then let it dry. It will be much more pleasant to work.
- The next step is to dismantle the wing.
Removing the wing is half the battle; now it needs to be thoroughly cleaned of dirt and other troubles. The recommendation to wash the car before starting work is not without meaning - after removing the wing, you will see how much dirt remains on the inside of the wing. But dirt is an excellent environment for corrosion. - After the wing has been thoroughly cleaned of external dirt, we clean it using a metal brush or similar attachment on a grinder or drill.
In the second case, the work will go faster, but a brush is still recommended for novice car enthusiasts. With it you can literally “feel” every centimeter of the wing of your car. Feel the depth and volume of corrosion damage. This treatment will help remove the topmost layer of rust. More subtle work will come next. - The rust converter at this stage is a material of paramount importance. Apply it to the damaged areas and wait until it dries completely. If there are places where the wing is rotten through and through, we treat them especially carefully so as not to get injured. We bend the protruding “rags” of rotten holes inward to avoid further injury.
- If you don’t have a rust converter, acid will also work, although you need to be very careful with it - the burns it leaves take a long time to heal and reluctantly. And yes, after working on the rust, it is advisable to clean off the acid with a rag.
- After the surface is free of rust, we apply a degreaser to prepare the wing for puttying.
We putty the dry and clean wing and then leave it alone until it dries completely. After the putty has hardened, it will need to be sanded with sandpaper - first coarse-grained, then fine-grained. In order to successfully sand, it is worth moistening the surface with water. After the surface has dried, we putty a second time, sand it, wait until it dries, apply a finishing layer of putty, and sand it. - Experienced motorists often use only coarse-grained sandpaper to level the first two layers of putty, and fine-grained sandpaper only when working on the last, finishing layer. But this is a matter of taste and the level of perfectionism, that is, the desire for perfection.
- After completing these works, we prime (preferably 3-4 times, with the surface completely dry after each application of the primer), and carefully go over it with sandpaper with a grit value of 1,000.
- After that, we paint (at least three layers) and leave the car to dry. It is better to paint indoors to avoid unexpected installations on the wing in the form of dust, sand, pollen, etc.
- After the paint has dried, we apply varnish (also in several layers, this will provide a higher level of anti-corrosion safety), and after it has dried, we polish the repaired wing. This can be done either with a polishing machine or by hand. Now you can install the wing in place.
- As a finishing touch, it is recommended to cover the inside of the wing with bitumen mastic. It will perform protective functions both regarding mechanical damage on the inside of the wing and regarding anti-corrosion protection. After the mastic has dried, the car can be driven.
Also read with this article:
Source: https://videovaz.ru/kalina/1766-remontiruem-perednee-krylo-lada-kalina-svoimi-rukami
Removing the front wing of a Lada Granta - step-by-step instructions
- The first step is to provide access to the mounting points; to do this, you need to remove the wheel and locker (fender liner). The process is familiar to most of you, so I won’t describe it. Everything is extremely simple, jack it up, hang the wheel, then unscrew the bolts and remove it. Next, remove the fender liner; to do this, unscrew the fastening screws using a key “8 and 10”, as well as TORX.
- Remove the turn signal repeater located on the wing by prying it off with a screwdriver.
- Then you need to remove the front bumper, you can find out how to do this in this article. Note: if you are replacing only one fender, it is not necessary to remove the entire bumper; you can only release one edge of the bumper, which interferes with the removal of the fender.
- Now you need to remove the headlight. To do this, turn off the power to the headlight by unclipping the wire block, then unscrew the four bolts securing the headlight. I note that many people get by without removing the headlight, but “the book” says that you need to remove the headlight. During the disassembly process, I think you will decide for yourself whether to carry out this step or not.
- Next, unscrew the three bolts securing the wing in its upper part, which secure it to the body.
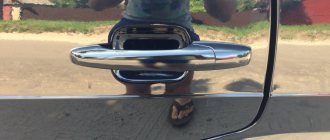
- Two more wing mounting bolts are located in hard-to-reach places. To unscrew the first one, you need to open the door; the bolt is located near the curtains and secures the wing to the rack. The second one is located under the threshold at the lowest point, see photo.
- The last fender bolt is located where the fender meets the bumper; this bolt holds the bracket, which in turn holds the edge of the bumper.
After all the above-described manipulations, the front wing can be completely removed and further necessary work can be carried out. Thus, by following the sequence, you can easily replace the Lada Granta wing on your own, even in your garage. After replacement, you should take into account the fact that the new wing will differ in tone from the entire body. It is very difficult to get, as painters say, “the tone” of a used part or even a new one; this is only possible in the case of individual selection of paint and painting of the donor wing. In all other cases, finished or used parts always differ in tone from the tone of the entire body.
I'll end here, thank you for your attention! Write in the comments how long it took you to complete this work and what difficulties you encountered during its implementation. I will also be very grateful to everyone who shares a link to this article with their loved ones on social media. networks, to do this, just copy the link or use the special buttons located below.
Rear fender replacement methods
You can change the rear wing yourself or at a service station. Everyone decides for themselves which option to choose.
Replacing the rear wing of a VAZ with your own hands
It is necessary to replace the legs of the rear wings in case of a number of troubles with it; they can be destroyed by corrosion, when replacing the sills, when these same legs are crushed. You need to start replacing the rear wing hams by cutting off the old ham, here I advise you to change only the necessary part of the ham, that is, it is not necessary to change the entire ham, you can replace half or a third part.
After removing the old ham, you need to look at the condition of the outer part of the wheel arch; it must be in good condition, since the ham must be welded behind it. But quite often, the arch rots in this place, and it has to be restored.
In my case, the arch was in poor condition, I had to treat it a little, a repair insert was made for this, I did it this way, someone might do it differently.
The insert is welded into place
Of course, before welding, the insert was measured more than once, and the rot was cut off. Next, the rust, which would have prevented the installation of a new ham, was cleaned off, the new ham was exposed, and during the fitting process everything was fixed with self-tapping screws.
The insert was welded, there are minor flaws, but they were corrected with a semi-automatic machine and a grinder. It is welded into the joint with the wing using a continuous seam, along the arch and in the door opening with dots.
If you don’t want to restore the wing yourself, it is recommended to buy a new one and take the vehicle to a service station.
Replacing the rear wing in a car service
An expensive option is to take the car to a service station and order turnkey work. Six new body elements need to be painted, and this is almost half of the Kalina, which has considerable age and mileage. To avoid noticeable differences in color, it is better to “drench” the entire car. Painting work alone in Moscow will cost a hundred thousand, and you also need to buy a bunch of spare parts, change the roof and check the “geometry” of the body.
The second way is to paint only the new mounted body elements in the same service center where the roof will be replaced, and later install them yourself. In this case, there is no guarantee that the master will exactly match the tone, and painting the two front fenders, the right doors and the front bumper will cost about 40 thousand. We need to look for a cheaper option.
Many sellers offer already painted body parts for cars of popular brands - for example, doors and fenders. It is important to understand that automakers do not supply such bodywork as spare parts; third-party companies take factory stamped parts and paint them themselves. There are even fewer guarantees that the paint will match exactly, but the prices for such spare parts are very attractive.
This is interesting: Do-it-yourself Dodge Caravan car repair
Since we are restoring a budget car, we choose the appropriate approach. We entrust the replacement of the roof panel (with painting), repair of the threshold and rear fender on the starboard side to a service station - for such work you need the appropriate premises, experience and equipment. We buy painted attachments (doors, front fenders and bumpers) in the store, and we also get the headliner and glass there.
This method requires considerable investment, but you can be sure that the work will be done efficiently and quickly.