Removing the front seats of Lada Priora
Required tools : flat screwdriver, 13mm socket, Torx E-10 socket (or regular 8mm socket).
- Move the driver's seat back as far as it will go and disconnect the torsion bars using a flat-head screwdriver.
- Remove the torsion bars from the mountings and remove them.
- Unscrew the 4 nuts securing the pillow base strut brackets using a 13mm socket. Remove the brackets from the studs.
- Tilt the driver's seat back. Remove the 2 front bolts securing the seat slide to the body using a Torx E-10 socket.
- Tilt the seat forward and move it to the full forward position. Similarly, unscrew the 2 rear mounting bolts for the slide using a Torx E-10 socket.
- Remove the Priora seat from the car interior.
Installation of the front seats is carried out in reverse order.
Removing the rear seats of Lada Priora
Required tools : 10mm socket, Phillips screwdriver.
- Release the latch by pulling the loop.
- Fold the right side of the seat back forward and unfasten the fastening buttons for the trunk trim.
- Pull the backrest hinges out of the body hooks and remove the right side of the backrest.
The left side of the seat back is removed in the same way.
- Press the latches on both sides of the seat cushion.
- Remove the pillow.
- Unscrew the 2 screws of the upper fastening of the plastic partition using a Phillips screwdriver.
- Unscrew the 2 nuts securing the armrest hinges to the body using a 10mm socket.
- Remove the armrest.
- Remove the plastic partition.
Installing the rear seat of the Priora is carried out in the reverse order.
How to remove the rear seats in a Priora
Lada Priora is one of the latest innovations in the domestic automobile industry. The car now has its own fans and critics. To protect their favorite, Priora owners say that the car copes well with the transportation of large-sized cargo. You just need to know how to remove the rear seats.
You will need
- – wrench 10;
- - Phillips screwdriver.
Instructions
1. Open the back door of the car. Feel under the seat for the small airbag lock handle. Press the handle while controlling the applied force. Finding a replacement for a broken one will be quite difficult.
2. Carefully lift the edge of the pillow to stretch it out. Go around the other side of the car and do the same operation so that both ends of the cushion come out of the grooves.
3. Lift and pull the seat cushions out of the passenger compartment. The left rear seat cushion of the Priora is slightly larger than the right one - because of this, it comes out a little more difficult.
4. Now take care of the headrests. Move them to the lowest position, then with sufficient force, pull up until it stops. After this, press the latch to pull the head restraints out of the back of the rear seat.
5. Find the fastener strap on the back of the seat. Pull it up. In a car with a lot of mileage, and occasionally even a new one, the locking mechanism can jam. If this snag remains after several attempts to remove the rear seats, you will need to lubricate the mechanism with lithol. In addition, it happens that it is impossible to find the strap due to the fact that the interior seats have been reupholstered. At the same time, the locking strap remained inside, behind the cover on the rear seat.
6. Pull up slightly to extend the rear seat backrest. That's right, pull out the second one in the same way. Remove the armrest screw attached to the hinge. Later, remove the hinge screw attached to the body. Release the loop and carefully inspect the pillow retainer. If it is faulty, disconnect it too and replace it with a new one later.
Installation of torsion bars for the front seats of Priora
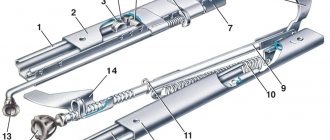
We place the taller plastic bracket (No. 1) closer to the threshold, and the less tall one (No. 5) to the floor tunnel. In this case, the hooks (No. 2) of the brackets should be directed towards the front of the car. We insert the short end of the torsion bar (No. 3) into the hole in the bracket (No. 5) and insert the torsion bar (No. 3) into the hook (No. 2) of the bracket (No. 1). Then use a mounting spatula or a powerful screwdriver to place the long end of the torsion bar (No. 3) behind the hook (No. 6) of the pillow base post. We install the torsion bar (No. 4) in the same way. The long ends of the torsion bars should be directed towards the front of the car.
Source: xn—-8sbabr6ahc3e.xn--p1ai
Front seats
The front seats can be removed regardless of the Priora body type, that is, the seats will be removed the same way on all types of cars.
In order to get started, you need to prepare the tool.
To remove the front seats of the Priora you will need:
- Ratchet;
- Torx head E10;
- Head for 10 and 13 mm;
After preparing the tool, you can begin to work.
Removal process
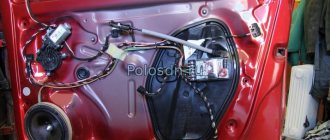
- Initially, you need to disconnect all wires connected to the seat, such as heated seats and the seat belt indicator. We find these connectors under the seat and disconnect them.
- Remove the springs pushing the seat forward numbered 1 and 2 by pulling them up from the plastic retainer.
- Next, use a 13 mm socket to unscrew the 4 nuts securing the front part of the seat.
- Then, using a torx E10 head, unscrew the 5 bolts securing the slide.
- We take out the seat through the front door of the car.
Installation is carried out in reverse order.
Rear seats
The rear seats will differ in dismantling depending on the Lada body type. Therefore, we will consider each body type.
Sedan
- In a sedan, the rear seat can be removed much faster than in other body types. To remove the sofa, you need to press on the locks located on the edges of the sofa and lift it up. After which the sofa can be removed from the car.
- The backrests of the rear sofa can be removed by opening the lock located behind the rear headrest. To do this, you need to pull the lock loop and tilt the backrest forward. After which the back is removed from the hooks.
Hatchback and station wagon
- In these types of bodies, the sofa is divided into two parts, each part is attached to two hinges that are screwed to the body with an M6 bolt with a 10mm head.
- To dismantle, you need to pull the loop and open the lock securing the sofa. Then unscrew the 4 bolts and remove both parts of the sofa from the hinges.
Back
- The back of the sofa is also divided into two parts and is supported on hinges, access to which opens after removing the sofa.
- Pull the lock flag to open it and bend the back forward. Then unscrew the bolts on the backrest hinges and dismantle it.
The installation process is performed in reverse order.
Source: enginehack.ru
Removing Priora seats
Operations carried out when removing and installing the rear seat on a VAZ 2170 2171 2172 LADA Priora (Lada Priora). Hatchback and station wagon
- In these types of bodies, the sofa is divided into two parts; each part is attached to two hinges, which are screwed to the body with an M6 bolt with a 10mm head.
- To dismantle you need to pull the loop and open the lock securing the sofa. Then unscrew the 4 bolts and remove both parts of the sofa from the hinges.
READ Replacement Tiguan Rear Brake Pads Without Computer
Sequence of operations when removing and installing the rear seat on a VAZ 2170 2171 2172 LADA Priora (Lada Priora)
Press the seat cushion lock handle...
...and lift the edge of the pillow.
Similarly, release the 2nd edge of the cushion... 4. ...and remove the seat cushion. The photo below also shows the rear seats from the luggage compartment side of the LADA Priora hatchback and station wagon. For these cars, all operations are similar.
Heated seats Lada Priora - breakdowns, installation instructions
In frosty weather, it’s not very pleasant to sit on an icy car seat to start the engine - so heated seats come to the rescue. Inventive owners of the Lada Priora almost immediately began installing heated seats in their Prioras. Of course, the seat does not warm up instantly, but it noticeably saves you from frostbite. While the heater is not heating up (since the engine has not yet warmed up!) is it necessary to sit in complete cold? Factory seat heating is installed only in luxury versions of the Priora car. Installing it is not very difficult, the main thing is to connect everything correctly. Heated seats, like “Emelya”, do not need to be installed, the seat upholstery is not removed, because it is just a cover for the seats - it is inserted into the cigarette lighter - although for some reason, over time, they burn out the cigarette lighter fuse.
You can install heated seats on a Priora yourself; it will cost relatively little (compared to the fact that your health can suffer greatly from warming up a frozen car). The heated seat control unit can be installed in the Priora where it is convenient: the main thing to remember is that this is not the most necessary button when driving a car, it should not interfere with pressing other levers and buttons. Read the article to the end and your car will be warm even at minus 45.
Installation of standard seat heating on Lada Priora
The standard seat heating kit for Priora should include:
- Heating elements (4 in total, two for each seat);
- Block for the control unit with wires;
- Priora seat heating unit.
At the same time, the article number for heated seats for the Lada Priora must contain the numbers 2170 - this, as any Priora owner knows, is the model number. It is worth distinguishing the standard heating kit for Priora 2 by catalog number - in comparison with the kit for Priora 1, they are different. The entire installation of seat heating on a Priora is best described with a detailed step-by-step algorithm, which has been tested by time and other car enthusiasts:
- We remove the front seats. Remove the factory covers from the seats, which are secured with a metal spoke and three plastic latches. You can disassemble the seats without dismantling them, removing only the covers, but then the process will become a little more complicated - it will be inconvenient to deal with wiring and laying out heating elements;
- We attach heating elements to the seats - one on the lower part, the second on the backs, in the lumbar area. Some people recommend attaching it with double-sided tape, but over time it can come off. It would be safer to sew the heating element to the pillow so that it does not move out of its place;
- Pull the wires from the heating elements through the hole in the mount under the pillow (run the wires from the lumbar heating elements to the place where the seat upholstery is attached). The piece of wire that passes through the hole can be protected from chafing using some kind of plastic tube. The power plugs for all four elements are out, all that remains is to connect them;
- Disassemble the central tunnel. Buttons for heated seats will be in place of the plug near the handbrake;
- The wiring is connected strictly according to the connection diagram for heated seats. Before doing this, it is recommended to disconnect the battery from the network. We install a terminal block to the heating control unit. The (-) black wire is attached under the bolt near the handbrake. A gray-red wire (for aesthetes, it is responsible for illuminating the buttons) is connected to the lighting of the cigarette lighter rim. The red 12V wire is pulled to the mounting block. You can't do without a fuse here. Then everything goes strictly “by the numbers”. Connect pin 87 to the red wire, pin 86 to the black wire. Connect the blue-black 12 V wire to pin 85, the pink wire to pin 30. You can connect to the mounting block via cut-in clamps to hold the wires tighter;
- Reassemble the tunnel and install covers on the seats.
The standard seat heating on the Priora is guaranteed to last for several seasons if it is connected correctly. And if immediately after installation the heating does not work, it means the wiring connection was incorrect.
How to remove the front seats
Instructions for dismantling the front seats will be needed not only for installing heating. The front seats in the Priora are installed simply, and to install and disassemble them you will need several tools and strength. By the way, on the Priora 2 seats in the “Lux” configuration have become softer and more comfortable, but the adjustment is still the same - you cannot adjust the height.
There are not many instructions on how to remove the front seat, everything is simple:
First you will have to move the seats all the way back and remove the torsion bars. You will need a size 8 wrench (for five bolts securing the slide) and a size 13 wrench (for four bolts on the bracket fastenings). First you need to unscrew the bolts on the bracket, then tilt the back of the chair back as far as possible and unscrew the two bolts on the slide. After this, tilt the backrest as far forward as possible and unscrew two more bolts. The seat can be removed from the passenger compartment.
How to remove the back sofa
Removing the rear row of seats is rarely done - only for cleaning or upholstery with new covers. However, also read the instructions for removing the rear sofa and keep it in mind “just in case.”
- Unclip the seat cushions on both sides (they are angular) and remove them from the passenger compartment.
- Find the locking strap above one of the backrests and pull it up. Do the same with the other back.
- Unscrew the bolts securing the armrest and remove it;
- Unscrew the bolts securing the hinges to the body.
The restyled and pre-restyled Priora, according to many car reviewers, are almost no different. But, if you dig deeper, you can find one big difference even in heating kits. In the kit for the pre-restyling version, the toggle switch works only in two modes: ON/OFF. And in the restyled version, the entire kit is designed to ensure that the heating operates in four modes: OFF, minimum, medium, maximum.
That is, the kit for the restyled version adds something that not all foreign cars have: the ability to change the degree and temperature of the seat heating. On the Priora, which was produced from 2007 to 2012, the heating elements immediately turned on to maximum.
The standard set for the Priora Restyling is also suitable for owners of the first model, because the design has not changed at all. The heating elements themselves will fit perfectly on the seats, and the wiring will be connected the same way – “according to the standard”.
You cannot neglect comfort in the car, otherwise every winter trip will become real torture. If the stove will not heat the air while the engine is warming up, then you can find other options to warm up. To do this you will have to spend half a day, but the efforts of this day will “pay off” when it is minus 25 outside.
Source: priorik.ru
How to remove the rear seats on a VW Jetta
If a car enthusiast is in constant search for new ideas that will improve his car, then the expected desire will be to equip the rear passenger seats with heating, which works when it is winter on the other side of the window. But there is one significant problem in that not everyone knows how to remove and disassemble the rear seat on a Volkswagen Jetta. If this problem is resolved, then the rest will require a minimum of time.
In order to remove the rear passenger seats on a Volkswagen Jetta, you need to perform the following steps:
- Unlock the existing rail latches in the mounts that are designed for VW Jetta child restraints;
- Next you need to remove the front part from the rear passenger seat, to do this it should be pulled upward, thereby removing it from a pair of fasteners;
- The remaining part needs to be moved back a little by pressing on it;
- The rear part should also be slightly pulled up to remove the passenger seats from the VW Jetta.
Now it’s time to remove the backrest from the rear passenger seat of the Volkswagen Jetta. To dismantle it you will need:
- It is necessary to open access to the middle support of the backrests; to do this, it is necessary to bend back the flooring where it is located;
- If there is an overlay on the support, it must be removed;
- Then you will need to unscrew the screws and remove the clamp from the support;
- Having raised the right side of the backrest, it should be removed from the middle support and from the finger;
- Next, you will need to unscrew the next fixing bolt and then easily remove the seat belt buckle from the floor.
- Now all that remains is to remove the right backrest from the VW Jetta, first by simply lifting the left backrest, removing it from the middle support and from the pin.
Rear seat Backrest
Useful information about seats on the Prior
Welcome! What will be included in the list of useful information, you ask? Firstly, we will walk you through the basic everyday things that a person should know about car seats, namely, we will show you clearly how to remove the headrests from the seats, and we will also show you how to correctly fold out the rear seat of a car to transport large items. cargo and some more useful information will be given about the seats.
Adjusting the position of the front seat and head restraints on the car:
Note! In fact, adjusting the seats is an integral part of any car, since when buying a new car, all people are different and in order for each person to sit comfortably in the car, it is necessary to adjust the seat exactly to it (We are talking about the front seats), but remember once and for all , it is recommended to adjust the seat only when the car is stationary (Apply only to the driver), because when adjusting the seat, for example in length, you may lose control of the car because if you do not properly fix the seat on the car, there is a possibility that it will suddenly move backwards and thus you may lose control of the car, so be careful!
How to recline the rear seat on a Prior sedan
We invite you! What will still be included in the list of useful information, you ask? Firstly, we will show you the main everyday things that a person should know about car seats, and specifically we will show you clearly how to remove the headrests from the seats, and similarly we will show how it is necessary to correctly fold out the rear seat of a car in order to transport large items oversized loads and a little more useful information will be given about the seats.
Note! Real seat adjustment is an integral part of any car, because when it comes to purchasing a new car, everyone is different and in order for each person to sit comfortably in the car, you need to adjust the seat specifically to it (We are talking about front seats), but remember once and for all, the seat It is recommended to adjust only when the car is stationary (applies only to the driver), since when adjusting the seat, for example by length, you can lose control of the car because if you incorrectly fix the seat on the car, in other words, the possibility that it will suddenly move backwards and thus you can lose control over the car, so be careful!
1) At the beginning, the conversation will be about how you can adjust the front seats on a car, so if you set a goal to adjust it, for example, in length (according to scientific longitudinal), you need to pull the locking lever upward with your hand as shown below in the photo and only after that use body movements to adjust the front seat because it is enough, alas, if you release the lever, move your body either forward or backward, and thus you will fix the seat and it will stand clearly in one place.
3.5) On the side of each of the front seats there is a handle that is made of a round shape, so thanks to this handle it is possible to adjust not the front seat itself, but only its back, for this purpose it is necessary to turn this handle in the appropriate direction and thereby achieve position that is comfortable for you.
How to lower the rear seats on a Priora
Friends! Can you please tell me whether the rear seat backrest folds down on all Prior sedans? Maybe it depends on the configuration or something else? Where do you need to press or what do you pull to make it fold? Thank you in advance!
Comments 21
yeah, only these ropes tend to fall to the bottom and have to be pulled out of the trunk with a screwdriver. They really couldn’t come up with anything more serious.
yes yes, they wrote about it. Apparently I didn't have enough imagination =)
To be honest, it’s better not to touch the backrest unless absolutely necessary, the rear backrest locks are made of such rubbish that after opening the closures a few times they will stop latching…
To be honest, it’s better not to touch the backrest unless absolutely necessary, the rear backrest locks are made of such rubbish that after opening the closures a few times they will stop latching…
I'll keep that in mind, thanks!
If the straps fall, then pass a thin wire into the trunk and hook it to the straps there. Pull them into the cabin and open it. But it doesn’t fold up, it can be removed (the back) You’ll shoot it when you fold back the 2 buttons of the trim and see 2 hooks at the bottom
Thank you! I'll keep it on mind. but I would like to hope that they still didn’t fail =)
The only catch is that the trunk upholstery is riveted to the backrests.
This is how... it turns out that they will need to be “unriveted?” Are they holding tightly?
To be honest, I don’t even know, but I reclined the seats a couple of times and 3-4 rivets vomited out. I didn't try to fasten them back.
Are they reusable or not, these rivets? or just pulled it out and that’s it...
There is a rope behind the headrest that you pull and the backrest opens. When I wanted to remove my backs, to my surprise, I didn’t find them. I had to open them from the trunk with a screwdriver. The trick was that these straps just fell into the gap between the back of the seat and the rear parcel shelf.
The rear seats on the Lada Priora hatchback car fold down, thereby forming a huge space in the trunk. But for some, even this space is not enough to transfer a certain load, so sometimes you have to completely remove them and take them out of the cabin. True, this method of increasing free space is very rarely resorted to.
Also, seats have to be removed for the banal reason of replacing them with new ones or for dry cleaning purposes. In any case, to complete this procedure, you will need no more than 10 minutes of time and a tool, the list of which is given below.
- Socket heads for 10 and 13 mm
- Extension
- Ratchets or cranks
How to recline the seat of a Priora sedan
We carry out work when it is necessary to transport large cargo, to repair or replace the rear seat, access to the fuel module and power wiring harness for the rear of the car, and replacement of rear seat belts.
By pulling the loop, we release the latch (for clarity, the rear headrest has been removed)…
...and tilting the right side of the seat back forward, unfasten the buttons for fastening the trunk trim.
We remove the backrest hinges from the body hooks and remove the right side of the backrest. The left side of the seat back is removed in the same way.
We press the latches on both sides of the seat cushion...
...and remove the pillow.
Using a Phillips screwdriver, unscrew the two screws on the top fastening of the plastic partition.
Using a 10mm socket, unscrew the two nuts securing the armrest hinges to the body...
...and remove the armrest...
...and a plastic partition. We install the rear seat in the reverse order.
The rear seats on the Lada Priora hatchback car fold down, thereby forming a huge space in the trunk. But for some, even this space is not enough to transfer a certain load, so sometimes you have to completely remove them and take them out of the cabin. True, this method of increasing free space is very rarely resorted to.
Also, seats have to be removed for the banal reason of replacing them with new ones or for dry cleaning purposes. In any case, to complete this procedure, you will need no more than 10 minutes of time and a tool, the list of which is given below.
- Socket heads for 10 and 13 mm
- Ratchets or cranks
Extension
Removing and installing the rear row of seats on Priora hatchback 2172
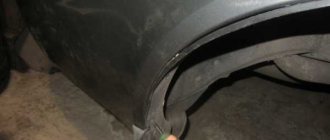
So, the first step is to remove the lower part of the seat, since it is the easiest to dismantle. To do this, use a flat-head screwdriver or use your hand to pry up the canopy cover, as shown in the photo below:
And in the recess we unscrew the nut using a 10 mm socket:
Now the canopy is moved to the side, because nothing else holds it.
We perform the same procedure with the second half. Then, by pulling the special belt in the back of the seat, on both one side and the other, we lift them and remove them from the passenger compartment.
As for the back, everything is also quite simple to do here. First of all, we recline the backrest, lifting the clamps next to the headrests, and from the inside we see several fastening nuts, both on one side and on the other. We unscrew them with a key number 13.
To show everything more clearly, below is another photo.
Also, on the back side there are still nuts that need to be unscrewed:
On the other side we do the same. After which you can begin removing the seats from the Priora. Once again, it is worth noting that the fastenings on the sedan will be different, so this procedure will have to be considered in the following articles. Installation occurs in reverse order.
How to remove the rear seats in a hatchback
The Lada Priora hatchback folds up, creating a huge space in the trunk. But for some, even this space is not enough for transmission. True, this method of increasing space is very rarely used.
Additionally, the seats need to be removed for regular seating. Either way, this procedure will take no more than 10 minutes to complete and the tool is listed below.
- End heads for 10 and 13 mm
- extension
- Hooks or wrenches
How to fold the rear seats on a Priora Hatchback ~ AUTOVIBER.RU
The front and rear seats of the Lada Vesta are recognized as one of the most functional and comfortable among the AvtoVAZ model range.
The chairs have a number of adjustments:
- by height;
- by depth;
- lumbar support.
The level of comfort increases if the rear row is folded down. A flat platform is formed, which allows you to rest and even spend the night if necessary.
How do the front seats fold out?
If necessary, the driver and front passenger can fold out the front seats. Unfortunately, an angle of 180° is not formed, but feel free to count on 140 - 150° degrees.
If you temporarily dismantle the sofa, the angle will increase by another 15°. This is quite troublesome and requires some effort.
To recline the backrests of the front seats, you must:
- Pull the lever under the seat towards you, move the chair back and forward.
- Pull up the lever located on the left.
- Tilt the backrest to the desired degree, release the handle. The position is fixed automatically.
- In the “Comfort” and “Luxury” trim levels, additionally adjust the position of the lumbar support roller.
To fold the seats back to their original position, adjust the levers one by one. Sometimes you need to fold the front passenger seat forward. To do this, press the lever to the “pull” position, move the chair back and forth, and adjust the backrest tilt.
How to remove the back seat
Sometimes it is also necessary to remove the seat from the car. The rear seat is removed for various reasons, for example, to accommodate non-standard cargo or for the purpose of replacement, etc. To carry out the procedure, it is not necessary to resort to the help of specialists; the motorist can handle this on his own, armed with a wrench and a screwdriver. Removing the rear seat is carried out as follows:
- First, you should remove the rubberized plugs from the seat cushion mounting posts that cover the fastening nuts. By unscrewing them, we fold them so that they do not get lost during the dismantling process and do not get tangled with other elements.
- Removing the pillow should be done very carefully. We lift its upper edge and, moving the chair forward a little, remove the pillow, disconnecting it from the fixing elements that hold the back part.
- We remove the spare tire bracket (in the luggage compartment), bend it and pull out the fastening plates connecting the floor to the trunk mat. To get to the seat backrests, you will need to remove the front cargo compartment trim.
- In the trunk we find two nuts that secure the right and left parts of the backrests, unscrew them and set them aside so as not to lose them.
- We tilt the back of the rear seat so that the fastening bolts come out of their holes, then remove the back of the seat, freeing the brackets from the brackets. We take the back out of the car.
- Rotate the armrests 45°, unscrew the fastening bolts and carefully remove the armrests.
- Now, getting rid of the fixing elements, we dismantle the head restraints.