Domestic ones have long moved away from the concept of producing completely mechanical components with a minimum amount of electronics.
The modern Chevrolet Niva model is a car with an injection engine, the operation of which is completely under the control of electronics. The article examines the problem of why the speedometer on a Niva Chevrolet does not work. The causes of the malfunction, the symptoms preceding them, and methods for checking all components of the speed counting system will be discussed.
Principle of operation
The car model in question is equipped with an electronic speedometer. The system includes the following elements:
- A visual speed control device located on the dashboard of a vehicle.
- A set of connecting wires protected by a fuse.
- On-board computer. The device is necessary to receive and calculate electrical impulses for the operation of the entire system.
- EMF or electronic speed sensor. The main purpose of the device is to work together with the gearbox to create electrical impulses.
The electronic speed calculation system was not chosen by chance. This approach made it possible to reduce errors in calculating speed, and also to include this parameter for the distribution of the combustible mixture, for stable operation of the power unit.
The operating principle of the speedometer is simplified as much as possible. The speed sensor is mounted in the lower part of the vehicle's transfer gearbox. It is combined with a mechanical drive. The gearbox drive gear rotates the sensor rod. The rotation is transmitted to a modified Hall sensor. The device converts rotational energy into electrical signals. The number of signals is directly proportional to the distance traveled. For a thousand gear revolutions, about 6004 pulses are issued. These signals are transmitted via a pulse wire to the ECU. The computer calculates the time and number of signals, converts them into electrical voltage and transmits them to the speedometer receiver-drive. Depending on the voltage, the electric motor of the drive deflects the needle of the device by a certain degree, which corresponds to the speed characteristic parameter.
When calculating the speed, the on-board computer also calculates the amount of air for the fuel mixture. The crankshaft position sensor helps with this. This sensor is also pulsed. The calculation of fuel and speed are interconnected, which allows you to most accurately stabilize the number of revolutions of the power unit for the current speed limit.
The operation of the electronic speedometer is often disrupted due to the breakdown of its components. These breakdowns are preceded by certain symptoms, which will be described below.
Symptoms of malfunction
A car owner can visually identify a significant number of symptoms when the speedometer stops working on a Chevrolet Niva. Symptoms include:
- Dashboard signal with error code "P0500". This error indicates a violation of the interaction between the speed sensor and the on-board computer. The reason may lie in a break in the electrical circuit or a malfunction of the EMF itself.
- Error "P0560" indicates high or low voltage in the power circuit. The cause may be a short circuit or a broken connection.
- Speedometer needle. It is very easy to visually determine the malfunction. The arrow completely stops functioning, gets stuck at a certain mark, works with trembling, and shows completely incorrect data. These symptoms may precede a number of malfunctions in the speed counting system.
The described symptoms directly indicate unstable electrical power. There are also several signs that affect the performance of the power unit. These include:
- An order of magnitude increased fuel consumption. The ECU is not able to estimate the current number of pulses from the EMF, since the signals arrive unstably. This is also affected by pulses from the crankshaft position sensor. The on-board computer cannot provide an overall picture of the vehicle speed and engine speed. Therefore, more fuel enters the engine.
- Significantly reduced power. Incorrect fuel dosage leads to a decrease in power. A large amount does not burn completely. The small volume is not enough to maintain the required number of revolutions.
- Failure to operate stable at idle. The reason lies in the periodic shutdown of the IAC (idle speed sensor).
- Complete failure when shifting into gear. Occurs when there is a loss of power. The power unit is not able to shift the vehicle's own weight.
- High load on the power unit. It is especially noticeable in low gears in off-road conditions. May be accompanied by rapid overheating of the cooling system.
These malfunctions are a direct consequence of incorrect calculation of fuel supply, based on inaccurate data from the speed sensor. Next, we will give a detailed overview of the faults that cause the speedometer on a Chevrolet Niva to not work.
Dashboard faults
The instrument panel, like any other electrical component, is susceptible to harmful causes such as short circuits, broken wires in the power supply circuit or failure of one of the main components of the device. If you have encountered a similar problem, first determine what signs of failure the shield shows:
- the panel does NOT work at all, but the engine starts and runs normally;
- The Niva-Chevrolet device panel does not light up, but at the same time all the indicators work (there are backlights)
- The speedometer and tachometer do not work;
- Temperature and fuel level sensors do NOT work.
In the first case, most likely the contact on the device connectors is lost. Just disconnect the pads, clean the contacts, and everything will work again. A similar malfunction may occur to you in the fall or winter, when the water level in the air is high.
If on a Niva-Chevrolet car the device panel lamps do not light up, but all its elements are operating normally, the reason must be found in the power wires of the lighting bulbs, or in the lamps themselves.
Failure of the tachometer or speedometer also indicates an open circuit in the power supply. The same can be said if there are problems in the operation of the fuel level and temperature sensors.
Malfunctions
There are not many malfunctions in the speed calculation system. All of them will be described, with detailed guidance on checking and possible replacement of the faults found.
Receiver drive
This unit is located on the back of the dashboard. It won't be difficult to check it. This requires:
- By pressing the button, reset the odometer readings.
- Press this button.
- Turn on the ignition.
When electrical voltage is applied and the odometer is reset, the on-board computer reboots the system, which provokes a check of the car's speedometer and tachometer. Both devices react to this by moving the arrows from zero to maximum. If the speedometer needle has not moved, it is worth checking the power connector. It is red and is located under the panel. Perhaps he does not “sit” well in the nest. After checking, it is worth repeating the test. If the problem persists, you should do the following:
- Connect one end of the control wire to the “+” terminal of the battery.
- Touch the “12” terminal on the red plug several times with the other end. This terminal is the very first, it is the impulse contact of the speedometer.
The arrow should respond to direct voltage supply.
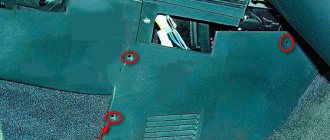
If the problem persists, it is worth dismantling the dashboard to visually check the drive. Often the problem is broken electrical tracks. A break occurs due to oxidation or short circuit. Found faults are eliminated by soldering. If there is a reaction, then you should pay attention to the fuse.
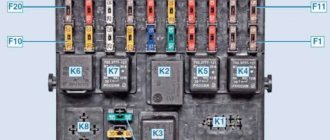
Fuse
A blown fuse causes the backlight to fail and the entire on-board panel to fail. Fuse “F19” is responsible for protecting this unit. It needs to be removed and inspected. You can visually determine if the jumper is broken or check the element using a tester turned on in continuity mode. It is also necessary to inspect the contacts of the safety block. Insufficient tension, dirt, oxidation should be removed. The terminals are tightened with the usual offset to each other. If a meltdown is detected, it is worth disassembling the block and transferring the wiring to a free cell.
After replacement, it is worth checking the voltage coming to the fuse. To do this you need:
- Turn the tester into DC voltage measurement mode.
- Connect the red test lead to the fuse output contact.
- Connect the black test lead to ground.
The tester should output data equal to the battery voltage. After checking, you should check the speedometer operation again. If the problem is not solved, then you need to check the speed sensor.
EMF
In order to check the speed sensor, you will have to jack up the car or drive it into a pit. The following events are carried out:
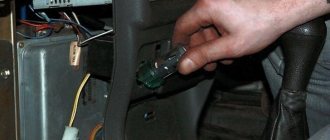
- Disconnect the power plug from the sensor.
- Inspect both halves of the plug. Remove any contamination or oxidation with solvent.
Next, you need to check the electrical power coming to the plug. Very often, the speedometer on a Chevrolet Niva does not work due to a break in the EMF power supply wiring. The devices are located at the very bottom of the gearbox. Operating a car on difficult road sections leads to cliffs. To check you need:
- Connect the red multimeter probe to terminal “1”.
- Connect the black multimeter probe to terminal “3”.
- Switch the measuring device to DC voltage measurement mode.
- Turn on the ignition.
The tester should output 12 volts. If there is no voltage, all wires and connecting elements will need to be checked. It is necessary to inspect the harness for breaks or insulation breaks. It is not recommended to twist damaged areas. The best solution would be to completely replace the damaged wiring. Insulation problems are easier to solve; it is enough to insulate the damaged areas. Damage cannot be left unisolated. Driving through water or snow will cause a short circuit.
If the voltage reaches the sensor plug, you need to check the device itself.
- From the battery terminal “+”, stretch the wire to terminal “1” of the sensor.
- From ground, stretch the wire to terminal “3” of the sensor.
- Connect the red measuring probe of the tester to the pulse terminal “2” of the sensor.
- Connect the black tester probe to ground.
- Turn the drive wheel of the car.
The sensor must produce pulse signals that are converted into a voltage from 0.6 to 12 volts. A similar test can also be carried out using a light bulb. It will more clearly show the formation of impulses. If the tester does not detect voltage, you need to remove the speed sensor. To do this you will need key “22”. The device is made in a plastic case. You need to carefully turn the key so as not to break the fragile case.
EMF often breaks due to cracks and chips on the body. The rod that rotates the drive may also break. The dismantled part is checked in the manner described above. After connecting all the control wires and probes of the tester, you need to turn the rod. If there is no reaction from the tester, then the part must be replaced. To do this, you will need to clean the seat and threads on the gearbox from dirt, replace the O-ring and screw a new EMF into place. Then connect the power plug to it. The plug must be treated with a sealing compound to protect it from moisture and dirt. After installation, you should check the operation of the sensor.
ECU
If all elements of the electronic speedometer have been tested and are in good working order, general diagnostics of the on-board system should be performed.
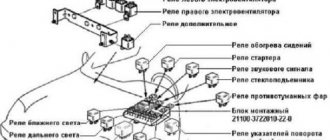
Niva 4x4 instrument panel diagrams
1 – plug connector block with conventional numbering of plugs;
2 – tachometer; 3 – voltage stabilizer; 4 – instrument cluster lighting lamp; 5 – coolant temperature indicator; 6 – fuel level indicator; 7 – resistor 470 Ohm, 0.25 W; 8 – resistor 36 Ohm, 5 W; 9 – warning lamp of the toxicity reduction system; 10 – control lamp for heated rear window; 11 – fog light indicator lamp; 12 – control lamp for high beam headlights; 13 – indicator lamp for external lighting; 14 – indicator lamp for direction indicators; 15 – voltmeter; 16 – brake fluid level warning lamp; 17 – diode IN4002;
1 – tachometer; 2 – voltage stabilizer; 3 – instrument cluster lighting lamp; 4 – coolant temperature indicator; 5 – fuel level indicator; 6 – warning lamp of the toxicity reduction system; 7 – indicator lamp for heated rear window; 8 – fog light indicator lamp;
9 – control lamp for high beam headlights; 10 – indicator lamp for external lighting; 11 – indicator lamp for direction indicators; 12 – voltmeter; 13 – brake fluid level warning lamp; 14 – oil pressure warning lamp; 15 – differential lock warning lamp; 16 – fuel reserve warning lamp;
Let us remind you that on the website you can find reports on the modification or repair of a domestic SUV.
Key words: 4x4 instrument panel
Found an error? Select it and press Ctrl Enter..
- Discounts and promotions for the purchase of LADA in March 2021
- Tuning the exterior and interior of the Lada Granta for 200,000 rubles
- Replacing and checking the knock sensor on LADA cars
- Photos of spoilers for Lada Priora hatchback, sedan and station wagon
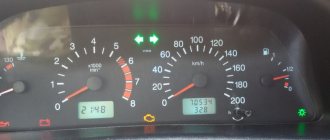
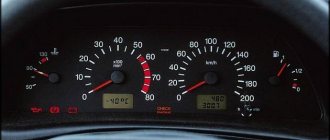
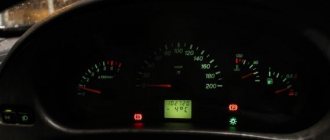
Designation of indicators on the Niva tidy
The diagram of the VAZ 21213 instrument cluster is shown above, the designation of the elements of the control panel is as follows:
- Coolant temperature controller, which also informs the driver about the engine temperature. If the sensor needle rises above the optimal value (enters the red zone), you must stop and turn off the engine to prevent it from overheating. Before further operation of the car, it is necessary to determine the causes of overheating of the internal combustion engine.
- A tachometer that tells the driver at what speed the crankshaft is moving. If the number of revolutions exceeds the permissible value and the arrow moves into the red zone, this may negatively affect the functionality of the engine as a whole.
- Left turn signal activation indicators, turns on only when the steering column switch is switched.
- Right turn signal.
- Speedometer, thanks to which the driver can know at what speed his Niva 21213 injector is traveling.
- Fuel level controller in the tank.
- A symbol that lights up when there is insufficient gasoline in the tank. If this lamp lights up, then there are less than 6 liters of fuel left in the tank.
- Dimensional lighting.
- The Niva instrument panel is also equipped with a brake emergency light. It may appear when the volume of fluid in the hydraulic drive reservoir has dropped below the permissible level. Operation of a car with such a problem is not allowed until it is eliminated.
- Distant lighting.
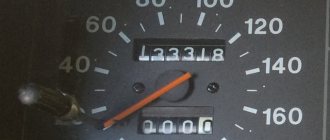
- Key for resetting daily mileage readings. To reset the values, the button must be pressed for five seconds, while the car must stand still.
- Mileage traveled by the car. The total mileage is indicated at the top, and the daily mileage at the bottom.
- An indicator indicating the need for engine diagnostics. When the ignition is turned on, this indicator always lights up; it should go out after the engine starts. If the lamp continues to burn, this indicates that not everything is in order with the engine.
- Emergency light signaling.
- Clock, outside temperature.
- Battery charge icon.
- The handbrake activation symbol should always light up in red.
- A light indicating a lack of engine fluid level always appears when the ignition is turned on, and after starting the engine it should go out. If the light remains on, this indicates that oil needs to be added to the engine.
- Reserve indicator (video author - Andrey Vlasov).
Also interesting: Choosing mud tires for a Chevrolet Niva