Many Lada Vesta owners were faced with the need to dismantle the rear sofa and the entire seat. To do this, we contacted a car service. But, this procedure is carried out quite easily and simply with your own hands.
Video about dismantling all the seats on the Lada Vesta:
The video will show how quickly and without unnecessary hassle you can dismantle the rear seat, and will also tell you about some of the nuances and subtleties of the process.
Why remove the back seat?
General view of the rear seat.
Of course, before considering the issue of carrying out the process of dismantling the rear seat of the Lada Vesta, it is necessary to understand in what cases this procedure will be needed.
So, let's consider in more detail in what cases it will be necessary to remove the sofa and the back of the car:
- To replace upholstery . This is often done when tissue elements are damaged. This could be holes burnt by cigarettes, spilled liquids, an accidentally torn surface, or, in extreme cases, a fire inside the car.
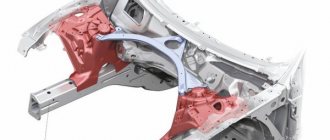
- Carrying out repair and restoration work on the body . It often happens that after a traffic accident, the rear part of the vehicle is damaged and deformations appear along the bottom of the cabin. This also includes side impacts in the area of the B-pillar and rear pillar.
- Replacement of upholstery or seats during the process of tuning and modification of the interior. In this case, you just need to remove the sofa and the back of the rear seat.
- Pasting soundproofing will also require dismantling the rear seat, since it is necessary to get to the bottom of the car.
- Other factors that will require dismantling the rear sofa and backrest.
Removing the rear seat of a Lada Vesta
The process of removing the rear seat on a Lada Vesta is quite simple and quite typical for all vehicles of the VAZ family. This procedure can be carried out in one pair of hands and requires minimal tools.
Let's consider the sequence of actions aimed at dismantling the rear seat:
- Of course, the manufacturer recommends removing the negative terminal from the battery when carrying out all repair and restoration operations. But, in this case, this is not necessary, so we will skip this operation.
- Let's start dismantling. First you need to dismantle the sofa. To do this, lift it up to remove it from the clamps.
Location of the rear sofa seat latch.
Location of the rear sofa fastenings.
Rear seat back bolt locations.
Location of the rear backrest fastenings.
The installation process is identical to the dismantling process in reverse order.
How to fold the rear seats correctly
Regardless of the reason why you needed to expand the space, be it organizing an overnight stay or transporting things that do not fit in the luggage compartment, the principle of action will be the same. Usually, how the rear seats fold and unfold is written in the vehicle manual, since there may be some nuances inherent in this matter that are specific to a particular car. On many models, the algorithm of actions is as follows:
- We lower the headrests or remove them and insert them into the storage holes.
- Next, find the locking lever, which you press to fold the back of the rear seat, and fold it forward.
- Now we pull the belt towards the front of the cabin and fold the seat up into the storage position.
- The legs should be folded, after which you need to pull out the belt.
- We put a hook on the handle to secure the folded structure.
- We adjust the belt to prevent it from sagging.
Unfolding to the original position is performed in the reverse order:
- Holding the folded chair, remove the hook from the handle.
- Carefully lower the seat and press firmly to secure it.
- We make sure that the legs are spread out. If not, we help manually.
- Pull the adjustment lever on the side of the car seat and raise the backrest.
- We check the quality of seat fastening.
It is not always necessary to recline all car seats; you can often get by with just one, for example, if the cargo is long and can fit in the space provided, at the same time there will be room for the passenger. In the case of a folding system in a 60/40 ratio, which is most often found, you can choose which part is best left for regular use and which part should be removed to free up space for transported luggage.
conclusions
As you can see, there is nothing difficult in the process of removing the rear seat of a Lada Vesta, and it is carried out quickly and in one pair of hands. Installation, like dismantling, can be done independently in your garage or even on the street
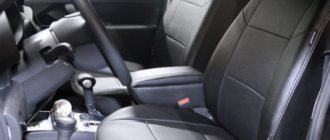
Car seat covers are not just about protecting car seats. This is also an element of the car’s interior, and quite an important one. The appearance of the seats radically changes the appearance of the interior as a whole, depending on the covers. Some people select covers to match the color of the car, others to match the color of the interior, while others, on the contrary, contrast the color of the covers and the car.
Lumbar support
AvtoVAZ designers tried to make the Lada Vesta the most comfortable of all VAZ models. So they added adjustable lumbar support. To adjust it, there is another handle on the side back.
She is responsible for a useful and rarely seen setting - lumbar support for the seat. This option can only be found in the Comfort trim level and above. The standard version of Vesta does not have such a setting.
Lift the lever up, changing the shape of the seat back. At the same time, the driver's back support moves forward. This ensures a straight back position, which helps during long trips behind the wheel, preventing pain.
Should I put covers on the seats or not?
This is the personal choice of the car owner. But generally, cases have more pros than cons. Of course, if you put cheap covers from the market on beautiful seats, the interior of the car will lose a lot in terms of appearance. But more often it’s the other way around - the standard seat upholstery looks so-so, but good covers give it a more expensive, beautiful look. Often already worn out seats are covered with covers.
Another undeniable advantage of covers is in terms of practicality. They can be removed and washed, wiped, vacuumed. And the standard upholstery underneath is like new. Before selling the car, you can remove the covers if they are frayed and sell the car with apparently new seats. The covers can be changed just like that if you get tired of them. Buy and supply a different color, a different material...
What types of covers are there for Vesta?
Cases are different. There are “shirts” that usually cover only the front seats. There are covers that completely cover all seats.
Car covers come in different materials. And at different prices. From two or three thousand in the nearest market to several tens of thousands. There is also a complete refurbishment of the interior, but that’s a slightly different conversation.
Covers are made from leather, faux leather, synthetic fabric, velor, vinyl, Alcantara and even sheepskin.
Synthetic fabric covers are very comfortable and inexpensive. Easy to remove, wash and put back in place. But there are some disadvantages: they look simple, they slip in the heat, and they don’t absorb moisture well.
Velor covers are pleasant to the touch, beautiful, and do not heat up or cool down very much. It’s quite comfortable with them, but...there are also disadvantages. They wear out, velor is short-lived. Such covers often have to be replaced.
Vinyl covers are cheap, bright, but very uncomfortable. They overheat greatly and become tanned in the cold. No comfort.
Covers for Lada Vesta
Since Vesta is a popular car, there are more than enough various accessories for this car, including covers. Cases are divided according to the material they are made from:
- Genuine leather;
- Eco leather;
- Faux leather;
- Jacquard;
- Velor;
- Synthetic polyester;
- Plush;
- Fur;
- Combined.
Next, we will look at each type of cover in more detail.
Cases made of genuine leather are the most prestigious and beautiful. The main disadvantage of such cases is their high price.
Cases made of genuine leather
Eco-leather covers are perhaps the most popular. This is the newest material listed above. It differs from ordinary leatherette in that it does not contain polyvinyl chloride, but in fact, it is the same artificial leather, only ultra-modern. The main advantage of the material is that it does not change either its properties or appearance under the influence of either high or low temperatures. The material is also much more resistant to mechanical damage. In a word, it can be called an ideal material for car covers. Hence the high popularity of these products.
Appearance of eco-leather covers
leather covers . Modern artificial leather is a fairly practical material. Its properties are not much different from eco-leather, but it is much cheaper in price.
Jacquard covers . Jacquard is a very interesting fabric; it consists of interwoven natural and synthetic threads. Covers made from this fabric ventilate and heat up very well. In a car with such covers, your back will never sweat or your bottom will freeze. In addition, it is very resistant to mechanical damage and abrasion. The only drawback of cases made of this material is their relatively high price.
Appearance of jacquard covers
Despite all the fashion trends velor covers are still the most affordable and popular. Velor covers have the largest number of color and design options, while they remain the most affordable in price.
Velor covers for Lada Vesta
Plush covers , despite the fact that they are soft and pleasant to the touch, quickly dry out and become unusable.
Fur covers are rather exotic, but at the same time quite popular in the regions of the far north and in general everywhere where temperatures are low in winter, and in Russia there are a lot of such regions. There is only one drawback: in the summer it will be simply impossible to drive in a car with such covers, you will sweat.
Fur covers
Well, at the end of our review, let's look at combined cases . These are covers that are made from various materials. There are quite a lot of variations and there is no such system among such cases.
Today we will install eco-leather covers on Vesta.
The central inserts are perforated. Since the car is silver, the covers are gray and black. Cases from the middle price category - without weights.
Let's start with the driver's seat, as it is the most difficult. First you need to remove it. You can put the covers on in place, but it will be more difficult and the result will be worse.
First of all, remove the headrest. We just pull it up.
Then we move the seat as far back as possible to get to the front bolts.
Use a Torx 40 wrench to unscrew these bolts.
After this, move the seat completely forward. Use the same torx to unscrew the two rear bolts.
Don’t forget to disconnect the connectors for heated seats and the passenger sensor (in the case of a passenger seat). The photo shows the connectors (bottom view):
Remove the lumbar support handle (if equipped).
To do this, you need to pull out the retaining bracket.
After this, you can remove the handle itself.
Carefully remove the seat from the car. It is advisable to call an assistant so as not to scratch the car body.
Depending on the weather, the seat can be taken home or to the garage for further action. You can continue to practice outside.
The seat lift handle can now be removed. The cover has a slot for a screwdriver.
We pry up and remove the decorative cover.
Under the cover we find two screws securing the handle.
Using a shaped screwdriver, unscrew them and remove the elevator handle.
The plastic cover on the side of the seat is held in place by latches. Carefully pry them off with a screwdriver and pull them out. Some latches need to be squeezed with pliers.
The casing does not need to be completely removed. Simply unclip the latches and thread the case using a ruler, for example, through the casing. If necessary, the casing can be removed; inside it is held on by a couple of latches.
On the other hand, the backrest reclining handle will interfere with removing the cover. It is held on a metal lever with a single latch. Bend it and remove the handle. Now you can remove this side panel.
We put the cover on the lower seat cushion. We thread, pull, tie and hook all the elastic bands and cords, depending on the model of the covers. Here we simply put rubber bands on the springs of the seat cushion, tightened and tied the main tightening cord of the covers. You can use special hooks from the cover set.
That's it, the bottom pillow is ready.
Assembling the seat. We install and snap back the plastic sides, put the elevator handle and the backrest tilt handle in place.
Next, we put the cover on the back of the seat. In some places, you may have to unfasten the standard seat trim. But there is no need to remove it completely. We tie all the laces and the cover is in place!
Find the location for installing the lumbar support handle.
Cut a hole large enough to fit the handle into place. The base of the handle should fit inside the cut out circle. It is better to cut with a scalpel or a stationery knife.
How to put on rear covers
First of all, remove the rear sofa cushion. We simply pull the front part of the sofa up. There are latches. Here is the mounting bracket in the photo on the removed pillow, bottom view:
Thanks for subscribing!
And the mount itself. Rear seat strip. It may break when the bracket on the pillow is pulled out of it, then it must be replaced.
Then we move the entire cushion of the back sofa towards the back. There are hooks under the back that hold the pillow.
We spread the pillow cover in a convenient place - on a table or workbench, face down. Place a sofa cushion on top (upside down). We stretch the cover, fasten all the elastic bands, tie the laces.
The rear sofa cushion is ready. Let's put it aside. We take hold of the back of the rear seat.
Remove the three rear head restraints. Immediately put covers on them and put them aside. The smallest headrest is medium. The case on it is also smaller, keep that in mind.
Next up is most of the backrest.
Using a 14mm socket, unscrew the lower fastening of the middle seat belt. The belt remains on the back of the seat.
Unscrew the front two bolts and two more at the back. We use a 13mm head.
Carefully, so as not to hit the car body, we pull out part of the backrest from the car. We place it on the table.
Remove the isofix child seat mount, which is located on the back side of the backrest. To do this, pry up the fasteners with a flat screwdriver and pull the fastener out of the back.
It is better not to remove the cover near the back recline button unless necessary. Very delicate fastenings, can be broken. It's better to just slide the cover under it.
These covers have a flap around the seat belt. After putting on the covers, you just need to fasten it with Velcro.
Then we thread the headrest locks.
We insert the child seat mount back.
Where necessary, we tighten it, tie the laces, and fasten the clasps of the case. The backrest can be replaced. With the second, smaller part of the back, we repeat all the points. We also install it in place, tighten the backrest mounting bolts and fasten the middle seat belt. Place the sofa cushion in place.
That's it, eco-leather covers on the seats. If small wrinkles have formed, don’t worry; they will smooth out over time. But the more you tighten the covers during installation, the better. This is a relatively budget option. There are covers that are twice as expensive, they need to be tightened, stitched, etc. But these look not bad either, better than the standard non-luxury seat upholstery, although this is also not for everyone.
Now you don't have to worry about getting your seats dirty. By the way, during the installation process, these new covers got dirty with grease like grease, all the bolts were in it. So the grease was wiped off with a damp cloth, not a trace remained, which pleased me.
Here are photos to compare the standard upholstery and seats with covers.
What does the seat assembly on a Lada Vesta car consist of?
Page 1 of 2
We prepare the car for work, disconnect the negative terminal of the battery.
Removing the front seat
Push lever 4, Figure 1, up and move seat 1 to the rearmost position.
Using a Torx T40 head, unscrew the two bolts 3 securing the slide 2.
We press the lever and move the seat to the extreme forward position.
Using a Torx T40 head, unscrew the two rear bolts 1, Figure 2, securing the slide, disconnect the rear wiring harness connectors from the seat, and remove the seat.
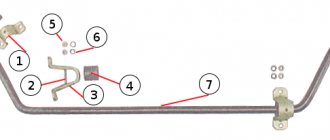
Removing the rear seat
We take our hands by the front edge of the cushion 1, Figure 3, of the rear seat and pull it up until the loop 2 of the cushion frame comes out of the hole in the latch 3 on the body. We repeat this operation on the other side of the seat.
Grab the cushion 1, Figure 4, of the rear seat, move it back towards the trunk, then lift the rear edge of the cushion to remove the hinge 2 of the cushion frame from the grip 3 on the body. Repeat this operation on the other side of the seat, remove the rear seat cushion from the car interior.
Using a 14mm head, unscrew bolt 5, Figure 5, securing the right seat belt buckle and the lower mounting point of the middle seat belt.
Using a 14mm socket, unscrew bolt 3 securing the rear seat back bracket to the body floor.
We tilt the right backrest 4 and the left backrest 6 forward by pulling up the clamps 1 and 2.
Using a 14mm socket, unscrew bolts 1, Figure 6, securing the brackets for the left 2 backrest of the rear seat, remove the backrest.
Unscrew the bolts 1 securing the brackets of the right 3 backrest of the rear seat, remove the backrest.
Install the seat in the reverse order of removal.
When installing the front seats, apply Fiol-1 lubricant to the rubbing surfaces of the slide.
Removing the rear parcel shelf trim
Remove the rear seat cushion as described above.
Lower the rear seat backs.
Remove the right and left side panel arch trim.
Using a Torx 20 head, unscrew the self-tapping screw 2 on the right and left sides, Figure 7, fastening the trim 1 of the side window.
We disconnect the side window trim from the body by pulling the trim with a force that overcomes the force of the plastic holders.
We remove the plastic buttons 2, Figure 8, fastening the upholstery 1 of the luggage compartment shelf.
Using a flat-head screwdriver, remove the gaskets 3 of the right 4 and left 5 seat belts from the holes in the shelf upholstery.
We remove the trunk shelf upholstery as an assembly with the right and left side window trim, threading the seat belts through the holes in the shelf upholstery and disconnecting the wiring harness block from the additional brake signal installed on the shelf upholstery.
Using a Torx T20 head, unscrew for each side three self-tapping screws 4, Figure 9, fastening the upholstery 1 and 2 of the side window to the upholstery of the 3rd shelf, and separate the parts.
Installation is carried out in the reverse order of removal.
The tightening torque of the seat belt bolts is from 38 to 50 Nm (from 3.8 to 5.0 kgf.m).
It consists of a pillow and a backrest, which are supported by a frame. The connection of these parts is made with the possibility of adjusting the position of the backrest, height, and also the distance relative to the steering wheel with pedals. The side pockets on the car are designed for one of these adjustments.
You can, of course, use capes; they will be easier to remove to wash, but they bulge and look untidy; the covers are universal, but cannot be adjusted to fit.
Vest owners are mainly inclined to choose textile covers, among which there are magnificent, practical eco-leather covers that can be given an individual design. Unfortunately, the standard Vesta does not provide upholstery made of natural or artificial leather, so this step is the exclusive right to upgrade the interior to a high level of quality.
In addition, covers made of genuine leather can be ordered, then the master will “adjust” the dimensions exactly to your car.
How to remove the front seat of a Lada Vesta Sedan
The process description is suitable for many car brands.
- We place the car on a level surface and open the front doors.
- Move the driver's seat all the way back. Remove two screws (head 10).
- Move the chair forward as far as possible and unscrew the two screws at the back. The size is similar.
- We remove the chair from the car interior and place it on the surface of the workbench for work.
Using the same principle, we remove the front seat of the Lada Vesta.
Unlike “Classic”, “Lux” and “Comfort” chairs have:
- greater rigidity;
- lateral support;
- quality of fabric upholstery;
- the presence of an armrest;
- heating system.
Finally got the front seats down!
Everything turned out to be very simple. We look under the seat and on the rail that is closer to the door we see a stop into which the folding tongue rests. The metal there is thick, it’s unlikely to be able to bend it without damaging the rail, so I used a drill and a metal cutting disc. After this intervention, the front seats receive the missing 5 cm of travel forward and the back rests flush with the rear sofa.
Bighorn UBS69, 97 g, SOTF, power bumper, lift 2″+2″, Lokka, winch 2x12000, snorkel, pneumatic system
She can lie down anyway, you just need to roll the seat by pulling the backrest adjuster all the way :))). And you have a potentially dangerous device, God forbid there is an accident, you risk driving forward along with the seat