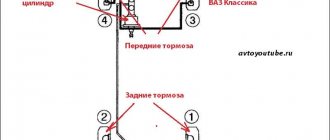
Many motorists are trying to modernize the vehicles they have purchased. They do this for the simple reason that almost all budget and classic vehicle models have a rear drum brake system. Replacing the drum brake system with a disc one is quite justified. The advantages of such a technical solution provide the following:
- More uniform application of braking forces and, as a result, increased efficiency of the braking process;
- Reduce the braking distance of the vehicle;
- Reduce the response time of the brake mechanism;
- Improve heat dissipation.
The last parameter can be considered one of the most significant, especially for those drivers who are accustomed to an active driving style at high speeds or when driving on mountain tracks.
Why are disc brakes better?
As mentioned earlier, replacing drum brakes with disc brakes is quite justified if the motorist wants to increase the efficiency of the braking system. It is worth resorting to such a technical solution, if only because it provides such undeniable advantages:
- The response speed of disc brakes is significantly higher from the moment you press the pedal;
- Operation occurs simultaneously on all wheels, which allows you to quickly and smoothly carry out the braking process.
Installation process
If any difficulties arise during dismantling, then it is worth looking into the VAZ 2114 service manual, there is a detailed description of the removal and installation of all mechanisms. And now to work:
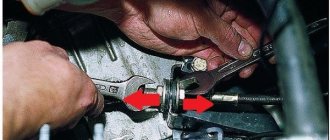
- The cable tension must be loosened and the rear pads must be brought together.
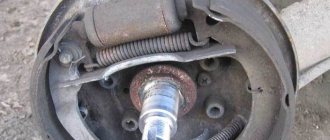
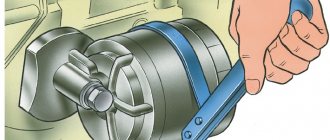
After this, you can use the 12th key to remove the guide pins. The seat must be thoroughly cleaned with a metal brush, and then the drum must be knocked down. It is not recommended to use a metal tool for these purposes, as it can damage the seat. The best solution would be a rubber hammer; The rear beam also needs to be sharpened - To release the pads, you need to remove the springs - this can be done with a regular screwdriver. After these manipulations, you can remove the tension spring and spacer bar. Next, you should lower the handbrake lever, after which you can remove the brake pad. The standard elements are removed, you can begin installing the new mechanism;
Important point! Sometimes one pin hole in a mechanism is smaller than the other. It is not recommended to adjust this size yourself. The best solution would be to go to a workshop where the diameter can be quickly adjusted.
- The caliper can be located in front or behind the wheel axle. This should not affect the operation of the mechanism in any way, but usually owners of the VAZ 2114 prefer to install it on the rear axles, since symmetry will have a positive effect on braking. The next step is to join the faceplate and hub. You should check that the centering has been carried out thoroughly. If there are defects, the docking must be repeated;
Grinding the corner of the beam - The next step should be straightening the corners of the beam. Once this procedure is completed, the hub can be installed. Straightening can be done using a grinder. The main part of the work is completed, all that remains is to install the rear brackets on the faceplate, and then attach the brake disc to the mechanism. In order for the structure to be reliable, it is necessary to place spacer washers at the contact points. The connection between the brackets and the faceplate must be securely secured, and then proceed to sealing the mechanism. An important point is to check the pedal. Rear wheels with an improved mechanism will significantly reduce the braking distance, thereby increasing safety.
Result of work
Important points: what to pay attention to?
If a motorist decides to replace the drum brake system with a disc one, it is important to understand and take into account some important points. This procedure is quite complex and therefore requires special attention. Since the lives of people inside and outside the vehicle directly depend on the effectiveness of the braking system, when replacing the type of brake system mechanism, it is extremely important to consider the following points:
- When replacing the brake system, you will also need to replace the handbrake with a hydraulic one;
- When choosing a brake system, it is important to pay close attention to its compliance with the standards required for similar structures on a car;
- Pay attention to the quality certificate of the disc brakes you purchase;
- After the replacement has been carried out, it is mandatory to undergo maintenance and notify about the change in the design with a note in the relevant documents.
How to replace it yourself?
To carry out this procedure independently, the contractor will need an installation kit for a disc brake system, consisting of a caliper, pad, disc, hose, faceplates, bolts and fasteners. In addition, to perform the replacement you will need a standard set of automotive tools. The procedure itself will look like this:
- Remove the brake pads according to the instructions;
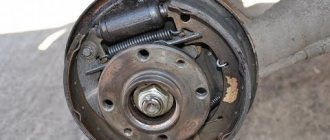
- Remove the drum brakes;
- Remove the nut supporting the parking brake cable and then detach the drum;
- Disconnect the brake hose from the cylinder and then remove it;
- Remove the hub and flange of the rear suspension arm;
- Install the disc brake system: connect the brake hose, parking brake cable and caliper.
- After installing the brake system, bleed it.
How to replace a drum brake system with a disc one will be explained in this video:
Published: June 14, 2021
What is needed for replacement
For a theoretical rework, the following elements will be required:
- Brake discs - parts from the front wheelset of a VAZ 2114 with a diameter of 240 millimeters are suitable. The only point is the diameter of the hub, which, using the appropriate equipment, needs to be changed from 58 mm to 60 mm.
- Pads, calipers and hoses are also suitable from Samara. It is worth remembering that in this system the VAZ 2114 is no different from the “nine”, so parts from 2109 will also fit.
- Plates for mounting calipers. You can find this part on the Internet or in the automotive market. Some motorists make plates themselves.
- Bolts M10x1.25 30 mm – 12 pieces.
- Distance washers from the timing belt of the VAZ 2114 or “nine” - 8 pieces.
Lada 2106 › Logbook › Installation of an HTD on a classic 2101-2107
Well, I don’t think it makes sense to talk about the advantages of disc brakes and why they are needed) Personally, I was not happy with the “classic” brakes from the beginning! When studying the issue (what and how to install), the choice fell on the front brakes of the VAZ 2108, for my purposes they are enough for the eyes!
bolton
I will provide a list of spare parts and modifications that will be required for installation at the end of the logbook!
Our initial task is to remove the axle shafts (there won’t be any problems with this; we know how to break them))
Remove the drum, unscrew it and remove the axle shaft!
As you can see in the photo, one drum turned out to have character, but an angle grinder and a sledgehammer have never broken anything like that!
Now we have removed everything (rear brakes, brake pipes along the tee, axle shafts, handbrake (dismantled the whole one, including the sales handle)) from the entire list we only need axle shafts!
Well, now the most difficult thing for most users)) is turning the axle shaft) The problem is that the brake. The disc just won't fit on the axle shaft!
My groove is a whole story that lasted 2 weeks) The first turner broke 2 cutters and, to put it mildly, sent me away) the second turner just sharpened for 2 weeks and did not sharpen them to the end, and the third turned out to be a Soviet-trained old man and did everything for 200 rubles right in front of me!
If you have a good turner (I only got one later))) then there are no problems at all!
I immediately changed the bearings, seals and made studs (the right thing). I made the studs as follows: I bought old-style 2108 head bolts and nuts from the Niva, all 8 pieces each!
Blank for hairpins! Leave everything as it should be, scald it, saw it off!
hairpins
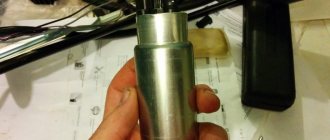
This is what the finished axle shaft looks like
We've done everything with the axle shafts, now we need a faceplate! There are a lot of drawings on the Internet for different calipers, I just went to the southern port and bought
ABTechnic faceplate
Well, all the spare parts are ready, and you can start assembling!
We wash everything and change the oil seal!
We put on the faceplate and screw the axle shaft to its rightful place! I used standard bolts (some are missing them)
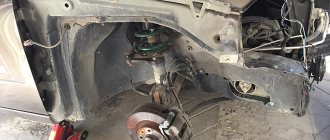
We install the brake disc, caliper and make sure that the disc does not rest against the caliper. My disc rested against the caliper and I had to make a 5mm spacer (I made them from standard spacers for the front wheels)
They machined it in the same way as the axle shaft
Simple assembly follows
Install the bracket and caliper
We use the following pipes - on the left side we put the pipe from the front brakes of the classic (which is short, between the cylinders) and on the right we put the pipe that goes to the left side (you can see them in the photo) and standard hoses from 2108
Here are the tubes and hoses. I bent the tubes where they needed to be and attached them to the bridge with plastic ties! Let's bleed the brakes and we're ready to have an HDT on the classic!
Ready
List of required spare parts: -Pipes (seen in the photo) -Hoses (stock before 2108) -Calipers 2108 -Disks (stock 2108) -Padders (Ferodo 2108) -Wheel studs -Plant washer (ABTechnic) -Mound axle shafts -5mm spacers (turned -Well, a bunch of small things (brake fluid, gearbox oil, repair kits for axle shafts, bolts and other crap) Budget is about 5 thousand rubles, you can do it much cheaper!
The problems I encountered: 1) It took a long time to sharpen the axle shafts 2) The disk rested against the bracket (I was making a spacer)
Ideally, buy a second set of axle shafts and swap everything in 1 day! This system is without a handbrake (I use the car every day, there are no problems) Question about the balance of the brakes - yes, the rear brakes really do over-braking (set the adjuster or swap of the front brakes to 2112)
Angle everyone)))
Lada 2106 Euphoria › Logbook › Lucas rear disc brakes
Finally I got to the rear brakes. Lucas wanted to keep the mechanical handbrake, but he refused the ready-made (purchased) version - the price tag was too steep, and it’s always more interesting to do something yourself!;)
Having searched through a bunch of everything on the net, I still couldn’t find a detailed FAQ on installing the Lucas HA on a VAZ classic... I only found a drawing of the faceplates and rings. Therefore, I will try to describe here in more detail how I did it and what difficulties I encountered.
For the installation you needed: 1. Faceplates for installing Lucas calipers on a VAZ classic, as well as spacers (4 pcs) and compensating rings (2 pcs).
This is where I came across the first nuance... spacer washers actually need 2 pcs 8mm on the right side and 2 pcs 9mm on the left side! And not 4 pieces of 7mm! Although this may also be a controversial issue, because... However, the brackets themselves may differ from Lucas, so it is possible that my washers sizes may only be suitable in some specific case...
2. Lucas calipers - I got them from an Audi A6 (C5) In fact, both Audi and VW - they are all the same, there is no difference in what to install. Even though the calipers were fully functional, I still decided to overhaul them and bring them in line with our style!))
3. Axle shafts and brake discs - semi-axles need to be machined on the outside to the size of the brake disc. Depending on the manufacturer of the latter, this parameter may differ, so you should measure and sharpen according to the fact, for a specific disc. Brake discs need R13 regular, non-ventilated. I took Brembo front for VAZ 2108
5. Brake pads - used TRW, catalog number GDB 1416
6. Brake pipes - made from copper, with a VAZ tip rolled on one side and a VAG tip on the other. One tube is 400mm long, the other is 750mm.
7. Brake hoses can be selected from any VAG hoses, here’s an example:
8. Well, and various small things: bolts, nuts, etc.
The mudguards were made from 1mm sheet metal and chrome. To attach the calipers I used standard lower bolts of the VAZ 2101-07 caliper. The faceplates are galvanized and coated with polymer.
As a result, we get the following set for installation:
Now the installation process itself in the form of a photo report:
Source
evgen-asket › Blog › rear disc brakes for classics
Rear brakes: Installation of rear disc brakes 2108/2110. The axle shaft flange was machined in diameter to fit the disk mounting size (to the outer edge of the technological holes on the axle shaft flange). It is also immediately necessary to machine the factory 5 mm spacer of the front wheels to the same diameter. So, to install the HCD in the correct way we will need: - two axle shafts 2101 - two axle bearings - two locking rings - only new ones, they are disposable! — a set of axle shaft mounting hardware — four lower caliper mounting bolts 2101, specifically 2101 — thread sealant — powerful heat source — caliper mounting brackets — 2 rear axle seals. Having taken out the axle shafts, first of all we will have to remove the old ring and bearing. The ring must withstand a pulling force of 3 tons, so it is impossible to tear it off without a press. Therefore, it needs to be sawed and split with a chisel. You can try to knock down or saw the bearing, the latter must be done very carefully, this is quite dangerous. We thoroughly clean the axle shaft with gasoline and diesel fuel, especially the area near the bearing stop, and check that there are no dents left from removing the old one. We put the bracket on with the notch towards the axle shaft splines. We take a new bearing, carefully wipe the inner surface of the bearing from grease, wipe the seat on the axle shaft dry, place the bearing on either side and carefully seat it. Apply hammer blows strictly on the inner ring, the pipe is very convenient, but old connecting rods will do. They are very well suited for this and will not allow you to hit the clip if you miss. Although this is not fatal, the bearing does not tolerate this during operation. The bearing should fit tightly so that there is no gap between it and the seat stop. Next, clean the thrust ring and heat it. I used a burner, 300 degrees of combustion of propane-methane is enough for the eyes to create a thermal gap. After heating for 10 minutes, the ring falls exactly onto the bearing, and let it cool. On the axle shaft, we put on a stock 5mm spacer, machined under the disk seat. We put on the disk, attach the caliper and rejoice! The caliper fits perfectly, exactly in the middle of the disk. As you can see, the disk with the spacer is thicker than the drum, so there is no space left for the wheel to fit; it will hang on the bolts/studs. I will eliminate this drawback later. All that remains is to fasten all this stuff with 4 bolts to the stocking and screw the lines. Voila.