Experienced car enthusiasts understand the principle of operation of the thermostat. Beginners have only heard about this part, but do not know what it is used for. Everyone encounters a thermostat sooner or later, since the unit changes with the same frequency as any other consumable. It lasts no more than three years, and its breakdown is difficult not to notice.
Characteristics of the Lada Kalina thermostat
The thermostat is an important engine cooling system; it occupies a place between the radiator and the cylinder block of the power unit. By design, this is a housing with an automatic valve, which, when the coolant is heated to a certain temperature, opens a large circulation circuit through the main cooling radiator. By closing the large circuit when the engine is cool, the car warms up much faster when circulating through the small circuit. The wear of its moving parts is reduced, overheating is eliminated, and the volume of harmful substances released into the environment is reduced.
A working thermostat allows you to warm up the engine to operating temperature, which for Kalina is 90-95 degrees. Over time, the valve wears out, and the heater maintains a temperature of no higher than 80 degrees. A working device helps the engine quickly warm up even in severe frost. Thanks to this device, the stove on Kalina is considered one of the warmest on VAZ cars. According to experts and car enthusiasts, the best price-quality ratio is the standard thermostat produced by DAAZ. It's all about a special screw, with which you can independently adjust the valve opening temperature. It is impossible not to take into account the reliability of factory products, which in this regard are superior to most analogues.
The same thermostats are used for 8- and 16-valve engines.
Checking for correct installation
It is very easy to check the correct installation and operation of the thermostat in the Lada Kalina. Here you will need to warm up the engine and then immediately turn it off. Next, open the hood and feel for the lower pipe that goes from the radiator to the cooling jacket of the engine block. If it is heated, the thermostat opens, and there is no risk of the Lada Kalina engine overheating. When this phenomenon does not occur, the system components require careful diagnosis. Therefore, it would be a good idea to check the functionality of the new thermostat before installation.
Trunk of Lada Granta
How the device works
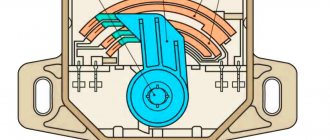
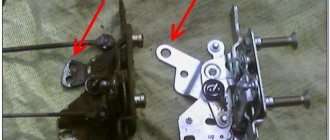
Photo 2 (Heater valve operation diagram)
Heater valve operation diagram
When the engine is cold, the thermostat valve is in the closed position, and antifreeze circulates in a small circle, passing only through the heater core and through the water jacket of the block. When the engine warms up to operating temperature, the valve opens completely and the liquid begins to circulate in a large circle, passing through the radiator, where it cools. This prevents overheating of the power unit.
In winter, warming up takes less time thanks to the thermostat - the heater radiator heats up earlier, and the cabin becomes warm within a few minutes, while saving fuel. The thermostat must be replaced if, when the temperature reaches 95 degrees or more, the valve does not open - the engine begins to overheat. If the motor, on the contrary, cannot warm up, it means that the device does not close and must also be replaced.
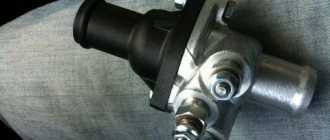
In design, this is a simple product consisting of a body, a main and bypass valve, a temperature-sensitive element, two inlet and one outlet pipe. Depending on the manufacturer, the thermostat is made of copper, brass or heat-resistant plastic. The heat-sensitive solid element is based on technical wax. When heated, it melts and, expanding, presses on the main valve, forcing it to open, thereby passing coolant in a large circle. The wax melts quickly thanks to the copper, aluminum and graphite powder that is included in its composition.
You can check the performance of the heater without installing it in the cooling system. To do this, place the device in a container of water and place it on the stove. As the liquid heats up, the thermostat valve opens approximately 3 centimeters. This way you can make sure that the device is working properly before installing it.
Thermostat malfunctions
The thermostat is a consumable item, which means it cannot be repaired. You can carry out the replacement yourself or contact a car service center with this question. In the first case, only the cost of the device itself will be included in the costs. When contacting specialists, about 400 rubles will be added to this amount for the work of a car mechanic. The part is changed because there is nothing to repair in it. The most common malfunction is the failure of a solid-state temperature-sensitive element.
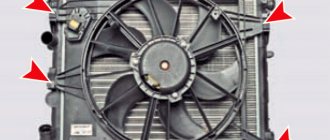
The thermostat on the Lada Kalina is located in the cooling system circuit between the radiator and the engine block - immediately below the air filter. It is enough to move it aside to see the device.
Before changing the thermostat or checking its performance, you need to know what malfunctions are typical for it. There are three signs that indicate a breakdown:
- The valve is stuck open. In this case, the coolant always circulates in a large circle, even when starting a cold engine. It takes much longer for the engine to warm up to operating temperature. In the summer, such a breakdown does not bring any inconvenience to the car owner, but with the onset of cold weather the engine may not warm up at all. The stove will not work as expected and fuel consumption will increase.
- The valve is stuck in the closed position. If the device cannot open, then the coolant circulates only in a small circle. The engine will constantly overheat, and there will be a risk of complete failure. Long-term operation of the vehicle with such a malfunction is prohibited. To prevent overheating, you can turn on the heater fan at maximum blowing speed and constantly monitor the engine temperature gauge.
- The valve opens earlier than it should. When the valve opens at a temperature of 70-75 degrees, the engine does not have time to warm up to operating temperature and spends more time and fuel on this.
The latter problem occurs rarely - mainly on devices that are not suitable for use on this car or are made in a homemade way.
Causes of malfunctions and ways to identify them
The most common problems:
- the appearance of corrosion on the moving elements of the device is rare, mainly when tap water is used instead of antifreeze;
- foreign objects entering the housing, contamination or scale formation;
- low quality antifreeze;
- Coolant pump malfunction.
There are several ways to test the thermostat. The following describes a method for testing the device without the need to dismantle it:
- Start the engine. Since in a working thermostat the valve should be closed, the lower radiator hose should be cold a few minutes after startup. If the hose is warm, this indicates that the valve is not tightly closed or completely open. The engine will take longer to warm up and consume more fuel.
- If the pipe begins to heat up after reaching operating temperature, then the thermostat is working. Or it is stuck with the valve closed - the engine will overheat and an urgent replacement will be needed.
All actions should be carried out with caution. During operation of the SOD, the pipes and the engine become very hot; accidental touching them can cause a serious burn. When the small circle is operating, the radiator is not activated, the upper hot and lower cold pipes indicate problems, provided that the engine is warmed up. If the described manipulations do not give complete confidence in the operation of the unit, you can carry out a more thorough check, but this will require removing the thermostat from the car. This testing method looks like this:
- Place the device in a metal container filled with water and place it on the stove.
- Wait until the water is hot enough. At a temperature of about 60 degrees the valve will begin to open slightly. It will open completely at a temperature close to boiling – 90-95 degrees.
- Remove the device from the container and watch how the valve begins to close as it cools. Eventually it should close, blocking the channel completely.
If during the inspection, malfunctions in the operation of the valve were identified - it does not open, does not open completely, does not close tightly - it should be replaced.
Replacing the thermostat on Kalina - how to change it to an element from Grant
Replacing the crankshaft oil seal: step-by-step instructions and features
Since it is categorically not recommended to operate a car with a non-functioning thermostat (any car enthusiast understands the consequences of overheating the “heart” of the car), this part should be changed without delay. Before you begin this process, you will need to select the model of thermostat you plan to install. It is not at all necessary to buy a “native” element. On the contrary, experts advise installing a Grant thermostat, believing that it has a longer service life.
After this, you will need to drain some of the cooling liquid (antifreeze or antifreeze) from the tank. This is not difficult to do. The driver will only need to operate the pump to empty the system. This is done in order to reduce fluid losses, which, we note, will still be, but not so significant. Next, you need to dismantle the air filter using a Phillips screwdriver, and possibly replace it by performing the following operations:
- remove the element by removing the cover of its housing;
- install a new spare part, making sure that the direction of the air flow coincides with the pointer on the new filter.
How can you modify the heater?
The new models Lada Kalina 2 and Lada Granta use a cooling system operating scheme with parallel connection of the heater radiator. Because of this, the operating temperature is reduced to 85 degrees, which is slightly lower than on previous models of the VAZ family. Many car owners seriously believe that this temperature cannot be normal - there is increased fuel consumption, as well as a decrease in the service life of moving engine parts due to premature wear. But according to experts, there is no connection between the reduced operating temperature and engine life.
The cooling system of the Lada Kalina works more efficiently thanks to a single-circuit design. Such a modernization only benefited the engine; it made it possible to change the ignition timing, resulting in fuel savings. The inertia of the thermostat is also reduced. The downside was the mediocre heating of the cabin at sub-zero temperatures. The way out of the situation is to independently modify the thermostat. Modification involves two main methods:
- shorten the rod of the solid-state temperature-sensitive element;
- replace the thermocouple.
For cars with a cable gas pedal, a heated throttle assembly from the cooling system is used. In this case, an additional circulation circle is added.
Adjusting the thermocouple rod
Shortening the end of the thermosensitive element rod will allow you to adjust the operating temperature to 90-95 degrees. Trimming is carried out sequentially in increments of no more than one millimeter. The metal is soft, so the procedure must be carried out carefully. It is advisable to reinstall the thermostat after each millimeter cut and check how much the operating temperature rises while driving.
If the result does not meet expectations, you can adjust the rod further until the arrow on the instrument panel shows 95 degrees and the air in the cabin begins to warm up faster. The method is simple but effective. Among the disadvantages, there is a slight increase in wear of SOD parts due to operation at high temperatures. If you overdo it with shortening, you can ruin the device.
Replacing the temperature sensor
The thermocouple can be replaced entirely. The Wahler brand thermostat insert is suitable for Lada Kalina: 3017.87 D (at 87° C) or 3091.92 B (at 90° C). The thermoelement is replaced as an assembly with a spring, and the device will have to be cut with a hacksaw to remove the insert. A more convenient option is to buy a thermostat from BEHR - you don’t have to cut or adjust anything
You can also use analogues from Daewoo Nexia or Renault Logan cars. Logan's thermal insert requires adjustment.
If a LUZAR thermostat is installed on Grant, then replacing the temperature-sensitive element is not possible.
Judging by the reviews of car owners who have made such modifications, fuel consumption while warming up the engine has decreased slightly.
Throttle body heating
Another way to upgrade the heater is to create an additional throttle valve heating circuit. Some drivers are trying to prevent the unit from freezing in winter in this way. The method is clearly not for beginners. It consists of drilling a hole in the cover of the device and welding an additional fitting to it, through which heated antifreeze will be discharged. The thermostat mounting studs will also have to be lengthened. The process is labor-intensive and ultimately impractical. Freezing of the throttle assembly is the exception rather than the rule, so there is no point in carrying out such an upgrade.
Replacing the thermostat
On the automotive spare parts market you can find a large number of thermostats from various manufacturers; their cost varies from 400 to 700 rubles. When choosing, it is better to stick to original AvtoVAZ spare parts. The catalog number for the standard thermostat on Kalina is 1118-1306010. Of the analogues, “Luzar” and “Pramo” have proven themselves well, but the first is often counterfeited, and the second has poor quality - the service life is on average about a year. The original device, which is installed from the factory, can last more than three years. Replacing a thermostat on Kalina with 8 valves or 16 is estimated at no more than 800 rubles, including removing air from the system. To avoid paying twice, you can change the part yourself. Just before this, you should check the device for functionality using the described methods.
What tools will you need?
To operate, you will need a working thermostat and a suitable container for draining the coolant from the SOD - a regular five-liter plastic bottle. The differences between replacements on an 8- and 16-valve engine are insignificant. On the latter, you will need to additionally remove the starter so as not to accidentally fill it with antifreeze. The rest of the procedure is similar.
To remove the assembly, you will need two socket wrenches, 13 mm and 12 mm, since Kalina uses nuts of different sizes.
To seal the seat, you will need a silicone sealant gasket. To remove the clamps, use a shaped screwdriver. The procedure lasts on average an hour and a half.
Replacement instructions
The replacement process is not complicated and can be done independently if you follow the instructions. First you need to disconnect the wire plug from the sensor on the air filter and remove it. It will take a few minutes to properly dismantle the filter:
- the two upper screws are completely unscrewed together with the nut from the power unit side;
- there is a recirculation valve on the filter housing; it must also be removed;
- lift the valve up and, without disconnecting the hoses, move it to the side;
- unplug the terminal from the air sensor and, loosening the clamps, disconnect the air pipe;
- After shaking the filter from side to side, turn its housing and try to pull it out.
Further procedure:
- Drain the coolant from the system.
- Using an 8 mm wrench or a shaped screwdriver, loosen all the clamps of all connecting hoses, then disconnect them.
- Unscrew the 12 mm nut on the thermostat and remove the wire.
- Using a 13 mm wrench, unscrew the fastening nut at the top and bottom of the thermostat on the studs, then try to remove the device by slightly loosening it. You don't need to make a lot of effort for this. Keep in mind that the thermostat operates at high temperatures, due to which the housing literally “sticks” to the seat.
- Clean the seat from dirt and remove the old sealing gasket. Then wipe the treated area with a clean rag, apply a thin layer of silicone cover and leave for 5-10 minutes.
- The new thermostat is installed in the reverse order. You should definitely replace the temperature sensor by removing it from the old device, and do not forget to connect the ground wire. To do this, it is fixed with a nut on the upper stud.
- Connect all hoses and fill the system with coolant to the maximum level.
After completing these steps, you need to start the engine and inspect all the places that were disconnected. You can make sure there are no leaks by lightly pressing all the hoses several times. The liquid level in the tank will drop, then you need to add antifreeze to the middle mark and screw the cap tightly.
Management
We bring to your attention detailed instructions for completely replacing the thermostat with a new one. Even if you don’t understand how to replace the thermostat on a viburnum, the video will help clarify the situation.
1. Disconnect the sensor from the air filter housing and remove the air filter. As a rule, it will take no more than ten minutes to dismantle it. This is done correctly like this:
- completely unscrew the 2 screws located on top, as well as the nut located on the side of the engine compartment. We recommend leaving these parts in one place so that later you don’t have to look for them separately on the market;
- remove the connector installed on the recirculation valve (it, in turn, is based on the filter housing);
- lift the valve up, and then, without disconnecting the tubes, move it all to the free side;
- by unplugging the plug from the air sensor, remove the air hose by loosening the clamp;
- Having slightly loosened and turned the air filter housing, it should come out.
2. Before carrying out direct disassembly . get rid of some of the coolant
3. Take a 8mm socket wrench and a screwdriver. Use it to loosen the clamps , and then remove the four hoses.
A well-pumped system will not allow liquid to spill in large quantities.
4. Take a 12mm wrench and remove the wire by unscrewing the top nut on the thermostat.
5. Now take the key for 13. There is a nut and a stud on the thermostat - you will find the first in the upper part of the housing, the second at the bottom. Try to remove the thermostat by gently loosening it.
Helpful advice: loosen the thermostat carefully, sometimes helping yourself with a screwdriver.
These actions must be performed because during operation, high temperatures literally “solder” the thermostat, causing the housing to stick. Help with a screwdriver will solve this problem.
6. Next, clean the seat from accumulated dirt (there will be a lot of it there). Don't leave the old gasket in place - get rid of it completely. Wipe the seating areas with a clean cloth. Using sealant, 1-1.5 mm of substance per seat, or use a paper gasket. The best option at the moment is sealant. If you have applied it, stop working for 5-10 minutes. During this time, the sealant needs to crystallize. In the case of a paper gasket, work can be carried out immediately.
7. Installation of a new thermostat is carried out in the exact opposite order of removal. It is important not to forget to replace the temperature sensor from the old thermostat. It is also important to connect the ground wire. This is done by screwing the ground wire onto the top stud.
8. After all hoses are reconnected, add coolant to the system . Its quantity can be selected based on how much liquid you drained during disassembly of the old faulty device. To accomplish this task, the method of removing air pockets is used.
In test mode, start the engine. While it is idling, make sure that all hose attachment points are not leaking . If such a problem occurs, tighten the loose clamps.