It often happens that the gearbox on a VAZ-2110 begins to work incorrectly. Some motorists are beginning to panic, believing that the gearbox will soon fail. In fact, often The culprit of all extraneous squeaks, noises and crackling noises when changing gears is the gearbox rocker. As practice says, in most cases this part does not need to be changed; it is enough to simply adjust it correctly.
But there are times when adjustment does not lead to the desired results. In this case, the part will have to be replaced.
How to identify signs of a broken rocker on a VAZ-2110
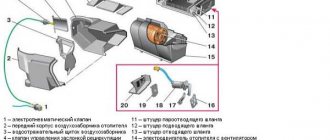
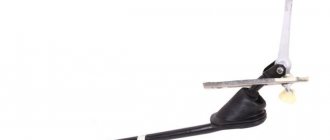
Gear shift drive diagram.
It is enough for an experienced owner of a VAZ-2110 to easily determine if the link is broken. This is indicated by a number of the following signs:
- Unable to engage first gear.
- The gearbox does not want to turn off first gear.
- It happens that the first gear is engaged without problems, but then the transmission itself switches to reverse gear.
- First and fifth gears do not engage, but other modes engage normally.
To avoid expensive gearbox repairs, if even one of the above symptoms is detected, you need to immediately go for diagnostics to a car service center or to a garage to independently determine and repair the breakdown.
What should I change?
Most types of breakdowns can be diagnosed independently, after which they should be promptly eliminated:
- If the gearbox lever has a lot of play, this is the result of wear on the rocker . In this situation, adjustment will not help. The backlash can only be eliminated by replacing the backstage.
- The rocker makes a characteristic ringing sound when changing gears . One of the most difficult cases. Replacing the slide may not help. This defect is usually related to the gearbox. It is possible that this is a manufacturing defect, or the result of unqualified intervention in the gearbox.
- The gear is engaged with great difficulty, it can “get knocked out” . In this case, you can try adjusting the scenes. If this does not help, it will have to be replaced.
- When trying to engage first gear, it always shifts into reverse . In this case, you need to change the backstage. In some cases, a repair kit may help.
- When the engine is running, there is strong vibration of the gear shift lever . In this case, it is possible that there is play in the hinges of the box.
All detected breakdowns must be promptly repaired, otherwise serious gearbox repairs cannot be avoided.
Adjustment
The backstage adjustment should be made in several cases:
- after dismantling the gearbox;
- when the cardan has been replaced or the fixing clamps have become loose;
- if the linkage rotates on the hinge.
Of course, this will also be advisable if you have recorded signs of a malfunction of the element, which are described in the previous paragraph.
What to cook?
Before you begin repairs, prepare in advance:
- wrench to loosen the clamp;
- wheel chocks or bricks.
Universal wrench
You will need wheel chocks...
...or the most ordinary bricks
Step by step instructions
To perform repairs, that is, adjustments, you need to perform the following steps:
- First, drive your VAZ 2110 into a garage with a pit or onto an overpass.
- Place bricks or special wheel chocks under the car. Apply the handbrake.
- Climb under the bottom of the car and find the clamp that secures the linkage and hinge.
- Use a wrench to loosen the clamp.
- Then sit in the driver's seat and put the car into reverse. Remember that the lever must be in the extreme left position. Therefore, set it the way you think it should ideally be when engaging reverse gear. It is advisable to do this work with an assistant so that he holds the gearbox lever in the position you set it.
- Now again climb under the bottom of the car and firmly fix the clamp in this position.
Reach under the bottom and loosen the clamp, then set the gearbox lever to the reverse gear position
This completes the adjustment of the device. Take a test drive and check the operation of the unit. If necessary, repeat all steps again.
Backstage adjustment:
Note! Before you go to the auto store and buy a new rocker, be sure to try to adjust the old one first so as not to waste money, maybe everything is fine with the old rocker!
1) At the very beginning of the operation, we will tell you why the adjustment of the rocker may go wrong, namely, after removing the box, after replacing the cardan shaft, or after unscrewing the nuts and bolts that secure the tension clamps of the rods that come from the rocker, and in other cases.
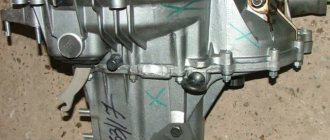
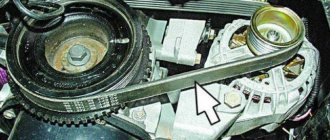
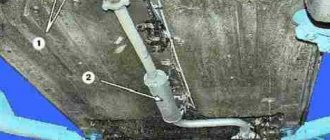
2) Now let’s move on to the actual adjustments, firstly, you will need to first drive the car into a pit or lift it using a lift, then climb under the bottom of the car and there you will find the boot under which the driveshaft itself is located (the boot is indicated by a red arrow), next to with this cardan and the boot that covers it, the end of the rod coming from the rocker itself will be attached, and this end will be attached using a tie clamp, so take two screwdrivers in your hands and with their help loosen the bolt nut a little (the nut is indicated by a blue arrow, and the bolt green), while when you loosen, hold the bolt itself with one wrench so that it does not turn, and with the other at this time loosen the nut, after the nut is slightly loosened, take a screwdriver in your hands and insert it into two holes, namely in the hole between the tie clamp (Indicated by a yellow arrow) and into the hole of the rod itself (Indicated by a white arrow), thereby widening both holes (In fact, these are not holes but a groove, so in the future we will use this word) so that the link rod can easily move relative to gear selector rod.
Note! Before you crawl under the car, put the car into first gear!
3) After you loosen the tension clamp, get out from under the car and return to the car interior. In the cabin, move the gear shift lever all the way to the left, but forward or backward and do not even try to pull it.
4) And to complete the operation, again climb under the car and tighten the nut of the same bolt that secured the tie rod of the rocker link.
Note! When all the operations are completed, test the gearshift lever for functionality, namely, check whether all gears engage clearly, start the car, drive it a little and if the shifter is working, then everything will be fine and you won’t even need to change anything!
By the way, another way (almost the same method) of adjusting the rocker, see the video clip below, in this video an example is shown on a VAZ 2109 car, but don’t pay attention to this, since the entire gear shift mechanism is on front-wheel drive cars VAZ, including the top ten, is practically no different from each other!
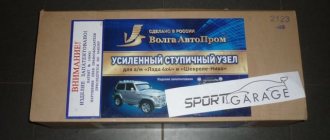
Modification by installing a different type of backstage
In the photo above there is a short-throw rocker, below is a standard one from a VAZ-2110.
Currently, VAZ-2110 owners have the opportunity to install an improved gearbox linkage on their car. This tuning includes replacing a standard part with a short-stroke rocker. Thanks to this procedure, gear shifts begin to shift much more clearly. Installation of the modernized backstage occurs according to the following algorithm:
- First, you need to disassemble the ball from the outside.
- You need to unclench the iron ring of the support and spread the plastic legs. After this the ball will come out.
- The thrust from the support is switched off. A piece of pipe and a piece of sheet metal need to be welded to the rod itself.
The diagram shows the incision locations.
New lever, welded from 8th and 10th.
Insertion into the original 10th slide.
We replace the cardan with a trimmed Kalinovsky one.
- The hinge with the hook must be lifted up.
The result of the work done.
View from above.
Of course, installing a short-throw shifter is not a completely standard procedure, which entails working with a welding machine, but after installing it, gears will shift much more clearly and smoothly.
On the other hand, the force that will need to be applied to the lever will become much greater. Therefore, for those who do not like to change gears with force, installing a short-throw shifter is not recommended.
Process in detail (algorithm)
It is recommended to carry out replacement work in a pit. In this case, you must take care of safety. The car must be secured using a handbrake and wheel chocks, which must be installed on both sides of the rear wheels.
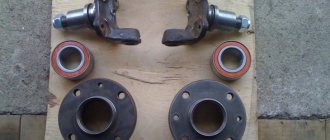
Having prepared a workplace and a set of tools, you can begin to work. To replace the gearbox seal, you need to do the following:
- Most often, the VAZ-2110 wing is closed with a rubber boot. If this part is covered in oil, this immediately indicates that the oil seal is really worn out. The boot needs to be bent. To do this, you just need to pull it by the wide part.
Oil leaking from under the “glass” - the rocker seal definitely needs to be changed.
Before loosening the clamp, you need to put a mark so that you don’t have to adjust the link later.
The oil seal is located deep in the bushing.
Only after this you need to press the new part into the rod. This procedure is quite complicated, since there should be no distortions. Many drivers use various homemade devices when pressing. When working, it is very important not to damage the new part, otherwise everything will have to be redone.
After the spare part is in its place, assembly is carried out in strictly the reverse order.
Is there any point in repairing the gearbox?
It happens that the metal parts of the scenes are in good condition, and only the plastic parts wear out.
The rocker repair kit includes all plastic parts.
In this case, you can get by with a repair kit. It is inexpensive, although the operations of disassembling and assembling the stage will take much longer than replacing the entire assembly.
In any case, everything will become clear when disassembling the scenes:
- It is enough to replace a deformed bushing with a new one.
- The hole in the lever axis must also be checked for wear.
- The cardan is also checked for play. If it is found, then a repair kit will not be enough.
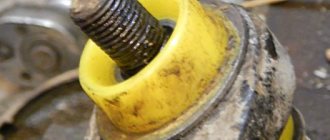
It also happens that all extraneous sounds during operation of the gearbox are associated not with the rocker itself, but with its cushion.
Repair
Regardless of what exactly you do with the rocker - repair, adjust or change, you will still need to disassemble this unit.
Disassembly is performed as follows.
- Remove the cover from your gear shift knob.
- Place the car on a pit, or raise the front end with a jack.
- Remove the front console. It is held in place by mounting bolts.
- Now remove the curtain itself. To fix it, AvtoVAZ used 6 bolts in the case of the VAZ 2110 model.
- When carrying out dismantling work, be sure to examine the condition of all elements.
- By bending the boot, you will gain access to the support, oil seal and cardan shaft.
Changing the boot
Now regarding the repairs. There may be several recommendations in this regard, depending on the current state of the node and its components.
- At best, repairs will require the use of a repair kit for the backstage. It doesn't cost much.
- If the bushing is deformed, it will need to be replaced with a new one.
- Check the lever shaft bore for wear.
- Make sure there is no play in the driveshaft. Otherwise, a regular repair kit will no longer be enough, that is, a complete replacement of the entire backstage will be required.
- Often the culprit of extraneous noise and rattling when shifting gears in gearboxes is the rocker pad. Changing it is quite simple, and even a beginner can perform the operation.
Replacing the oil seal
Quite often, VAZ 2110 owners are faced with a situation where, after parking under the car, they find traces of oil. There are two options here - the oil filter has worn out or there are problems with the oil seal.
As you replace the oil seal, you will be able to simultaneously inspect and change such elements as the cushion, cardan shaft, and boot.
Dismantling works
But let's talk about everything in order. First of all, check whether it is really an oil seal and not a filter. If everything is fine with the filter, then we drive the car into a pit or find another way to end up under the bottom of your VAZ 2110. Beforehand, it would be a good idea to watch video materials regarding your current situation.
- Carefully inspect the boot. If oil leaks from the gearbox through the oil seal on your car, traces of it will definitely remain on the boot.
- Bend back the boot. This way you can get to the cardan, disconnect it and gain access to the cuff.
- You first need to dismantle the cardan from the lever, and only then from the rocker itself. Not the other way around.
- The cardan has been removed, so we move to the oil seal.
- The cuff is removed from the gearbox using a hook and an awl. Therefore, make sure you have these tools at hand in advance.
- Now a new one is installed in place of the old oil seal. Craftsmen have adapted to using ordinary plastic bottle caps. If you get used to it, it turns out to be very easy to change the oil seal.
- After replacing the element, return all dismantled components to their places. If some of them need replacing or signs of wear are already visible, it is better to replace them immediately. It is unlikely that you will want to repeat the same operation in a couple of weeks and lie under your own car.
Repair will not give the desired result if the adjustment was carried out with errors. To do everything carefully and competently, use the help of a partner. One will work under the car, the second will help from inside.
When noise comes from the gearbox, vibrations and other unpleasant properties appear, many car owners begin to seriously panic. Although often a breakdown of the gearbox is a premature, incorrect “diagnosis”, since often the problem is in the shifter.
Many years of experience clearly demonstrates that replacing the rocker is a rather rare occurrence, because it is easier to adjust it. However, this article is aimed not only at covering this topic, but in addition will tell you how to carry out repair work correctly, what modification features should be taken into account, as well as how to change the rocker on a VAZ 2110 , following all the rules.
Replacing the drawstring cuff
Replacing the backstage seals of a VAZ 2110
First you need to arm yourself with the necessary set of tools, which includes:
- Set of keys (10, 13);
- An ordinary awl or other sharp metal object;
- Screwdriver;
- Hook;
- Plastic stopper.
The oil seal must be replaced in a viewing pit or overpass. If this is not possible, then an option with a lift will do. In addition, there is another option, which involves placing two spare tires flat under the car, like stops. Two strong boards are placed on them, and the car drives onto a makeshift overpass. Simple and brilliant.
Advice. If a motorist drives into a hole or other device, he must take care of the safety rules. In particular, it is necessary to secure the vehicle using the parking brake and wheel chocks.
Replacing the gearbox seal of a VAZ 2110
Video instruction
Many inexperienced drivers begin to panic and talk about a breakdown of the gearbox, although in fact the culprit of the problem is the rocker.
Practice shows that replacement and repair are rare and not very common measures. Much more often, the current situation forces you to simply adjust the scenes.
But today we will talk not only about adjustment, but also talk about the features of modification, repair and replacement of this element.