Design and operating principle
To understand the features of the repair, you must first study the design of the starter and understand how it works for the benefit of your car.
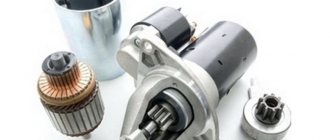
Let's start with the design. It includes four main nodes.
| Knot | Peculiarities |
| Electric motor | It transmits direct current through four brushes |
| Freewheel with gear | A clutch or bendix drives the flywheel of your car's engine. |
| Traction relay | Serves to extend the bendix with gear when turning on the electrical appliance |
| Bushings | Ensure easy rotation of the clutch, rotor, and gear. One bushing is located inside the starter, and the second is in the clutch housing. |
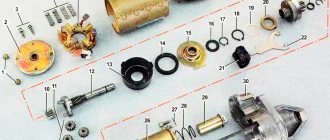
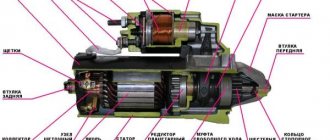
Device diagram
Having familiarized yourself with the starter diagram, you can discuss the principle of its operation.
The operating principle is to convert an electrical signal into the rotational movement of a drive gear. Current is transmitted through the brushes to the poles of the electric motor. At the same time, the clutch extends and the gear is connected to the flywheel ring. To start the engine you need a quick but easy rotation of the starter. When the engine starts, the clutch returns to its original position.
Symptoms of failure of VAZ 2109 starter bushings
The main sign that lets you know that the starter bushings are faulty when you turn on the ignition is a piercing noise coming from the engine compartment, then developing into a squeal and abruptly dying out.
It is possible that the bushings may fail if the armature rotates jerkily or very slowly.
If, during diagnostics, signs of wear, metal shavings, scuffs, or cracks are found, then the damaged parts must be replaced. Most often, the bushing in the clutch housing (front) breaks, less often - the rear cover bushing.
If the rear cover bushing fails, it is recommended to replace the bushing as an assembly.
Replacing the VAZ 2109 starter bushings, despite its apparent simplicity, is a rather complex procedure that requires special tools and knowledge of the starter structure, but it can be done with the help of these instructions and car repair skills.
For VAZ 2108, VAZ 2109 cars, the installation of a starter 29.3708 is provided. Some cars exported had other starters installed, but their characteristics and installation dimensions were almost identical.
When manufacturing a car, the bushing is pressed into the crankcase, which creates additional difficulties when removing the part from the socket. To do this, you need to use a special puller or choose the right tap. Next, you need to screw the tap into the bushing, reaching the bottom of the hole, it will push the bushing out.
When replacing the rear bushing, you will need to disassemble the entire starter, since the element is located at the rear of the starter.
There is an opinion that before installing a new bushing in the starter, it should be modified. To freely rotate the armature, you need to expand the sleeve with a special reamer with a diameter of 12 millimeters. After this, the bushing can be put in place.
To carry out work on replacing the VAZ 2109 starter bushing you will need:
- screwdriver and chisel;
- tap or puller;
- fighter;
- open-end wrenches “10”, “13”;
- hammer;
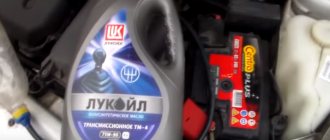
- set of starter bushings for VAZ 2109.
The price of a set of bushings VAZ 21080160122000 is 65 rubles.
The price is relevant for Moscow and the region for summer 2021.
Using a 10mm wrench, loosen the tightening of the nuts of the coupling bolts.
Remove the terminals from the battery.
Using a 13mm wrench, unscrew the three starter mounting bolts.
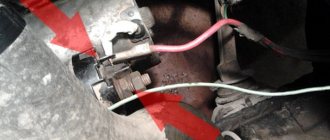
Using the same “13” wrench, unscrew the nut of the wire terminal leading to the battery. Remove the connector from the starter traction relay terminal.
Screw the tap into the bushing and...
... take out the front bushing.
Using a bolt, press it into the clutch housing.
Use a screwdriver to pry up the locking ring and remove it.
Remove the restrictive ring.
Using a 10mm wrench, unscrew the two tie rod nuts.
Remove the starter back cover.
Using a punch of a suitable diameter, knock out the bushing.
Using a hammer, we hammer the new bushing into place.
We assemble the starter and remaining parts in reverse order.
Sometimes, to eliminate a malfunction, you have to remove the starting mechanism and disassemble it.
Removing the starter consists of the following steps:
- First, the car must be de-energized by removing the negative terminal from the battery.
- Then you need to disconnect the connector with wires.
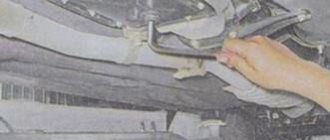
- The next step is to remove the crankcase protection.
- To remove the starter, it is more convenient to first unscrew the two nuts at the bottom of the engine compartment, and then move to the top and unscrew the third nut.
- Now you can remove the device from the clutch housing.
Before performing DIY repairs on a removed device, it should be washed and cleaned of dirt.
How to remove the starter?
For work, you will need 13mm wrenches (open-end, socket, socket) and a 10mm wrench to remove the terminal from the battery. Stock up on them before removing the starter. First, remove the negative terminal from the battery to prevent a short circuit. If your car has an injection system, you will have to remove the air filter, which is located above the starter.
There are two ways to remove the starter on a VAZ 2109: through the top and through the bottom. If you follow the second path, you will have to get rid of the engine protection for a while. First, disconnect two wires from the starter solenoid relay: a thin one, which is necessary to power the relay winding, and a thick one, which supplies voltage to the starter itself.
The first one is simply pulled out with your hands. To disconnect the second one, you need to unscrew the nut from the retractor contact with a 13mm wrench. When you get rid of the wires, move them to the side so they are out of the way. Using a 13mm wrench, you now need to unscrew the three nuts that secure the starter housing to the clutch block.
If necessary, you can use socket wrenches with a universal joint. But, as practice shows, all work is carried out without difficulty using a spanner. When all three nuts are unscrewed, you need to pull the VAZ 2109 starter housing to the right side to move it away from the studs.
Now all that remains is to pull the starter up or down. When removing it from the top, you may need to slightly pull the pipe going to the radiator of the cooling system to the side.
Typical faults
It is better to start diagnosing the starter even before you remove it.
After dismantling, some signs of failure, by which the source of the problems can be determined, can no longer be determined.
Signs of a faulty element include:
- An unusual noise occurs when the engine starts;
- Complete absence or slow rotation of the starter;
- Rotation occurs, but there is no gear engagement with the Bendix ring;
- The unit rotates with the bendix, but then the clutch breaks;
- Turning the key in the ignition, there is silence.
Checking the dismantled unit
Before blaming the starter for everything, take the time to look under the hood and check the condition of the terminal contacts and connectors. Also pay attention to whether everything is ok with the battery. Only after this can you start working on the starter.
Now let's talk about possible malfunctions of the VAZ 2114 starter, and also discuss their causes and symptoms.
Do-it-yourself replacement of starter bushings
How to replace starter bushings? Before getting to the heart of the matter, it is necessary to at least get acquainted with the structure of the unit in general terms. A car starter is essentially a miniature four-lane electric motor that initiates rotation of the crankshaft.
It provides the initial rotation speed that is necessary for the internal combustion engine to start. The starter is a DC electric motor that takes energy from the battery.
Receiving electrical voltage from the battery, it increases power through the four brushes that are an integral part of it. Starters are:
- Geared;
- Gearless.
Both the first and second have both their advantages and disadvantages.
Geared starters are good because they can provide the crankshaft rotation necessary to start the engine, even when the battery is very discharged.
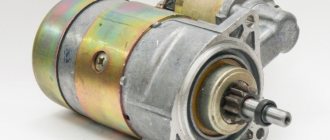
gear starter
In addition, the strength of gear options is the presence of permanent magnets, due to which problems with the stator winding are minimized. Although, with prolonged use of such a starter, the rotating gear may fail. To be fair, it is worth noting that this is most often caused by poor production quality or defects.
Gearless starters have a direct effect on gear rotation.
These devices have a simpler design. It is easier to repair them yourself, without resorting to the help of specialists from a car service center. They are quite reliable, and the probability of their failure due to electrical influence tends to zero. However, at low temperatures, gearless starters can still operate unstably.
In the life of any motorist, there may be situations when, for various reasons, it is impossible to start the engine. One of the reasons may be worn bushings. Let's imagine this situation. During starting, the starter with noticeable difficulty tries to turn the crankshaft, every now and then sticking and stopping.
At the same time, the uninitiated motorist is perplexed as to why this could be happening, because the battery is in good condition and fully charged. The reason in this case is the armature touching the stator.
The gap between the first and second is only tenths of a millimeter, due to this, even the slightest misalignment of the armature shaft relative to the stator will certainly lead to the above problems. This misalignment appears due to the failure of the plain bearings in which the armature rotates.
As a rule, the front bearing is more worn out, since the main load falls on it. The bearings in this case are bushings made of brass. The front one is built into a special hole, which is located in the clutch housing. The rear bearing is located on the starter cover.
Bushing replacement
Replacement technology
First of all, you need to disconnect at least one of the wires from the battery, as well as all the wires from the starter. Then you need to unscrew the bottom bolt that secures the starter and screw it in on the reverse side to secure the engine to its front mount. Otherwise, the motor may move forward.
After this, you need to unscrew the remaining two bolts that secure the starter and remove it from the car. As mentioned earlier, the bushing is built into the clutch housing. To remove it, you need an M12 tap, as well as a drill chuck. The tap will have to be inserted into the chuck, then clamped, after which it must be carefully screwed into the sleeve, thereby cutting the thread.
Great care is required due to the fact that the steel of the tap is very fragile and even a slight misalignment with the applied force can lead to its breakage. In this case, the shank will remain in your hands, and the cutting part will remain inside the sleeve. It would seem that the situation is hopeless. However, it is not.
In a situation where the tap is broken off so that it is impossible to screw a nut onto it, you can take a bolt with a corresponding thread about 10 centimeters long and grind grooves on it similar to the grooves of the tap. Or you can do it more radically, but at the same time simpler. Go to the store for a new tap.
The tap is equipped with three grooves into which you need to insert nails of the appropriate size. This must be done in such a way that their ends protrude beyond the end of the tap by about 10 mm. Try to insert the resulting structure into the sleeve with the broken end of the tap. It may not work out right away, but with the right amount of persistence the operation can be easily accomplished.
After this, you can try to unscrew the piece and try to unscrew the bushing again. As a rule, after a few turns the bushing will begin to rotate and can be carefully unscrewed. If the bushing is very stuck, you will have to cut the thread in it approximately 6 or 8 turns. After this, remove the tap, and in its place screw in a bolt of a suitable size and use it to remove the sleeve. When a new one is inserted in its place, it is slightly pressed in.
Bushings
If the replacement is not happening for the first time, then the bushing can be inserted quite easily by hand. But during long-term operation, this can lead to it turning in the mounting hole. Over time, the mounting hole will break up, forming the so-called eccentricity, and the starter shaft may become misaligned.
This means that the starter will stick and the engine will not be able to start. However, this is quite easy to fix. To do this, it is necessary to determine the size of the so-called eccentricity. Then you need to machine or order from a specialist a bushing with a larger outer diameter just to fit the eccentricity. You should solder some solder on the side of this bushing.
After this, the bushing will fit in with a slight interference fit.
Summary
It is worth noting that a starter without a gearbox has a larger gap between the armature and the stator than a geared counterpart. For this reason, its permissible shaft misalignment is also greater.
And one more piece of advice. If the starter is still disassembled, then it would be a good idea to replace the brushes. The parts are cheap, so waiting for them to fail and then dealing with them separately is not worth it. Of course, for all the operations described above, at least a little experience is required. And, as you know, he is a profitable business. In the end, to get it you have to try. Go for it!
gear starter
Replacing the starter bushing on an Oka car
Despite the fact that the design of the starter on the Oka is implemented on a principle similar to the VAZ-2109 (the front bushing is also located in the clutch housing), the execution of the engine starting mechanism turned out to be extremely unsuccessful, as were most other components of this car. The main reason for this is the desire of designers to reduce the cost of the production process as much as possible. It is for this reason that bushings are manufactured using technology taken from powder metallurgy, and a combination of graphite chips and bronze is used as the starting material. Because of this, these parts have a very small margin of safety, which negatively affects their service life.
For those car enthusiasts who are interested in how to replace the starter bushing on the Oka, you need to know about one more drawback of the engine of this car. We are talking about a seat in the clutch housing itself, which breaks down unevenly during long-term operation. Therefore, if you buy a standard size product (external diameter 13.03 mm) to replace it, then most likely it will fit into place too loosely and even begin to dangle. This should not be allowed, as the part will very soon become unusable. Knowing this feature, experts recommend using a repair size bushing (external diameter 14 mm), but it often turns out that its diameter does not correspond to the size and even shape of the seat.
In the case where the development of the socket is relatively the same around the entire circumference, the problem is solved by simply adjusting the outer diameter of the sleeve using sandpaper. If, during replacement, you find that the seat is unevenly divided (for example, in the form of an ellipse), in this case it will have to be leveled. At the same time, experts do not recommend trying to unscrew the front bushing socket yourself using hand tools, since in this case it will not be possible to maintain alignment with the starter shaft, which is fraught with problems in its operation. If you find yourself in such a situation, it is better to contact specialists who, using special equipment, will turn the hole in the right direction. By the way, many car service centers manufacture repair-size starter bushings from bronze.
You can make a part of the required diameter at specialized service stations
After reading this manual, you were able to see for yourself that replacing starter bushings on a “nine”, as on any other car, is not the easiest task. Difficulties can begin already at the stage of removing the starter due to the inconvenience of work and end with pressing in the bushings. Therefore, when performing this type of repair, be patient, take your time, and follow the instructions strictly.
Malfunctions and their causes - diagnostics without a service station
To carry out diagnostics, arm yourself with a conventional tester with voltmeter mode.
- Connect the battery terminals to the poles of your measuring device. You will need an assistant to drive.
- After connecting the terminals to the voltmeter, look at the readings of the device. If the battery is working properly, the data will be 11-13 V.
- Turn the ignition key and at this moment measure the voltage. If the losses are only 1-2 Volts, then the starter works normally and does not show resistance.
- If the voltmeter parameters decrease by 2 times or more, the reason is in the starter. Or rather its bushings or brushes.
- Remove the starter and check the relay. Connect the battery terminals to its terminals on the body and transfer it to 12 V. If the overrunning clutch moves in the front cover, then the relay works perfectly. If not, replace it.
Replacing the front starter bushing of a VAZ 2109
When replacing the bushing, it is necessary to completely disassemble the starter, since it is otherwise impossible to check the suitability of all its parts. All the work can be done in a garage with your own hands, without the help of a partner, without using special tools. You will need a new bushing, new brushes if maintenance has not been done in a while.
How to remove the starter?
For work, you will need 13mm wrenches (open-end, socket, socket) and a 10mm wrench to remove the terminal from the battery. Stock up on them before removing the starter.
First, remove the negative terminal from the battery to prevent a short circuit.
If your car has an injection system, you will have to remove the air filter, which is located above the starter.
There are two ways to remove the starter on a VAZ 2109: through the top and through the bottom. If you follow the second path, you will have to get rid of the engine protection for a while. First, disconnect two wires from the starter solenoid relay: a thin one, which is necessary to power the relay winding, and a thick one, which supplies voltage to the starter itself.
The first one is simply pulled out with your hands. To disconnect the second one, you need to unscrew the nut from the retractor contact with a 13mm wrench. When you get rid of the wires, move them to the side so they are out of the way. Using a 13mm wrench, you now need to unscrew the three nuts that secure the starter housing to the clutch block.
If necessary, you can use socket wrenches with a universal joint. But, as practice shows, all work is carried out without difficulty using a spanner. When all three nuts are unscrewed, you need to pull the VAZ 2109 starter housing to the right side to move it away from the studs.
Now all that remains is to pull the starter up or down. When removing it from the top, you may need to slightly pull the pipe going to the radiator of the cooling system to the side.
Device repair
When you take out the device, place it on a workbench and clean it of dirt. First, disconnect the solenoid relay, which is secured with two screwdriver-head bolts.
The anchor must be removed from the metal bendix plates. Using a 10mm key, unscrew the rear cover of the VAZ 2109 starter; a view of the rotor axis will open.
There is a retaining ring installed on it, which will need to be removed using a flat-head screwdriver.
If a planetary mechanism is installed, then the brushes are parallel to the starter housing, and if not, then perpendicular. The bushing is pressed into the back cover, so you need to prepare for pressing out. In order to get rid of the old bushing, you will need a hammer and a mandrel of a suitable diameter. Place it against the part and with sharp blows drive it out of the seat.
Where is the fuse for the cigarette lighter of the Lada Kalina
The main thing here is balance, since excessive force can cause a crack to appear in the lid. But nothing can replace it, unless you can find a similar VAZ starter. Installation of the new bushing must be done in reverse order. Assess whether the brushes need to be replaced. If yes, then replace them, clean the lamellas on the collector with a thin piece of metal.
How to check the VAZ 2109 starter and correct assembly? Try connecting it directly to the battery first. Smooth and calm work will tell you that the assembly was carried out correctly, no inaccuracies were made during the work process. If everything is assembled as it should, you can install the starter in place.
If during the disassembly process it turns out that there are serious defects (destruction of the housing, windings), then it is necessary to replace the VAZ starter with a similar model.
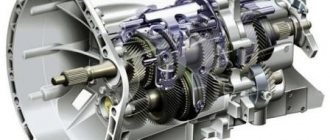
It is worth noting that mechanisms with planetary gearboxes are considered the most efficient in operation: they have higher speeds, therefore, starting is much easier.
Assembly is carried out in the reverse order to the one in which the VAZ starter was removed. Don't forget to reinstall the air filter and battery terminal when finished.
Failure-free operation of the starter is ensured by the coordinated operation of all components and mechanisms, the failure of which affects the operation of the vehicle.
Parts that are subject to mechanical loads are the most susceptible to wear, such as bendix, armature and bearings.
The moving part of the armature consists of a shaft that rotates in two cermet bushings impregnated with oil. One of the bushings is pressed into the rear cover of the starter, the other is mounted into the clutch housing.
Removing the starter
Before removing the starter, you need to prepare two keys, 10 and 13, they will be needed in order to remove the terminal from the battery. To avoid short circuit, first remove the negative terminal. If your car has an injector, you will have to remove the air filter located above the starter.
The VAZ-2109 starter can be dismantled in two ways: through the top or through the bottom. If the second option is chosen, then you need to temporarily remove the crankcase protection so that it does not interfere. Next, you need to disconnect the solenoid relay from the two wires. First, we disconnect the power (thick) wire through which voltage is supplied to the starter, then the thin wire needed to power the relay winding.
The thin wire can simply be pulled out by hand. To turn off the power, you need to use a 13 key to unscrew the nut from the contact of the solenoid relay. After disconnecting the wires, move them aside.
Next, you need to unscrew the three nuts securing the starter to the clutch block. To do this, use the key number 13.
After unscrewing the nuts, you need to pull the body to the right and move it away from the studs. Now you can pull the starter out through the top or bottom and start repairing it.
Place the dismantled starter on a workbench and remove all dirt from it. Disconnect the solenoid relay, which is secured by two screwdriver-head bolts. Next, remove the anchor from the metal bendix plates. Take a 10mm wrench and unscrew the rear starter cover. After removing the cover, you will have a view of the starter axis, from which you need to remove the locking ring. It can be removed using a flathead screwdriver.
The starter housing on the “nine” consists of three parts, which is held in place by three studs that tighten it. In the process of unscrewing the nuts on the studs, all parts of the unit are disconnected, so disassembling the starter will not be accompanied by difficulties. There are two types of starters: with and without a planetary gearbox, the collectors of which are slightly different.
If a planetary gearbox is installed in the VAZ-2109 starter, its brushes will be located parallel to the body, in the second option - perpendicular to the starter axis. The old bushing is securely pressed into the starter housing, so you will have to try hard to remove it. To get rid of the old bushing, take a hammer, a piece of pipe of suitable diameter, or
mandrel. Place it against the bushing and use sharp, short blows of a hammer to knock it out of its seat. The main thing is not to overdo it in the process, since the starter cover can burst at any moment, and there will be nothing to replace it with.
To avoid having to look for a similar starter from which you can remove the cover, be extremely careful. Before pressing in a new bushing, it is advisable to go over the installation site with fine-grained sandpaper. To press in a new bushing, it is best to use the old one, since it is made of soft metal and will soften the impact force during installation, this will prevent cracks from appearing on the cover body. While the starter is disassembled, inspect the brushes; they may need to be replaced. Reassembling the starter is done in reverse order.
To check the starter's operation, connect it to the battery. Smooth, quiet operation will confirm that the process of replacing the bushings and assembling the starter was completed correctly. Then you can install it in its place.
Removing and replacing starter bushings on VAZ 2108, 2109, 21099 – Avtochanel
Well, the check showed that the starter needs to be repaired. Therefore, the first thing we do is dismantle it.
- Secure the car stationary by turning on the handbrake and placing stoppers under the wheels.
- Move the negative terminal from the battery to the side. This will deprive your car of power.
- Disconnect the wire connector from the starter solenoid relay terminal.
- Unscrew the fastening nut from the relay contact bolt and remove the wire.
- If there is a crankcase guard, remove it. Here all the bolts are simply unscrewed.
- The 2 starter fixing nuts are unscrewed from the bottom of the engine compartment. But the third one is more conveniently removed from inside the engine compartment.
- Having removed the fasteners and disconnected the wiring, you can safely remove your starter from the clutch housing.
Before starting work, be sure to clean the device from accumulated dirt so that it does not get inside the structure and reduce all repair efforts to nothing.
Hello, in this article you will learn how to replace starter bushings on VAZ 2108, 2109, 21099 cars. The starter on these car models has 2 bushings, one of them is located in the rear cover of the starter housing, and the second in the clutch housing. Most often, the bushing wears out in the clutch housing.
When one of the bushings wears out, extraneous noise may be heard from under the hood, especially from the gearbox and starter. This noise is caused by the fact that the armature shaft rotates with a certain amplitude that is unusual for it, due to play in the bushing. First, remove the starter from the car. Now visually determine the condition of the bushings. To replace the bushing in the rear cover of the starter, simply knock out the old bushing and install a new one
If the new bushing is difficult to insert, then it needs to be sanded, thereby reducing its outer diameter; if the bushing is pushed in with great force, the cover body may burst. When replacing the bushing in the clutch housing, the situation is more complicated. There is no through hole here and knocking out the bushing will not work.
Now we screw the tap into the sleeve and pull the tap handle, or knock it out using the clip on
Before installing the new bushing in place, check whether the starter shaft fits into it freely; if it is difficult, then it is better to increase the inner diameter of the bushing before installing it, since usually when the bushing is pressed into place, its diameter decreases slightly.
Avtochanel
Replacing the starter bushing on an Oka car
Despite the fact that the design of the starter on the Oka is implemented on a principle similar to the VAZ-2109 (the front bushing is also located in the clutch housing), the execution of the engine starting mechanism turned out to be extremely unsuccessful, as were most other components of this car. The main reason for this is the desire of designers to reduce the cost of the production process as much as possible. It is for this reason that bushings are manufactured using technology taken from powder metallurgy, and a combination of graphite chips and bronze is used as the starting material. Because of this, these parts have a very small margin of safety, which negatively affects their service life.
For those car enthusiasts who are interested in how to replace the starter bushing on the Oka, you need to know about one more drawback of the engine of this car. We are talking about a seat in the clutch housing itself, which breaks down unevenly during long-term operation. Therefore, if you buy a standard size product (external diameter 13.03 mm) to replace it, then most likely it will fit into place too loosely and even begin to dangle. This should not be allowed, as the part will very soon become unusable. Knowing this feature, experts recommend using a repair size bushing (external diameter 14 mm), but it often turns out that its diameter does not correspond to the size and even shape of the seat.
In the case where the development of the socket is relatively the same around the entire circumference, the problem is solved by simply adjusting the outer diameter of the sleeve using sandpaper. If, during replacement, you find that the seat is unevenly divided (for example, in the form of an ellipse), in this case it will have to be leveled. At the same time, experts do not recommend trying to unscrew the front bushing socket yourself using hand tools, since in this case it will not be possible to maintain alignment with the starter shaft, which is fraught with problems in its operation. If you find yourself in such a situation, it is better to contact specialists who, using special equipment, will turn the hole in the right direction. By the way, many car service centers manufacture repair-size starter bushings from bronze.
You can make a part of the required diameter at specialized service stations
After reading this manual, you were able to see for yourself that replacing starter bushings on a “nine”, as on any other car, is not the easiest task. Difficulties can begin already at the stage of removing the starter due to the inconvenience of work and end with pressing in the bushings. Therefore, when performing this type of repair, be patient, take your time, and follow the instructions strictly.
Do-it-yourself starter repair on a VAZ 2109: diagram, disassembly, bushing replacement
Next, you have to check the condition one by one and take appropriate measures to eliminate problems with the following components of the starter:
- Brushes;
- Anchor;
- Overrunning clutch;
- Traction relay;
- Bushings.
Now let's talk about everything one by one.
First, assess the current condition of the brushes. In most cases, they are the source of problems with the starter.
- Remove the pair of screws that hold the protective cover in place. The cover is now easy to remove.
- Use a screwdriver to remove the retaining ring from the shaft, and don’t forget about the adjusting washers.
- Unscrew 2 more tie rod nuts. Remove the manifold side cover.
- Use a screwdriver to press out the springs and remove the brushes from the holder.
- Measure the brushes with a caliper or ruler. If the height is less than 12 millimeters, the brushes must be replaced.
- It is also better to replace elements if there are chips, cracks and other defects on the surface.
If all is well with the brushes, the next suspect is the anchor.
- Remove the housing with the starter.
- At the anchor, look at the condition of the commutator, check whether the winding is intact.
- If there is carbon deposits on the collector or signs of breakdown, clean these areas with fine sandpaper.
- Check the armature and stator windings using a multimeter in ohmmeter mode.
Overrunning clutch
Parallel checking of the overrunning clutch with the armature will allow you to replace the latter at the same time.
To gain access to the clutch you will have to remove the armature from the front cover. At the same time, change it if necessary.
- Remove the retaining ring located near the overrunning clutch.
- Remove the restrictor ring.
- Remove the plastic lever stop, which will allow you to reach the anchor.
- Remove the intermediate support from the shaft.
- Check the condition of the gear teeth. If there are defects, the unit is replaced with a new one.
Bendix or overrunning clutch
Traction relay
Replacing the traction relay is necessary if, when voltage is applied to its terminals, the overrunning clutch does not extend. Sometimes the VAZ 2109 is equipped with collapsible relays. But it’s still better not to repair it, but to replace it with a new relay.
- To remove the relay, unscrew the two screws located on the front;
- Lift the relay, disconnect the armature from the lever;
- Remove the relay from the housing, grabbing the spring and armature. All elements are changed if necessary.
Bushings
Excessive wear on the bushings often impairs the performance of the starter. This is due to the material from which they are made - brass, bronze or copper. Contact with stronger metal causes wear.
Bushings
- In the case of the VAZ 2109 starter, we have one bushing located in the rear cover, as well as a second one, which you will find in the clutch housing.
- The presence of defects can be determined visually. If the elements have chips, cracks, burrs, or other defects, this indicates wear.
- Try moving the starter shaft transversely. If there is noticeable play, the starter bushings are worn out and need to be replaced.
- When planning to replace the rear bushing, it is recommended to simultaneously change the cover itself.
- The front bushing is removed from the crankcase using a tap of the required size. Tighten the tap like a thread, and resting it against the bottom of the hole, the sleeve will gradually begin to move out of its place.
- Before installing a new bushing, treat the inner surface of the seat with engine oil.
When putting the starter back together after repair, the most significant advice is to clean the surfaces from contamination. This will significantly extend the service life of the repaired unit and avoid breakdowns in the near future.
Be prepared for the fact that attempts to repair the starter will not give the expected effect. In this case, it is better to replace it completely or contact a trusted car service.
Loading …
Device repair
When you take out the device, place it on a workbench and clean it of dirt. First, disconnect the solenoid relay, which is secured with two screwdriver-head bolts. The anchor must be removed from the metal bendix plates. Using a 10mm key, unscrew the rear cover of the VAZ 2109 starter; a view of the rotor axis will open. There is a retaining ring installed on it, which will need to be removed using a flat-head screwdriver.
The VAZ 2109 starter housing consists of three parts, which are held together by two studs. When the nuts on these studs are unscrewed, all parts of the device are separated, so disassembling the VAZ starter does not cause any particular difficulties. It is worth noting that there are two types of devices: with and without a planetary gearbox. They have slight differences in the manifold.
If a planetary mechanism is installed, then the brushes are parallel to the starter housing, and if not, then perpendicular. The bushing is pressed into the back cover, so you need to prepare for pressing out. In order to get rid of the old bushing, you will need a hammer and a mandrel of a suitable diameter. Place it against the part and with sharp blows drive it out of the seat.
The main thing here is balance, since excessive force can cause a crack to appear in the lid. But nothing can replace it, unless you can find a similar VAZ starter. Installation of the new bushing must be done in reverse order. Assess whether the brushes need to be replaced. If yes, then replace them, clean the lamellas on the collector with a thin piece of metal.
How to check the VAZ 2109 starter and correct assembly? Try connecting it directly to the battery first. Smooth and calm work will tell you that the assembly was carried out correctly, no inaccuracies were made during the work process. If everything is assembled as it should, you can install the starter in place.
If during the disassembly process it turns out that there are serious defects (destruction of the housing, windings), then it is necessary to replace the VAZ starter with a similar model. It is worth noting that mechanisms with planetary gearboxes are considered the most efficient in operation: they have higher speeds, therefore, starting is much easier. Assembly is carried out in the reverse order to the one in which the VAZ starter was removed. Don't forget to reinstall the air filter and battery terminal when finished.