Where to start troubleshooting.
Before starting troubleshooting when the VAZ 2107 is not charging, you need to decide which generator connection diagram is used. To do this, pay attention to whether the charging indicator lamp lights up when you turn on the ignition. If the lamp lights up, then look for the presence of relay PC702 on the right wing under the hood. Connection diagrams are described in the article “VAZ-2107 charging diagram”. In all cases, before starting troubleshooting, it is necessary to check the voltage at the battery terminals. With a working generator and its connection diagram, the voltage should be in the range of 13.5 - 14.5V. at medium crankshaft speeds and high beam headlights on. If the voltage does not fall within this range, the fault must be found and corrected.
Voltage regulator
And most importantly, the VAZ-2107 charging lamp is connected to the excitation winding through a voltage regulator. The latter allows you to maintain the voltage at the same level - within 13.6-14.2 V. The design of the regulator can be absolutely any, the following designs are distinguished:
- Mechanical - work on electromagnetic relays.
- Electromechanical - work on electromagnetic relays and transistor switches. A kind of combined scheme.
- Electronic regulators - consist of a single crystal on which a switching circuit is made. Essentially, this is one large power switch that allows switching to maintain the required voltage level.
What to do if there is no charger?
If the VAZ 2107 is not charging, then the voltage at the battery terminals, both with the high beam headlights on and off, does not increase when the engine is running and corresponds to the voltage of the battery. Most often, the tension even decreases. This indicates a lack of power on the generator excitation winding. The reason for this may be a malfunction of the regulator or loss of power to it. In this case, the first thing we do is use a test lamp to check the power on the wire connected to the voltage regulator or terminal 15 of the generator, depending on the connection diagram used.
On vehicles manufactured after 1996, it is necessary to connect the wire from terminal 15 of the generator to ground with the ignition on. In this case, the charging indicator lamp should light up. If there is power, and on cars produced after 96. If the control lamp is on, then remove the voltage regulator from the generator and check its serviceability. How to do this is described in the article Checking the voltage regulator.
In the event of a power failure, it is necessary to check, on vehicles produced before 1996, the integrity of fuse No. 9 in the mounting block. If it is in good condition, check the serviceability of the wire from the mounting block to the voltage regulator, the reliability of its connections and the presence of power at pin 3 of block 11 of the mounting block. If there is no power at terminal 3, check the integrity of the conductive paths in the mounting block. On cars produced after 1996, if the warning lamp does not light up, you need to check its serviceability and ring the circuit from it to terminal 15 of the generator according to the diagram given. If the voltage regulator and excitation circuit are working properly, it is necessary to remove and repair the generator.
Troubleshooting VAZ 2107 battery charging problem
First, you should check the serviceability of the alternator belt - it is this that causes the alternator to rotate and generate current. This belt drives the coolant pump, so this malfunction also manifests itself in engine overheating.
If the charge indicator lamp does not light up, and the voltmeter shows normal voltage of the on-board network, and the battery does not charge, the reason is in the contacts at the terminals.
You should remove the wires from the battery and clean the battery terminals and wires with emery cloth. If the charge does not appear, it is necessary to measure the voltage at terminal “30” (generator output) with the engine running. If the voltage at this terminal and the battery is very different, you need to clean the contacts and ring the wire going from the generator to the battery. The faulty wire must be replaced.
If, when the engine is running, the voltage in the on-board network is within normal limits, but when a load (headlights) is connected, it drops, the reason lies in the weak tension of the alternator belt. As the load increases, the weakened belt slips. A correctly tensioned belt should bend by 12-17 mm with a force of 10 kgf. A loose belt must be tightened or replaced.
Important: if the belt is over-tensioned, excessive load occurs on the bearings of the generator and pump, which can lead to their failure.
Other reasons for the lack of charge may be a broken rectifier diode on the generator, an open or shorted rotor or stator winding.
Diodes can be checked using a multimeter or a test lamp. Using a multimeter, you can check the resistance of the diodes in the direction in which they should be locked. To check with a test lamp, you must remove the “+” terminals from the battery and connect the test lamp. The wire of the test lamp must be touched in succession to the three bolts of the rectifier devices. Then perform the same operation, only disconnecting the “-” terminal. If the lamp lights up, the diode being tested is broken.
If one of the diodes malfunctions, the diode rectifier assembly must be replaced.
A break in the stator winding is determined with a multimeter by measuring the resistance between the rectifier unit mounting bolts. Lack of contact between the winding and the other indicates its breakage. In this case, it is necessary to replace the winding or generator assembly.
A common cause of generator failure is brush wear. To check them, you need to dismantle the brush assembly. The length of the brushes must be more than 5 mm, otherwise they need to be replaced. Also, the brushes may become warped or “stick” in the wells. Therefore, it is necessary to check the condition of their side surface.
Note: the VAZ 2107 generator (carburetor) is no different from the unit for the injection version of the “Seven”. Therefore, all tips for checking and repairing the generator are relevant for both modifications of the car.
If the warning lamp does not light up and other devices do not work when the engine is running, and the battery is not charging, the reason is a blown fuse or a breakdown of the ignition switch (relay).
The reason for the lack of battery charging may be a breakdown of the relay regulator. To check it, you need to connect “+” from the battery to the top contact, and “-” to the left one and check the voltage on the brushes, which should be 12 V. If the voltage is lower, the relay regulator must be replaced.
The battery is undercharged.
When using a VAZ-2107, charging may not be completely lost, that is, the battery may be undercharged. This is expressed in a voltage drop when checking at the battery terminals when the load is turned on, most often the high beam headlights. While when consumers are turned off, the voltage is normal. The reason for this may be poor contact in terminal 30 of the generator, that is, in the connection of a thick wire secured with a nut. In this case, the voltage on the bolt corresponds to the norm and strong heating is often observed. In this case, it is necessary to unscrew the nut securing the wire and clean the contact surfaces. It is also necessary to tighten the nut securing the bolt; it is not worth unscrewing it without removing the generator. If the voltage at the bolt is the same as at the battery terminals, then the generator is faulty.
In some cases, when the battery is charged, the charging lamp may light up on the instrument panel. This may be due to a malfunction of the PC702 relay on cars with a G222 generator, or a malfunction of one of the additional diodes in the 37.3701 generator.
I hope the above will help you in troubleshooting when the VAZ 2107 is not charging.
How does it all work?
First you need to understand how everything works. So, on the VAZ-2107, the on-board network is powered from two sources - the battery and the generator. The first provides electricity to all consumers until the power plant is started. The battery itself is a storehouse of electrical charge, which it releases when needed.
A generator is a unit that generates electricity, but for this it is necessary that it perform a mechanical action (its rotor rotates). In order for the generator to operate and power the network, it is driven from the crankshaft via a belt drive.
Everything works simply: to start the engine, the battery energy is supplied to the power electric motor - the starter, as well as the ignition system. After the power plant starts, the generator will be driven by the drive, the generated energy of which will power all devices. It will also be supplied to the battery to restore the charge spent on starting the power plant.
Recharging the battery from the generator must be carried out without fail, otherwise after several starts of the power plant, the loss of electricity in the battery will be significant (the battery runs out), and it will simply not be able to start the engine.
In order to monitor charging, a warning lamp and a voltmeter are installed on the dashboard of the VAZ-2107. Thanks to these control devices, it is possible to detect that the battery is not charging.
If the entire circuit through which the battery is recharged is in good condition, then after turning on the ignition, the charge indicator lamp lights up, but after starting the engine and entering the operating mode, it should go out, which indicates that voltage is supplied to the battery. In this case, the arrow on the voltmeter should be in the green zone, indicating that the voltage parameters correspond to the norm. But if, after starting the engine, the lamp lights up and “blinks”, while the arrow may twitch, this indicates a malfunction.
It should be immediately noted here that it often happens that the battery icon is on when the engine is running, but the voltmeter shows that charging is in progress. In general, the behavior of this system can be very different - charging is not happening, it is, but control devices show the opposite, recharging periodically disappears, but then is restored. In this case, there is a possibility of undercharging or overcharging, which are detrimental to the battery. A weak battery will eventually lead to it being completely discharged over time and making it impossible to start the car.
No charging - signs
A situation in which the generator has ceased to perform its main tasks of providing electrical energy to the battery can be determined using the following symptoms:
- the battery loses charge at an increased rate;
- frequent signals from the corresponding lamp on the dashboard;
- The performance level of electrical appliances in the car has decreased.
A driver who notices one of these situations, or all at once, will be able to conclude that the on-board generator is faulty.
Signal lamp
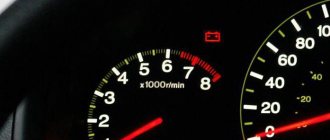
The Russian VAZ-2107 car is equipped with an on-board instrument panel, on the panel of which there are indicators indicating, among other things, the presence of structural problems. One of the lights is responsible for transmitting information regarding the stability of the generator: if the circuit is operating normally, the indicator lights up only when ignited, exactly until the propulsion system starts.
Please note: proper operation of the unit means that the warning light should go out immediately after the engine is started. If the indicator continues to light, there is a problem in the circuit.
Battery drains quickly
Problems that occur during operation of the generator set will immediately affect the state of charge of the battery. A faulty generator will not be able to provide the required level of electrical voltage necessary to properly charge the battery. The driver can determine the insufficient amount of charge in the battery by the occurrence of difficulties when starting the engine.
Reduced electrical performance
Since the generator works to provide on-board electrical devices with the required amount of energy, its malfunctions will lead to malfunctions in the operation of various devices. A driver who suspects a malfunction should try to put into operation any components that require electricity to function: for example, turn on the headlights or heating unit.
A decrease in the performance of these devices - insufficiently bright light and weak fan rotation - will be signs of generator failure.
Charging system diagram
To figure out why the VAZ-2107 does not charge the battery, or it does not correspond to the standard, or the control devices show unreliable information, you should consider the operating principle of this system. It should be noted here that on these cars of different years of production, the charging system has certain design differences, the main one of which was the generator.
At the same time, the basic operating diagram of the system itself remains unchanged, so let’s consider it using the example of a system with a 37.3701 generator:
Reasons why charging on the VAZ 2107 carburetor disappeared
What to do if the battery is discharged (no charging)?
If the battery of your VAZ 2107 is discharged, then one of three elements may be “to blame”: the generator, the voltage regulator, and the connections between them. You can determine “who is to blame” very simply, without additional equipment. How this article will help.
This is interesting: If you find a coin on your car, your car has been tagged by car thieves
We carry out the test using standard equipment . To monitor the operation of the generator on the “seven” there are two instruments: a voltmeter and a control light on the instrument panel. With their help, you can track the cause of your troubles.
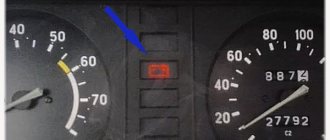
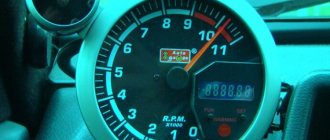
1) Turn on the ignition without turning on the starter and look at the warning lamp. It should shine at full intensity, as in the photo. The voltmeter needle, normally, stands on the white part of the scale (photo). Let's say everything is OK - go to point 2 ).
The control lamp is on
Voltmeter readings before starting the engine
The lamp does not light up, the voltmeter needle remains at zero when the ignition is turned on - check fuse No. 10 in the mounting block. 99% of the time it will be burnt out. In this case, all other lamps on the instrument panel will also be de-energized. Replace it with the same one and test again. If the fuse burns out again, you need to look for the cause, that is, a short circuit. We check whether the wires from the generator are disconnected, whether the insulation is frayed somewhere, etc. Diagram 3 at this link
The lamp does not light up, the voltmeter needle shows normal - we check the wires on the generator to see if the wire has come loose from terminal “61”. If everything is normal there, you will have to remove the instrument panel and check the lamp. Replace the burnt out one. See how to remove the panel here
Terminal “61” of the VAZ-2107 generator
2) Start the engine . The control lamp should go out, the voltmeter needle goes into the green sector and is located from the middle to the right edge (photo). If everything is so, then most likely the generator is working normally .
Voltmeter reading - normal charging
The lamp remains on or dims slightly. If you give it gas, it goes out at high speeds and lights up again when they decrease. The voltmeter needle is in the white sector and goes to the edge of the green when the speed increases. The generator output is faulty . The same conclusion if the lamp continues to light at any speed, and the voltmeter needle is in the white sector and even goes to red.
This is too little for normal charging
Note! During such a check, it is better and safer to work together. You cannot disconnect the battery terminal without at least turning on the heater fan or other load. A power surge at the time of shutdown can “burn out” the electronic elements of the ignition systems. You need to be especially careful on a car with an injection engine.
What to do if the battery is boiling?
The lamp goes out, the voltmeter needle goes to the right into the red sector, and there is a sharp “chemical” smell in the cabin. At idle, the needle is in the green sector, but as soon as you accelerate, it goes all the way to the right. This indicates that the voltage regulator (chocolate) has failed . If this happens, moving on is more expensive! All the electrical equipment of the car may burn out, and the battery will get damaged, the electrolyte will “boil”, the plates may become warped. To get to the repair site, you can temporarily turn off the generator by removing the wire from terminal “61” of the generator. You can drive for quite a long time on a good battery, just don’t forget to turn off unnecessary electrical appliances - heater fan, heated rear window, radio, etc. Headlights or running lights will have to be left.
Voltage too high - overcharge
This article describes a simple way to determine if the alternator, voltage regulator, or connections between them are faulty. How to repair all this in the next article .
Step-by-step troubleshooting
There can be many reasons for an unstable charge. To independently identify the correct one, you should familiarize yourself with the electrical diagram of the charging circuit of the VAZ-2107 car model.
First of all, you should not panic, thinking that charging has stopped due to the most serious reason. Quite often the cause of a malfunction is a small thing that you can fix yourself. It is recommended to find out the cause of the malfunction step by step in the following sequence:
- Fuse F10 is checked for integrity. A burnt-out element responsible for feeding the excitation winding of the generator must certainly be replaced with a new one.
- The control lamp does not light up or only half lights up, which means that the cause of the breakdown should be found in the car wiring. More precisely, in the connecting wires of the battery and the car body. Quite often, the cause of the malfunction is the usual oxidation of the wires, which is easily eliminated by stripping the terminal.
- Having not found the cause in the switching system, experts recommend inspecting the operation of the voltage regulator. If upon inspection it is revealed that this element is faulty, it should be replaced with a new one as quickly as possible. You should not try to repair the voltage regulator, since it cannot be repaired, and the cost of a new one will not exceed 350 rubles.
Taking into account the advice and recommendations of specialists, owners of VAZ-2107 cars will be able to independently find out why the generator does not charge and eliminate the cause of the malfunction.
Replacing a generator in a VAZ 2107 is a fairly rare occurrence. This unit usually works without failures and does not need repairs. However, in fairness, it is worth noting that it also has malfunctions, the elimination of which requires immediate repair, or even its complete replacement. The most common generator problems are listed below:
- Failure of the diode bridge (rectifier unit);
- Failure of the stator winding (break, short circuit);
- Failure of the excitation winding (break or short circuit);
- Worn or stuck brushes;
- Worn or jammed bearings;
- Failure of the voltage regulator.
These faults in the VAZ 2107 are quite easily diagnosed, which cannot be said about their elimination. For example, bearing wear is accompanied by noise or knocking noise during operation. In order to make sure that the cause of its appearance is damage to the generator bearings, you should loosen and remove the drive belt and shake/turn the pulley. If there is play or difficult rotation, the bearings must be replaced immediately.
Unlike the mechanical problem described above, electrical problems are more problematic from a diagnostic point of view. The fact that the VAZ 2107 generator is not working is indicated by the battery charge lamp. But the cause of such a malfunction will be more difficult to establish. If you do not have sufficient experience in handling auto electronics and special measuring instruments, then it is better to entrust this matter to specialists.
If you feel that you are able to solve the problem yourself, then proceed with the initial diagnosis of the malfunction. To do this, at a minimum, you need to have a multimeter on hand that can measure the voltage at the generator output and test the rotor and stator windings.
It should be noted that with an interturn short circuit in the stator winding, you can do without a measuring device. With such a malfunction, the generator emits a characteristic howl. In other cases, you will still have to remove the generator, disassemble it and try to determine the cause of the malfunction from the inside.
Typically, any of the above malfunctions can be eliminated by replacing the failed element: rotor, stator, bearing, brushes. However, if repairs take time, and the car is needed urgently, a known working generator is installed in place of the faulty one. Typically, for classic cars, which includes the VAZ 2107, separate replacement units are available both from car enthusiasts and in workshops. After repairing the original generator, a reverse replacement is performed.
Removing the generator from a VAZ 2107 is quite simple. To do this, you will need two wrenches, 17 and 19, and penetrating lubricant like WD-40 in case you can’t just unscrew the nuts. First, use a 17mm wrench to unscrew the nut intended for tensioning the drive belt, and then use a 19mm wrench to unscrew the nut securing the generator to the engine housing.
Reinstall the generator in reverse order, while monitoring the tension of the drive belt. When pressing on it between the pulleys, the degree of deflection should be 10-17 mm. If you lose sight of this important point, you may end up with new troubles in the future, such as belt damage, premature wear of bearings, or loss of charging due to belt slippage.
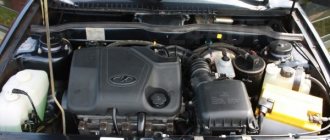
A car generator is designed to generate electrical energy and power the vehicle's on-board circuit. It is driven by transmitting torque to its pulley from the engine crankshaft pulley. The generator structure consists of a stator, a rotor, a cover and a rectifier that converts alternating current into direct current.
VAZ 2107 is equipped with alternating current generators models 372.3701 or 9412.3701.
About the VAZ 2107 charging relay
Not every driver knows what a VAZ 2107 charging relay is; in addition, this device is extremely rarely remembered. The charging relay is a voltage regulator or “chocolate bar” that is located in the generator. Owners of the Seven only pay attention to this detail after problems with the battery not charging begin. To prevent it from happening at one point, which negatively affects the engine, it is necessary to periodically monitor the operation of the charging relay.
How to check the VAZ 2107 generator
The need to diagnose the generator on the “seven” appears when there is no charge or when the battery is being recharged, i.e. when the voltage does not correspond to the norm. It is believed that a working generator should produce a voltage in the range of 13.5–14.5 V, which is quite enough to charge the battery. Since the charge source contains many elements on which the voltage supplied to the battery depends, attention should be paid to checking each of them separately.
Checking the brushes
The generator brushes on the VAZ 2107 are a device made as a single unit with a voltage regulator. On earlier models these two elements were installed separately. The brush assembly sometimes fails and requires replacement, especially if low quality parts are used. Problems first appear in the form of periodic interruptions in the voltage supplied by the generator, after which it completely fails. However, there are also cases of sudden failure of brushes.
Purpose of the regulator relay VAZ 2107 injector and carburetor
The main purpose of the voltage regulator relay on the VAZ 2107, and any other car, is to maintain a stable and sufficient charging current for the on-board network and the car battery, as well as to level out voltage surges in the generator. Variations in the generated voltage would occur as the generator rotates at different frequencies. When the power drops below 12V, the battery stops charging, and the entire bot network no longer functions at 100%. If the voltage exceeds 16 Volts, this can lead to boiling of the battery, as well as failure of on-board devices.
On early production VAZ cars of the carburetor type, the voltage regulator is located on the left arch of the engine compartment. Such devices are also called external, since they were installed outside the generator structure. To be more precise, a brush mechanism was installed in the generator, and control was carried out via a printed circuit board, which was installed outside the product.
Most VAZ 2107 cars of the carburetor and injection type are equipped with generators with built-in charging relays. The charging relay on such VAZ 2107 vehicles is located directly on the side of the generator opposite the pulley.
To maintain an acceptable battery charge, the alternator requires 13.6 to 14.6 volts of power. The voltage regulation circuit is carried out using an electrical circuit, which is located on a printed circuit board (chocolate board) or in the form of a single semiconductor module (tablet) with brushes. The switch located inside the generator is usually not able to adequately respond to the ambient temperature due to its location close to the running engine. The built-in relay is sometimes replaced with a three-level voltage regulator, which is due to the greater efficiency of the product due to manual adjustment of the output voltage.
How to check the charging relay on a VAZ 2107
If you suspect a faulty operation of the voltage regulator relay, then you must first check the voltage at the battery terminals with the car running. The power supply must be no lower than 13 and no higher than 14.6 Volts. The reasons for such increased or decreased voltage can be caused by the following factors:
- charging regulator malfunction;
- failure of the generator itself;
- lack of contact in the electrical connections of the battery or generator.
To check the serviceability of the chocolate bar, it is necessary to remove it from the generator. This must be done by unscrewing two bolts.
It is important to know! Before you begin to remove the device, do not forget to remove the negative terminal from the battery.
How can you check the product for serviceability without removing it from the car? To do this, you need to connect a voltmeter to the battery terminals, and then start the engine. If the voltmeter readings are below 12.7V or above 14.6V, then the probability of the chocolate bar failing is 95%. Replace the product with a new one, then check the voltage.
It is important to pay attention to the brushes of the product, which should protrude from the brush assembly at a distance of no less than 5 mm. If the brushes are worn out, the brush assembly must be replaced.
This is interesting: The insurance company admitted that protection under DOSAGO is unprofitable
Product replacement
Replacing the voltage regulator on a VAZ 2107 is very simple. To do this, you need to unscrew two bolts using a screwdriver or a wrench, which depends on the generator model, then disconnect the terminal, and then remove the part itself, which looks like the one shown in the photo below.
Replacing the voltage regulator is quite easy, and there is no need to even remove the generator. Before carrying out work, be sure to disconnect the negative terminal from the battery to avoid a short circuit.
You can replace the product with a similar one, but it is recommended to use a three-level regulator. It allows for more reliable stabilization, and three adjustable output voltage levels.
The brush mechanism is installed in place of the standard relay, and the box with the board and three-position switch is fixed anywhere in the engine compartment, but always with a mass on the coupling bolt. After replacement, the switch should be set to the appropriate position, depending on the temperature conditions.
Generator: why the VAZ 2107 is not charging
In this article you will learn why the VAZ 2107 does not charge, as well as how to fix this problem. There are quite a few reasons for this behavior of the car’s electrical equipment, so you will have to look for a breakdown using the elimination method. It doesn't matter if the generator is working properly. It may function normally, but it will not charge. Now let's try to find out all the possible reasons.
What is needed for repair?
In the event that the VAZ-2107 has lost its charge, you need to start repairs as quickly as possible. It is impossible to carry all the tools and equipment with you, but it is still worth having a minimum set in the glove compartment or trunk.
More specifically, you need to have the following set of tools:
- Voltage measuring device (multimeter).
- Lamp 12 volts and power no more than 3 W.
- Screwdrivers - flat and Phillips.
- Stationery knife for cleaning wires.
- Pliers.
- Sandpaper.
Having this entire set of tools, you can begin to carry out repairs. Fortunately, on a VAZ-2107 it’s quite easy to do this with your own hands.
How the charging system works
The battery in any car, in particular in the VAZ 2107, is only necessary for the functioning of the power supply system while the engine is turned off. But when the engine is running, all electrical equipment runs from the generator. It provides power to the injector - nozzles, fuel pump, electronic control unit. But the main load is the battery. It charges while the engine is running.
And the service life of the battery directly depends on how well the charging occurs. A generator is just one source of electricity. But it may be in working condition, but charging is not going to the battery. There can be a lot of reasons for this behavior; you need to thoroughly study the electrical circuit of the charging circuit of the VAZ 2107 car.
Battery charging circuit
The same scheme is used not only on the VAZ 2107; a similar one is used in any other car. The only difference is in the components - they are designed for different currents and operating modes. Charging circuit:
- the negative terminal of the battery is connected to the metal body by a thick copper bus;
- the entire electrical system of the car is connected to the positive terminal - there are two buses: to the starter and the generator (“30” terminal);
- from the positive terminal of the generator, voltage goes to the fuse box and ignition switch;
- from the ignition switch the voltage goes to the mounting block with fuses;
- only after it is power supplied (protected by fuse F10) to the control lamp, signaling insufficient charging, as well as to the voltmeter - a device that measures voltage;
- After this, power is supplied to the fuse box and goes to the “61” terminal of the generator set - to the brush assembly.
The circuit is not simple, it has a lot of elements that can fail. The contact may even break, causing the alternator to not charge the battery well. And all this affects your nerves - panic immediately begins.
How to save 20% fuel?
This thing really saves 10-30% on gasoline. You simply install this device on the fuel supply hose and...
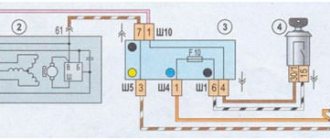
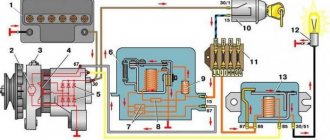
1 - battery; 2 — Generator impeller; 3 - Protection diodes; 4 - Drive pulley; 5 - Rectifier diodes; 6 - Stator winding; 7 - Voltage regulator; 8 - Excitation winding; 9 - Filter capacitor; 10 - Fuse block; 11 - Indicator lamp on the dashboard; 12 - Voltmeter; 13 - Ignition switch relay; 14 - Ignition switch.
But there is no need to panic, it is enough just to diagnose the condition of all elements of the system. And even if you have an injector installed on a VAZ 2107, the car will be able to withstand the journey to the nearest service station or auto parts store. If the battery is in good condition, of course.
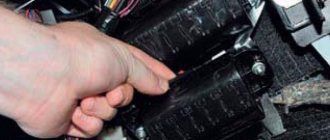
How to replace the charging relay?
- Important! First, as always, we turn off the ground, remove the negative wire from the battery terminal, then remove the yellow wire going from the generator to the relay, then use a Phillips screwdriver to unscrew it;
- Then we take it out together with the brushes:
- Now we need to carry out diagnostics. To do this, we test the voltage on the brushes with a voltmeter, and we power the relay itself from the battery, “simulating” the rectified current of the generator. At the same time, we apply (+) to terminal “B”, to the yellow wire, and connect (-) to the other terminal, “ground”. We are familiar with the signs of trouble. If you don’t have a tester, you can take a 1-3 W, 12 V light bulb.
- When installing a new relay, you need to press it firmly during installation, since new, unworn brushes provide more resistance.
If after taking these measures there is no effect, you need to look for the cause in the generator, we’ll talk about this next time. At the same time, remember that if you are removing a generator, then either you have decent knowledge in electrical engineering, or you have someone to give it to. There is no third option, especially if you have an injector.
In conclusion, let me tell you about several other reasons for the lack of charging or imitation, and also give advice:
- If you have a VAZ 2107 injector, then it is strictly not recommended to reset the battery terminal for various “checks” while the engine is running, and especially to allow strangers near the hood for this purpose. This is very harmful to electronic “brains”.
- It is advisable for those who like to “light up” to be able to say a firm “no” if you have a VAZ 2107 injector.
- On the instrument panel, the connectors are not soldered to the board, but riveted. Therefore, in some cars in the cold, while the interior is cold, there is no contact with the charging lamp. It lights up, simulating a lack of current from the generator. After the interior has warmed up, contact is restored and the lamp goes out.
- The next reason for those who like to go to the car wash in the cold. When water gets into the relay and brush assembly and freezes there, there is no charging. The solution is to heat it with any powerful hairdryer.