The operation of the lubrication system of an internal combustion engine is possible only if all its structural elements are in good working order and coordinated action. Failure of at least one of its parts will inevitably lead to problems in the power unit.
In this article we will talk about what an oil pump pressure reducing valve is and what its functions are. We will also look at the operating principle of this lubrication system unit and tell you how to properly repair and adjust it.
Why do you need an oil pump pressure reducing valve?
As you know, oil is supplied to moving engine parts under a certain pressure created by a running pump. Without this, the lubricant would simply flow into the crankcase, exposing the elements of the crank and gas distribution mechanisms to increased friction and overheating. But too high a pressure is also dangerous for the engine. Gaskets, seals, seals are not able to withstand exceeding its normal values. Because of this, oil begins to ooze from under them, and can also enter the power and cooling system of the power unit.
It is to reduce the lubricant pressure in the system that the oil pump pressure reducing valve is designed. The word “reduction” itself is often used in mechanical engineering, denoting a reduction, reduction, or weakening of something. In our case, this refers to oil pressure.
Signs of a faulty oil pump
There are several typical symptoms of a faulty oil pump. These include:
- Reduced engine oil pressure. This will be indicated by the oil can light on the dashboard.
- Increasing engine oil pressure. Engine oil is squeezed out of various seals and joints in the system. For example, oil seals, gaskets, oil filter connection points. In more rare cases, due to excess pressure in the oil system, the car refuses to start at all. This happens because the hydraulic compensators stop performing their functions, and accordingly, the valves function poorly.
- Increased oil consumption. Occurs due to leakage or waste.
It is necessary to understand that some of them may indicate failure of other elements of the oil system. Therefore, it is advisable to carry out the check in a comprehensive manner.
Where is he located?
The oil pump pressure reducing valve is most often located on the cover of this device, which is located in the lower front part of the engine block behind the generator drive pulley. Sometimes it can also be installed on the oil filter housing.
There are two types of valves: built-in and detachable. In the first case, the oil pump and pressure relief valve are a single structure that cannot be disassembled. In the second, the pressure control mechanism is removed from the pump using a tool and can be repaired separately.
Repair, replacement and adjustment
The performance of the pressure reducing valve can only be determined after its removal and disassembly (in the case of a collapsible design). Oil deposits and dirt on its body are removed with kerosene, gasoline or a special liquid for cleaning carburetors. Particular attention is paid to the spring - it is changed even at the slightest sign of compression, stretching or deformation.
To check the functionality of the valve in a “makeshift” way, just press on the piston or ball. If some effort is required to activate them, the device can be considered serviceable.
The valve is faulty if, during the process of pressing, it jams or does not tighten the hole sufficiently. In the first case, it is pulled out and then thoroughly washed in gasoline. In the second case, it is necessary to select a new spring that ensures tight closure of the hole, and replace the worn-out mechanism with it.
Video: replacing the pressure relief valve
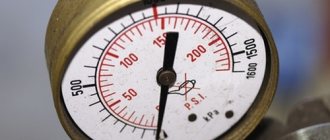
After repairing or replacing the pressure relief valve, it should be reinstalled and adjusted. The adjustment is carried out by a stop screw, the rotation of which compresses or stretches the spring. The pressure value is determined using a liquid pressure gauge.
Note that the valve itself can only be adjusted with the engine not running, and the oil pressure is measured with the engine running.
The oil pump pressure reducing valve is a small but extremely important part of the engine of any car. The performance of the entire power unit depends on its serviceability. Timely diagnosis of valve faults and their immediate elimination will allow you to avoid serious troubles on the road.
Operating principle of pressure reducing valve
The oil pressure in the system can depend on several factors, but the main one is the number of crankshaft revolutions. In other words, the harder we press the gas pedal, the faster the oil pump gears rotate. And the faster the gears rotate, the greater the volume of oil the pump captures from the crankcase, and the higher its pressure at the outlet.
When the pressure reaches a certain value, the serviceable valve opens slightly, allowing oil to pass into the reserve channel, through which the lubricant flows back into the crankcase.
The operation of the oil pump pressure reducing valve is as follows. The piston or metal ball is pressed against the inlet of the housing by a spring, which, in turn, is supported by a thrust screw. The oil, under the influence of increasing pressure, begins to put pressure on the surface of the valve, pushing it inside the body and compressing the spring. Thus, a hole opens, through which the lubricant goes into the reserve channel.
When the pressure decreases, its value is no longer sufficient to keep the valve in the open position, and the ball or piston, under the influence of a spring, again closes the inlet hole. As you can see, the scheme is quite simple and reliable, however, it sometimes fails.
Operating principle and main functions of the pressure reducing valve
Motor oil continuously circulating in the engine exerts a certain pressure on all its elements. Constant monitoring of this indicator within the limits established by the manufacturer is a prerequisite for normal operation of the power unit .
Purpose and functions
Any deviation in oil pressure can cause failure of individual components or the engine as a whole. In this case, a major overhaul of the engine may be required, which will involve large financial costs. To prevent such situations, a pressure reducing valve was invented, which is responsible for oil pressure. Despite the importance of the functions it performs, it has a simple design and is easy to repair and replace.
The pressure reducing valve is the most important element of the oil pump
An oil pump, the design element of which is a pressure relief valve, circulates lubricant throughout the engine. Oil pressure is adjusted precisely with the help of a valve that opens or closes the inlet. Excess oil goes into the reserve channel, which, in turn, allows the pressure in the system to be stabilized.
Location
In modern cars, the pressure relief valve is located together with the oil pump. The pump itself is usually installed behind the generator. Depending on the car model and the type of valve, the latter is located either on the oil filter or on the pump cover.
Reducing valve malfunctions
The pressure reducing valve, oil pump and oil filter are the main elements of the lubrication system, but if the latter, due to the peculiarities of its design, almost never breaks, but only becomes clogged, then the first two parts can fail quite often. The reason for this is usually the use of low-quality oil, lubricant that does not correspond to the type of engine and its operating conditions, as well as untimely replacement. In this case, particles of dirt, metal shavings or combustion products contained in the lubricant settle on the working surfaces of the valve, which, in fact, leads to its clogging and jamming.
Also, the cause of the malfunction can be a spring if it has stretched over time or, conversely, has compressed, bent, or burst.
It is immediately necessary to point out that repairing the oil pump pressure reducing valve is only possible if it has a collapsible design. For non-separable models, the entire pump cover will need to be replaced.
A valve is considered faulty if it is unable to maintain the required pressure in the system, and when its mechanism does not operate when the pressure reaches its maximum value. In the first case, it will not be difficult to determine the breakdown - a warning lamp on the car’s instrument panel will notify you about this. But you can only find out about the increase in pressure by oil leaks on the engine.
At what pressure should the pressure reducing valve operate?
But how can you understand that the pressure has increased or, conversely, decreased? And what should it even be like? The optimal oil pressure in the system can be found by looking at the owner's manual. It will be different for different brands and models of cars. For example, the pressure reducing valve of the Tavria oil pump operates at 0.55 MPa. Approximately the same indicators are relevant for most Lada cars.
You can measure oil pressure by connecting a special liquid pressure gauge to the system into the pressure sensor mounting socket. Before this, the engine must be warmed up to operating temperature. All measurements are made with the engine running.
Useful tips
Finally, here are some useful tips that may help you avoid problems with the oil pump pressure reducing valve or make it possible to identify its malfunction in time:
- Fill the engine only with high-quality motor oil of the appropriate type and viscosity grade. Lubrication requirements can be found in the vehicle manufacturer's recommendations.
- Never mix different brands of oils, even if they are of the same class.
- Change the oil and oil filter in a timely manner. The regulations for this procedure are also indicated in the car owner's manual.
- Do not allow dirt, moisture, or process fluids to enter the lubrication system.
- Monitor oil pressure. When the corresponding warning light on the device turns on, do not hesitate to go for diagnostics.
- Pay attention to the operating temperature of the engine. Overheating can cause coolant to enter the lubrication system.
- If you decide to replace or adjust the oil pump pressure relief valve without the necessary skills and tools, it is better to use the services of specialists.
Without a working lubrication system, no car will last long. Its most important element is the oil pump, which provides full pressure in the system. However, it also does not last forever, and in case of failure it must be replaced. You can solve the problem even without contacting the service, but you will have to spend a lot of time. Today we’ll talk about why the oil pump fails on a Priora and how to change it if it fails.
Typical breakdowns
There are only two main oil pump malfunctions. In one case, repair is possible, but in another it is much easier to remove the part, throw it away and install a new one.
Typical problems are:
- clogging of the oil receiver. In this case, it is necessary to drain the liquid from the crankcase, remove the pan, oil receiver and rinse them completely;
- mechanical damage to the pump or any of its components. The valve responsible for maintaining pressure in the system especially often fails. In this case, repair is impractical; it is better to replace it.
An alarm signal is a drop in oil pressure. In this case, it is recommended to temporarily stop operating the vehicle and thoroughly diagnose the entire system.
The installed oil filter is of poor quality or clogged
To avoid oil starvation, there should always be some amount of engine oil in the oil filter when starting the engine. The lubricating fluid is held there when the power unit is turned off thanks to a lock washer or check valve.
If the filter is of poor quality, then the above elements may not cope with their task or may be absent altogether. In this situation, the oil returns to the oil pan. This leads to the fact that when pressure builds up, the switched on engine experiences oil starvation, which causes increased wear of its parts.
A clogged oil filter puts additional stress on the oil pump. In addition, it causes a decrease in pressure in the system.
How to replace the pump
Replacing a part will require you to spend a lot of time, so set aside a few free hours, say, on a weekend. The work consists of several main stages. Let's look at the procedure step by step.
- Basic procedures: disconnecting the negative battery, draining the oil.
- Removing the timing belt.
- Disconnecting the wiring harness from the crankshaft position sensor, removing the pulley.
- Removing the key and removing the protection.
- Twisting the fasteners and removing the clutch housing cover.
- Removing the crankcase.
- Removing the crankcase gasket.
- Removing the oil receiver.
- Twisting the oil pump fasteners.
That's all, actually. Assembly work is carried out in reverse order. During the work, try to replace consumables. First of all, we are talking about the crankcase gasket. Install the new part and seal it, having first cleaned the mating surface of dirt and old sealant. At the same time, you can clean the oil receiver. For this you will need white spirit. If the part cannot be cleaned, it will have to be replaced.
This must be done, as there is a risk of ignition of the lubricant. The next element to be inspected and replaced is the oil receiver seal. If the ring breaks or loses its elasticity, you need to install a new part.
The oil pump plays a vital role in the engine lubrication system of any car. Even short-term operation of a car with a faulty pump will lead to failure of the power unit. Therefore, any car owner should know the main signs of oil pump failure and take appropriate measures in a timely manner.
Functions, structure and location of the VAZ 2110–12 oil pump
The engine lubrication system is designed to timely supply engine oil to the moving and hottest elements of the power unit. Oil is supplied from the sump and circulates through special channels inside the block and cylinder head. The oil pump ensures forced circulation of the lubricant.
Location of the oil pump on the VAZ 2110–12
On the VAZ 2110–12, the oil pump is located in the lower right corner of the cylinder block under the crankshaft gear, which drives the gas distribution mechanism.
The oil pump is located in the lower right corner of the engine under the crankshaft gear
This applies to both eight and sixteen valve engines. The pump housing is also the side cover of the power unit.
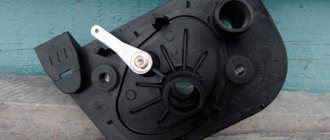
Oil pump device
The design of the oil pump is very simple and includes the following elements:
- housing with lid;
- driving and driven gears;
- pressure reducing valve with spring;
- oil receiver
The oil pump has a simple design based on two gears
Operating principle of the oil pump
The pump is driven by the crankshaft through the drive gear. The latter rotates the driven gear, creating a reduced pressure at the input of the device and increased pressure at the output. Thus, oil from the crankcase flows through the oil receiver tube into the pump, and from it into the engine oil line. When the pressure inside the pump begins to exceed the permissible value, a spring-loaded pressure relief valve drains excess oil back into the sump.
Troubleshooting
Direct connection of the pump to the crankshaft avoids damage associated with its drive. This, however, does not exclude the possibility of other malfunctions.
Pump malfunctions and their symptoms
The main malfunctions of the VAZ 2110–12 oil pump include:
- clogging of the oil receiver mesh;
- damage to the device body;
- wear of gear seats in the housing and cover;
- wear of the drive or driven gear;
- damage to the pressure reducing valve;
- deformation or damage to the valve spring.
A constantly burning warning light in the form of an oil can indicates a drop in pressure in the lubrication system to a critical level
Signs of oil pump failure may include:
- critical oil pressure warning light on the dashboard;
- engine overheating;
- high-frequency knocking (clattering) at the pump location.
The design of the VAZ 2110–12 engine does not provide for the installation of an oil pressure sensor. Like most modern cars, representatives of the tenth family are equipped only with an emergency (critically low) pressure sensor. When the pressure in the system drops, a warning light in the form of a red oil can lights up on the instrument panel. However, this lamp can also light up in the event of other malfunctions (failure of the sensor, break in its electrical circuit, oil leak, etc.).
Engine overheating also cannot be attributed only to symptoms of a faulty oil pump. It usually occurs due to problems in the cooling system.
As for the knocking coming from the oil pump, not everything is clear here either. Sometimes, when gears or housing elements wear out, the device may produce a high-frequency knocking sound. As a rule, it is associated with the formation of play between the gears and the housing (cover) and is most clearly audible at idle. However, similar sounds can also be produced by worn bearings (tension or guide rollers, pumps, crankshafts).
How to determine that the oil pump is faulty
The process of replacing the oil pump on a VAZ 2110-12 is quite simple and does not involve the use of any special tools. However, to do this you need to buy a new pump and spend some time. Therefore, before replacing the device, you should make sure that it is the one that is faulty. This can be done using the following algorithm.
Oil level measurement
First you need to measure the oil level in the engine and check its consistency. This is done with a special probe. It is advisable to remember when the oil and filter were changed. If the car has traveled more than 10 thousand km since the last replacement, it is better to replace them immediately. Then you should apply a drop of oil to your thumb and rub it with your index finger. If the oil turns out to be too dark, liquid and quickly absorbed, it needs to be replaced.
If the lubricant level on the dipstick is below o, add oil and start the engine. Next, you need to see if the warning light on the dashboard comes on. You should also check whether the power unit is overheating. At the same time, the engine is inspected for oil leaks. If you previously heard a knocking sound from the pump, you should listen to see if it disappeared after adding oil.
One of the reasons for the drop in oil pressure in the system may be its low level
Checking the sensor electrical circuit
If the listed symptoms do not disappear, you should do the following:
- Stop the engine and let it cool.
- Disconnect the wire from the emergency oil pressure sensor. On sixteen-valve engines it is located on the left side at the end of the camshaft bearing housing, on eight-valve engines it is located on the right on the rear side of the cylinder head.
- Turn on the ignition without starting the engine.
- In the engine compartment, short the wire going to the sensor to vehicle ground. If the warning light goes out, everything is fine with the sensor circuit.
To check the sensor circuit, it is enough to short-circuit the wire going to it to ground with the ignition on
Sensor diagnostics
To diagnose the sensor, you need to unscrew it with a 21 key and inspect its working part, which goes into the cylinder head. There should be traces of engine oil on it, indicating normal lubricant circulation in the system. If the working part is dry, the oil pump is most likely faulty.
The sensor itself is usually checked by replacing it with a known good one. After this, it is checked whether the warning light is on and how the engine behaves.
Checking oil pressure
If after checking and replacing the sensor the symptoms do not disappear, you need to measure the oil pressure using a special pressure gauge. This pressure gauge has a metal tip with a thread that is screwed into the sensor socket. Then the engine starts and warms up. If the pressure gauge shows a pressure greater than 0.6 bar (60 kPa) at idle, the oil pump is working. If the pressure is lower, the pump should be replaced.
The oil pressure at idle speed must be at least 0.6 bar (60 kPa)
Checking the oil pump on the stand
In a car service center, the oil pump is checked on a special stand. This implies:
- determination of pump performance;
- measuring oil pressure at the pump outlet;
- measuring the pressure at which the pressure reducing valve opens.
In this case, special oil is used, the temperature of which should be exactly 20 0 C. The performance of the VAZ 2110–12 pump at a crankshaft speed of 6000 rpm must be at least 35 l/min, and the pressure reducing valve must open when the pressure inside the pump increases to 0 .55–0.75 MPa.
Malfunctions in the operation of the pressure reducing valve
The structure of the pressure reducing valve is quite simple, which ensures its reliability and reduces the likelihood of breakdown. However, sometimes this still happens. Most often this is due to wear and tear of the mechanism, so do not forget to regularly diagnose all components of the car, as well as promptly replace outdated parts.
There are two main types of mechanism failure.
- The valve creates insufficient pressure. Usually the cause of this problem lies in the spring. With prolonged use, it becomes less elastic and stretches. As a result, the valve remains slightly open all the time. Due to this, the pressure decreases, and the oil does not reach some engine components. Sometimes it happens that unprofessional craftsmen install a spring with insufficient elasticity during repairs. This has the same effect.
- Excessive pressure builds up in the valve. As a rule, the cause of this breakdown is the entry of debris into the mechanism or the use of old viscous oil.
How to determine that the pressure relief valve is broken?
It is impossible to determine at first glance that the valve is broken. It is necessary to carefully inspect other elements of the system and exclude the possibility of damage to other parts of the oil pump. In order to understand that there are malfunctions in it, you should look at the dashboard. Most car models have a sensor located there that indicates problems in the system. It is a warning light with a pictogram that lights up at high speeds.
If the pressure indicator on the dashboard lights up, you need to check the operation of the oil pump
If this happens, you should stop the car immediately, as further movement may lead to permanent engine damage. Turn it off and get out of the car. Next, you will need to take the following steps.
- Wear protective gloves. At the moment, the engine compartment of the car is hot, so you can easily get burned.
- There is no point in checking the oil level if you have just stopped. It will take time before it drains into the crankcase. At this time, you need to inspect the engine: look for fresh oil leaks or damage to the crankcase.
- If the problem is a broken crankcase, you will need to seal it. This can be done using available materials: an ordinary rag, a piece of rubber and even tape.
- Inspect the oil filter. Damage to its gasket can also cause a breakdown.
- If the above items are in order, you should check the oil level. This is done with a special probe with o and “maximum”. Ideally, the oil level should be between them. If there is a lack of lubricant, simply add it.
The required oil level is between the minimum and maximum marks
All further actions are carried out on the valve removed from the pumping system. Examine it carefully. Often the cause of breakdown is clogging of the mechanism. This usually happens to drivers who are too lazy to change the oil. Dirt accumulates on the surface of the valve or spring, which prevents normal operation. If you have recently carried out a major overhaul of your car, then there is a risk that the valve was not properly washed and there are particles of chips and other debris left in it.
For this reason, technicians often recommend replacing valves after major repairs. If you do not want to do this, make sure that the system is not clogged before using the vehicle.
There is an unusual way to check the functionality of this element. Take a small piece of cotton (or other breathable) fabric and place it on the fitting that is parallel to the lid. Now you need to take a sharp breath through the material. If you feel strong resistance, it means that the valve is working as it should: it blocks the air flow and passes it through a special hole. A working mechanism should not be easily blown through.
Table: diagnosis of low pressure in the oil pump, causes and remedy
| Guide to diagnosing hypotension | ||
| Malfunction | Cause | Remedy |
|
|
|
| Low oil pressure throughout the entire engine speed range | There is too little oil in the engine. The oil intake screen is dirty, the oil intake tube is broken | Add oil to the engine. Remove the oil sump, clean the mesh, if necessary, replace the tube. |
| Worn oil pump | Remove, check, replace if necessary | |
| Engine bearing wear | Repair the engine | |
The main reasons for oil pump failure
The service life of the VAZ 2110–12 oil pump regulated by the manufacturer is 150–200 thousand km. This, however, does not mean that the pump will not last longer or fail much earlier. The main reasons why it may stop functioning normally are:
- spent resource;
- untimely replacement of the oil filter, as a result of which metal particles (friction products) enter the system, acting on the pump parts as an abrasive, and the filter mesh of the oil receiver becomes clogged;
- use of oil whose characteristics do not meet the requirements of the car manufacturer.
Oil pump replacement and repair
The oil pump of VAZ 2110–12 cars is replaced in an inspection pit or overpass. In extreme cases, you can use a jack. To work you will need the following tools:
- wheel wrench;
- keys for 10, 13, 17;
- hexagon socket wrenches 5 and 8;
- large slotted screwdriver;
- special key for tension rollers (to adjust the timing belt tension);
- clean, dry container to drain the oil.
Removing the oil pump
The procedure for dismantling the oil pump on a VAZ 2110–2112 is as follows:
- Remove the timing drive casing, having first unscrewed the mounting bolts on it with a 10mm wrench (on an eight-valve engine - 3 bolts, on a sixteen-valve engine - 6).
To remove the timing case, you need to unscrew 6 bolts
To loosen the alternator belt, you need to unscrew the bolt with a 13 mm wrench.
To remove the pulley, you need to unscrew the bolt with a 17 mm wrench
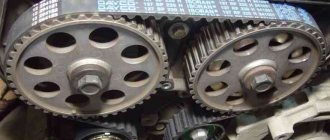
The marks on the camshaft gears must match the marks on the rear timing cover
Before removing the timing belt, make sure that the marks on the pulley and on the pump cover match
To loosen the timing belt, you need to unscrew the bolts securing the tension and guide rollers
When removing the crankshaft timing belt, be careful not to lose the key.
To make the oil drain faster, unscrew the filler neck.
To remove the pan, you need to unscrew the 16 bolts securing it with a 10mm wrench.
If the gasket is deformed or damaged, it must be replaced
The oil receiver is secured with three bolts to the main bearing cap and the oil pump.
To remove the oil pump, you need to unscrew 6 bolts with a 10mm wrench
When installing the oil pump, assembly is performed in reverse order.
Oil pump repair
Practice shows that in most cases it is better and easier to replace the pump as an assembly. If the device malfunction is not critical, you can try to repair it. Before this, the pump should be disassembled and the reason why it failed should be determined.
Pump disassembly
The procedure for disassembling the pump is as follows:
- Using thin pliers, remove the crankshaft oil seal from its seat. If it shows signs of damage, it will need to be replaced.
The crankshaft oil seal is removed using thin pliers
To disassemble the pump you will need a 5mm hex key.
The drive gear is located in the cover, and the driven gear is located in the housing
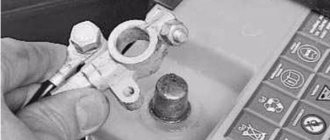
The valve plug is unscrewed with an 8mm hex key
The pressure reducing valve is pressed by a spring
Assessing the condition of oil pump elements
In order to understand whether the pump can be repaired, it is necessary to inspect all its elements and assess the degree of wear in the following order:
- Inspect the internal surfaces of the pump housing and cover. There should be no burrs, roughness or dents on them.
- Using a caliper, measure the diameter of the driven gear seat in the pump housing. It should not exceed 75.1 mm.
If the diameter of the seat is greater than 75.1 mm, the housing must be replaced
The segment thickness must be at least 3.4 mm
The thickness of the driven and driving gears should not be less than 7.42 and 7.45 mm
When free, the spring should have a length of 55.72 mm, when compressed - 31.7 mm
Removal, replacement, repair, installation of oil pump
Directory
Tags
Removing, replacing, installing anti-roll bar
Removing, replacing, installing timing belt
Removing, replacing, installing rear suspension shock absorber spring
Inspection, checking the steering
Removal, replacement, installation of the crankshaft and its bearings
Symptoms: pressure in the lubrication system constantly drops, grinding and noise when the oil pump operates.
Possible cause: oil pump is faulty.
Tools: socket set, wrench set, flathead screwdriver, tools for measuring gaps between parts.
1. Disconnect the cable from the negative terminal of the battery.
2. Remove oil from the engine oil sump.
Note. After dismantling the timing belt, do not turn the crankshaft and camshafts, otherwise the pistons may fall into the valves.
4. Remove the wiring harness connector from the crankshaft position sensor.
5. Remove the crankshaft pulley by prying it with two screwdrivers.
6. Remove the key from the groove in the crankshaft.
8. Unscrew and remove the fastening bolts of the clutch housing front cover using a 10mm wrench.
9. Remove the front cover of the clutch housing.
10. Unscrew and remove the sixteen engine oil sump mounting bolts using a 10mm socket.
11. With extreme care, separate the crankcase from the engine block using a screwdriver, then remove the crankcase.
12. Remove the engine oil pan gasket.
Note. During assembly, the gasket must be replaced with a new one, and the layer of sealing agent must be renewed; Before installing a new gasket, it is necessary to clean the mating surfaces of the crankcase and engine from dirt and residues of the old sealing agent.
13. Unscrew the three oil pickup mounting bolts using an 8-mm wrench.
14. Remove the oil receiver.
15. Clean the oil receiver mesh from dirt using white spirit. Replace the oil pickup if the screen is damaged or cannot be cleaned, otherwise the oil may catch fire.
16. Replace the oil pickup O-ring if it is torn, worn, or has lost its elasticity.
17. Unscrew and remove the six bolts securing the oil pump to the engine block, then remove it with a screwdriver (insert the screwdriver between the oil pump and the main bearing cap).
18. Remove the oil pump along with the gasket.
Note. When reassembling, install a new oil pump seal gasket. It is recommended to use only a branded gasket, otherwise the correct operation of the pump may be disrupted (this factor is due to the difference in the thickness of the gaskets from different manufacturers).
When installing a new or old rebuilt oil pump, consider the following details:
– before installing the pump, it is necessary to clean its mating surface and the mating surface of the engine cylinder block;
– fill the cavity of the oil pump with grease before installing it. This is necessary to ensure oil suction from the crankcase when the engine is first started;
– the oil pump drive gear must be correctly installed on the crankshaft: its protrusions must be aligned with the flat on the crankshaft;
– Apply a thin layer of engine oil to the working edge of the oil seal. When installing the oil pump, be very careful to thread the seal lip onto the crankshaft journal using a wooden stick. Only after all the above installation details have been completed should the pump mounting bolts be tightened.
To repair the oil pump, follow the instructions below:
19. Unscrew the crankshaft position sensor mounting bolt using a 10mm wrench.
20. Remove the sensor.
21. Unscrew the six oil pump cover mounting bolts using a 5mm hex key.
22. Lift the pump housing so that the cover pins are removed from the holes in the housing, then remove the pump housing from the cover (use two screwdrivers).
23. Remove the drive gear from the pump housing.
24. Remove the driven gear from the pump housing.
25. Unscrew the pressure reducing valve plug using an 8-point hex key. Remove the O-ring and inspect it for defects, and if found, replace the O-ring.
26. Remove the pressure reducing valve spring.
27. Tap the lid on a clean board to remove the pressure relief valve. If there is a problem with removing the valve, use a pointed wooden stick.
28. Inspect the oil pump cover. Signs of wear, scuffs and deep scratches in the contact area of the gears are not allowed; if they are present, the cover must be replaced.