Cars admin26.02.2020
Without thinking twice, I decided to do my first complete engine overhaul on my own. 1) you don’t need to take off the head, but the block is heavy and contagious, it is held on by 4 bolts to the box and on one pillow. Everything needs to be untwisted but not pulled out completely. 2) take out the pump and everything that will interfere with getting out. 3) we take out the block by pulling it off the box, it’s better to unscrew the entire pillow, 4) we disassemble the block into molecules, take out everything that can be taken out 5) wash the block and take it to the borer, I wanted to hand it over to Pretsezion in Volgograd, but they refused to accept it, because I generously bought in gasoline, and you can see the smell of it. 6) When taking the block, take the crankshaft and pistons with you, let them immediately check for runout, at the approval and tell you what to buy, and not rack your brains with a dipstick. 7) After boring, I got a block shiny inside in oil, but a little in the sand, who knows why, they took it off the cart while they were transporting it to the delivery point, but they did everything correctly, measuring everything down to the hundredths, they told me which pistons were needed, rings, main bearings, crescents , connecting rod bearings, I was too lazy to go somewhere, and three stores refused, either there are no main rings or there are no such rings, I bought them from boring companies - The piston was pressed for free on the hot pins - SM rings seem to be good according to reviews - copper crescents for the crankshaft. - a set of connecting rod and main liners totaling 5500 wooden ones, I think everything is divine, in Pretsezion they would have charged so much just for boring, they got greedy. The beginning of the assembly is as follows: thoroughly wash and blow everything, so that God forbid a grain of sand does not roll under the liner or into the piston. 1) install the crescents, put them in oil, they sculpt perfectly 2) lay out the main bearings, depending on the marks and where which one is installed, on the third pillow it should be different in some way, but mine is the same, so we smear it with oil and sculpt the lock to the lock. 3) install the crankshaft, touch it to see if it moves, see if the crescents have fallen out, correct it 4) install the liners in the cushions again, lock to lock, lubricate, and fix it on the crankshaft, lock to lock, depending on the marks, first one mark, second 2 marks etc. 5) pulled as far as I could and checked to see if the crankshaft was clamped, everything seemed to be smooth. 6) similarly insert the connecting rod bearings. 7) having struggled with pushing the piston without a mandrel, I realized I had to buy it, I bought it and stuck it in without any problems, the installation order is written on the rings, and we carefully look at where on the second compression ring it says top or top, and install it that way. Also, the arrow on the pistons should point towards the timing belt, otherwise you won’t go far and it will immediately bend. we lubricate the mandrel, insert the piston, and carefully hammer it in, I also tightened everything like crazy, I don’t know whether it’s bad or good, there’s no torque wrench and I don’t want to give away 2500. 9) install the oil pump and crankshaft oil seal holder. 10) install the clutch and basket; you will need a mandrel to install the disc evenly, otherwise you won’t be able to fit the block in. 11) install the oil receiver, crankcase, and insert the block, I won’t describe the process too intimately, many spells were cast, but it stood up. We are glad that we have!
(I made a blower from a wheel, pump one into one and blow from the other) Ask if you don’t understand, I’ll try to explain.
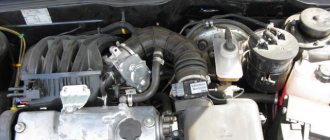
Gasoline engine on the "eight"
The appearance of the VAZ 21083 gasoline engine is directly related to the low quality of domestic rubber products. The fact is that at the very beginning of production, the Lada Samara family of cars was equipped with a VAZ 2108 engine, the first domestic power unit designed specifically for transverse placement under the hood of a front-wheel drive car.
However, the VAZ 2108 engine had an unpleasant feature, also characteristic of foreign engines with a timing belt drive. When the timing belt breaks, the engine pistons meet the cylinder head valves, and the latter inevitably bend, which leads to expensive repairs of the VAZ 2108 engine. On foreign cars, such a breakdown occurred extremely rarely due to the high reliability of timing belts. However, in the first Samaras, the breakage of a low-quality belt was such a frequent occurrence that it was necessary to urgently modify the engine with the help of specialists from German automakers. As a result, a new engine appeared, which became the progenitor of a whole family of power units. Assembling a VAZ 21083 engine is not a difficult task; it can be completed without the help of specialists.
Installing a crankshaft on a VAZ
Overhaul of a VAZ 21083 engine usually consists of disassembling the unit, troubleshooting parts, boring the crankshaft and cylinders, and assembling the engine. Disassembling the engine is a simple matter, troubleshooting and boring are also simple procedures. But you need to assemble the motor extremely carefully, carefully following the instructions.
Let's start by installing the crankshaft into the cylinder block. Remember: cylinder and main bearing numbers are counted from right to left as the vehicle moves. That is, 1 cylinder is located near the pump and timing drive, and 4 is located near the clutch and gearbox.
- Turn the block upside down.
- We place the main bearing shells with the locking protrusions into the grooves of the beds. In the 3rd bed (middle) we put the liner without a groove, and in the remaining 4 - with grooves.
- Lubricate the liners with engine oil.
- Lubricate the crankshaft journals with oil and place it in bed, with the flywheel flange facing the 4th cylinder.
- We insert thrust half rings into the grooves of the middle main bearing. Each half-ring has 2 notches on one side. Using these sides we install the half rings to the crankshaft cheeks. We place the white half-ring in front (on the pulley side), and the yellow half-ring in the back (on the flywheel side).
- We rotate the half rings so that their tips are flush with the ends of the bed.
- We place liners without grooves in the main bearing caps, with locking protrusions in the grooves, and lubricate them.
- We place the main bearing caps on their corresponding beds with notches in the direction of mounting the generator. 1 cover is marked with one notch, 2 - two notches and 2 holes, 3 - three, 4 - four, 5 - two.
- We secure the covers with bolts.
- Tighten the cover bolts in the following sequence - first cover bolts 3, then 2 and 4, and finally cover bolts 1 and 5.
- After this, we rotate the shaft; if it jams, we look for the cause and eliminate it. If it doesn’t jam, check the axial clearance of the crankshaft; if it is more than 0.26 mm, replace the half rings with thicker ones. If the gap is normal, we proceed to install the oil seals and oil pump.
Engine assembly
The engine begins to be assembled by installing the main bearings and crankshaft. Nowadays you can come across liners in different configurations, in the photo the liners are not very well equipped as there are no holes on the liner for the central crankshaft journal, and since this journal does not have a through hole, the lower liner will be starved of oil and this leads to faster wear of the crankshaft journal . So don’t be lazy and drill a couple of holes as shown in the photo below.
Photo. Correct installation of liners in the VAZ 21083 engine block.
Before installing the liners in the bed, carefully wipe the bed with a rag so that nothing gets under the liner; debris under the liner can lead to pinching of the crankshaft and poor heat transfer of the liner to the engine block. Install the half rings immediately as shown in the figure, lubricate the inserts with oil, and also lubricate the half rings inside with oil, then they will not fall out of their places.
Photo. The arrow shows the thrust half-rings of the VAZ 21083 engine
After installing the crankshaft into the block, be sure to check the longitudinal movement of the crankshaft, this can be done with a screwdriver as shown in the photo below, insert it from different sides, if there is movement of the crankshaft, then repair half rings are needed. Here you can already select one repair and the other standard, or lightly grind the half ring on a stone or sandpaper spread on a flat surface. Try to ensure that there is no longitudinal movement of the crankshaft; if there is longitudinal movement, the half rings may fall out during engine operation.
Photo. Checking the longitudinal movement of the crankshaft.
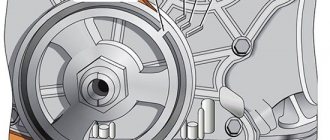
Now you need to put the crankshaft cushions in their places, each cushion must return to its place, you cannot install a cushion from another engine as it will be slightly different in the gap and can either clamp or give way. The photo below shows how to install the pillow correctly, note that the lock of the liner is placed next to the lock of another liner, the photo shows the installation of the third pillow with drilled holes. It doesn’t matter whether the holes are beautifully drilled or not, what is important is that oil will flow through them to the crankshaft journal.
Photo. Correct installation of the crankshaft cushion.
Immediately place all the cushions on the crankshaft but do not tighten, tighten the bolts. Now start tightening one cushion at a time, I always start with the third one, tighten it until the crankshaft is tight, turn it with a wrench as shown in the photo below. And so after each tightened pillow, try to rotate the crankshaft. You need to tighten the pillows well, but do not overdo it, as you can break the bolts. You can read more about the crankshaft in the article Repair of the crankshaft (crankshaft).
Photo. Tightening the crankshaft cushions.
After installing the crankshaft, we begin installing the pistons. The photo below shows how the piston should be installed correctly in the cylinder. You can read more in the article Changing pistons on a VAZ 08-09.
Photo. Correct installation of the piston in the block, the arrow shows the liner lock on the connecting rod.
Before installing the piston into the cylinder, be sure to lubricate the piston rings with oil and do not forget to lubricate the connecting rod bearings with oil.
Photo. Installing the piston into the cylinder using a homemade clamp, which I grasp one ring at a time, insert the oil scraper, and insert the next one with a light blow of the hand.
The pistons and connecting rods are in place, we install the rear cover, but do not forget to replace the old oil seal with a new one, I do not put a gasket under this cover, I apply sealant.
Photo. Rear engine cover of VAZ 2108.
Before installing the flywheel, use a chisel to make a clearer groove along the factory mark, since the factory mark is very thin and can be difficult to find on the flywheel when it is in the engine.
Photo. Mark on the flywheel of the VAZ 21083 engine
The correct way to install the flywheel is to place the fourth piston at the very top as shown in the photo, the mark should be at the top.
Photo. Correctly installed flywheel on a VAZ 21083 engine
Be sure to lubricate the bolt threads with sealant when tightening the flywheel, since in the crankshaft there are through threads that are not coated with sealant and a bolt that is not coated with sealant can leak oil into the clutch disc.
Photo. The bolt is coated with sealant when tightening the flywheel.
To easily and firmly tighten the flywheel, you can use the method shown in the photo below. Block the connecting rod with the pipe and tighten the bolts with the head.
Photo. Flywheel tightening.
After installing the flywheel, you need to install the clutch disc correctly; if you put it in the opposite direction, the clutch will not work. In the photo below you see the clutch disc and basket, the arrow shows the protruding washer of the clutch disc, it should fit into the basket. As shown in the photo, this is how it should be installed; the input shaft from the classic box is ideal as a clutch disk centering mandrel.
Photo. Correct installation of the clutch disc.
Photo. A twisted basket with a centering shaft, after which this shaft is pulled out, the shaft gives precise alignment of the clutch disc, without a centering shaft it is very difficult to correctly center the clutch disc. And this may prevent you from putting the engine on the box, since the box shaft will rest against the clutch disc.
Photo. Shaft in the clutch disc.
Now you can install the front cover (oil pump), do not forget to replace the oil seal with a new one, touch the oil pump to the crankshaft groove. I don’t put a gasket under this cover; I use sealants. Install the timing belt drive key and gear. Screw on the front crankshaft pulley.
Photo. Tightening the front crankshaft pulley.
Before installing the oil receiver, be sure to coat the tip of the tube with sealant, this will prevent air from leaking into the oil pump; if this is not done, the old rubber gasket will poison the air, which will lead to poor oil pressure.
Installation of oil seals and oil pump
The 21083 engine lubrication system consists of an oil pump, oil receiver, filter and channels. After disassembling the engine, all channels must be washed with solvent and blown with compressed air. The oil pump should be installed together with the crankshaft seals, and the oil receiver should be installed after installing the ShPG and flywheel.
Installation procedure for seals and pump.
- Using a thick copper or brass spacer and a hammer, drive the rear oil seal into the holder all the way.
- Using lithol or other grease, glue the gasket to the other side of the holder.
- Lubricate the inner edge of the rear oil seal and the crankshaft flange with engine oil.
- We put the oil seal assembly with the holder on the flange; to do this, carefully tuck the inner edge of the oil seal onto the flange using a sharp and soft wooden stick.
Replacing the oil pump seal
- After this, we slowly move the holder along the flange all the way to the cylinder block, secure it with bolts and align it so that its edge completely coincides with the edge of the block. Only after this do we tighten all the bolts completely.
- Just like the rear one, we hammer the front crankshaft oil seal into the oil pump hole.
- Lubricate the inner edge of the oil seal and pump gears with oil. To ensure uniform lubrication, turn the gears with your finger.
- Use lithol or any other consistency to glue the gasket to the oil pump.
- We rotate the drive gear so that the protrusions on it coincide with the cuts on the front of the crankshaft.
- We put the oil pump on the shaft, use a sharp soft wooden stick to tuck the lip of the oil seal onto the crankshaft journal.
- Just like the holder, we move the oil pump all the way to the block, secure it with bolts, align the edges and tighten the bolts completely.
Return to contents
Installation of VAZ 21083 engine
Photo. Box boot VAZ 21083
You can immediately lubricate the release bearing with oil, preferably transmission oil or mixed with lithol; it can be pressed with a syringe through the slot shown in the photo below.
Photo. Release bearing of VAZ 21083 engine.
We install the engine as we removed it through the bottom without the head; this can be easily done at home with two people. To do this, pass a belt or rope under the engine, place a thick rag on the front of the car and using a pipe or crowbar you can effortlessly pull the engine onto the box, as shown in the photo below. Bolt the box, lift the engine, screw on the mount, the engine is installed, all that remains is to install the head.
Photo. Installing the VAZ 21083 engine through the bottom.
Installing the connecting rod and piston group
The connecting rod and piston group (CPG) must be installed as an assembly. It is not recommended to press the piston pin into the connecting rod head without special tools. This procedure is best left to professionals.
To install the ShPG, you need a steel mandrel in the shape of a ring. The height of the ring is 2-3 cm, the diameter of the hole is slightly larger than the diameter of the cylinder. The pistons must be mounted in such a way that the arrow on their bottom (the part adjacent to the valves) is turned towards the oil pump. The number of the connecting rod and piston must correspond to the number of the cylinder. Before installation, you need to separate the locks of the oil scraper and compression rings at an angle of 120 degrees.
- Turn the block over.
- We wipe the cylinder walls and crankpins with a dry cloth.
- Thoroughly lubricate the cylinder walls, the side surfaces of the pistons and the inside of the mandrel with oil.
- We place the mandrel on the cylinder and insert the piston and connecting rod assembly through it. We push the piston into the cylinder using a round wooden stick (hammer handle).
- Place the liner in the connecting rod cover and lubricate it with oil.
- We lay the block on its side and install the connecting rod cap so that the cylinder number on it and on the connecting rod are on the same side. We secure the cover with nuts.
- In the same way we mount the remaining pistons and connecting rods. After this, turn the cylinder block upside down and tighten all 8 nuts securing the connecting rod caps.
If you don't have a mandrel, you can cut it yourself from a piece of thick-walled steel pipe.
How to replace piston rings yourself
Of course, replacing rings is a rather labor-intensive procedure. It requires accuracy and certain skills, but by and large there is nothing complicated about it (unless you remove the engine). To do this you need:
- remove the cylinder head, following all the recommendations of the car manufacturer;
- drain the oil, remove the flywheel protection and engine sump;
- remove the oil intake;
- Having turned the crankshaft, set the desired piston to bottom dead center;
- unscrew the connecting rod cover and remove it;
- pull the piston along with the connecting rod out of the cylinder, pushing it upward with a wooden strip;
- clean the piston from carbon deposits. Based on its marking, determine the piston class, purchase a new set of piston rings corresponding to it;
- Before installation, each new ring is first inserted into the cylinder to check the clearance in the lock. The gap must correspond to the value specified in the vehicle's operating manual. If it is less than necessary, then the ends of the lock are carefully filed with a file;
- The pistons are thoroughly cleaned of carbon deposits. The holes intended for draining oil are also cleaned with a suitable wooden stick. The cleaned grooves are lubricated with clean engine oil;
- The rings are put on starting with the oil scraper. On one side of the ring is marked “TOP” (up), which indicates how it should be installed in the piston. The locks must be installed at 120 degrees relative to each other. This will prevent gases from penetrating through them. You cannot put the rings on in a “twist”; such installation may be accompanied by the appearance of microcracks, which will lead to their breakage;
- Reassemble in the reverse order, simultaneously cleaning everything with a clean rag and lubricating it with fresh engine oil. Pistons must be installed exactly in the cylinders from which they were removed. Also, the connecting rod caps with connecting rod bearings must be put on the same connecting rods from which they were removed.
If the wear of the connecting rod bearings allows them to be reused, then there is no need to replace them, since this will require boring the crankshaft journals. You won’t be able to do this kind of work on your own without experience.
Tools required for work
To replace the rings you will need:
- sets of open-end and ring wrenches, as well as wrenches with an extension and heads with a nominal value of 10 – 19;
- torque wrench;
- specialist. crimp (mandrel).
In addition, you will need an oil-resistant sealant. It will come in handy when installing the oil pan and valve cover gaskets.
And there seems to be nothing complicated in the steps listed above, if the replacement is made without removing the engine from the car. However, there are nuances without which an engine with new rings will not work for a long time. When the cylinder reaches the extreme stage of wear, a “step” is formed on the surface of its mirror. Having hit it, the new ring will either break immediately or get a crack, which will ultimately lead to its failure. In addition, the grooves of the old piston also have wear, so grinding new rings to the cylinder will be difficult or completely impossible. This means that it is better to entrust the troubleshooting of the piston group and cylinders to professionals.
Boring and honing of cylinders should also be carried out by qualified specialists. In addition, this work cannot be done without removing the engine. Therefore, before getting down to business, you should think carefully and realistically assess your strengths and capabilities. So that the result of the repair would not be the replacement of the piston group as a whole, or even worse, it would not be necessary to submit the engine for a major overhaul.
Assembling the flywheel, oil receiver and pump
It is important to install the flywheel so that the notch on it is located against the connecting rod cap 4, and the ring gear is adjacent to the clutch.
- Apply a thin layer of auto sealant to the bolts securing the crankshaft.
- We put the flywheel and its washer on the shaft and tighten the bolts securing it until it stops.
That's it, the flywheel is installed. We mount the oil receiver and engine crankcase.
- We change the seal ring of the oil receiver.
- Lubricate the new ring with oil.
- We put the oil receiver in its proper place and screw it to the oil pump.
- We fasten the part with 2 bolts to the second main bearing.
- Tighten the bolts.
- We cut off the excess parts of the oil seal holder and oil pump gaskets.
- Apply consistency to the lower edges of the block and glue the crankcase gasket.
- Carefully put the crankcase in place so as not to move the gasket.
- We secure the crankcase with bolts around the perimeter.
- We tighten all the bolts one by one.
Now you can rest, since the assembly is almost complete. And after the break, you need to return the pump to its place.
- We place the gasket on the pump and lubricate it with lithol or other grease.
- We install the pump with the markings facing up and screw the part to the block with 2 bolts.
That's all, the cylinder block is assembled. After this, you need to install the head, clutch, pulleys, timing covers, generator and other attachments on it.
Above are videos about dismantling and assembling the engine, which should be studied before carrying out work.
Determining motor faults
The compact, small-sized engine in the front-wheel drive VAZ 2108 is located transversely in the engine compartment. The gearbox is also located here, which simplifies access to repairing the main components of the car. Criteria by which motor malfunctions are determined:
- The engine does not want to start.
- It works unstably and may stall at idle.
- No full power during operation.
- A knocking sound is heard from the bearings located on the crankshaft.
- When the throttle valves are opened sharply, a knocking sound of the connecting rod bearings is heard when the engine is idling.
- The appearance of “beating” of the piston in the cylinder, which is accompanied by a muffled knock of the piston.
- Exhaust and intake valves are knocking.
- When idling, the oil pressure is insufficient.
- High oil consumption.
- Increased fuel consumption.
- The engine gets very hot.
- The coolant level in the expansion tank drops quickly.
If there is any malfunction, the VAZ 2108 engine requires repair - periodic or major.
Periodic engine repair
Constant maintenance of the engine consists of maintaining all its components and parts in good condition. This will postpone major engine repairs for the VAZ 21083, which means it will reduce the cost of operating the vehicle. These include:
- Timely replacement of filters.
- Change of oil.
- Checking the pressure in the cylinders will give an idea of the condition of the piston system
- Make sure the coolant is at the correct level.
Engine overhaul
Unstable engine operation, the occurrence of extraneous noise, knocking, high fuel consumption, and a decrease in power may indicate the need for a major engine overhaul. On a VAZ 2108, engine overhaul includes restoring the technical characteristics of the unit to the indicators indicated in the operating instructions. Overhaul of the VAZ 2108 engine is carried out after removal from the vehicle and complete disassembly of the unit.
Removing the engine from the car
- The battery is removed.
- Oil and cooling fluid are drained from the engine crankcase from the system.
Tip: The engine must be removed together with the gearbox. You need to lower it down from the engine compartment. It is more convenient to carry out work on a lift.
- The bolts are unscrewed and the engine crankcase protection is removed.
- The exhaust pipe of the muffler is disconnected.
- The air filter is removed.
- The vacuum hose intended for the brake booster is disconnected from the inlet pipe of the device.
- The ground wire is disconnected from the clutch housing.
- The hoses are disconnected from the thermostat.
- The high-voltage wire is released from the distributor cover.
- The block with low-voltage wires is disconnected.
- The hose for supplying fuel from the fuel pump is released.
- The cable end attached to the clutch release lever is removed.
- The block with the wire is disconnected from the traction starter relay.
- The block with the wire is disconnected from the generator output.
- The wires are disconnected from the carburetor valve.
- The hose for return drainage from the fuel carburetor is removed from the clamp.
- The choke rod is released from its control lever.
- The air damper drive cable is disconnected.
- The clamp holding the accelerator drive cable is removed from the damper drive sector.
- The air spring for the throttle valve drive is removed. The drive cable is removed from the latter sector.
- The bracket holding the accelerator drive cable is disconnected from the valve cover.
- The sensor that controls the coolant temperature is released from the connection.
- The oil pressure sensor is turned off.
- The heater inlet and outlet hoses are disconnected.
- The drive rod is released from the joint tip to change gears.
- The speedometer turns off.
- The switches for the vehicle's reverse lights are disconnected on the gearbox.
- The right and left braces are moved to the sides so that they do not interfere with removing the engine from the car.
- The cotter pin is pulled out, securing the nut holding the ball joint of the steering linkage and the swing arm.
- The nut holding the steering rod ball joint is unscrewed.
- Using a special puller, the steering link joint pin is pressed out of the strut lever.
- The ball joint for the suspension arm is disconnected from the steering knuckle.
- Using a pry bar, the shank of the inner CV joint of the gearbox drive shaft is pressed out and moved to the side.
- Having secured the side gear from turning, the second CV joint is disconnected like the first.
- The engine clings to the frames and the hoist cables are pulled as shown in the photo.
Slinging a VAZ 2108 car engine
- The nuts securing the rear engine mount to the body are unscrewed.
- By slightly lifting the engine, remove the bolt holding the right front support of the unit.
- The left front support is released in the same way.
- The engine is lowered onto stands, the car is raised and the engine is pulled out from under it.
Tip: Before lowering the engine, make sure that all wires and hoses are disconnected from it.
Overhaul of the VAZ 21083 engine begins with disassembling it and drawing up a defect list. After a thorough examination of all parts and measurements of the dimensions of the mating parts, the stages of repair and its cost are determined. Parts that can be repaired are subject to restoration, those that have become unusable are replaced with new ones. According to the rules for the VAZ 2108, major repairs are carried out after 150,000 kilometers of the vehicle. Repairs begin with replacing piston rings and pistons and boring the cylinder block. The crankshaft journal is ground. A visual inspection of the starter, generator, and ignition distributor is carried out. In the cooling system, hoses, thermostat, drive belts and pump are replaced. The radiator is washed and cleaned.