Today, friends, I will share with you some Lifehack)
There will be only one picture, I think it will be clear to everyone.
Backstory:
When I bought the BU 2114, its gas tank flap was broken... that is, it did not close, but dangled like snot... when removing it, it turned out that The lid itself (not from the hinge)
broke off a mustache that was responsible for attracting and holding the lid in the closed position... I didn’t want to look for a new lid, and I didn’t want to repaint it later either)
LifeHack was invented
A powerful magnet
was uprooted from the computer's Hard Drive , the magnet was stuck to the lid with double-sided tape.
Next, I unscrewed the rubber band from the body, found a bolt
the size of the bolt, screwed it in there, screwed it in like a native one, you can adjust the lid closing protrusion.
One of the first advantages is that the operation of the lid has been restored
The second plus is that it
stopped rattling
(on the 2109 there was such a rattling noise, you unscrew the rubber band and the lid sticks out a lot) And the third plus is that the lid is pulled so tightly that you might think that the hatch is somehow
closed
from the inside! That is, I make a lot of effort to open it, night street trekkers on scooters (who are always draining gas, or trying to drain it) will be a little puzzled (although this has not been noticed in my area))))
Maybe this lifehack will help someone) Good luck everyone!
The fuel tank is one of the most reliable components of a car. However, it is subject to wear and tear over long periods of use. This manifests itself in the appearance of mechanical damage and corrosion and requires repair.
Fuel tank design
The main function of a fuel tank is to store a certain amount of fuel. At the same time, everything must be organized so that the likelihood of a fire hazard is minimized.
On VAZ cars the fuel tank is located under the rear seats. Due to this placement, in the event of serious accidents and car overturns, the tank in most cases remains undamaged. VAZ fuel tanks are made of leaded steel sheets. Thanks to a thin layer of lead that protects against corrosion, the service life of the tank is significantly increased. The outside of the fuel tank is covered with dark enamel.
The fuel tank, covered with dark enamel, is reliably protected from corrosion
The fuel storage volume of the VAZ 2108 and other similar models is 43 liters. This takes into account the reserve, but it is not recommended to fill the tank to the brim. You should always leave a free volume of about four liters. It is especially important to do this in the summer, since the fuel expands as the temperature rises. If the tank is filled to the brim, then after swelling it may simply burst. The volume of the VAZ gas tank is designed in such a way that the autonomous mileage is enough for 500 kilometers, and this is considered a normal road segment in modern conditions.
The tank is securely fixed to the car body using flexible and durable plate-type clamps. Rubber gaskets must be placed under the clamps to ensure a tighter connection.
The tank mounting plates are very flexible and durable
Gasoline is poured through the neck on the right (in the direction of travel) rear side of the body. It is closed with a screw cap.
The neck of the VAZ 2115 tank is closed with a tight lid
Main elements of the fuel tank
The neck is connected to the tank cavity through the filler hose. The other two tubes are integrated with a seven-liter separator installed outside the tank and designed to capture gasoline vapors. As a result of wear, the separator may split along the seam and gasoline will begin to leak out. It can be replaced without dismantling the tank. Moreover, you can temporarily cover the separator seam with a gasoline-resistant sealant.
The separator tank holds seven liters of fuel
In order not to remove the separator (it is necessary to dismantle the bumper and filler pipe), experienced car owners simply disconnect the hoses of the element and cut it out with metal scissors. In place of the separator, a fine fuel injection filter is installed, which performs similar functions.
Instead of a separator, you can install a fine fuel filter
Some separators are equipped with a double-acting valve to minimize fuel leakage. The valve admits and releases gasoline vapor. Once in the tank, the vapors condense and thereby reduce fuel consumption.
The fuel system of the VAZ 2112 car is quite simple
The tank of VAZ cars produced after 2000 is equipped with a fuel level sensor (FLS), which regulates the amount of gasoline in the tank and sends data to the electronic control unit (ECU). The sensor is fixed through a rubber gasket and can be easily removed through the rear seat.
The fuel level sensor is installed on all VAZ models produced after 2000
VAZ 2114 replacement of fuel hoses. It is necessary to replace the fuel pipe of the VAZ 2115 in the figure
After washing the gas tank from dirt, we also wash the dirty filter. Gas tank of the VAZ 2109 (bottom front view). “1” the fuel tank itself, “2” the fuel drain line, “3” the fuel supply line.
VAZ 21093, 1.5, 1995. Hello everyone! I removed the gas tank, washed it with plain water, and finally doused it with boiling water. Are there any recommendations? and how to dry the gas tank?2109. My grandfather from the car depot taught me how to rinse. You pour water and sand into the tank, then it’s all a chore and a chore. Find out how to rinse the gas tank. Several ways to clean a gas tank from rust and Instructions for removing a gas tank using the example of a VAZ 2106. High-quality flushing of a gas tank: methods - Then remove the fuel tank of the VAZ 2109 by unscrewing the nuts and holding the gas tank with your hand.4. Rinse the gas tank, or at least remove and blow out the gas inlet. 5. If there is absolutely nothing and nothing to do, remove the inlet in the carburetor and blow it out. Community forum “VAZ: Repair and Improvement” on DRIVE2. I want to wash the tank. I’m tired of changing the fuel filter every week. Tell me who has already encountered this, how to do it correctly and what is the best way to wash it? To flush the gas tank, use Lobomid, MS or ML detergents. Then, to remove any remaining detergent, rinse and steam the gas tank. HELPFUL ADVICE It is recommended to remove the gas tank on VAZ 2108, VAZ 2109, VAZ 21099 cars with an assistant. On domestic VAZ 2110, 2109 it is installed at the bottom, on the VAZ 2106 or 2107 on the side, and on foreign cars again at the bottom. We must not lose sight of the change of seasons, when during the transitional spring-autumn period the tank needs to be cleaned and washed. There are several ways to flush the fuel tank. Flushing with electrolyte. The Nissan gas tank flap lock can be installed on a VAZ. To completely remove their residues from the surface, it is necessary to rinse the tank with a stream of very hot water. Removing and replacing the gas tank. We carried out the procedure for this procedure on a VAZ 2110 car; on other cars (2107, 2109-2114) the procedure was not - Before cleaning, you should drain the fuel from the tank.
The fuel tank of VAZ 2108, 2109, 21099 cars does not have a drain hole, so to do this, remove it from the fuel intake and thoroughly clean it with a toothbrush soaked in acetone. Wash with gasoline. Cleaning and flushing the gas tank. The gas tank can be cleaned and washed only after it has been completely dismantled. Replacing the gas tank is thus carried out in two planes - under the car and in the cabin. The design of the VAZ 2108, 2109, 2114 and 2115 does not allow the work to be done. Repair manual for the VAZ 2108, 2109, 2114, 2115. Remove fuel level sensor 9 from the tank. To remove dirt and deposits, wash the tank with detergents (Lobomid, ML, MS). After studying the repair manual and this algorithm, there should be no questions left about how to flush the carburetor of a VAZ 2109. Repeat the procedure after 5-7 thousand km. After first use, clean the gas tank as a preventative measure. The fuel tank on the VAZ 2109-2108 is located under the bottom of the car, and is located across the body at the rear. It is not necessary to replace the gas tank very often, since it is quite problematic to damage it, even though it is not protected by anything. After removing the gas tank to wash it, you will need to drain all the sediment from it and then fill it and thereby wash it with clean gasoline. Replacing the gas tank is thus carried out in two planes - under the car and in the cabin. Design of VAZ 2108, 2109, 2114 To flush the gas tank, use Lobomid, MS or ML detergents. Then, to remove any remaining detergent, rinse and steam the gas tank. HELPFUL ADVICE It is recommended to remove the gas tank on VAZ 2108, VAZ 2109, VAZ 21099 cars with an assistant.
Gas tank capacity Lada X-Ray
A standard drive holds 50-54 liters of fuel. In this case, the total capacity is up to 61 liters. fuel. This difference is explained by the thermal expansion of gasoline - if you fill the container up to the cap, there is a risk of damage to the lines or leakage of the mixture through the bleed holes. Thus, it is strictly not recommended to fill the mixture after shooting the refueling nozzle - this violates the factory instructions.
Gas tank reserve
With a standard container capacity, the storage tank is designed for 6-7 liters of fuel. Depending on the engine settings and driving mode, you can drive up to 100 km with the “red light” on. This reserve is enough for safe driving and finding the nearest gas station even in highway conditions.
Why is a subwoofer needed and what types of this speaker are known?
Whatever the subwoofer, its role is predetermined - it only complements the existing speaker system and is not needed for full bass reproduction. This means that without a subwoofer, some bass will play normally. For example, this applies to low frequencies of 80-200 Hz.
Installing a subwoofer in a VAZ 2114
There are two main types of subs: in a box and without it.
Let's start with case models:
- They are delivered in a box, the size (volume) of which may vary;
- In turn, such subwoofers can be either active or passive (see Which subwoofer is better: consider active or passive). The former initially have a built-in power amplifier along with a frequency divider or crossover, as it is also called. Subwoofer passive has neither an amplifier nor a crossover, but costs several times less than the first;
- The second type of subs comes without a housing. Such models crash into the rear parcel shelf or seat of the car.
Subwoofer in the wing of a VAZ 2114
For hatchbacks, such as the VAZ 2114, it is recommended to install an active subwoofer (see The best active subwoofers for cars and their review), since the shelf above the trunk will not prevent bass from penetrating into the body. The same applies to station wagons, but for sedans an open speaker embedded in the rear seat is more suitable.
How to remove the gas tank on a Lada X Ray
Dismantling the unit is necessary for washing or repairing it. The process does not require deep knowledge or the presence of a highly specialized instrument, which makes it possible to perform the operation independently. The sequence of actions is as follows:
- Put the car on the lift.
- Release the pressure inside the pressure lines. To do this, you need to turn off the power to the fuel pump and start the engine until the fuel runs out (stops).
- Fold down the rear seats to access the pump.
- Disconnect the power supply from the battery and loosen the mounting bolts. Then you can remove the unit from the cylinder.
- Open the filler flap and unscrew the mounting flange screws (2 pieces in total).
- Remove the rear wheel.
- At the top under the arch, near the filler pipe, there is a body weight mount. You need to unscrew it with head No. 10 and disconnect the wire from the stud.
- Next we go down. 5 nuts and 1 bolt of the pipeline protective casing are unscrewed and the part is removed.
- Using a flat-head screwdriver and pliers, disconnect the fastening clips of the TB thermal protection fasteners.
- Remove the foil screen from the seat.
- Remove the exhaust system from the brackets and move it to the left side in the direction of travel of the car.
- Next, you need to disconnect the fuel supply and steam return pipes from the absorber. To do this, the latches are pressed in and the tubes are pulled off the fittings.
- The next step is to remove the handbrake line clamps (you can simply move the lines apart).
- The suspension bolts are unscrewed with a wrench and the tank is removed from the car.
The assembly of the structure is performed in the reverse order.
Draining gasoline from a VAZ-2114 gas tank: all methods
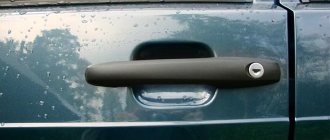
Open the hatch, unscrew the lid and let's go!
Draining fuel from the tank of domestic cars is much easier than from a foreign-made vehicle. But draining gasoline from a VAZ-2114 car is also not an easy task. One way is to remove the tank from the car , but this will take more time and effort. But you can do it in an easy way.
Method without removing the tank
Draining gasoline from the gas tank
The process takes a little time, but you need some skill and the necessary tools. First you need to get a hose , the length of which will correspond, as well as a special container for gasoline. Next, you need a pump or some analogue or a regular home vacuum cleaner.
Once all the tools are at hand, you need to unscrew the tank cap and insert the hose there. It is recommended to check the fuel level in the tank. This can be done either with a regular stick, or by inserting the hose into the tank and then removing it, thereby checking what level the gasoline is at. We lower the hose as low as possible to remove all the fuel from the tank .
Gas tank protection for Lada X Ray
To increase the safety of the machine in the event of frequent off-road trips or operation on rough terrain, the manufacturer has provided protection for the engine crankcase. The structural element can withstand light impacts, shaking or contact with stones. However, the fuel tank and lines remain open, which can cause breakdown or rupture of the pressure pipe. The factory installed a standard boot on the hoses, but the quality of the design raises questions. In this regard, buyers resort to modifying the bottom of the car. You can buy Lada X-Ray gas tank protection for a price starting from 10,000 rubles. The kit includes the necessary fasteners. You can also replace the standard fuel line casing with a reinforced version. The amplifier installation procedure is as follows:
- Drive the car onto a viewing hole or lift.
- Prepare the necessary bolts and fasteners.
- Using a socket, unscrew the standard suspension bolt of the front part of the tank and attach the additional angle that comes with the protection to it.
- Using a knife, remove part of the heat shield to loosen the second mounting bolt. Screw the next bracket onto it.
- Attach the module to the rear axle of the gas tank suspension through a special bushing.
- Using the supplied bolts, tighten the shield to the installed fasteners and fully tighten the bolts.
The reinforced fuel line module is installed using standard fasteners with original bolts. The design shape is similar to the factory one, which greatly simplifies the installation procedure.
The capacity of the factory tank is sufficient for full use of the vehicle for its intended purpose. The standard design of highways does not imply reliable protection of elements from mechanical damage, but the defect can be quickly eliminated by installing attachments.
How to drain gasoline from a VAZ 2114 tank, some tips
Motorists whose cars have been damaged by low-quality gasoline need to do everything possible to get their car back into working condition. How to drain gasoline from a VAZ 2114? What do you need to know about this difficult process?
Why drain gasoline?
It is necessary to drain gasoline if the car owner previously filled the tank with low-quality fuel. To eliminate any negative consequences associated with the destructive influence of such gasoline, it is necessary to drain all the remaining fuel in the tank.
Poor fuel quality is far from the only reason why motorists waste gasoline. It happens that at gas stations there are cases of topping up diesel fuel. It’s good if the car owner finds out about this quickly enough. Otherwise, he will have to flush not only the tank, but also the fuel pump.
Some car enthusiasts dump fuel in order to make big money from it. For example, a driver can refuel a car in another country at a low price, and then return to Russia and sell the fuel, making a profit. Naturally, we are not considering this option, but are talking only about those cases when it is necessary to drain gasoline in order for your car to continue to serve you faithfully.
Is it possible to drain gasoline from a VAZ 2114 with your own hands?
You can drain gasoline without involving specialists. Every car enthusiast can do this. All you need is to strictly follow the instructions presented below.
Particular care should be taken because gasoline is highly flammable and can cause serious damage not only to your car, but also to your health. It is advisable to carry out all gas tank cleaning procedures outdoors.
You will also need the help of another person. This is due to safety precautions. If a fire occurs, his help may prove invaluable.
How to drain gasoline from a VAZ 2114 tank
On the 2114 model, pumping out fuel is not as easy as it might seem at first glance. The VAZ 2114 is a modern car, so it has a special design for the tank filler neck.
It will not be possible to pump out gasoline even with the help of a dropper tube. It is for this reason that many ways have been invented to drain gasoline from this model. We will consider those that are suitable for ordinary car enthusiasts.
Ways to drain gasoline
In some situations it is necessary to completely dry the tank. The reason for this is that condensation may form in the tank. It is able to settle on the walls, and then mix with gasoline and settle to the very bottom.
This can pose a serious threat to the fuel system, so if too much sediment accumulates, the sediment must be removed somehow. To do this, you can remove the tank. This will not be easy to do. Some car enthusiasts who have never removed the tank will have to spend a couple of hours. In addition, to remove the tank you will need a lift or at least an inspection hole.
If you think that you can cope with this difficult procedure, then first of all you should remove the filler pipe from the tank. In this case, there will be very little mixture of gasoline and condensate left in it. It should only be drained when the gas tank is completely removed.
- Once the tank is removed, you will need to give it a good flush with clean gasoline. Instead of gasoline, you can use a mixture of alcohol and gasoline.
- Once this is done, all you have to do is dry out the gas tank and reinstall it on the car. This method guarantees complete removal of any traces of fuel.
Draining gasoline without having to remove the tank
If you do not have the time and energy to dismantle the gas tank, a standard fuel pump can help you. In the 2114 model it can be found in the tank itself.
- To do this, you will need to find a hose that has a suitable diameter so that it can be placed on a special fuel rail fixture.
- After this, you will need to unscrew the nipple from the fitting, and then put on the hose and apply 12 V to the fuel pump.
- Now you can start draining the fuel into a previously prepared container.
Important information! One of the undesirable consequences of using this method is clogging of the fuel line, as well as the cleaning filter and fuel pump.
Removing gasoline from the car interior
This method cannot guarantee complete removal of fuel, but it is quite effective.