Handbrake light (LR) - an indicator on the dashboard in the form of an exclamation mark with curved lines on the sides (sometimes there is the inscription Brake). Indicates that the car is on the parking brake (ST).
Possible causes of the problem:
the harnesses have become frayed as a result of long-term use;
failure of the ST cable under the influence of external factors;
frequent emergency braking.
The optimal solution would be to replace the worn part.
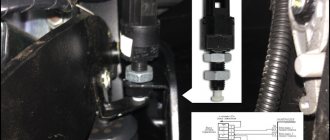
Where is the reverse sensor located on the VAZ 2114?
The sensor is located directly on the gearbox. To get good access to the product, you need to place the car on an overpass, or drive into a pit, or lift it using a lift.
An easy way to diagnose
In order not to guess whether the sensor is working or not, it is enough to take a small exposed wire. After this, you need to disconnect the chip from the sensor and jumper the two contacts directly in it. In other words, put one end of the wire into one connector, the other into the other. Then you need to turn the ignition key (you do not need to start the car) and see if the reverse lights come on. If everything works, the cause of the malfunction is the sensor. Another reason may be simple oxidation of the connecting contacts, so before replacing it is worth carrying out a careful inspection, and if oxidation is detected, thoroughly clean the connection points.
Location and performance check of the DZH
You can easily find out where the reverse sensor is located by looking up at the suspension of the fourteenth. It is located on the gearbox; there are two meters in total: the one we need and the one that signals the speed of movement. If it is not possible to get under the bottom of the car, you can get to the reverse sensor by opening the hood. But the first option is more convenient.
- To make sure that the auxiliary gearbox is faulty, you need to turn the wheels to the left, looking from the driver’s side: on the side of the gearbox there is a protection with contacts inside.
- We remove the protection, look at the device and the two contacts that go to it, close them on the frog and start the fourteenth, putting it in reverse gear. If everything is fine with wires, contacts and lamps, then the white lights light up.
- The lights do not light up - with a tester we measure the voltage on the ground and the wire (orange) leading from the frog; if there is voltage, then you should check the board of the white lights and the contacts to it. There is a possibility that the contact between the fuse block and the sensor contacts has failed; you should find it and measure the voltage in it.
- Oxidation of rear light contacts
- The sensor may become loose, it needs to be screwed in deeper
- No contact with transmission wiring
- No contact between plug and fuse box
- Any fuse can blow and disrupt the contact circuit.
It also happens that the DZH is normal, and the contacts are safe and sound, but the reversing lights do not light up . The lamps themselves may become covered (elementally burn out), or the contact may be lost (for the same lamps).
Checking the reverse sensor
How to remove and replace a relay in a refrigerator
It doesn't take too much effort to check your vehicle's reverse sensor (switch). In fact, this process can be completed in several steps.
Step 1: Locate the reverse sensor location. In almost all models it is located at the bottom of the gearbox housing. In fact, there are two sensors installed there: one to measure the speed of movement, and the second is a reverse sensor. To get to it, you will need to drive into the “pit”.
This is what the reverse sensor looks like
Step 2. Once you reach the sensor, disconnect the power wires from it.
Having found the location of the sensor, disconnect the wires from it
Step 3. Connect the disconnected wires to each other (connect them).
Connect the wires together
Step 4. After this, you need to turn on the ignition and “stick” the reverse gear.
After checking the sensor, engage reverse gear again
What will it give? In fact, there may be different scenarios for the development of events after the wiring is closed.
If after this the lights are on. This indicates a faulty sensor condition that needs to be replaced.
If the lights still don't come on. This means that you need to look for the cause in the circuit, and the sensor itself most likely has nothing to do with it. Use a test light to measure the voltage coming from the sensor wire. If there is voltage, you need to check the contacts and boards.
Adjusting the switch on a manual transmission
To adjust the switch, you need to connect a circuit tester between the terminals.
Engage reverse gear and loosen the locknut. Turn the switch until the tester lights up, and then secure the correct position with the locknut.
This is what the switch looks like on the mechanics
Other switches are adjusted by unscrewing the switch completely and adding or subtracting a shim. The installation is correct when the tester lights up when the switch is fully tightened.
Adjusting the switch on an automatic transmission
Some switches on automatic machines are adjustable. The basic adjustment method is described here, but you should also check your repair manual for the correct procedure.
Switch on automatic transmission (automatic transmission)
- Start by identifying the four wire switches and terminals, then disconnect them.
- Move the gear shift lever to the drive position. Loosen the locknut and unscrew the switch from the gearbox a few turns.
- Using a circuit tester with its own power supply (not a test light), connect it across the two reversing terminals.
- Slowly turn the switch until the indicator goes off. Mark the position of the shifter relative to the transmission using a marker or a piece of white chalk.
- Now connect the circuit tester between the two inhibitor terminals. Turn the switch until the tester lights up again. Mark this position on the transmission according to the previous mark you made on the shifter.
- Screw the switch until its mark is exactly halfway between the two marks on the transmission (the ones you made with chalk), then tighten the locknut.
- Tighten the switch and check that the car will only start with the gear lever in the “P” or “N” position, and the reverse lights will only come on when it (the lever) is in the “R” position.
Reverse sensor malfunction
This is not a serious fault, its repair can be systematically postponed, but it should still be carried out. The light indicating reverse gear is not required for driving, although it is necessary to communicate your intentions to other drivers.
Sometimes it happens that the lamps do not activate, although the reverse gear is engaged. In some cases, only one of the lamps does not light up. If one lamp does not work, then that is the reason. You can easily replace it yourself without visiting a service center. When two lamps fail at the same time, this requires checking the electrical circuit coming from the sensor.
Due to their location, patch cables are prone to frequent breaks.
Replacing the sensor requires experience:
- First you need to disconnect the wires.
- Unscrew the reverse switch and screw in a new one. This must be done quickly, otherwise a lot of oil will leak out.
- You can simply place a clean container under the crankcase to collect the oil. Then you need to fill it back.
Apart from the need to have this sensor in perfect working order, in practice it can provide invaluable assistance when performing a complex maneuver on the road
This is especially important if lighting conditions are poor. Repairs will be easy, especially if it involves replacing a fuse or lamp
If the fault comes from the gear switch - the least common - the repair is somewhat more difficult
The repair will be easy, especially if it involves replacing a fuse or lamp. If the fault comes from the gear switch - the least common - the repair is somewhat more difficult.
Replacing the lamp
Access to the light bulb is usually easy and in some vehicles this is explained in the manual itself. Simply remove the outer casing and start loosening the screws.
The next step is to remove the lamp from the socket. To do this, simply twist the lamp and let the metal part slide down the lamp holder guides.
As soon as the bulb is removed from the socket, it will be possible to see signs that the lamp needs to be replaced.
After replacing the lamp, you need to check its functionality. To do this, you need to turn the key, turn on the ignition and engage reverse. In this case, the new light bulb should light up.
Checking and replacing the fuse
After replacing the lamp, it still does not work, the problem is probably in the fuse. To fix it, you need to again use the car's owner's manual, which will help you determine the correct fuse.
If the lamp is damaged, a peak current may occur that will blow the fuse protecting that part of the electrical installation.
The fuse must always be replaced with another fuse of similar amperage and under no circumstances should another fuse be used.
Due to the ease with which this procedure can be performed, it can be done before replacing the lamp.
Replacing the gear switch
The breakdown is not always in the easy and clean part. Sometimes the problem is the power switch; a device that is not manually controlled, but automatically starts working when reverse gear is engaged.
You need to search behind the transmission until you find a couple of cables. If the connection terminal to the vehicle's electrical system is normal, then most likely the problem is inside the switch that controls the gear shift lever. The operation of this switch is quite simple: when reverse gear is installed, the mechanical switch closes and the lamp turns off.
If this spring is damaged or blocked, the mechanical switch will not work and either the tail light will stay on all the time or it will never turn on.
As soon as the driver has changed the switch, you need to make sure that the O-ring is installed correctly and the thread is well tightened. It will also be useful to check the brake fluid level sensor.
The sensor is important for the reverse system. Periodically checking the device and wiring will not only reduce the number of future malfunctions, but also avoid problems while driving.
Reverse lights do not light up - troubleshooting and repair
How to remove, replace and check a water heater heating element
In general, the result of such malfunctions is the same - the reverse lights do not light up. Then you need to identify the cause and, accordingly, eliminate it. If the lamp burns out, then it is time to replace it with a new one. To do this, turn off the exterior lights, open the trunk and disconnect the wiring harness. Of course, you will first have to dismantle all the upholstery located behind the lamp. Next, by squeezing the latches located on the sides, you can remove the panel and, pressing on the lamp itself, unscrew it. Then we install a new one and return everything to its place.
Oxidized contacts must be cleaned. To provide access to them, you simply need to remove the headlight unit. What about the missing “ground”, it should be put in place, and the broken wires are called up, and the non-working ones are replaced. Failed fuses also need to be replaced; they are all located in a special fuse box, so this is not difficult to do. Another problem that can arise is when the reverse lights are constantly on.
There may be several reasons for this behavior, either, again, not everything is in order with the electrical part, or the special sensor located on the box has failed. In the first and second cases, arrange for the replacement of faulty parts. In addition, the reverse light switch may also fail. You can get to it either from below the car or through the engine compartment, but before dismantling it, make sure that it is the one that has failed
.
To do this, having released it, you need to start the car and, and then, closing the contacts, look at the lights that should light up. Next, having removed the switch, we check with a multimeter whether the contacts close when it is turned on. In the absence of such a short circuit, flaring cannot be avoided. Having cut out a flexible contact from the electromagnetic relay of the required length, we tin it in place of the old one. Then, after checking the reliability of the soldering, we put the switch back together and ring it. If the circuit is normal, install it in its original place.
What are reverse lights? These are white road lights that turn on in reverse gear, guaranteeing safety while driving. If the reverse lights are not on, then the possibility of the driver getting into an emergency increases; it is very difficult to park in the dark when the road is not visible, and passengers will not be able to predict the actions of vehicles, which can lead to unpleasant consequences.
The frog signal device is a necessary device. As they say “in the language of a motorist”: everything that is in the car must function properly, the safety of vehicle traffic depends on it!
So, at the slightest breakdown or short circuit of the reverse light, you need to immediately begin repairing it. This can be done both at service stations and at home, quickly and very simply. And this theoretical basis will be a great help!
How to troubleshoot?
The most common reasons that the brake light on the VAZ 2114 does not work are the following factors:
- Fuse failure.
- Broken wires in one of the sections of the circuit.
- Limit switch faulty.
- Bulbs burn out.
- Oxidation of contacts in lamp sockets.
- Damage to the contact board.
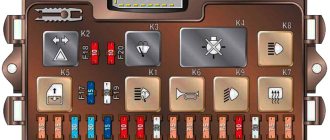
The most common and at the same time the most easily removable of the above reasons is a blown fuse. To identify such a malfunction, you need to examine the fuse box. A 10-amp fuse F3 is responsible for the brake lights, which also protects the ignition switch, computer and interior lighting.
Malfunctions in the operation of the latter may also indicate a malfunction of the stop fuse (and in this case, troubleshooting should begin with the block). If it turns out that the fuse has blown, then you should replace it with a new, similar one.
VAZ 2114 fuse box
A new fuse installed in place of a failed one must be designed for exactly the same maximum current. If it is less, the fuses will blow more often, and if it is more, the protected device itself may burn out.
The problem may also be in the fuse block itself - sometimes the tracks on its printed circuit boards burn out or the contact legs oxidize. In order to check its serviceability, it is enough to measure the voltage at the contacts of the newly installed fuse.
Another common reason why the brakes of the VAZ 2114 do not light up is a malfunction of the limit switch that turns on the signals. It is located on the brake pedal bracket and is always in working order, regardless of whether the car engine is turned on or not.
It works automatically when you press the pedal. In order to check its serviceability, it is enough to see whether the power supply is suitable for its contacts (on one of the contacts the presence of power must be constant). In addition, if you press the pedal and thus turn on the limit switch, you can measure the voltage at its connectors.
Limit switch
If there is no current at the switch contacts, you should check the wire going to the limit switch from the fuse box. If the test shows that the wire is faulty (there is a break), then it should be replaced with a new one and the test repeated.
Otherwise (if everything is in order with the wire), you should disconnect it (as well as the other wire suitable for the second connector) from the switch and connect directly. If after such an operation the brake light works, then the limit switch itself has failed and should be replaced.
Brake light wires
You should purchase a new brake light limit switch that is exactly the same model as the failed one. Installing a different type of switch may result in incorrect signal operation.
Description of DZH
How to remove handles from a Hephaestus gas stove
Purpose
Let's start with the purpose. DZH is a device designed to activate white lamps, indicating that the car is in reverse gear. The device is used to turn on the reversing lights, which allows other road users to know the driver's intentions and the maneuvers he is about to perform.
When it's dark outside, white headlights will also help warn drivers behind you that your car is in their path. This, in turn, helps prevent possible incidents and emergency situations on the road. Where this device is located - the location may vary slightly, but as a rule, the controller is located on the gearbox.
Design and principle of operation
The DZH itself consists of a housing, contacts for connection, a rod, a moving ball, and a return spring.
As for the operating principle, it is as follows:
- The driver shifts the transmission lever to the reverse gear position.
- In this case, the gear shift fork is pressed against the controller.
- Next, the device shorts the cable to ground.
- After this, the light source installed in the rear lights is activated, which warns other drivers that the car has started to reverse.
Symptoms of a problem
What signs of malfunction may indicate a breakdown of the DZH:
- One of the problems that happens most often is oxidation of contacts on the terminals or wiring. This problem is relevant for many car owners. To solve this problem, it is necessary to thoroughly clean the contacts and then install them in place. When performing this work, the battery should be disconnected. If the contacts are inoperative due to the fact that they are burned out, then they will have to be changed in any case. But before making a replacement, it is necessary to find out why the burnout occurred; most likely, the essence of the problem lies in voltage surges in the on-board network.
- The device became loose in its seat. During vehicle operation, the controller may slightly move out of its installation location; this problem is usually caused by high vibrations. In this case, you will simply need to more securely fix the device at the installation site.
- Another reason for inoperability is the lack of contact with the on-board network in the gearbox. In this case, it is necessary to diagnose the condition of the contacts, as well as electrical circuits. If necessary, failed components must either be cleaned or replaced.
- The next problem is that there is no contact between the connection connector and the safety mounting block. In this case, you also need to diagnose the condition of the contacts, as well as clean and change the wires, if necessary.
- Failure of the safety device. In this case, the problem can only be solved by replacing the fuse. If this part often fails, then the reason may lie in the same voltage surges. It is necessary to check the electrical circuit more carefully.
- The reverse light may not turn on because the light source itself, that is, the lamp, has burned out. In this case, you will have to dismantle the optics cover in the trunk and replace the failed device.
- And finally, the last reason for inoperability is the breakdown of the DZH. In this case, you will not be able to repair it, since such devices, as a rule, cannot be repaired. The controller will need to be changed (the author of the video is the Do-It-Yourself Auto Repair channel).
Brake pedal position sensor VAZ 2114
Hello everyone! I would like to tell you a little about the M74 ECU and the common error “P0504 Incorrect signal from the brake pedal switches.” In connection with the transition to new toxicity standards, AVTOVAZ engineers and designers have developed a new line of M74 and M17.9.7 ECUs. The ECUs can be said to be normal, but have not yet been fully tested. After all, cars on these ECUs are very much “strangled” by toxicity standards and therefore, without reprog and installing firmware e2 or lower, you can’t drive the car in any way, but this action is not all available now, since the protocol, pads and the reprog algorithm itself have changed with the ECU, in Therefore, it is necessary to have an additional module for the programmer. Diagnostics of ECU data is already available, since all major companies have taken care of their customers and have released software updates.
Well, okay, I’ll start right away with the story of how to get rid of the error “P0504 Incorrect signal from the brake pedal switches.” Due to the fact that the ECUs were changed, AVTOVAZ began installing new sensors and IMs. There are also 2 new sensors on the brake pedal, just don’t be alarmed if you suddenly find only one. AVTOVAZ designers and engineers managed to combine 2 sensors in 1 housing, that is, only one sensor is installed on the brake pedal, but this is not so, inside the housing there is the brake pedal sensor itself and another sensor, which is popularly called “frog”. Error “P0504 Incorrect signal from the brake pedal switches” appears because the sensors are not adjusted properly from the factory. If suddenly a car with M74 or M17.9.7 came to you and the scanner produced such an error, then you can safely take the keys and adjust the sensor gap, since it is not adjusted. The sensor is adjusted in a simple way and is not difficult. There are two nuts on the sensor body. One secures the sensor to the mount from above, and the other from below. The nut that is on top regulates the sensor gap, so loosen the bottom nut a little, and then tighten the top one a little, thereby adjusting the sensor gap. In my case, the sensor was set from the factory so that the button was pressed only halfway, now I made it press almost completely. I say almost due to the fact that I left a small reserve of travel for the button, about 2 mm, so that when the brake pedal is suddenly released, the button does not get too clogged into the sensor. When you adjust the gap, then start the car, having first reset the error, and let it run for a while, since the error is not registered immediately, but after a certain period of 5-10 minutes. If the error is not registered, then you can safely take money from the client and say goodbye to him. Also, on some cars, a clutch pedal sensor is installed; it also needs adjustment, because if it is not adjusted, the car begins to stall, as it were, since the ECU thinks that the clutch pedal is depressed. I guess I'll finish here. If new information appears on the ECU data, I will post it on this forum, since it is the best.
This error often occurs on new cars, since in my opinion our cars are made through... and there is no good quality control department, since cars with such bugs are passed through.
The article is not mine. Many thanks to: DimkaTitov (DRIVE2).
The mileage of the car is 2500 km, and the check is already lighting up with alarming frequency. The pre-installed BC multitronic displays a message that error P0504 is a problem with the brake pedal sensor. I erase it so that it doesn’t become an eyesore, but nevertheless, the error pops up. What to do? How can I adjust/change this button? In the photo this bastard is indicated by a red arrow. As people write, you need to play with adjusting it, which is done with two nuts. The most common thing is that people adjust so that the sensor button barely touches the brake pedal pad. In general, let's give it a spin and see. My BC immediately starts yelling as soon as I start the car, saying there is a mistake. I'll go dig around this weekend.
I noticed that the error pops up more often when you stand on the brake with the selector “D” on. I think the problem is deeper than just adjusting the sensor.
Yesterday, April 14, 2014, I was at the dealer for maintenance. In particular, he voiced hemorrhoids with error P0504. The dealer cheerfully undertook to fix everything. But he didn’t fix it, he said that we need to order a brake sensor, they say it’s defective. I drove out of the gate and wasn’t even surprised when the CHECK light came on again. And this morning the car did not start from the remote control, the BRAKES light was displayed on the key fob, which was corrected by pressing the brake a couple of times, then the car simply did not move, became dull, twitched, but after hitting the brake pedal again, everything was corrected, but then again. In general, the morning did not go well. I freaked out, went to the store and bought this damn sensor.
Fault localization
Understanding the operating principle allows you to determine exactly why the brake lights may not light up:
- The fuse has blown. In the diagram, the fuses are marked with the letter F (from English - Fuse) and the serial number of the seat in the fuse block, for example, F3;
- poor contact at connectors;
- the light bulbs have burned out, but since the lights are connected in parallel, the likelihood that 2 lamps will burn out at once is extremely low;
- poor contact on the negative terminal of the lights. In this case, problems may begin not only with the feet, but also with the lighting of the remaining lamps in the lanterns;
- Damage to the negative track in the lamp board. From the total mass directly to the brake light lamp, the minus goes along a special path on the board. The path may collapse from water or mechanical impact;
- malfunction of the brake light switch, the so-called frog;
- broken wiring, oxidation of contacts.
Troubleshooting algorithm
To detect a fault in the electrical network, you will need a multimeter or a tester, which you can make yourself
Previously, we told you how to use a multimeter, so we won’t focus on that.
The sequence of searching for the cause of the breakdown:
- Check the fuse for the brake light circuit. The location diagram of the fuse links can be found in the repair and operating manual for your car; often the symbol of the protected circuits is located on the back of the cover covering the fuse mounting block. If the installed fuse of the required rating immediately blows, there is a short circuit (short circuit) in the circuit. Please note that the fuse can protect not only the feet, but also other circuits. Installing a fuse with an increased rating is fraught with the risk of a car fire;
- If oxidation is detected on the terminals, clean the contacts mechanically or use an aerosol contact cleaner.
- Having turned on the ignition first and holding the brake pedal depressed, check whether there is power on the positive wire that goes from the limit switch to the rear light connector. If there is power, there is a malfunction in the lights themselves;
- check whether the positive signal is coming from the mounting block to the limit switch. If + comes, but when you press the brake pedal it does not appear on the second terminal of the limit switch, then the problem is in the “frog”;
- If there is no + at the limit switch terminal, examine the circuit up to the mounting block. If the wire is intact and securely fastened in the connectors, then the problem is in the mounting block.
If, for example, there is a + on both terminals of the limit switch when you press the brake pedal, but it does not come to the headlamp connector, then you need to look for the location of the wiring break. You can check the existing “frog” with a multimeter. Simulate the state of the brake pedal being pressed, attach probes to the terminals, turning the multimeter into resistance measurement mode. If there is no resistance between the terminals, the limit switch is faulty. If you removed the brake pedal limit switch for diagnostics, adjust its position correctly during installation. The brake lights should light up at the slightest touch of the brake pedal.
The search principle we considered is suitable for most cars. But, for example, in some cars, a relay is also involved in the operation of the brake lights, due to which the brake lights may also not light up. That is why it is always necessary to start by reading the electrical diagram.
How to check
Turn on the ignition and press the brake pedal, the brake lights should light up. After releasing the pedal they should go out. If the lamps do not light up, check the brake pedal sensor and the voltage supply from the battery to the wiring harness block.
(Largus, Vesta, XRAY) Move the rod lock to the right position using a screwdriver. We check the brake pedal sensor using a multimeter in ohmmeter mode. Circuit 3-4 should be closed (resistance value is close to zero), and circuit 1-2 should be open (resistance should tend to infinity). After pressing the rod, circuit 3-4 should open, and circuit 1-2 should close. Before installation, move the rod to the left position.
(Priora, Kalina, Granta, Niva 4x4) Circuit 1-4 should be closed, and circuit 2-3 should be open. After pressing the rod, circuit 2-3 will close, and circuit 1-4 will open.
Repair methods
To repair the reverse signal, you can proceed in two ways. They differ in the way the sensor is accessed.
- Drive the car onto a lift or pit.
- Do the work by climbing under the car.
If you have already encountered a similar problem, then you will probably agree that replacing the DZH is best done using a pit or overpass. This makes access to the sensor as comfortable as possible, plus you minimize the risk of being splashed with oil from the gearbox.
Replacing the DZH is not the cleanest job
Of course, there is another cleanest way - sending the car to a car repair shop. But then you will have to pay not only for the sensor, but also for the services of the specialists. And this is another 2-3 times the cost of the sensor. The choice is yours anyway.
Self-replacement
It’s not difficult to get to and replace a failed DZH on your own. Follow the instructions, do not break the sequence of operations, and then the process will not take you much time and effort.
- Place the car on a pit or overpass. Be sure to apply the handbrake and place the transmission in first gear. This will help prevent your car from accidentally rolling away.
- Remove the protection from the contacts of your sensor, disconnect the contacts.
- Prepare a container into which the oil will be drained when unscrewing the DZH.
- When the container is ready, remove the sensor. In some cases, it may not be unscrewed by hand. In such a situation, use a 22 mm socket.
- Very rarely even the key cannot help, since the sensor becomes stuck to its location. Here you will have to arm yourself with a hammer and chisel and try to remove it as carefully as possible.
- Take out the failed device and insert a new one in its place.
- If oil gets on the gearbox housing, remove it with dry rags. There is no need for extra dirt. Plus, it can lead to a decrease in the efficiency of the device.
- Return all contacts to their places, put the protection back on.
- If a decent amount of lubricating fluid has spilled out of the box, be sure to top it up. Just use fresh ones. By the way, this is one of the reasons to completely change the oil in the gearbox if it has been there for more than the first season.
- The decision to change the oil will simplify the task when removing the sensor. If the liquid is drained in advance, it will not flow in different directions when the sensor is unscrewed. The work will be cleaner, plus you will kill two birds with one stone - replace the sensor and gearbox oil.
Removal and replacement
After completing the work, do not forget to check whether the reverse traffic warning system is now working. For this:
- Turn the ignition key, but do not start the engine;
- Engage reverse gear on your gearbox;
- See if the white lights turn on. If yes, everything went great.
How much it costs?
Many VAZ 2114 owners are often interested in the cost of certain spare parts. In the case of DZH, a new device will cost you up to 300 rubles. You can find devices for 100 rubles.
The price depends on the manufacturer, quality level and pricing policy of the auto parts store where you decide to shop.
Additionally, it wouldn’t hurt to purchase WD40, which can be used to clean contacts. Plus, the wires may need to be replaced. We do not recommend doing this on your own if you do not have the relevant experience.
If the culprit for the problem with the rear lights is the light bulbs themselves, replacing them will cost a pittance. Today they cost up to 50 rubles.
Loading …
Thanks Don't like Nighttrain Oct 18, 2011
Hello! help establish the reason for 2114 - at first the lights on the left side stopped lighting, I thought it was the bulbs and I didn’t rush to replace them, then all the brake lights stopped completely i.e. stopped glowing when pressed, I checked all the bulbs were intact. Low, high and turns all work as before. On the right side everything works except the stops. I checked the left rear light with a control, there is no voltage but the turn works, the fuses seem to be in order, there may be a mass, but I only saw where the stop is attached to the body and where the battery is attached from the terminal to the body, I moved everything to no avail. I also checked the brake pedal frog with a control as if there was no voltage either. Tell me what to do, I searched but didn’t find anything like that.
The jumper in the largest relay (it is collapsible and has a jumper) in the mounting block is responsible for the feet! In general, the non-functioning dimensions on one side look like fuses, but I do not rule out the fact that water gets into the mounting block, which can lead to different tricks!
Description of DZH
Purpose
Let's start with the purpose. DZH is a device designed to activate white lamps, indicating that the car is in reverse gear. The device is used to turn on the reversing lights, which allows other road users to know the driver's intentions and the maneuvers he is about to perform.
When it's dark outside, white headlights will also help warn drivers behind you that your car is in their path. This, in turn, helps prevent possible incidents and emergency situations on the road. Where this device is located - the location may vary slightly, but as a rule, the controller is located on the gearbox.
Design and principle of operation
The DZH itself consists of a housing, contacts for connection, a rod, a moving ball, and a return spring.
As for the operating principle, it is as follows:
- The driver shifts the transmission lever to the reverse gear position.
- In this case, the gear shift fork is pressed against the controller.
- Next, the device shorts the cable to ground.
- After this, the light source installed in the rear lights is activated, which warns other drivers that the car has started to reverse.
Symptoms of a problem
What signs of malfunction may indicate a breakdown of the DZH:
- One of the problems that happens most often is oxidation of contacts on the terminals or wiring. This problem is relevant for many car owners. To solve this problem, it is necessary to thoroughly clean the contacts and then install them in place. When performing this work, the battery should be disconnected. If the contacts are inoperative due to the fact that they are burned out, then they will have to be changed in any case. But before making a replacement, it is necessary to find out why the burnout occurred; most likely, the essence of the problem lies in voltage surges in the on-board network.
- The device became loose in its seat. During vehicle operation, the controller may slightly move out of its installation location; this problem is usually caused by high vibrations. In this case, you will simply need to more securely fix the device at the installation site.
- Another reason for inoperability is the lack of contact with the on-board network in the gearbox. In this case, it is necessary to diagnose the condition of the contacts, as well as electrical circuits. If necessary, failed components must either be cleaned or replaced.
- The next problem is that there is no contact between the connection connector and the safety mounting block. In this case, you also need to diagnose the condition of the contacts, as well as clean and change the wires, if necessary.
- Failure of the safety device. In this case, the problem can only be solved by replacing the fuse. If this part often fails, then the reason may lie in the same voltage surges. It is necessary to check the electrical circuit more carefully.
- The reverse light may not turn on because the light source itself, that is, the lamp, has burned out. In this case, you will have to dismantle the optics cover in the trunk and replace the failed device.
- And finally, the last reason for inoperability is the breakdown of the DZH. In this case, you will not be able to repair it, since such devices, as a rule, cannot be repaired. The controller will need to be changed (the author of the video is the Do-It-Yourself Auto Repair channel).
Error P0504 or problem with the brake pedal sensor
@belais14323
Hello everyone! I would like to tell you a little about the M74 ECU and the common error “P0504 Incorrect signal from the brake pedal switches.” In connection with the transition to new toxicity standards, AVTOVAZ engineers and designers have developed a new line of M74 and M17.9.7 ECUs. The ECUs can be said to be normal, but have not yet been fully tested. After all, cars on these ECUs are very much “strangled” by toxicity standards and therefore, without reprog and installing firmware e2 or lower, you can’t drive the car in any way, but this action is not all available now, since the protocol, pads and the reprog algorithm itself have changed with the ECU, in Therefore, it is necessary to have an additional module for the programmer. Diagnostics of ECU data is already available, since all major companies have taken care of their customers and have released software updates.
Well, okay, I’ll start right away with the story of how to get rid of the error “P0504 Incorrect signal from the brake pedal switches.” Due to the fact that the ECUs were changed, AVTOVAZ began installing new sensors and IMs. There are also 2 new sensors on the brake pedal, just don’t be alarmed if you suddenly find only one. AVTOVAZ designers and engineers managed to combine 2 sensors in 1 housing, that is, only one sensor is installed on the brake pedal, but this is not so, inside the housing there is the brake pedal sensor itself and another sensor, which is popularly called “frog”. Error “P0504 Incorrect signal from the brake pedal switches” appears because the sensors are not adjusted properly from the factory. If suddenly a car with M74 or M17.9.7 came to you and the scanner produced such an error, then you can safely take the keys and adjust the sensor gap, since it is not adjusted. The sensor is adjusted in a simple way and is not difficult. There are two nuts on the sensor body. One secures the sensor to the mount from above, and the other from below. The nut that is on top regulates the sensor gap, so loosen the bottom nut a little, and then tighten the top one a little, thereby adjusting the sensor gap. In my case, the sensor was set from the factory so that the button was pressed only halfway, now I made it press almost completely. I say almost due to the fact that I left a small reserve of travel for the button, about 2 mm, so that when the brake pedal is suddenly released, the button does not get too clogged into the sensor. When you adjust the gap, then start the car, having first reset the error, and let it run for a while, since the error is not registered immediately, but after a certain period of 5-10 minutes. If the error is not registered, then you can safely take money from the client and say goodbye to him. Also, on some cars, a clutch pedal sensor is installed; it also needs adjustment, because if it is not adjusted, the car begins to stall, as it were, since the ECU thinks that the clutch pedal is depressed. I guess I'll finish here. If new information appears on the ECU data, I will post it on this forum, since it is the best.
This error often occurs on new cars, since in my opinion our cars are made through... and there is no good quality control department, since cars with such bugs are passed through.
The article is not mine. Many thanks to: DimkaTitov (DRIVE2).
13.5KSeptember 13, 2014 Comments
How to check the functionality of the frog?
The contacts from the sensor are removed and clamped together, after which the ignition is turned on. If there is light, then you need to replace the sensor. And if not, then the problem is in the circuit, but the frog is fine.
When the reverse lamp does not light up, it is often necessary to replace the old sensor with a new one.
What should be done:
- place the car on the overpass;
- install the handbrake;
- remove protection;
- remove the contacts of the old sensor;
- place the container and remove the frog;
- Unscrew the faulty device and replace it with a new one.
Attention, the price of a new sensor is within 250 rubles.
The next option is if the reverse light does not light up on a VAZ 2114, then the problem is in the light bulb. To replace it, you need to disconnect the wiring block, remove the plastic contact panel from the flashlight, while squeezing the side fixing elements.
We rotate the light bulb counterclockwise and, pressing slightly on the socket, remove it. Now we install a new one, check the contacts and put the entire unit back together.
We visually assess the condition of the wiring; if necessary, we strip the wires, check for breaks using the ringing method, and check the contacts on the headlight film.
Why aren't the reverse lights on yet?
A blown fuse is a common cause, which means you need to know exactly where they are located and how they change.
The products are located in the fuse box, which can be found under the steering wheel on the left side. It can be easily removed with just one touch of your hand. There is no need to unscrew anything.
When the reverse light does not light, you need to check the condition of the fuses. How to do this? You can visually look at the fuses and determine the breakdown - the integrity of the middle part.
But the burnt jumper is not always so clearly visible, so you need to turn on the dimensions and, without removing the fuses, check the voltage; if one end is on and the other is not, the device is faulty.
To replace the product, you don’t need tools, just take tweezers, remove the old unit and install a working one.
You can find out where the VAZ 2114 reverse sensor is located very simply by looking up at the gearbox, and if the driver cannot get under the car, then the hood opens and thus the condition of the frog is checked.
To completely verify that the brake gearbox is damaged, you need to turn the wheels to the left and look at the gearbox from the driver’s side. There is a protection with contacts inside on the side, remove it, close the contacts on the DZH and turn on the ignition. When everything is in order, a white light appears.
If not, then use a tester to measure the voltage on ground and on the orange wire that comes from the frog. If voltage is present, then we check the flashlight board itself and clean the contacts.
There is also a chance that the contact between the frog and the fuse block has “frozen”; you need to find it and check its condition.
This is why the reverse light on the VAZ 2114 does not light up, as you can see, there can be many reasons, and for the motorist it is important to carefully check the integrity of all frog mechanisms, identify the malfunction and repair the functionality of the lighting. Have a nice journey, good fellow travelers and a smooth road!
Have a nice journey, good fellow travelers and a smooth road!
The reverse sensor is a fairly reliable element in the VAZ device, but at some point it can still fail.
This is easy to determine, since in this case the corresponding lights on the car stop working. However, something else is interesting here: the white lights could well have failed without breaking the sensor. To understand the situation, let's try to outline the range of possible problems.
As we have already found out, this device is responsible for turning on the rear lights on the car. If the white light does not appear when the driver backs up, then a pressing problem arises. It is necessary to determine the cause of the malfunction.
Not only the sensor could break, but something else as well. For example, a fuse or some kind of cable.
And without a rear light, driving in the dark is not very pleasant. It is simply difficult to inform other road users about your intentions to move back. In addition, they illuminate the path for the driver himself.
Even if this malfunction does not seem critical (like, for example, a breakdown of the knock sensor), it still needs to be corrected. And you can do this as follows.
Troubleshooting
Below are examples of how to fix basic problems and how to easily find them.
Fuse
This is the most frequently damaged element in brake light failures, and also the most easily repaired. To eliminate the breakdown, you just need to replace the fuse on the mounting block.
The fuse responsible for the operation of the VAZ 2114 brake lights is located on the fuse block under number F3 and has a fuse-link current of 10A.
To make sure that the fuse has blown, you need to turn on the interior lighting. If the brake light fuse is faulty, the light in the car interior will not light up because This fuse F3 is responsible for lighting the interior and the on-board computer.
Below is a diagram of the VAZ 2114 fuse box.
Brake pedal sensor
The brake pedal switch is responsible for turning on the brake lights when you press the brake pedal. This sensor is located on the pedal assembly of the car and is a kind of limit switch. When you press the brake pedal, the contacts on the sensors close the power supply circuit of the brake lights and light up their lamps, signaling that the car is braking.
Quite often, the spring that pushes the contacts to close on this sensor breaks, thus the sensor does not close the contacts when the brake pedal is pressed and the brake lights do not light up.
Replacement is carried out using a set of keys.
Lamp burnout
Often, the culprit of brake light malfunction is burnt-out lamps, but it should be noted that the likelihood of two lamps burning out at the same time is very small. Most often, when a brake light bulb burns out, one light fails.
The lamps are replaced from the luggage compartment of the car.
The type of lamp installed in the rear brake light of the VAZ 2144 is P21W – 12V.
Cartridge oxidation
Over time, due to moisture, the contact on the socket into which the light bulb is inserted can oxidize and the contact between the socket and the light bulb will disappear, which will make it impossible for electric current to pass to the lamp, thereby making it impossible to light it.
This problem can be eliminated by cleaning the contact using sandpaper and the lamp contact.
Connector oxidation
Just as with oxidation of the cartridge, due to exposure to moisture, the contacts on the connector oxidize, thereby blocking the path of electric current to the lamp. With such a breakdown, most often the entire lamp suffers and not only the brake light stops lighting, but also the turn signal, clearance signal, and reverse signal.
The problem is eliminated by cleaning the contact with sandpaper and treating with alcohol.
Damage to the board
This problem is less common, but it causes damage to the flashlight. The board is a plate of conductors to which a connector is connected. Conductors are tracks that quite often fray or break, which leads to an open circuit and, consequently, to failure of the lantern.
Solving this problem is quite problematic; it is necessary to solder the soldering iron tracks. Most often, when such a breakdown occurs, the flashlight is completely replaced.
Broken wire
A broken power cord is the most common problem. Most often, a break occurs in the luggage compartment of a car due to loading and unloading of various cargoes that can break this wire.
The most difficult thing in this problem is to find the break point. It is necessary to carefully inspect the places where the wires are laid in the luggage compartment.
We hope our article was useful to you.
How to check the ignition relay on the "seven"
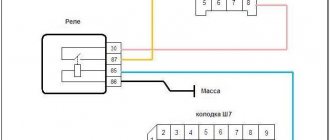
You can check the ignition relay directly on the car, so you can carry out this procedure yourself in two to three minutes. However, for accuracy of work, it is recommended to arm yourself with a multimeter or at least a regular indicator light. Next, you need to proceed according to the following algorithm:
- Remove the connected block from the relay.
- Inspect the contacts for oxidation, damage and contamination.
- If necessary, you need to clean the contacts.
- Connect a multimeter to the relay contacts.
After applying power to the relay, it is necessary to measure the voltage that the device produces. If there is no short circuit when current is applied to terminals 85 and 86, then the relay is faulty. The functionality of the relay is determined by the closure of the contacts between pins 30 and 87. The numbering of the terminals is indicated on the relay itself on the reverse side.
Reverse sensor VAZ 2114
As we have already found out, this device is responsible for turning on the rear lights on the car. If the white light does not appear when the driver backs up, then a pressing problem arises. It is necessary to determine the cause of the malfunction.
Not only the sensor could break, but something else as well. For example, a fuse or some kind of cable.
And without a rear light, driving in the dark is not very pleasant. It is simply difficult to inform other road users about your intentions to move back. In addition, they illuminate the path for the driver himself.
Even if this malfunction does not seem critical (like, for example, a breakdown of the knock sensor), it still needs to be corrected. And you can do this as follows.