Fault localization
Understanding the operating principle allows you to determine exactly why the brake lights may not light up:
- The fuse has blown. In the diagram, the fuses are marked with the letter F (from English - Fuse) and the serial number of the seat in the fuse block, for example, F3;
- poor contact at connectors;
- the light bulbs have burned out, but since the lights are connected in parallel, the likelihood that 2 lamps will burn out at once is extremely low;
- poor contact on the negative terminal of the lights. In this case, problems may begin not only with the feet, but also with the lighting of the remaining lamps in the lanterns;
- Damage to the negative track in the lamp board. From the total mass directly to the brake light lamp, the minus goes along a special path on the board. The path may collapse from water or mechanical impact;
- malfunction of the brake light switch, the so-called frog;
- broken wiring, oxidation of contacts.
Troubleshooting algorithm
To detect a fault in the electrical network, you will need a multimeter or a tester, which you can make yourself
Previously, we told you how to use a multimeter, so we won’t focus on that.
The sequence of searching for the cause of the breakdown:
- Check the fuse for the brake light circuit. The location diagram of the fuse links can be found in the repair and operating manual for your car; often the symbol of the protected circuits is located on the back of the cover covering the fuse mounting block. If the installed fuse of the required rating immediately blows, there is a short circuit (short circuit) in the circuit. Please note that the fuse can protect not only the feet, but also other circuits. Installing a fuse with an increased rating is fraught with the risk of a car fire;
- If oxidation is detected on the terminals, clean the contacts mechanically or use an aerosol contact cleaner.
- Having turned on the ignition first and holding the brake pedal depressed, check whether there is power on the positive wire that goes from the limit switch to the rear light connector. If there is power, there is a malfunction in the lights themselves;
- check whether the positive signal is coming from the mounting block to the limit switch. If + comes, but when you press the brake pedal it does not appear on the second terminal of the limit switch, then the problem is in the “frog”;
- If there is no + at the limit switch terminal, examine the circuit up to the mounting block. If the wire is intact and securely fastened in the connectors, then the problem is in the mounting block.
If, for example, there is a + on both terminals of the limit switch when you press the brake pedal, but it does not come to the headlamp connector, then you need to look for the location of the wiring break. You can check the existing “frog” with a multimeter. Simulate the state of the brake pedal being pressed, attach probes to the terminals, turning the multimeter into resistance measurement mode. If there is no resistance between the terminals, the limit switch is faulty. If you removed the brake pedal limit switch for diagnostics, adjust its position correctly during installation. The brake lights should light up at the slightest touch of the brake pedal.
The search principle we considered is suitable for most cars. But, for example, in some cars, a relay is also involved in the operation of the brake lights, due to which the brake lights may also not light up. That is why it is always necessary to start by reading the electrical diagram.
how to install brake lights in a car directly from a frog???
You need to check the chain with a tester...
there are two wires on the frog itself, one of them is a plus constant and the second receives a plus when the frog closes the circuit, that is, when we press the brake pedal, to check whether the plus is there or not, you can use an ordinary light bulb or a tester))))) if there is no on both wires are positive, then you can throw another plus from the fuse block, that’s the whole dilemma)))) you just need to make sure that the second wire goes to the brake lights
I had such a case, the frog is fine, the lights, power, everything is fine, but the stoplights don’t light up (the wire along the spit was broken after the accident), we pulled the wire from the frog directly, everything worked, you just need to do it correctly
Both wires are removed from the frog and checked for ground through a light bulb. (the light comes on and power comes to the frog) then the wires of the frog are connected to each other. if the brake lights do not light up, then any plus is thrown in turn on these two wires (there will be no short circuit in any case) if they light up, then power is not supplied to the frog (you can throw any direct plus, for example from the cigarette lighter) if they do not light up, then check the stop lights themselves ( there are many options and the simplest one is a tester) if not available, then a simple way to apply a plus to the headlight unit to the stop contacts, well, then the system is clear. in my experience, it mainly interrupts the wire from the frog to the feet. (but it happens that the contacts on the headlights are simply oxidized). in any case, it takes half an hour maximum to eliminate it for any reason
touch.otvet.mail.ru
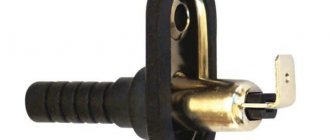
Pneumatic brake light switches
Switches of this type are used on automotive vehicles equipped with a pneumatic brake system. This device can be used as a sensor to turn on and off various electrical equipment at a certain air pressure in the system.
The basis of the device is a metal body, divided into two chambers by a rubber diaphragm. A sealed chamber is formed under the diaphragm, to which air is supplied from the pneumatic system; a threaded fitting or connecting channel with internal thread is made for connection to the circuit. Above the diaphragm there is a camera with a contact group, which consists of two fixed contacts and one movable one. Moreover, two design options for the contact group are possible:
- The fixed contacts are made in the form of pins, the movable contacts are made in the form of a plate located on the diaphragm under the pins;
- The moving contact is made in the form of a pin, above which one of the fixed contacts is located; the second fixed contact has a permanent connection with the moving contact through a return spring.
The switch is installed in the pneumatic line of the wheel brake mechanisms. When braking, the pressure in the line increases, which leads to deflection of the diaphragm and the rise of the moving contact located on it - the circuit closes and the brake lights turn on. When the pedal is released, the pressure in the line drops, the diaphragm, under the action of a spring, moves away from the contacts and breaks the chain.
Pneumatic switches are ideal for trailer applications because they eliminate the need for signal circuits to operate brake lights from the towing vehicle. And in general, switches of this type simplify and increase the reliability of the vehicle’s electrical system.
Troubleshooting procedure
Lamps fail most often. It's best to start with them. If they are working properly, remove the plugs from the frog and connect them together. The plugs should have +12.
If there is no voltage, check the fuse. If the fuse is intact, check connector Ш12. By applying 12V to pin 3 of the Ш12 connector, voltage should appear. Check the voltage at the fuse contacts. If there is voltage on the fuse on both sides, we try to apply +12 directly to the frog plug. If the lights come on, change the fuse box.
We recommend: Description of Daewoo Nexia fuses: characteristics, diagram, photo and video
The fuse box can only be repaired in specialized workshops. In this case, the board track could have burned out.
When there is voltage at the frog plugs, but the lights do not light up, we check 12V directly at the contacts of the lights board. If there is voltage, but the lamp does not light, check the connector contact. When there is voltage at the board contact, but the lamp does not light up, remove the lamp and check for the presence of 12V directly on the current of the conductive surface of the base. If there is voltage and the contact is clean, check the housing part of the base. If necessary, replace the flashlight board.
It is extremely rare for the brake light wire to break. The wiring harness comes out from under the instrument panel and runs along the floor of the car under the carpet. Both brake lights are connected in parallel. We check the integrity of the wire from the frog to the lights. If necessary, replace a separate stop wire.
The brake light on the VAZ 2110 does not work
Driving out onto the road with such a problem is prohibited by traffic rules. This will create problems not only for you and your car, but also for other road users.
This model provides monitoring of the status of the brake light lamps; when a malfunction occurs, the signal lamp flashes. However, work stoppage can be caused by other reasons.
That's what we'll talk about in this article.
A failure can occur on the way, the service is far away, but you need to continue moving. Therefore, any driver should know the approximate causes of failures and what to do in this case. For in-depth testing, it is advisable to have an autotester or multimeter. In extreme cases, a control light can help out. It is advisable to print and carry with you a list of fuses and the circuits they protect.
Where to start checking
The power supply circuit for the brake light lamps is protected by 7.5 Ampere fuse F17, but in addition to them, it also powers interior lighting lamps, ignition switch illumination, a clock or a computer. In the event that all this does not work, you should check this protective device.
If a fuse is blown, try to determine the cause of the failure before installing a new one. If there is a short circuit in the circuit, then burnout will occur indefinitely until the cause of the short circuit is found and eliminated.
Next, you should check the serviceability of the brake light switch, which is installed on the brake pedal bracket. One of the two suitable wires must have on-board voltage. It can be checked with a device or a test lamp.
The appearance of light will confirm the failure of the switch; its absence suggests continuing the search.
What else to pay attention to
Very often, the appearance of such malfunctions occurs due to the fault of the rear lights, or more precisely, in the places where the connectors with wires and lamp sockets are connected.
Using a measuring device or a test lamp, check the presence of power at the rear light connectors with the brake pedal pressed or the wires on the switch connected to each other.
If it is missing, you should carefully check the condition of the wiring harness.
Oxidation of contacts in connectors or sockets of electric lamps can be removed using available means. It is not advisable to use sandpaper for this, even very fine sandpaper. Alcohol-containing liquids are best suited for this, as they remove the resulting oxidation.
What are the VAZ 2110 fuse box relays responsible for?
K1 – relay for monitoring the health of light bulbs; K2 – front wiper relay; K3 – repeater and alarm relay; K4 – low beam relay; K5 – high beam relay; K6 – additional relay; K7 – relay for turning on the heated rear window; K8 – backup relay (not installed on 110 series vehicles);
F1-F20 in the diagram are fuses. The circuits in the car are protected by fuses based on a certain rated current (in A). The battery charging circuit, generator circuit, ignition and engine starting are exceptions.
To replace a faulty fuse, first find the one that has blown, then eliminate the reason why it was damaged and then install a new one. Below is a list of fuses and information on each one.
* Never replace fuses with jumpers, this can lead to failure of various components and elements, including failure of the wiring tracks in the fuse box and even a car fire.
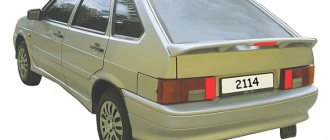
VAZ 2114 (2113) stops do not work
There are few reasons why the brake lights of a VAZ 2114, 2113 car do not work. Let's list them all and try to figure out this problem ourselves.
The brake light bulb in the rear light is burnt out.
Most often, only one lamp burns out, but sometimes two lamps burn out.
In this case, you will have to replace the lamp with a new one or a known good one. The brake light uses a P21W lamp. Similar lamps for the turn signal, reverse light, and fog light are in the same rear light. They can be used to check the brake light by replacing it.
The contacts in the stop lamp socket have oxidized
In this case, a “break” occurs in the electrical circuit of the lamp. Most often, in this case, one brake light will not work, while the other will be on.
To restore contact, you need to turn the light bulb in the socket several times, or remove it and clean the oxidized contacts with fine-grained sandpaper.
The wiring block for the rear light is faulty (chip)
Either it is not securely fastened, or the contacts have oxidized. In any case, there will be an open circuit in the electrical circuit.
It is necessary to remove and put the block on the terminals of the rear light board several times to restore oxidized or unreliable contact. Subsequently, you can clean the pins on the board and the wire tips in the connecting block.
The fuse in the mounting block has blown
If the fuse is blown, both brake lamps in the taillights will not light.
The electrical circuit for turning on the brake lights of the VAZ 2114 (2113) is protected by fuse F3 (7.5A) in the fuse and relay mounting block. Check the integrity of the fuse. If faulty, replace with a new one. If the fuse is blown again, you should look for a short circuit in the circuit. According to the connection diagram shown below.
The track in the rear light board has crumbled
As a result, the electrical circuit will be broken (“open”), and the brake light lamp will not light up.
It is necessary to remove the rear light board where the brake light is not illuminated and inspect it for damage to the tracks. If you cannot visually detect the location of the damage, you should “ring” the tracks with a multimeter or test lamp. Wiring is soldered to the damaged track and the board continues to function. For details, see the article “Checking the rear light board.”
The rear light ground is missing
In this case, one or two lights may not work. The negative wire of the lamp of each of the rear lights comes out of its connecting block of wires (chips) and is attached to the body next to it. Over time, this connection oxidizes and the contact disappears (the circuit opens).
It is necessary to unscrew the nut securing the tip of the negative wire to the body. Clean the pin and tip. After which the contact will be restored and the stop will light up.
Brake light switch faulty
If it malfunctions, both brake lights will not light up. The switch is located under the brake pedal and, after pressing it, closes the contacts of the electric stop circuit.
We remove two wires from it - white-red and pink-red, and connect them together with a piece of wire. The brake lights are on fire - we change the sensor, no, then we check the electrical circuit. In addition, we check the adjustment of the free play of the brake pedal, since the position of the switch may be broken, it does not work completely and the contacts do not close.
“Open” in the electrical circuit of the stop lamps
The cause of the “break” may be insecurely fastened wire harness chips, oxidation of the contacts in them, breaking of the circuit wires or their damage as a result of repairs.
Using a multimeter in voltmeter mode, you can check the presence of voltage in various parts of the electrical circuit and determine the damaged area. The best way to do this is to use a diagram.
First of all, we check the presence of voltage at the tip of the red wire in the rear light blocks to understand the malfunction in the lights or circuit. Then we check for voltage at the tip of the white-red wire of the brake light switch under the brake pedal.
Notes and additions
Before carrying out a detailed diagnosis of a malfunction of the VAZ 2114, 2113 stops, it is necessary to visually inspect the accessible sections of the brake light switching circuit and its elements, and also remember whether any repairs have been carried out on the car, since often the solution to the problem is on the surface.
TWOKARBURATORS VK -More information on the topic in our VKontakte group
How to check the serviceability of brake lights without outside help
You can often see cars with one or more brake lights not working. Lamps usually burn out. But there are problems in connectors, wiring, sensors. On the one hand, this is very bad and dangerous. You can easily get a “kiss” in the trunk from a car moving behind. On the other hand, it is very difficult to check the serviceability of brake lights alone.
Typically, car owners resort to the following verification methods:
- They ask a friend or just a passer-by to press the brake pedal, and they themselves go to see if all the lights are on.
- Drive up backwards to a mirrored, reflective surface, such as a store window or a wall decorated with glossy tiles, and monitor the operation of the brake lights using the rear-view mirrors.
- You can look nearby for a large, weighty object. For example, a brick or a large stone to press down on the brake pedal. But finding suitable weighting is not always possible. And few people want to carry a brick with them in the trunk.
- Some craftsmen install a toggle switch parallel to the limit switch, the activation of which simulates pressing the brake pedal. But unauthorized intervention in the electrical equipment of the car is fraught with loss of warranty. And if connected incorrectly, it can cause a short circuit and fire.
So what to do, you ask? You should check regularly!
"Wand-checker"
There is a very simple way to check the operation of the brake lights without resorting to outside help, without looking for a reflective surface or brick, without interfering with the car’s standard wiring.
To check, you only need a small stick, about 50 cm long. Maybe more, maybe less - depends on the size of the particular car. I call it a “stop tester” and always carry it in the trunk. Due to its small size, it does not interfere there. But there can be a lot of benefits from it.
Stop tester for checking the serviceability of brake lights
I think how to use the “stop tester” is clear from the picture
- Move the driver's seat back.
- Press the stop tester with one end against the brake pedal and the other against the front end of the driver's seat cushion.
- Move the driver's seat forward so that the stick presses the brake pedal. There is no need to press hard. All you have to do is select the pedal free play. Typically, this will cause the brake lights to light up.
- Start checking the operation of the brake lights and, if necessary, replacing burnt out lamps.
So, with the help of a simple stick, you can check the operation of a system that is very important for the safety of the car, detect and replace faulty lamps. Moreover, by holding the brake pedal down using such a “stop tester”, you can go through the electrical circuit of the brake system, find the fault, if the problem does not lie in the lamps, and fix it.
In addition to the above-mentioned conveniences of working with the brake light circuit, such a “magic wand” can help in other cases. For example, to get a part or thing that had rolled there from under a car.
“Knots” for memory:
- Brake lights need to be checked more often
- The “stick” in the trunk is not trash
DIY connection instructions
Car laser brake lights are a universal emitter, therefore, as stated above, it can be installed on any car model. Installation of the device can be done either in a garage or by seeking help from specialists. Judging by the reviews of other car enthusiasts, the installation procedure is a fairly simple task, so we suggest that you read the detailed instructions for installing the laser.
The device must be installed on the rear of the vehicle, it can be fixed:
- under the car number;
- on the bottom of the car;
- under the optics itself;
- inside the car, in particular, behind the rear window.
As you understand, the installation procedure may vary depending on the choice of mounting location. In any case, during installation the laser itself must be installed in a special holder, which is included in the kit and installed on the machine. The holder is fixed using self-tapping screws, screws or double-sided tape. The latter option is less reliable, especially if the device is mounted not inside the car, but outside. As a result of temperature changes, as well as rain, the double-sided tape will quickly come unglued, which will lead to the laser disconnecting (the author of the video is the Cognitive channel).
When the installation of the device is completed, you will need to point the emitter itself downwards, and the angle of inclination should be no more than 45 degrees. This will prevent dazzling drivers of cars behind you. Now all you have to do is connect the device to the car’s on-board network.
In this case, you also have several options for implementing power from the mains:
- You can connect the device to dimensional optics. In this case, the lasers will not be stops, but dimensions, that is, they will always light up when the side lighting is activated.
- The best option is to connect the device to the brake lights. Accordingly, when implementing this method, the laser will be activated when the driver presses the brake.
- Alternatively, the device can be connected to fog lights. In this case, its activation will also occur along with the inclusion of PTF.
Price issue
The cost of a laser directly depends on its functionality. Simpler options in the form of a line on asphalt will cost an average of about 600 rubles. You can purchase a laser that will project a logo or car name onto the ground - such a device will cost the buyer an average of 900 rubles. Alternatively, you can buy a more expensive option that will project a complex pattern onto the ground - the cost of such a laser will be about 1,300 rubles.
Loading …
Main reasons
Almost all problems related to automotive electrical systems can be solved in approximately the same way. You need to look for a potential or probable cause of malfunctions in the problematic object itself, or understand the system responsible for supplying power.
The situation is exactly the same with devices called brake lights. If they stop working, then you should look for the reason in one of the following points:
- There were problems with the fuse. It has oxidized or completely failed;
- There are faults in the lamps themselves or in one lamp, depending on how many stops are not working;
- The reason lies in the mechanism responsible for turning on the warning signal when the brake is applied;
- In the socket where the stop light is installed, the contacts have oxidized;
- More serious problems appeared related to damage to the wiring.
Based on the stated reasons why the feet may stop working, we can draw a completely objective conclusion. A truly serious malfunction concerns only wear or damage to the electrical wiring. Solving such a problem with your own hands is not always correct.
When the rear brake lights (left and right) or the additional central brake light repeater fail, do not rush to look for an auto electrician and offer him money to fix the problem.
There is a high probability that you will be able to do everything on your own. You will only need a standard set of tools for a motorist, as well as an understanding of how the lighting equipment in general works in your vehicle. Start with the most likely and fairly simple to solve possible malfunctions. Only if it turns out that the problem is bad or damaged electrical wiring, then it makes sense to visit a good car service center. It is better to entrust such tasks to experienced craftsmen. The main components for restoring the operation of brake lights on your own, you will need a spare working lamp, a control unit or a multimeter, as well as suitable tools.
It would be a good idea to study the owner's manual and understand how to get to the stops on your car.
Fuse
The first place to start is by searching for the mounting block in which the fuse responsible for the brake light is located.
Moreover, each machine has its own electrical circuit and specific location of fuses.
These can vary significantly depending on the vehicle, such as:
- VAZ 2110;
- VAZ 2107;
- Toyota Rav 4;
- Ford Fusion;
- VAZ 2114;
- VAZ 2115;
- Ford Focus;
- Chevrolet Lacetti;
- Lada Granta;
- Hyundai Accent;
- Renault Logan;
- Hyundai Solaris, etc.
A blown fuse quite often causes the failure of a number of equipment, including lighting devices. Check fuses visually and using a multimeter.
But there is a simple and effective way to check that takes a minimum of time. To do this, start the engine and hold down the horn button. This is not suitable for all car models, but on many vehicles the same fuse is often responsible for the sound signal and brake lights.
If this is not the case, we continue our search further.
Brake lamps and their sockets
Next, you should switch to the brake lights themselves. In most cars, to gain access to the feet, the luggage compartment is opened, the rear light bulb is removed, after which you can get to the feet themselves.
Questions about selecting and replacing a brake light switch
Brake light switches work intensively during vehicle operation, so they are highly likely to fail. As practice shows, in most cases there is no point in repairing this device - it is cheaper (and easier) to buy and install a new switch.
A replacement switch should be of the same type and model that was installed previously - this is the only way to guarantee that the system will operate reliably. If necessary, you can try to install a device of a different type, but here you may encounter a lot of difficulties. For example, mechanical switches have a wide variety of designs, so replacement is not always possible, and if this can be done, the new device may have different dimensions, making it very difficult to correctly adjust the timing of turning on and off the brake lights.
When choosing pneumatic and hydraulic switches, you should rely on the type of connecting fitting and the operating pressure in the brake drive - the switch must match it to ensure reliable operation of the brake lights. When using a device with a higher or lower operating pressure, the brake lights will either not illuminate when the pedal is pressed, or will operate even if there are random fluctuations in pressure in the pneumatic or hydraulic system.
Replacing and adjusting the brake light switch must be carried out in accordance with the vehicle repair and maintenance instructions. When performing work, you must comply with safety requirements and a number of recommendations. For example, a switch with a pneumatic drive should be replaced when the compressor is not working and after the pressure has been released. Installing a hydraulic switch is almost always associated with a leak of working fluid, so after repair you need to fill the leak and, if necessary, bleed the system (remove air bubbles). And if the mechanical switch is replaced, fine adjustments must be made to ensure that the brake lights operate reliably.
The correct choice of switch and its correct installation is the key to reliable operation of the vehicle's light alarm system.
Feeling the breath of winter, all motorists are thinking about replacing seasonal tires. And many of us, when buying winter tires, are faced with a difficult choice - “studded” or “Velcro”? Each type of tire has its own advantages and disadvantages, and choosing one over the other can be very difficult. In this article we will try to make this difficult choice.
Filling the tank with low-quality diesel fuel can damage the engine until it completely fails. Special auto chemicals—diesel fuel additives, which are described in detail in this article—help to minimize or eliminate the negative consequences of refueling with low-quality diesel.
Using the right type of tires ensures your car has stability and controllability in any driving situation. Only seasonally used tires guarantee optimal grip on the road surface and minimal braking distance.
In addition to the main direction indicators, all motor vehicles must have auxiliary lights - side turn signal indicators. Read all about repeaters, their classification, design, characteristics and operation, as well as about the selection and replacement of this type of device.
Liquid decorative rubber is a real find for all connoisseurs of car tuning. With its help, you can quickly and without special financial costs change the exterior of your car, make it original and memorable. Read about the positive properties, advantages of liquid rubber, and the features of its application to car body parts in the following article.
During the operation of a car, the metal rims of its wheels become covered with various contaminants, which cannot always be removed by regular washing. To solve this difficult problem, wheel rim cleaners are used - learn about these products, their types, composition and features from the article.
In recent years, devices for working with viscous sealants, adhesives and other materials in standard tubes - mounting guns - have become increasingly available. The article describes what a sealant gun is, how it works and works, as well as the selection and use of the tool.
Source
Brake lights do not light up. Causes and solutions
Well-known member
And in the dark and when visibility is insufficient, operating the vehicle is generally prohibited! (2.3.1 Section 2 of the Traffic Regulations)
It is better to eliminate this problem immediately after it arises, besides, most often the reasons why the brake lights do not light up are quite trivial, and the malfunction can be easily corrected without contacting a service center.
Almost any problem with electronics in a car can be solved in the same way. You need to look for the problem either in the device itself, which is faulty, or in the power supply system to it. The situation is similar with the main reasons for the breakdown of brake lights. If they do not light up, it may be due to one (or several) of the following reasons: Problem with the brake light fuse: its oxidation or failure; Malfunction of the lamp(s) installed in the brake light; Problem with the brake light activation mechanism when pressing the brake pedal; Oxidized contacts in the socket for installing the brake light lamp; Damage to electrical wiring. As you can see, among the problems listed above, only one can cause serious problems for the driver if he wants to repair the brake lights himself, and we are talking about wear and tear on the electrical wiring. Modern cars are equipped with dozens of electronic devices, and a worn, torn or improperly clamped wiring harness can cause your brake lights to turn off. If none of the troubleshooting steps below resolve the problem, it is most likely a wiring issue. In such a situation, you will need to find a detailed plan for the car's electrical wiring and check with a tester for the presence of voltage in the sections, and after finding the problem, solder or replace the wires. But don’t rush to get a tester, most often the brake lights don’t light up due to much more mundane faults, the elimination of which will be discussed below.
CHECKING BRAKE LAMPS AND CARTRIDGES
It is advisable to start troubleshooting the brake lights by checking the lamps. To do this, you need to open the trunk and remove the taillights, after which you can get to the brake lights. Depending on the make and model of the car, the method of removing the taillights will vary, and on some cars you can even get to the brake lights without this procedure. The most reliable way to check whether the cause of the malfunction is burnt out lamps or oxidation of the contacts in the socket for installing them is to replace them with new ones. It is not always possible to determine by eye whether the lamps have burned out or not, so it is better to acquire new light-emitting devices in advance and install them. If it turns out that no new copies of the required size were found, you can remove the working lamps from the turn signal indicators, side lights or other lighting devices of the car. Try them, and if the problem is solved, then it is enough to buy new lamps and replace them so that the brake lights begin to work as before. Important: Some car models are designed so that if one brake light fails, the second one turns off automatically. Accordingly, when checking, it is better to screw the lamps into both brake lights to make sure that the problem is not related to their malfunction. When replacing the lamps does not resolve the problem, you need to make sure that there is no oxidation of the brake light “cartridges”. Also check that the sockets are connected to the vehicle's wiring. If there is any doubt about this, you can disconnect the wiring contacts, clean them with fine-grit sandpaper, lubricate them with electrically conductive grease and reconnect them.
PROBLEM WITH THE FUSE FOR THE BRAKE LIGHTS
In a car's electrical circuit, a malfunction often occurs due to fuses that may fail. There are several ways to check fuses in a car, including visually or using a multimeter. In this case, there is one “household” method for diagnosing the brake light fuse. You can make sure that the brake lights are not on due to a failed fuse. To do this, just start the car and press the horn. If the sound is heard, then the fuse is good and the brake light malfunction is due to another reason. If there is no sound, you need to determine from the fuse block diagram which one is responsible for the brake lights and horn, and then replace it. Please note: This verification method is not suitable for all car models. On some cars, different fuses are responsible for the brake lights and horn, and if one of them fails, the other will continue to work properly.
When the driver presses the brake pedal, the force is transmitted to a mechanism commonly called the “frog” or limit switch, which is also the brake light switch. When you press it, the brake lights come on; therefore, if for some reason it stops working, the brake lights will not turn on. In total, there are 2 main reasons why the limit switch fails: Oxidation of contacts; Formation of carbon deposits and corrosion. As you can see, the faults are quite similar, and they are eliminated in the same way - by cleaning the “frog” or replacing it. To remove the brake light switch you will need to remove the pedals. Then it can be easily found under the brake pedal, and the limit switch can be removed by simply turning it counterclockwise by 90 degrees. When the “frog” is dismantled, disconnect the wires from it and try to close them “manually”. If as a result of these manipulations the brake light comes on, it means that the brake light switch needs to be replaced or repaired. If you decide to tinker with the limit switch, repairing it is quite simple. It is enough to understand the device, clean all contacts with alcohol-based liquid and then lubricate them with electrically conductive lubricant. After this, the “frog” can be assembled, installed and tested. Important: Please note that if your car's brake lights are constantly on, there is a high probability that the problem is also related to the limit switch. The method for troubleshooting in this situation is no different from the option given above.
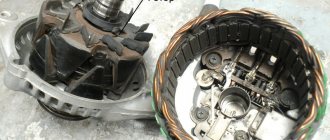
How to change the reverse sensor on a VAZ 2107
Before replacing the sensor, it is advisable to clean the gearbox of dirt. If this is not done, it may get into the oil, which is located in the crankcase. Replacement of the VAZ 2107 reverse sensor is carried out in the following sequence:
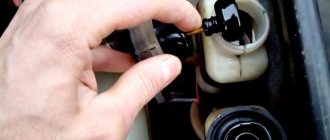
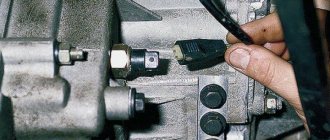
- disconnect the wire tips from the sensor contacts;
- Using a 22mm wrench, unscrew the old sensor from the gearbox, removing it along with the metal washer;
Note: if the sensor is “stuck” and cannot be unscrewed using a wrench, you can try to unscrew it using a chisel and hammer
However, this must be done with extreme caution so as not to damage the gearbox housing, which is made of a fragile aluminum alloy.
- clean the sensor seat;
- put a new washer on the new sensor and screw it into the gearbox using a 22mm wrench;
- Place the wire ends on the sensor contacts.
Now you know how to change the reverse sensor on a VAZ 2107
After installing the new sensor, pay attention to how tightly the wire tips fit on the sensor contacts. They should not dangle or fall off
If necessary, tighten the tips using pliers. It is a good idea to clean the tips before placing them on the sensor contacts. This way you can be sure of reliable contact on this connection.
What is needed for replacement
To change the part, you only need two things: a 22mm wrench and a new reverse sensor with a metal washer-spacer. It is advisable to use a socket wrench with a long wrench. But, if you don’t find one, you can get by with a cap or even a carob.
parking lights
Dimensions on the VAZ-2107 are activated by the leftmost of the four key switches located under the gearbox control lever . This switch is a three-position switch: the side light, along with the license plate light and instrument lighting, is turned on in the second position.
The side lights are activated by a three-position switch located under the gearshift lever.
On the fuse block, which is located under the hood of the car near the windshield closer to the passenger seat, the rear side lights fuses are numbered F14 (8A/10A) and F15 (8A/10A). In this case, fuse F14 is responsible for the operation of the side lights of the left front headlight and the right rear light, as well as:
- a lamp indicating the operation of the dimensions;
- license plate lights;
- engine compartment light bulbs.
We recommend: How to check the Matiz ignition coil
Fuse F15 is installed in the side light circuit of the right headlight and left rear light, as well as:
- instrument lighting;
- cigarette lighter lamps;
- glove compartment lighting.
If one of these lamps does not work, you should check the integrity of fuses F14 and F15.
Read about repairing VAZ-2107 fuses: https://bumper.guru/klassicheskie-modeli-vaz/elektrooborudovanie/blok-predohraniteley-vaz-2107.html
Fuses F14 and F15 are responsible for the operation of the side lights.
Design of pneumatic switches
Switches supplemented with pneumatics are usually installed on automotive vehicles that have a braking system with a pneumatic drive.
, as well as on trailers. In some cases, the device is responsible not only for the operation of brake lights, but also acts as a sensor that responds to changes in air pressure in the pneumatic system and connects certain electrical equipment according to the situation. Pneumatic brake light switches are based on the following elements:
- Housing with a pair of cameras;
- Diaphragm;
- Threaded fitting or channel;
- Contact Group.
The contact group itself can have two designs: fixed pins and a movable plate; a movable pin with a return spring and a fixed contact of any shape. Of interest is the housing of the pneumatic brake light. It is divided by a diaphragm into two chambers. The point is that as soon as the pressure in one of the chambers increases, it bends and the movable contact attached to it closes with the stationary one. Of course, an increase in pressure in the system is provoked by the activation of the brake system.
Malfunction of brake lights together with other indicators
Quite often, the brake indicator lamp is used together with the side lighting of the car. One cylinder contains two filaments, one end of which is connected to the base, and the other two are brought out to separate contacts. If the brake lights and parking lights do not light up, the most likely loss of contact is at the point of their connection to the body (“ground”) of the car or in the socket. This can happen due to a broken wire or oxidation. The broken end is connected to the terminal by soldering or crimping. Oxides are cleaned off with a sharp tool (knife or screwdriver); after repair, it is advisable to cover the joint with paint or grease to prevent re-oxidation.
It is quite rare to encounter a malfunction when not only the brake light, but also the other indicators on the car do not light up. This is usually observed in “drowned” cars that have somehow been in water (as a result of careless driving or an accident). Even after thorough drying, moisture still remains inside the interior trim and electronic components. Its presence leads to increased oxidation of conductive surfaces. In such a car, having eliminated the malfunction of one system, you cannot be sure that it will not appear again.
Causes of reverse lights not working
If you find that the light on the seven does not light up when reversing, then you need to immediately identify the problem and fix it. Most likely the reason will be:
- Fuse blown. If any electrical appliance or circuit malfunctions, the first step is to check the serviceability of the fuses. From the name you can guess that the essence of a fuse is to protect an electrical circuit from high current and short circuit. If the fuse is blown, it needs to be replaced and the lights will work properly.
- Bulbs burn out. One of the reasons is the burnout of the lamps, but this factor is easy to exclude, since if the lamps burn out, not both of them burn out at once.
- The integrity of the wiring is compromised - mechanical stress often contributes to damage to the wires. Rarely is the cause of their damage due to a short circuit. To determine if the wiring is working properly, you will need to use a multimeter by ringing each wire or measuring the voltage on the lights.
- Sensor malfunction - it is also called the reverse switch, since it is responsible for turning on and off the light alarm. Moreover, it may either break, in which case it will need to be replaced, or the terminals may oxidize, compromising the quality of the contact connection.
Malfunction of the reverse sensor is quite common, so you first need to check the integrity of the fuse, then make sure there is voltage on the lights, and only then proceed to replace the switch in question. Moreover, its malfunction can be manifested not only by the lack of lighting of the lights, but also by constant burning. If the 3X lights are constantly on, then it is necessary to replace the sensor.
How to find the reverse sensor VAZ 2107
The element in question, which is responsible for turning the rear lights on and off on the VAZ 2107, is located in the main mechanism - this is the gearbox. To find the location of the switch, you need to crawl under the car and look at the box. The element is attached to the bottom of the gearbox on the right side.
It is impossible to confuse it with another sensor if you know where the box is and what it looks like. There is only one sensor installed on the box, not only on carburetor, but also on injection modifications.
This small part cannot be repaired, so if it is found to be faulty, it will need to be replaced. To make sure that the cause is in the device in question, you should remove the lead wires from the sensor terminal, and then move the gear shift lever to the reverse position. Set the multimeter regulator to the continuity position and touch the two contacts with the probes. If the device emits a sound signal when the reverse gear is engaged and, on the contrary, is silent when the lever is moved to the neutral position, it means that the element is working and you need to look for the cause in other components. Knowing where the frog is located on the VAZ 2107, it will not be difficult to check it further.
Why don't my tail lights work when my headlights are on?
The taillights and headlights have separate connections. This way, one set of headlights will still work, while the other set may have some problems and not work. Tail lights can go off for several reasons, and they are almost similar to the reasons why brake lights don't work while tail lights work.
Causes of rear light failure:
- Burnt out light bulbs;
- The fuse has blown;
- Damaged wiring.
If you still can't determine the problem with your brake lights or taillights not working, or you're not sure what to do, take it to a professional auto repair shop. Do not attempt to fix anything, be it major or minor repairs, if you have little knowledge of the vehicle.
REMEMBER: You can always contact our car service center, where your favorite car will be happy to receive professional technical assistance. You can also make an appointment with us for a scheduled technical inspection! Please familiarize yourself with our car repair and diagnostic services.