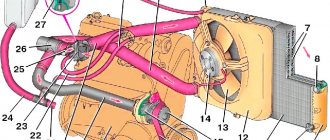
It is necessary to bleed the brakes on a VAZ 2109 in some cases, for example, if air has entered the brake system or if there is a need to replace the brake fluid or after repairing the brake system, and in some other cases.
One of the most obvious signs of air in the brake system is increased brake pedal travel, as well as its softness.
It is worth noting that it is necessary to bleed the brake system with an assistant; one cannot cope with this work. Also, before you start pumping, you should make sure that the brake system is tight. You should also pay special attention to what kind of brake fluid was filled if you want to top it up rather than change all of it.
You should adhere to a certain order when performing work; pumping should begin with
- rear right brake cylinder
- then comes the front left brake cylinder
- then the rear left brake cylinder
- and after that the front right brake cylinder
Let's move on to bleeding the brake system:
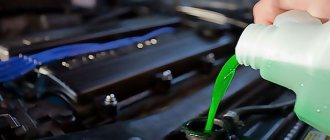
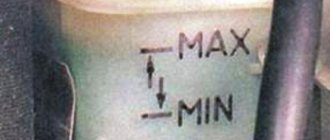
— first, make sure that the brake fluid level in the barrel is at the MAX mark; if this is not the case, then add brake fluid to the barrel.
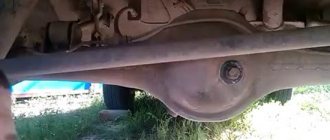
— if the rear wheels of the car are suspended, then you should first unlock the pressure regulator of the rear brakes by inserting a screwdriver between the plate and the piston, as shown in the figure below. Don't forget to remove the screwdriver after finishing work.
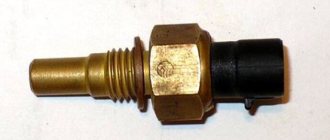
- Now you should clean the air release fitting on the brake cylinder from dirt and dust.
— remove the protective cap from the air release valve. We put a rubber hose on the head of the brake bleeder fitting and immerse the end of the hose in a plastic bottle that is partially filled with brake fluid (the end of the hose must be immersed in the brake fluid).
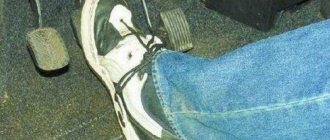
— the assistant should press the brake pedal 5-6 times, after pressing the brake pedal, keep the pedal pressed. Please note that there should be an interval of 1-2 seconds between presses.
— now you should unscrew the air release fitting 1/2-3/4 of a turn; there will be air leaks in the brake fluid flowing out of the hose. After the brake fluid stops flowing from the hose, tighten the air release fitting, and only after that the assistant releases the brake pedal.
- Repeat this operation 5-6 times until you see that the release of air bubbles in the liquid has stopped. Don't forget to check the brake fluid level in the reservoir and add brake fluid if necessary.
- after you have done this, remove the hose and wipe the fitting so that it is dry. And we put a protective cap on it, after which we bleed the brakes on the other wheels in the same way.
Replacing brake fluid.
In essence, this is the same operation as described above, only you initially drain all the brake fluid that is in your system, and then simply pump all the brake mechanisms with new fluid
It is worth noting that this instruction is also suitable for VAZ 2108 and VAZ 21099 cars, since the brake system in them is no different from the VAZ 2109 about which we wrote here.
Compound
Replacing brake fluid on a VAZ 2109 is quite quick and easy. Before starting this matter, you should carefully study its composition.
It would be ideal if it consists of:
- Motor oil
- Synthetic base
- Mineral base
Note: it is advisable to pour liquid into the tank without additional additives. That is, the way it was purchased in its original form.
General properties
By pressing the brake, the force is transferred to the brake mechanisms. Actually, due to this, braking is carried out. However, if the fluid overheats during this process, the following may occur:
- It will boil (it boils at different temperatures and this depends on how old it is).
- So-called “plugs” of steam will appear.
- It will become compressible.
- The pedal will fail and will not return to its original position.
- All this leads to braking failure.
Note: to prevent this from happening, you must use only the liquid that is suitable for the “nine”.
Requirements
Brake fluids must meet the following requirements:
- No negative impact on parts made of rubber material. If this requirement is neglected, the rubber cuffs located between the cylinders and pistons will become deformed. That is, the rubber will increase significantly in volume.
Note: Parts must not swell as this will cause brake failure.
- They must protect the metal from corrosion. Different parts of the brake system are made up of different particles. There are also metal, steel, cast iron elements. Substances are added to some fluids that protect against rust. You should find just such a liquid.
- Must act as a lubricant. It is this property that ensures maximum mobility of the elements, thereby significantly increasing their service life.
- Must be able to withstand temperature changes. In the system, temperature, like pressure, is not constant. Therefore, the task of brake fluid is to maintain its primary properties at temperatures from -40 to +100 degrees.
Checking the fluid level
The sequence for checking the fluid level is as follows:
- Prepare the car for this operation.
- Remove the cap from the brake fluid reservoir.
- You need to look at the fluid level.
Note: It is important that it is above the Max mark. Brake fluid “doesn’t go anywhere.” A “fluid cycle” occurs in the system. That is, the liquid circulates to all parts and returns back to its desired place.
- Once the cover with the sensor is installed, its level will rise automatically. This is due to the fact that the volume of the sensor will “squeeze” it out.
Note: When lowering the level, you need to check whether the pads are working correctly. Because this usually leads to their breakdown.
- To refill the tank, remove the cap and pour in liquid up to the Max mark.
Note: TJ consists of chemical elements, so if it gets on soft parts, it will begin to corrode them.
- Close the lid.
Fluid replacement
To replace the fluid in the system, you should follow the following algorithm:
- Unscrew the cap of the reservoir containing the “old” fluid.
Note: It is advisable to cover the lid with a cloth, as it may release toxins. In addition, liquid may also drip from the float. You need to be very careful.
- If the rear wheels are suspended, you should unlock the pressure regulator (to make this easier, you can insert a screwdriver or other flat object between the plate and the piston. However, it must be removed after finishing work)
- Clean the valve. Remove the rubber cap from it, which performs protective functions.
- Insert the rubber hose into the tank. Insert the other end into a clean container.
Note: The hose should be transparent so that you can better see how the liquid flows out.
- Press the brake with a sharp movement (it is advisable to have someone help). You need to press 4-5 times. The last time you should not take your foot off the pedal.
- Unscrew the air release valve. After this, old fluid will flow out of the hose.
- The pedal must be pressed all the way.
- After all the liquid has flowed out, the valve should be closed.
Note: You need to constantly monitor the fluid level. It must not be allowed to fall below the MIN mark.
- Add liquid to the MAX mark and close the lid.
- When the replacement is completed, protective caps should be placed on the valves through which air is released.
How often does it need to be changed
The fluid should be changed at least every two years. However, it can be changed more often. At the same time, many drivers do not replace it completely, but simply add a little fluid to the maximum mark, but this is not correct. Reasons for replacement:
- Brake fluid works even at very high temperatures (new fluid boils at temperatures above 200 degrees). At the same time, during operation it absorbs moisture, so its boiling point constantly decreases. After some time, it begins to boil at fairly low temperatures.
Note: this is unacceptable, as due to the presence of steam in the system, the brakes will be blocked.
- Part of the liquid goes into the reserve tank. The remaining fluid cannot provide the required pressure, so the pedal falls down.
- The brake system has “locked up”. Brake fluid affects the proper operation of the entire braking system.
You can replace the fluid yourself. Moreover, this process does not take too much time. Moreover, now on the Internet there are many photos and videos on this topic. The instructions offered here can also help with this difficult issue. All you need for this is desire. And most importantly, the price of home repairs will be much lower than what car services offer. You will only need to pay for the liquid, and it is inexpensive (only 200-250 rubles, depending on the store).
Typically, the VAZ 2110 brake fluid is replaced every few years (40 thousand kilometers). It is better, however, to do this annually. Agree, all this is your immediate safety, and therefore you should not show excessive negligence and take into account all possible nuances. Moreover, it cannot be said that the procedure is extremely difficult for an ordinary motorist.
see also
Which brake fluid is better
Replacing brake fluid
Brake fluid DOT 4
How to bleed the brakes
- 167 2 164k
How often to change brake fluid
Maintaining the required level of brake fluid is necessary for the proper operation of the vehicle's braking system. How much is needed can always be found in the service book, but often car owners are not used to looking into it, but act empirically or look for the answer on the Internet. It is these users that we will try to help figure out the question of how much brake fluid is needed for replacement and which one should be poured.
Brake fluid is the working fluid of the brake system, with its help the force created in the master cylinder is transmitted to the wheel pairs.
If the brake fluid level is below the minimum mark (by the way, this will be indicated by the corresponding icon on the instrument panel - a red circle with waves inside), then you need to top it up. It also doesn’t hurt to check the brake system, since a decrease in the brake fluid level may indicate a malfunction or wear of the master cylinder gaskets. As a rule, the brake system of a passenger car contains from 0.55 to 1.0 liters of brake fluid. And its specification can very often be indicated on the body of the expansion tank or its cover.
It will be useful: How to paint alloy wheels with your own hands?
When checking, do not forget to pay attention to the color of the liquid . The new TJ is transparent with a yellowish tint. During operation, it changes its color and becomes dark, this is mainly due to the accumulation of various impurities. If the fluid has darkened, this may mean that a complete replacement is necessary and simple topping up is not enough. Experts recommend replacing brake fluid approximately every 2-3 years , this is the optimal interval in accordance with hygroscopicity and exposure to temperature loads. For the brake mechanisms to function properly, the fluid must have a number of properties and also meet a certain standard.
Old and new brake fluid
How to choose new brake fluid
Usually replacement begins with a trip to the store. A good, but no less expensive (almost 400 rubles) would be a bottle of American brake fluid from Step Up Brands (DOT 4). No less worthy, but much more affordable, will be the offer of the European brand Mobil (about 250 rubles).
If you want to save an extra hundred rubles, you will lose a little by choosing a domestic manufacturer. Here, the Dzerzhinsky Tosol-Sintez (RosDOT 4.5) has proven itself well, which will ask only 120 rubles for a liter bottle of its brake fluid. The offer from Siburneftekhim (Nordix Kapros brand), which is also very good in its performance characteristics, costs the same.
Diagnosis of problems with old VAZ brake fluid
The big problem with the brake fluid for the VAZ 2110, as for almost any other car, is its hygroscopicity. It simply absorbs moisture like a charm. If the water content in the brake fluid is higher than 3-5%, it may boil and the brake pedal, accordingly, will fail.
Visually, the liquid should be clean and transparent and free of foreign impurities. Also, to diagnose it, a special tester is often used to determine the percentage of moisture in the total volume of liquid in the tank. This pleasure costs about one and a half thousand rubles. Of course, it’s not that cheap, but believe me, it’s really convenient to always have this kind of device with you in your car.
Replacing brake fluid, basic rules
We have somehow decided on the question of when to change the brake fluid on your car and why. Now we should talk about how this is done. It is impossible to say that the process is extremely complex and labor-intensive. However, it is necessary to take into account a certain mass of nuances, without which an adequate replacement of brake fluid is impossible.
To begin with, we highly recommend taking at least a liter container. Even though the actual volume occupied by the liquid in the system is much smaller, we will need the excess liquid for flushing its main parts and lines. If you give preference to a domestic manufacturer, then the price will not be affordable at all.
Be careful when using brake fluid. The substance is quite aggressive in its chemical composition and perfectly corrodes the insulation of VAZ electrical wiring. If liquid gets on the car body, immediately wash it off with cold water, do not let the brake fluid get on your skin and especially your eyes. Do not pour used brake fluid down the drain; there are specialized disposal points.
Volume of fluid in the brake system
Basically, the brake system holds from 0.55 to 1.0 liters of fluid, this depends both on whether the car has an ABS system and on the size of the car. The period for replacing brake fluid in most cars is 2-3 years of use, or 40-60 thousand mileage . To determine a more specific interval, you need to look at a specific fluid standard and driving characteristics. For example, in sports cars the TZ is changed every 5-10 thousand.
But since the question of the required volume of brake fluid in the system and its standard is asked only by owners of ordinary cars, and not premium or business class ones, we will give specific examples for cars popular in the CIS countries.
What and how much brake fluid is in some cars
| Table of the volume of brake fluid required for replacement | ||
| car model | DOT class | Required amount of fuel fluid, l |
| Ford Focus 2 | DOT4 | 1 |
| Ford Focus 3 | DOT4 | 1 |
| Ford Kuga | DOT4 | 1 |
| Chevrolet Niva | DOT4 | 1 |
| Chevrolet Cruze | DOT4 | 1 |
| Chevrolet Lacetti | DOT 4 | 0.5 a with ABS and ESP 1.0 |
| Kia Sid | DOT4 | 1 |
| Kia Rio 3 | DOT4 | 1 |
| Kia Rio 2 | DOT 4 | with ABS - 1-1.5 l without - 1 l |
| Kia Sorento | DOT 5.1 | 1 |
| Kia Spectra | DOT3, DOT4 | 1 |
| Renault Logan | DOT 4 | with ABS – 1-1.5 l without – 0.7 l |
| Renault Duster | DOT4 | 1 |
| Renault Fluence | DOT4 | 0,5-1 |
| Renault Sandero | DOT4 | 1 |
| Renault Megane 2 | DOT4 | 1 |
| VAZ 2107, 2109 | DOT 3 | 0,55 |
| VAZ 2114, VAZ 2115 | DOT 4 | 1 |
| VAZ 2108, 2110, 2112 | DOT 4 | 1 |
| Lada Kalina | DOT 4 | 1 |
| Lada Priora (VAZ 2170) | DOT 4 | 1 |
| Lada Granta | DOT 4 | 1 |
| Lada Largus | DOT 4+ | 1 |
| Daewoo Matiz | DOT 4 | 1 |
| Mitsubishi Pajero 4 | DOT 4 | 1 |
| Mitsubishi Lancer IX | DOT 3, DOT 4 | 1 |
| Mitsubishi Lancer 10 | DOT 4 | 1 |
| Mazda Demio | DOT 3, DOT 4 | 1 |
| Mazda 3 | DOT 5.1 | 1 |
| Mazda cx 5 | DOT 4 | 1 |
| Skoda Superb II | with ABS DOT 4 | 1 |
| SKODA Octavia A5 | DOT 4 | 1 |
| Toyota RAV4 | DOT 3, DOT 4 | 0,5 |
| Toyota Corolla | DOT 4 | 1 |
| Toyota Prado 150 | DOT 4, DOT 5.1 | 1,5-1,6 |
| Volkswagen Polo sedan | DOT 4 | 1 |
| Daewoo Nexia | DOT 4, DOT 5.1 | 1 |
| Hyundai Solaris | DOT 4 | 1 |
| Hyundai Accent | DOT 5.1 | 1-1,5 |
| Volvo XC70 | DOT 4+ | 1 |
| Nissan Tiida | DOT 4 | 1 |
| Nissan Qashqai | DOT 4 | 1 |
| Nissan X Trail | DOT 3, DOT 4 | 1 |
It will be useful: How to paint a car with a spray can with your own hands?
How much brake fluid is in the VAZ system
VAZ cars are filled with brake fluid of the DOT-4 , but its amount in the brake system can be from 550 ml in a classic (VAZ 2107) to 1.0 liters in more modern domestic cars, such as VAZ 2110 or Kalina . But if you replace the TJ with flushing, then you should take 1.5 liters, and since there is no such packaging, you will have to buy two liter bottles.
How often to change brake fluid
Useful recommendations on how often to change the brake fluid in a car. Regulations on the frequency of changing brake fluid. More details
How to bleed the brakes
To properly bleed the brakes, you need to know the bleeding procedure specified by the car manufacturer. However, such mistakes should not be made. More details
Bleeding the brakes without an assistant
Bleeding your brakes can be a challenging task at times. But there is a simple way to do it without an assistant. See instructions for bleeding your car's brakes yourself. Learn more.
Preparatory stage
First of all, let's unlock the pressure regulator. Why is a screwdriver or other gasket inserted between its piston and the plate? The air valve fittings of the VAZ rear cylinders and brake calipers are likely to be covered with a decent layer of dirt and dust. It should be thoroughly cleaned before starting work.
Open the hood of the car and the lid of the brake fluid reservoir. Then we unscrew the fittings on all four wheels and let the fluid drain from there by gravity, taking with it all the debris accumulated in the system. We wait for some time and fill the reservoir of the VAZ 2110 with new brake fluid.
Do not close the fitting until the leaking liquid stops bubbling. Thus, the air is replaced by brake fluid. After all the fittings have been closed, the system needs bleeding, since there is still air in the lines.
How to change brake fluid on a VAZ 2109
The fluid must be replaced every 45,000 km. The work is best done with an assistant.
Brake fluid absorbs moisture from the environment, so it should not be stored open. Contact of brake fluid with wires, plastic or painted body parts is unacceptable. If liquid gets on these parts, they must be wiped off immediately.
If the rear wheels are suspended, it is necessary to unlock the rear brake pressure regulator by inserting a suitable bolt or screwdriver between the plate and the ball. After completing all the work, you need to remove the bolt or screwdriver that was used to lock it.
Unscrew the tank cap and place it on a clean cloth. Brake fluid may drip from the float.
Remove the protective rubber cap from the air release valve on the right rear brake mechanism and put a hose on the valve, the end of which is lowered into a transparent container.
What does bleeding the brake system of a VAZ 2110 mean?
Bleeding is carried out with the participation of an assistant, who creates pressure in the brake system by pressing the brake pedal several times and pressing it to the floor. After which a second person opens the drain fitting of the valve and drains a certain volume of liquid along with air and foam. The VAZ 2110 system should be pumped wisely and constantly monitor the fluid level in the tank.
The main thing here is to press the brake pedal correctly without foaming the brake fluid. To do this, we do not make sudden movements or strikes on it. It is correct to press vigorously, but the pedal stroke should be quite smooth. Be sure to keep these recommendations in mind when changing the brake fluid yourself.
You should be extremely responsible when bleeding the brake system, if only for the reason that the presence of air in it means additional losses and unreliable operation of the brakes. Why can the brake system of the VAZ 2110 itself become airy over time:
- leakage;
- corrosion of lines and brake cylinders.
The result is sluggishness when pressing the brake pedal and insufficient force of the pads on the brake disc.
How to properly bleed the brakes on a VAZ 2108-VAZ 21099?
Note! Before starting work, take an assistant with you, because together it will be much easier for you to bleed the brakes in your car!
1) First unscrew the brake reservoir cap, and then remove it.
Note! When the cover is removed, then place it on the engine, placing it under a clean rag!
2) Then fill the brake reservoir with brake fluid.
3) Next, if you are carrying out work, and both rear wheels of your car are hanging, then in this case, between the brake pressure regulator and the plate, insert a screwdriver in order to unlock the regulator, and after completing all operations, remove it.
4) Now from the bleeder fitting “Indicated by a red arrow”, remove the protective cap “Indicated by a blue arrow”.
5) And after removing the cap, put a hose on the bleeder fitting, and place the tip of this hose in a previously prepared container, which will be filled with a small amount of brake fluid.
6) Next, ask an assistant to sit in the driver’s seat of your car, and then have him press the brake pedal all the way, about 3-4 times, at an approximate interval of 2-3 seconds.
Note! When your assistant depresses the brake pedal for the last time, let him leave it depressed until the brake bleeding job is completed!
7) And at this time, using a wrench, slightly loosen the fastening of the bleeder fitting, and after that, the used brake fluid, with air bubbles, will gradually drain into the container prepared in advance, and at the same time, the assistant will have the brake pedal It will have to sink completely into the floor, all the way to the stop.
Next, when the brake fluid is already running out in the brake reservoir, at this time you screw the bleeder fitting all the way, and let the assistant take his foot off the pedal, and then go up to the car engine and fill the reservoir, again to the required level, with brake fluid .
Note! Under no circumstances should you completely empty the brake reservoir of fluid when bleeding, because this can lead to air getting into the system!
9) After pouring the brake fluid into the reservoir, continue bleeding the system with an assistant until all air bubbles disappear from the emerging brake fluid.
Special equipment for pumping
There is a special valve for bleeding the brake system. It fits onto the fitting and prevents air from flowing back into the lines. Thus, the liquid in the system is hermetically sealed when the fitting is closed. If you don’t have this kind of device, this is not such a big problem.
Instead of a specialized valve, it is quite possible to assemble a very ordinary liquid seal. It is assembled from a small piece of hose of a suitable size, a 0.25-0.5 liter plastic bottle and a small amount of brake fluid in it. The effectiveness of this “old-fashioned” method is no worse than the modern one.
The main nuances of pumping the brake system on VAZ 2110 cars
The correct algorithm for bleeding the system should be observed, taking into account the diagonal separation of the brake circuits. If you do not quite understand what the diagonal separation of the contours of the VAZ brake system is, just follow the following sequence of actions:
- bleed the system through the fitting of the rear right wheel, close it;
- go to the front left, follow a similar procedure;
- open the rear left fitting;
- We complete the procedure on the front right wheel.
After all work, be sure to check the tightness of all fittings. Ask your partner in the car to press the brake pedal to the floor, and you yourself, wiping the fitting with a dry cloth, visually check for any leaks. Make sure the brake hoses and lines are completely dry. Only after you have checked all the fittings do you put caps on them.
If after several days of driving the brake pedal again becomes sluggish and the performance of the brakes has worsened, you should not be overly upset. Most likely, shrinkage of the brake fluid occurred (re-foaming of the brake fluid and bubbling of the lines with air). This could happen due to corrosion of both the system itself and poor quality of the liquid itself.
Replacing brake fluid on a VAZ 2110 sometimes results in the above-mentioned problems. Nothing wrong with that. We call our partner back and repeat the pumping procedure again. Checking the brake fluid level. Afterwards you definitely shouldn’t have any problems.
Preparation for pumping and sequence of work
If the brakes stop working immediately after repair work, you may not need to bleed the entire system. After all, the braking system consists of two circuits: front and rear. If you repaired the brakes only on the front or rear circuit, you should not touch the second circuit. Only in this case we neglect the second circuit.
In other situations, if you removed the brake master cylinder or replaced pipes, a mandatory procedure is full circuit bleeding. The Operation and Repair Manual 2109 prescribes how to properly bleed the brakes on a VAZ 2109. The work can only be performed in a certain sequence.
- Right rear wheel.
- Front left.
- Rear left.
- Front right.
Before this procedure, you need to prepare. Preparation begins with checking the brake fluid level in the expansion tank. If the level is below the MAX mark, add the missing amount. Next, you need to prepare a small plastic container and pour some brake fluid into it. It is necessary to fill in order to identify the air by the presence of bubbles during testing. Then we select the hose so that it is long and has a diameter equal to the diameter of the outlet fitting on the brake cylinder.
If you intend to carry out work using a lift, and the rear wheels will be hanging in the air, it is necessary to block the pressure regulator, because when pumping, a lot of pressure will be forcibly created. To lock the adjuster, look for the brake piston under the car that is adjacent to the plate. We insert a flat-head screwdriver between the plate and the piston.
It is more convenient to pump with two people. One person builds pressure in the system (presses the pedal), and the second with a hose and bottle is near the fitting. Before starting work, loosen the fittings.