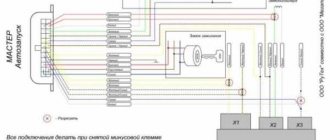
Reasons why the Priora 16 valve engine is tripping. Nothing new
- Supply system;
- Ignition;
- Sensors
- The most common cause of 16 valves on a Priora is damage to the injector winding. You can check this by removing the cover and manifold. Then measure the resistance on the injector winding; it should be within 15-15 Ohms. If it is faulty, it should be replaced. Read more about how to do this in the article “How to check an injector nozzle”;
- Another reason is a clogged injector. This usually happens when using low-quality fuel. You can also “clog” these engine elements yourself by pouring various cleaners into the tank. They partially destroy sediments. Which, in the form of a suspension, enter the injector, where they get stuck in the nozzles. To fix the problem, you need to flush the injectors. You can do this yourself without removing them from the engine.
- First, let's visually evaluate the candle. It should be brown-sand color. If it is darker, then it may be faulty. It is advisable to check it on a special stand. The spark should be blue and white. If it is yellow or red, then this is a bad sign. You can, of course, try to clean it with sandpaper, but this may not bring the desired effect;
- Try using another spark plug and check how the engine runs. If everything returns to normal, then the cause has been found. Also check the high voltage wire;
- After this, check the ignition coil. It is the weakest ignition part in the Priora. To check, we reset errors from the ECU. And with the ignition off, they swap the supposedly non-working ignition coil with the obviously working one. The engine starts for a couple of minutes. The diagnosis is repeated. If the flash miss “migrated” along with the coil, the problem is in it. Replace it with a new one.
AutoFlit.ru
Checking Lada Priora injectors
As mentioned above, both the fuel system ECU and the injector itself can fail. To carry out a complete diagnosis of the ECU, special software is required, which the average motorist simply does not have. Therefore, the only option is to diagnose the machine at a service center. The program, connected to special equipment, will quickly detect ECU errors and correct them.
A full check of Priora injectors is possible only on a special stand
And if problems arise in the mechanical part of the injector, then the diagnostic program will be useless. The maximum that it can do is indicate which cylinder is not working correctly. After this, the car owner can only replace the failed injector on the specified cylinder, since these devices cannot be repaired.
In order to clean the injectors in VAZ 2114/2115 cars, it is recommended that you familiarize yourself with this material:
Siemens Deka injectors
Lada Priora Station wagon quartz from Morsha Logbook Replacing the heater fan on a Priora without air conditioning
There is no certainty with Siemens injectors, since the plant can install injectors of different markings on the same engine. However, there is a clear difference between the injectors for eight-valve and 16-valve engines.
In the first case, the nozzle
single-flare, in the second - double-flare, that is, it sprays fuel onto each of the intake valves separately.
They are marked as VAZ20734 (orange markings) and 20735 (blue markings). On eight-valve engines, a Siemens 6393 nozzle with a thick torch can be used. Its productivity is 1.662 mg/sec, and the operating pressure is 3 atm. Each of these injectors can be installed on a VAZ-2114 engine.
This video was processed in YouTube Video Editor ()
Injector works perfectly
Perfect combustion of fuel can only be achieved if the injector is fully operational. Translated from English, it is called a motor pump.
To understand how to properly clean, you need to know the operating principles of the mechanism itself. This part is based on one or two channels. The first will receive the sprayed liquid, the second will receive the same steam or gas, which will spray the first liquid. The torch will burn continuously and evenly if the nozzle is of high quality and clean. In gasoline engines like the Lada Priora, an electromagnetic injector is usually used. It is a simple device that operates using an electronic control unit - at the right time it is required to supply voltage to the valve excitation winding. Thus, an electromagnetic field will be created: it will retract the valve with the needle and release the nozzle. The fuel will inject, the voltage will disappear and the needle will return to the seat.
This is interesting: Replacing brake discs with your own hands
When to change: self-diagnosis
Lada Priora Sedan 16kl Kvartsukha Logbook REPLACING THE FUEL FILTER
The fuel system of an injection engine has a fairly extensive architecture and faults can only be identified after an accurate diagnosis of each of the system elements. For example, a drop in engine power may be the result of either a malfunction of the injectors, insufficient performance of the fuel pump or a clogged fuel filter.
In addition, jerks and dips, unstable idle and difficult starting, increased consumption, can occur when the injector is simply clogged.
You can check the injectors themselves directly on the engine without removing them. To do this, just start the engine and remove the wires from the connector one by one. If the stability of the engine changes in this case, the engine begins to trip, then the injector
in order. If, when removing the wires from the connector, the stability of the motor does not change, the injector needs to be cleaned or replaced.
How to remove injectors on a Priora with air conditioning
Removing and installing Lada Priora injectors
- Signs of injector failure may include:
- – difficult engine starting;
- – unstable engine operation;
- – the engine stalls at idle;
- – reduced crankshaft speed of the VAZ 2171 at idle;
- – the engine does not develop full power, insufficient engine response;
- – failures in engine operation when driving;
- – increased fuel consumption;
- – increased content of CH in the exhaust gases.
You will need: a 5-point hex key, a flat-blade screwdriver, a 17-point key (two), an autotester.
1. Disconnect the connecting block of the injector wiring harness and the engine harness by pressing the lock.
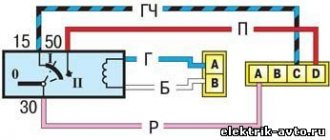
2. Carry out an initial check of the injector windings of the VAZ 2172. To do this, connect an ohmmeter to the contacts of the pads one by one.
The block has five contacts: four for supplying a control signal to the injectors and one common “+12 V” (a crimson wire with a black stripe is connected to it).
3. In turn, connect the four control contacts to the common contact and measure the resistance in each case. It should be 11–15 ohms. If during one or more measurements the resistance value differs from the specified one, the Lada Priora injectors being tested or their wiring harness may be faulty.
4. For a more accurate check and replacement of injectors, remove the fuel rail from the Priora fret (see “Removing and installing the fuel rail”).
5. Use a screwdriver to pry off the spring retainer of the injector...
Removing injectors on Priora (Lada 2170, VAZ 2112)
Thank you so much for watching my videos, tell your friends, leave comments and subscribe...
Replacing injectors (full technology)
Lada Priora Station Wagon Logbook Towbar and roof rack
Before replacing injectors on a VAZ-2114 of any generation, it is necessary to relieve the pressure in the power system.
To do this, remove the rear seat cushion, open the hatch and remove the contact block from the fuel pump. Now it is de-energized and will not build up pressure.
We start the engine and wait a few minutes until all the fuel in the system is used up. As a matter of fact, I’m interested in which spark plugs are best for Lanos 1.5, I take spark plugs seriously. The car drives every day, 5 thousand a month, so I want it to always start with a half turn and. The pressure has been relieved, now you can safely remove the old injectors and replace them with new ones. We proceed according to the following algorithm:
- We de-energize the car by removing the negative terminal from the battery.
Disconnect the negative terminal from the battery
Remove the hose from the pressure regulator
Disconnect the electrical connector of the throttle position sensor
Disconnect the connector from the idle air regulator
Disconnect the connector block from the injector wires
Unscrew the fuel rail mounting bolts
We dismantle the fuel rail with injectors
Squeeze the spring clip and disconnect the electrical connector of the injector.
Rock the injector and remove it from the fuel rail.
Installation of injectors is carried out in the reverse order. Before installation, it is advisable to check the integrity of the O-rings; if they have lost their elasticity, it is better to replace them with new ones. The injectors are installed and ready for further use. Good luck to everyone!
Removing Priora fuel injectors
- Disconnect the block with wires from the injector by pressing the spring clip.
- Remove the bracket by prying it off with a screwdriver.
- Remove the injector from the fuel rail, overcoming the resistance of the sealing ring.
- Remove the injector O-rings using a flat-head screwdriver.
Before installing the injectors, it is necessary to replace the O-rings.
Then apply a thin layer of engine oil to the O-rings. Assembling and installing the fuel rail with injectors is performed in the reverse order. Owners of domestic Lada Priora cars note the build quality and reliability of the car’s components. However, most of the comments and questions from car enthusiasts concern the maintenance of the engine and fuel systems. The most important role in the dynamics of a fuel-injected car is played by injectors, which provide fuel injection into the engine cylinders. They often require cleaning or replacement.
Auto diagnostics - Prices for work
Replacing the heater motor for VAZ 2110, 2111, 2112 1500 rubles
Replacement of engine compartment wiring harnesses for VAZ 2108, 2109 (without injection wiring) 2000 rubles
Replacement of torpedo electrical wiring together with the mounting block on a VAZ Kalina 5,000 rubles
Replacement of idle speed control VAZ, GAZ 300 rubles
Replacing the heater rheostat VAZ 2109, 21015
300 rubles
Replacing the rheostat of the VAZ 2110 heater 1000 rubles
Replacement of spark plugs (four) 200 rubles
Replacement of fuel injectors on a 4-cylinder engine 1500 rubles
Replacement of electric fuel pump on VAZ cars 1000 rubles
Replacement of electric radiator cooling fan VAZ, GAZ 800 rubles
Replacement and repair of electric windshield wipers on VAZ 2110, 2111, 2112 1500 rubles
Replacement and repair of electric windshield wipers on VAZ 2109, 2108, 2114, 2115
1000 rubles
Replacement of temperature sensor VAZ, GAZ 300 rubles
Computer diagnostics of Cevrolet, Daewoo 800 rubles
Computer diagnostics GAZ 600 rubles
Computer diagnostics of Peugeot electronic systems 900 rubles
Reprogramming (chip tuning) of the control unit “Mikas 11 ET” for GAZ cars, Euro-3 system 2500 rubles
Repair of the electrical heating system, replacement of stepper motor gearboxes on VAZ 2110, 2111, 2112 1500 rubles
Repair, setup, adjustment of mechanical injection systems (injectors K, KE-jetronik) 5000 rubles
Removing the fuel rail for repair or replacement of injectors on VAZ cars with 16-valve engines 2000 rubles
Removal and installation of fuel rail injectors, for replacement or repair of injectors on VAZ cars with 8-valve engines (except classics) 1200 rubles
Removing/installing the battery 200 rubles
Removal/installation of mounting block VAZ 2109, 21015 500 rubles
Installation of radio tape recorder 600 rubles
Installation of the activator in one door VAZ 2109, 2110 1000 rubles
Installation of two electric windows together with electrical wiring and buttons 3000 rubles
Installation of rear speakers, with wiring (including cutting out holes for speakers in the shelf) 1,500 rubles
Installation of immobilizers (immobilizer together with installation) 4000 rubles
Installation of parking sensors 4000 rubles
Installation of alarms without auto start and pager (the price includes the alarm and its installation) 5,000 rubles
Installation of alarms with auto start and pager (price includes alarm and installation)
7000 rubles
Chip tuning Renault 4000 rubles
Chip tuning of “Classic” cars (rear-wheel drive) with control units M 73 2500 rubles
Chip tuning of “Classic” cars (rear wheel drive) and Bosch 7.9.7+ unit 2500 rubles
Chip tuning of VAZ Lada “Samara” 1.6 and 1.5 cars with Bosch control unit 7.9.7+ 2500 rubles
Chip tuning of VAZ cars with control unit “January” 5.1, 5.1.1 and VS 2000 rubles
Chip tuning of GAZ cars Euro-3 system 16-valve ZMZ engine, with Mikas 11 ET control unit (electronic throttle)
2500 rubles
Chip tuning of Lada Kalina cars with Bosch 7.9.7+ control unit (16 and 8 valve engines 1.4 and 1.6) 2500 rubles
Chip tuning of Lada "Kalina" cars with control unit M 73 (16 and 8 valve engines) 2500 rubles
Chip tuning of Lada Priora cars with M73 control unit 2500 rubles
Chip tuning of Lada Priora cars with Bosch control unit 7.9.7+ 2500 rubles
Chip tuning of Lada Priora 1.8 cars 2500 rubles
Chip tuning of M 73 blocks 2500 rubles
Chip tuning of injection VAZ cars with control unit “January” 7.2 2000 rubles
Troubleshooting injector problems
First you should try to wash the Priora injectors. There are three methods for this procedure:
- Flushing during operation.
- Hardware flushing method, without removing it from the Priora engine.
- Ultrasonic cleaning in a special machine.
The most affordable and easiest way is to clean the Priora injectors yourself. This is done by pouring a special liquid into the tank. They are available for sale in a sufficient variety. The most popular of them are the following drugs:
- German "Liqui Molly".
- US "High Gear"
- Russian "Laurel".
To rinse, it is enough to pour liquid into the tank at the time of refueling, according to the instructions on the bottle. And drive quietly until all the fuel is used up. After this, replace the spark plugs.
Important! This operation is more likely not a repair, but a preventative measure for the Priora. It is advisable to carry it out every 30,000 kilometers.
Then it will be effective.
The other two methods require special equipment and can only be carried out in a service station. Washing the injectors, without removing them from the Priora, is carried out by connecting a special container to the engine fuel frame. The electric fuel pump turns off. The fuel line fitting is disconnected from the frame and the flushing tank is connected. It contains a mixture of gasoline and washing liquid under pressure. The Priora engine starts and runs until the mixture is completely exhausted. After which, the Priora spark plugs are also replaced.
Cleaning injectors using ultrasound
To do this, you will have to remove the injectors from the Priora engine. The operation is performed on a special stand or in an ultrasonic bath. Such equipment costs quite a lot, and not every car service center can afford it. Moreover, it is a risky operation. Sometimes, instead of putting the injectors in order, ultrasonic treatment, on the contrary, completely disables the components
Therefore, you need to treat this process with great caution
But in any case, the injectors, as when replacing, will have to be dismantled. How to do it?
Removing injectors for cleaning or replacement
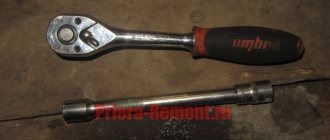
This is a serious process that requires attention and patience. To bring it to life you will need:
- Screwdrivers.
- Pliers.
- Head keys for 13 and 10.
- 5mm hex key.
- 2 wrenches for 17.
- Mount.
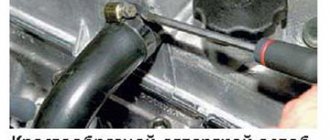
First of all, of course, the Priora battery is turned off. After this, the connectors are removed from the ignition coils. Using a 10mm wrench, unscrew the fastening bolts and remove the coils. Using a 13mm socket, unscrew the 5 bolts and nuts that secure the intake receiver to the head. Using keys 17, disconnect the fuel line from the pipe going to the injector frame. Using a screwdriver, unscrew the fastener of this pipe to the block head. Unscrew the fasteners and remove the dipstick tube. After removing the clamp, move the rubber pipe from the crankcase to the head. Unscrew and remove the 10mm nuts holding the incoming air air receiver on top. Remove the air filter housing. Using a hexagon, unscrew the two bolts securing the fuel frame. Pull the receiver toward you (towards the radiator) by 3-5 centimeters without removing it completely. Disconnect the injector harness connector. Using a pry bar, carefully pry it up and pull it out of the nozzle holes.
Important! Ensure that the injector sealing rings are intact. Try not to drop it. After this it becomes possible to pull the fuel frame towards the battery
Transfer it to the table and start removing the nozzles. This is no longer difficult. Disconnect the wiring harness from each, remove the fixing bracket from the frame and remove the “injector” from the socket. All. You can install a new one or give the old one for washing. And put everything back together in reverse order. Start and check the effectiveness of replacement or flushing
After this, it becomes possible to pull the fuel frame towards the battery. Transfer it to the table and start removing the nozzles. This is no longer difficult. Disconnect the wiring harness from each, remove the fixing bracket from the frame and remove the “injector” from the socket. All. You can install a new one or give the old one for washing. And put everything back together in reverse order. Start and check the effectiveness of replacement or flushing.
There is a useful video for viewing on the topic, removing injectors on a Priora:
- How to change the fuel filter on a Priora
- How to change the cabin filter of Lada-Vesta
- How to change spark plugs on a Priora
- How to revive car wipers
Removing the fuel rail
You will need : relieve pressure in the fuel system, remove the engine air filter, prepare a Phillips and flat-head screwdriver, a 22mm open-end wrench, a 17mm wrench, pliers, a 10mm socket, a 13mm socket and a 5mm hex socket. .
Procedure :
- Disconnect the connector from the injector wires and remove it from the bracket.
- Unscrew the screw securing the pressure plate of the fuel supply tube to the ramp using a Phillips screwdriver.
- Unscrew the fitting of the fuel supply tube to the ramp using a 17 wrench, holding the tip of the ramp tube with a 22 wrench. Otherwise, the ramp may be broken.
- Remove the fuel supply tube from the tip of the ramp tube, and remove the rubber sealing ring.
- Loosen the crankcase ventilation hose clamp using a Phillips screwdriver. Remove the hose from the cylinder head cover.
- Unscrew the self-tapping screw securing the guide tube using a Phillips screwdriver.
- Remove the tube with the oil level indicator facing up.
- Remove the brake booster hose from the intake manifold by using pliers to loosen the clamp.
Disconnect the end of the throttle valve drive cable from the drive sector. Move the throttle body away from the intake manifold (see replacing the throttle body). Disconnect the blocks with wires from the ignition coils (from cylinders 1, 2 and 3), and move the wire harness to the side (see replacing spark plugs).
- Unscrew the two nuts from the upper fastening of the intake manifold using a 10 mm socket.
- Then two bolts and three nuts for the lower fastening using a 13mm socket.
- Disconnect the block with wires from the phase sensor. Remove the ignition coils from cylinders 1, 2 and 3. Cover the holes for the ignition coils with a rag.
- Push the intake manifold towards you and lift it up, bringing it out from under the wiring harness.
- Unscrew the two screws securing the fuel rail to the cylinder head using a 5mm hexagon.
- Remove all four injectors from the cylinder head holes by pulling the ramp along the axes of the injectors. Remove the ramp with injectors and wiring harness.
- Fuel rail assembly with injectors and wiring harness.
When to change self-diagnosis
The fuel system of an injection engine has a fairly extensive architecture and faults can only be identified after an accurate diagnosis of each of the system elements. For example, a drop in engine power may be the result of either a malfunction of the injectors, insufficient performance of the fuel pump or a clogged fuel filter.
In addition, jerks and dips, unstable idle and difficult starting, increased consumption, can occur when the injector is simply clogged.
You can check the injectors themselves directly on the engine without removing them. To do this, just start the engine and remove the wires from the connector one by one. If the stability of the engine changes in this case, the engine begins to trip, then the injector
in order. If, when removing the wires from the connector, the stability of the motor does not change, the injector needs to be cleaned or replaced.
Important nuances
There are a few things to keep in mind when cleaning your injectors. Here they are:
- You cannot save on flushing fluid. The injector is a very important part of the engine. And it is extremely sensitive to the quality of the flushing fluid. The optimal choice for washing Priora injectors is a product from Wynns, developed specifically for injection engines. The cost of a liter bottle is 700 rubles;
The plastic bottle must be removed carefully after washing the Priora injectors.
Replacing injectors is a long procedure. Nevertheless, it is quite within the power of a novice driver if he has at least a vague understanding of the structure of an injection engine. When cleaning the injectors, the situation is much simpler: you just need to be able to use a drill and know where the main fuel hose is located.
| Is the engine stalling, not pulling or running rough? The cause may be faulty injectors, which should be checked and cleaned if necessary. Do you know how to replace injectors on a Priora with your own hands? |
How to check for faults
The car owner can independently check the performance of the injectors on his car. The procedure is quite simple and does not require special training or expensive equipment. In garage conditions, diagnostics can be performed with a set of open-end wrenches, screwdrivers and a tester with a resistance measurement mode.
Reasons indicating problems
Diagnostics must be performed not after any period of operation or mileage has expired, but in the presence of external manifestations of injector failures. In cases where other vehicle systems are operating normally, the following indicators indicate problems with the injection solenoid valves:
at idle there is instability in engine speed;
starting the engine is difficult - the engine may stall;
when overclocking it is impossible to achieve the same dynamics;
The amount of fuel consumed has noticeably increased.
Unclip the plastic clips that secure the valve's power cable. Remove the connector.
Switch the tester to resistance measurement mode and take measurements of the windings of each of the injectors in turn. That is, you need to apply one contact of the tester to each of the five terminals, and the second one to the fifth wire for power.
Optimal resistance values in all cases should be in the range of 11–15 ohms. If at least one pin shows deviations, it will be necessary to change the nozzle.
Communication, commercial requests Help channel: PrivatBank 5168 7556 3188 1725, WMZ.
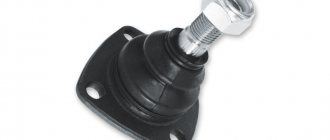
What injectors are installed on Priora cars
Injectors are an indispensable element in the operation of any power unit with continuous injection. Structurally, they are electromagnetic valves, which, when opening, ensure the supply (injection) of fuel in the required volume into the engine cylinders. At the same time, the main purpose of the part is to save fuel, so the valve opens at regular intervals, depending on the driving mode.
Have a red body
On "Priors" equipped with an injection type engine, imported injectors are installed. Products manufactured by Bosch and Siemens are characterized by a high degree of reliability and wear resistance. Their service life is determined by a mileage of 100–150, after which it is recommended to change them.
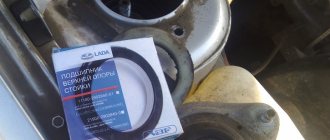
Usually available in black
Differences between injectors for 8 and 16 valve engines
Various modifications of Priora are equipped with parts of the same model. There are no differences for 8 and 16 valve power units. The only thing is that you should be careful when selecting injectors for engines of different sizes: for example, for a 1.5 engine, spare parts will differ in markings, color and thickness from those for a 1.6.
It is recommended to choose materials from the same manufacturer that were equipped with the car at the factory.
Injectors installed on Priora
The Lada Priora car is equipped with imported injectors manufactured by the German company BOSCH. These devices are highly reliable. Their service life can reach 160 thousand kilometers. However, car service specialists strongly recommend changing injectors every 120 thousand km.
Almost all Prioras are equipped with German injectors from BOSCH
Injectors for 8 and 16 valve engines
You should know that the injectors of the 8-valve Priora engine are no different in appearance from the injectors of the 16-valve engine. These are all the same devices from BOSCH, consisting of a housing, a coil, a diffuser and a fuel grid. When choosing injectors for a Priora, you need to think not about the number of valves in the engine, but about its volume. Because the markings of injectors for 1.5 liter engines are different from the markings of injectors for 1.6 liter engines. In the first case, the BOSCH injector should be marked 0-280-158-110, in the second - 0-280-158-502. You can clarify the markings in the car’s operating instructions, at the end of which there is a summary table with digital designations of all BOSCH injectors depending on engine size.
Table of applicability of injectors for VAZ cars
Injector malfunctions
Among the most common causes of injector failure may be the following:
- The injector nozzle is coked - in this case, increased fuel consumption may be observed, vehicle dynamics will decrease, and engine starting will be difficult at subzero ambient temperatures. Otherwise there are no differences.
- The injector valve does not close hermetically (“the injector is snotty” - note) - here there may be increased fuel consumption, “tripleting” and increased detonation (about checking the knock sensor here), unstable idling.
- Valve sticking - engine troubles. Replacing the timing belt on a Priora 16-valve engine is a little more complicated than on 8-valve engines, however, this procedure is necessary. In order to diagnose it, with the engine running, turn off the power supply to each injector in turn. How to change bearings on a generator in a VAZ 2110, replacing its bearings will be for you. With a non-working injector, no changes in engine operation will be observed, but with a working injector, the speed will drop.
If you find a non-working injector on your car, or they need cleaning, you need to know how to properly dismantle them. Replacing valves on a VAZ-2112 with 16 valves with your own. You could already read more about this above.
A problem arose - the injector nozzle was coked - we repaired it ourselves, thank you very much to the author of the article. When replacing, we found the same ones, plus we bought several o-rings at the car market, they cost pennies. The repair was very inexpensive!
I couldn’t understand what it was? I filled the tank, but it was eating like crazy. I dug around and couldn’t figure it out until I was advised to look for information on the internet. It’s good that smart people write and show how to understand and deal with the problem. I looked, listened and I figured it out myself - the injectors were snotty, changed it and that’s it... the problem disappeared. I didn’t have to spend any money!
Before going to the service station I read your article, now I’ll try to disassemble and wash it myself. It turned out to be easier than I expected. Timing belt Correct belt replacement. VAZ 2110 and 2111. -. Replacing the cylinder head gasket on a VAZ 2110 (8 and 16 valves. Thanks to the author.
Cleaning procedure
Cleaning injectors can provide the car owner with the following benefits:
restoring the original functionality of the device;
reduction of fuel consumption;
optimization of motor operation.
That is, in case of contamination (use of low-quality fuel), it is possible to flush and clean the valves in order to restore them to functionality.
Open the hood and make sure all vehicle systems are working properly
Several cleaning methods
Experienced drivers know that there are several ways to clean injectors on a Lada Priora. Moreover, each of them has both its pros and cons.
The first option is to use a detergent additive - the liquid is added to gasoline and, after entering the gas tank, it enters the injectors. Usually one bottle of the additive (0.5 l) is enough for a whole tank of fuel. In this case, absolutely all parts of the fuel system are washed. However, the disadvantage of this method is the lack of drainage of dirt - it will remain in the system.
The second option involves using a solvent. It is considered the most effective, since flushing is carried out while the engine is running. However, it is necessary to replace the spark plugs immediately after using the solvent, as they may stop functioning.
Ultrasonic cleaning of injectors can be considered the most modern method . However, the average car owner cannot always afford to buy this type of equipment.
The Lada Priora car owner can clean and replace faulty injectors on his own - the main thing is to carefully monitor the progress of the work. The solenoid valve on the Priora is considered a fairly reliable element of the fuel system, so you will rarely have to perform any type of work with it.
Diagnostics of spark plugs by plaque
When the engine starts cold or hot, you can check the carbon deposits on the spark plugs. If the coating is white, then this indicates a lean mixture and overheating of the engine. A black tint indicates a rich mixture. In both the first and second cases there are problems with the operation of the electronics. This is either installing new firmware, or replacing the ECU. A normal candle has a brick color. By the way, the engine may stall at idle if the part is damp. This also significantly increases the warm-up time. In addition to the spark plugs, the ignition coil may also be acting up. Priora (8 valves) is equipped with distributor ignition. Overheating of the coil is often observed. You can restore the operation of the motor by simply replacing the element.
BOSCH injectors
Their use depends on the engine size and the number of valves. There is no particular variety in VAZ-2114 engines, so there are only the following options:
- Nozzle BOSCH 0280 158 022 The nozzle is marked black, has a productivity of 1.9644 mg/sec, operates under a standard pressure of 3.8 atmospheres. Installed on a 1600 cc engine with 16 valves. Works with January 7.2 controller.
BOSCH nozzle: productivity 1.9644 mg/sec
BOSCH nozzle: productivity 1.922 mg/sec
New injector
may have a thicker O-ring and, accordingly, a longer nozzle. The injectors are completely interchangeable. These injectors can only work with the January 5.1 controller.
In addition, you need to know which engine control controller is installed on the car, since January 5.1 and January 7.2 may require injectors of different capacities.
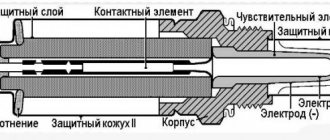
About the design of Priora injectors
It was these components that gave the common name to the type of car with an ECM. None of the drivers wants to pronounce the full name. They say simply - an injector. So what is a nozzle (injector)? This is a device that allows you to inject fuel, under pressure, directly into the working chamber of the cylinder in strictly metered portions.
The principle of operation of Priora injectors is based on the electromagnetic effect. When the circuit is closed, the coil retracts the core, which opens the channel for supplying fuel accumulated in the fuel frame under pressure. The opening signal comes from the electronic control unit (ECU). The nozzle consists of the following parts:
- Frame.
- Coil.
- Fuel cleaning mesh.
- Nozzle with holes (diffuser).
Main problems of injectors
Malfunctions of these important components of the Lada Priora car can be divided into two categories:
- Electrical part.
- Mechanical component.
The first option includes damage to the coil or connector. A break or interturn short circuit may occur in the coil. One or both contacts in the connector may break. Over time or from an impact they break off. In any case, such a nozzle requires replacement.
Mechanical malfunctions of Priora injectors include various changes in the diameter of the fuel supply channel. Most often with Priora, this is contamination caused by the settling of foreign particles on the walls of the channel and in the diffuser. Or corrosion (increase) in diameter under the influence of additives. Although this happens extremely rarely at Priora. With an increase, there are no options other than replacement. But if they become dirty, you can wash the nozzles. About replacement and flushing, about identifying a breakdown, further.
Important! Contamination of the contact area of the shutter needle can also cause incomplete closure and fuel leakage.
Symptoms of malfunction and diagnosis of injectors
"Priora" begins to "triple". The engine shakes at idle. When driving, loss of power and failure to gain speed. The “Check Anger” lamp gives a signal. This means that one of the cylinders is not working as expected. First of all, you need to do computer diagnostics and count the errors. The ECU detects faults in the electrical part immediately. Otherwise, it gives at least an accurate orientation to the inoperative cylinder. And then all that remains is to determine what failed:
- Candle with coil.
- Compression in the cylinder.
- Nozzle.
Knowing which of the “boilers” is not working makes it easier to act. The first thing to do is measure the compression. On a cold engine. If it is within the normal range, move on to candles. First, swap the coils on the Priora engine. If the leaks are again in the same cylinder, swap the spark plugs. Here you go. Nothing has changed. So this is an injector.
Attention! The nature of the malfunction can be indicated by the spark plug! If it is clean, then fuel is not flowing. But blackening and deposits on the electrodes indicate that the nozzle “does not hold” fuel and “floods” the spark plug.
Injectors: how to check and clean without removing them from the engine
The nozzle on a car's injection engine plays a decisive role in the stability of its operation. It is no less important than spark plugs or pistons, since without proper fuel injection it is impossible to detonate at a strictly specified moment. The injector injects fuel into the combustion chamber of the engine in a certain volume, which allows you to maintain the most economical and productive operating mode of the internal combustion engine. The vehicle's electronic control unit regulates the amount of fuel supplied by the injector.
Supply system
If the Priora engine (16 valves) is tripping, the reasons may be trivial. When there is no flash in the cylinder, perhaps there is simply no fuel there. If it has a normal compression ratio, it is worth diagnosing the power system. You should pay maximum attention to the air filter and the pipe. It is necessary to make sure that the clamps are securely tightened, whether the purifier body itself is intact, and whether there is any air leakage from the outside
Also pay attention to the tubes. They must be tightly secured to the throttle assembly
Fuel leaks, cracks, and broken plastic may indicate that some parts are faulty.
Replacing injectors on a 16-valve Lada Priora engine
As mentioned above, symptoms of injector malfunction include unstable engine operation, starting problems and increased gas mileage. To change the nozzle to a new element, you will have to spend a lot of time, since the replacement procedure is quite complicated.
As a working tool, it is recommended to immediately prepare:
set of open-end wrenches;
Phillips-blade screwdriver.
After the car has stood for some time and cooled down, you can start working:
The plastic retainer of the harness must be pressed to the side with your finger to pull the bundle of wires out of the injector.
After which you will need to relieve the pressure in the car’s fuel system. The average pressure is approximately 380 kPa, that is, if work is carried out without bleeding, you can get injured due to sudden fuel emissions. To do this, you will need to open the car and remove the seat from the back row.
There is a carpet under the seat, and under it there is a hatch to the gas tank.
Using a Phillips screwdriver, unscrew the two screws that secure the hatch cover to the panel and remove the cover.
From the fuel pump, which is located in the gas tank, you need to disconnect the power wire - the connector can be pulled out without difficulty.
After this, you need to start the car and wait until the engine stalls due to lack of gasoline.
Next, you need to run the starter for at least three seconds so that the pressure in the system equalizes.
Disconnect the cable from the negative terminal on the battery.
After which the procedure for removing the injectors is possible without risk. To begin, use a screwdriver to unscrew the decorative box on the engine.
Next, remove the screws securing the air filter box from the car body - it will prevent free access to the engine, so it is better to remove it immediately.
The wire connected to the throttle valve is disconnected from the intake manifold.
Next, you will need to disconnect all the lines that connect directly to the frame connectors. It will be necessary to prepare to remove the fuel frame - to do this, use a 10mm wrench to unscrew the bolts that secure the frame to the body.
Using a screwdriver, loosen the clamps on the ventilation and vacuum hoses and disconnect the hoses from the cylinder block.
The intake manifold is bolted to the cylinder head with three nuts - you will need to unscrew them to remove the intake manifold.
After which it will be possible to disconnect the injector harness.
The fitting through which fuel is supplied is disconnected from the engine compartment.
After this, you can remove the fuel pipe from the frame, and then dismantle the fuel frame along with the injectors that are located on it.
The injectors can be pryed off with a screwdriver - the fixing element is easily removed so that you can get to the valve itself.
Comprehensive diagnostics of the operation of injectors on the ramp
For such a check, the fuel rail will need to be removed from the engine along with the injectors attached to it. After this, you need to connect all electrical contacts to the ramp and injectors if they were disconnected before removal. It is also necessary to return the negative terminal of the battery to its place.
- The ramp must be placed in the engine compartment so that a measuring container with a scale can be placed under each of the injectors.
- It is necessary to connect the fuel supply pipes to the ramp and additionally check the reliability of their fastening.
- The next step is to turn on the ignition, after which you need to crank the engine a little with the starter. This operation is best performed with an assistant.
- While an assistant rotates the engine, check the efficiency of all injectors. The fuel supply must be the same on all injectors.
- The final step will be to turn off the ignition and check the fuel level in the containers. The specified level must be equal in each container.
More or less fuel in the measuring containers will indicate a faulty injector or the need to clean one or more injectors. If the nozzle shows underfilling, then the element needs to be cleaned or replaced. Fuel leakage after turning off the ignition will indicate that the injector is “flowing” and has lost its seal.
In addition to self-checking, you can use the injector diagnostic service at a car service center. This operation is performed on a special testing stand. Testing an injector on a bench allows you to accurately determine not only the efficiency of fuel supply, but also the shape of the torch during fuel spraying.