How to choose a place in the car to install a subwoofer
Drive with the breeze and high-quality music along a highway with beautiful scenery. Isn't this what every car enthusiast dreams of? And it seems like everything is there - a car, music, and the beauty of nature outside the window. There's just something missing. Most often, this “something” is the volume of sound, its depth, which can only be achieved by installing a high-quality subwoofer. At first glance it may seem that there is nothing complicated about this. Whatever the case. Many car enthusiasts have no idea where they can install such a useful device for maximum efficiency. In this article we will deal with all the questions that interest you in more detail.
Installing a subwoofer in the trunk so that it plays into the cabin through the hole in the back of the rear seat
Electrical part, installation tips
One power wire (positive) is pulled to the subwoofer amplifier. “Mass” can be taken, for example, from the seat mounting bolt. Also, if necessary, you need to extend a control cable to the subwoofer, connected to terminal 6 of connector C. When the radio is turned on, a positive voltage appears at the terminal.
Power supply for active subwoofer, fuse
Of course, the positive power conductor is connected through the pre-flask. This unit must be secured next to the battery. Let us remind you once again that first of all you need to disconnect the negative terminal, and only then you can carry out any work.
Each power cable must be of sufficient size to withstand the maximum current drawn by the equipment. The minimum possible cross-section of copper should be indicated in the instructions. Be careful!
Signal cables (thin) are connected to the wires of connector B, marked 1/2 and 7/8. It is quite acceptable to use T-clamps here. The main thing is not to damage the standard wires. The appearance of such clamps is shown in the figure.
Theoretical information
Let's look at what types of acoustics are generally used in a car. Four types of systems are popular - the so-called infinite acoustic screen, closed-type acoustics, strip-type acoustics and a case with a bass reflex. I would immediately like to note that the use of complex acoustics for the low-frequency head makes it possible to install lower-power amplifiers. At the same time, the volume and sound quality remain at the same level. Considering that the cost of an amplifier largely depends on its power, this aspect is very important.
When purchasing a subwoofer, you need to ask how many voice coil windings are in the device. Today, “low-frequency drivers” with 1, 2 or 4 windings are on sale. In principle, increasing the number of windings is some trick of manufacturers, who enable customers to use several devices of lower power instead of one powerful amplifier.
The so-called active cabinet subwoofers, which are sold in conjunction with an amplifier, are very popular. In this case, the car enthusiast’s task is simplified, because the time for choosing devices is significantly reduced. And the sound quality always remains at its best. The advantage of active subwoofers is simplicity and high speed of setup. In addition, they are easy to install and are equipped with all necessary inputs. But there is a drawback - there are no inputs from the built-in amplifier. This means that if it burns out during operation, the speaker itself will no longer be usable.
Why is the standard option not suitable?
The standard instructions contain information about the connectors installed on the rear wall of the radio. The signal connector, which is designated by the letter “C,” contains three groups of contacts. Group “1-6” is just what you need to connect external equipment. Taking the signal from pins 1 and 2, it can be applied to the low-voltage inputs by extending the ground conductor from pin 3. This option is standard.
Wiring out the touch radio connector
However, do not rush to buy a terminal block suitable for the specified connector. We won't need it. According to reviews, the standard connection option has disadvantages:
- Any external device (amplifier), along with the useful signal, receives high-frequency interference. We are talking about using connector C;
- It would seem that HF interference is not dangerous for a subwoofer. However, by connecting its inputs to pins 2/3, you can observe the following effect: when you start the motor, a hum comes from the speaker.
These defects are irreparable. However, no one bothers you to use high-voltage outputs (connector B). But since the subwoofer is equipped with a low-voltage input, matching will be required. Looking ahead, let's say: a transformer is supposed to be used.
There really can be no complaints about the quality of the products produced. If you connect the radio outside the car body, these defects are absent.
Installing a subwoofer in a car: where, how and why
Actually, it’s no secret to every experienced car enthusiast that installing a subwoofer in a car largely depends on the vehicle’s body type. Moreover, today there are three main classes (of course, this is conditional) - convertible, sedan and hatchback (station wagon). Each type must be considered separately, which is what we will do next.
Installing a subwoofer in a sedan
One of the options for installing a subwoofer in a sedan
So, let's start our excursion with one of the most difficult options - installing a woofer in a sedan. There are “craftsmen” who install a subwoofer in the trunk or mount it in the side wall, believing that this is enough. But this is the wrong approach. With this method of “installation”, only the lowest frequencies will reach people in the cabin, and this will happen due to the body elements. Therefore, there is no need to talk about any sound quality. What options are there?
1) Installing a subwoofer in the rear shelf. This method is considered the most convenient and promising in terms of sound quality. Moreover, the car enthusiast has the opportunity to use a variety of sound design options:
— endless acoustic screen. One of the simplest ways. But here it is necessary to acquire special low-frequency heads, without which it is impossible to achieve high sound quality. In addition, the task of the car enthusiast is to completely separate the trunk from the passenger compartment. This is easy to do - you just need to seal all existing holes. The next step is to redo the rear shelf. It is desirable that it be made of thick MDF board. As a last resort, you can use regular plywood or a sheet of chipboard. The use of these materials will avoid rattling of the speaker. In general, the thicker the rear shelf, the better for overall sound quality. In addition, a thick shelf allows you to “get” the subwoofer out of the trunk a little and save time on creating a hole for it.
To prevent the speaker from breaking down after just a few days of active use, it is very important to use a special infra-low frequency filter (the ideal setting in this case is about 30 Hz). With such an installation, we must not forget that the quality of low frequencies will directly depend on the contents of the luggage compartment;
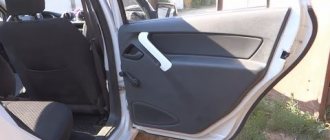
Lada Kalina Cross Ryzhik › Logbook › Installing a subwoofer and new speakers in the front doors
After purchasing the car, I wanted to improve the sound quality of the music in it. Since I didn’t want to spoil the overall interior, I decided that I would install everything and connect it to the original push-button radio.
What we need to connect the sub: 1) 5 m of red power wire, which will go from under the hood to the trunk (+); 2) 1.5 m of black power wire, bolted at the back of the machine to the metal (-); 3) 5 m of control wire (REM), which will turn off the subwoofer so that the battery does not discharge when the radio is turned off (+); 4) 5 m of acoustic wires, either tulips or ordinary ones + - as for speakers (depending on the connection).
Since the standard radio does not have tulip acoustic connectors, I decided to use the second option - connecting a subwoofer from the rear speakers. This method of connecting the standard and additional connector was included with the subwoofer.
First thing
lay
the positive wire
. I used a jig. I chose the hole in the place where the wiring goes to the wiper motor. I took out the rubber plug and did not install it in place. The hole is located on a fairly vertical surface, it seems that water should not get in. I control this moment and check.
READ How to install a Kaiser door
Then
you need to connect to the regular GU. To do this, you need to disassemble the front panel with climate control.
Now we will work with the wiring.
I immediately installed 2 buttons in the cover, under which there are fuses next to the trunk opening button.
All wiring (power wire, acoustic and control wires) was laid along the sills on the driver's side of the car.
Black power wire (-)
I screwed it into the luggage compartment in the area where the rear seat hinges are attached.
The sub installed, configured, everything works correctly.
To the front doors
installed 13 ALPINE coaxial speakers manufactured in 2010-2013, which perfectly play both live instruments (piano, guitar) and electronic sounds. I can’t tell you the model now, since the box is lost.
Source
Stealth Kalina station wagon
The review provides patterns of parts intended for assembling the subwoofer and its subsequent installation in the Lada Kalina station wagon. The subwoofer body in question can easily be placed in the trunk close to the left fender. For the manufacture of the case, chipboard with a thickness of 17 mm is used.
Let us note one important point: to make the upper and lower walls of the subwoofer, you will need an electric jigsaw. The design in question has no other features.
Re: Help me choose a subwoofer for a Kalina sedan
thanks for the answer
———- Message added on 12/20/2012 at 10:50 a.m. ———-
Kicx ICQ-300B + Kicx AR2.120 the choice fell on this, and in terms of money in our city it costs 800 rubles more than my budget.
Don't buy this kit before it's too late!
———- Message added on 12/20/2012 at 08:58 ———-
DLS M112 in box + Mystery MR1.300.
In general, for a sedan it’s better to bother with a free-air sub. We cut a shelf in the shape of an old one from 19-21mm plywood (200 rubles), cover it with carpet (100-200 rubles), cut a hole in the metal shelf (0 rubles), glue it with a vibrator (200-300 rubles), firmly fasten the shelf to the metal. Sub install a Pioneer TS-W309D4 and connect it at 2 ohms to the Mystery MR1.300. There will be quite powerful and pleasant bass in the cabin, and not somewhere distant in the trunk of a sedan.
Case wall patterns
The design in question itself consists of ten parts that can be cut from a sheet of chipboard. The edges of some parts (5–8) should not be perpendicular to the surface of the sheet. However, the absence of inclined edges can be compensated for with sealant. Here are the drawings in a simplified form:
After assembly, the case looks like a monolithic block:
Subwoofer housing assembly
Each part is first made from corrugated cardboard for “fitting”.
You can try to assemble the body after you are sure that each of the parts will take its place in the structure. If necessary, an incorrectly manufactured element is replaced.
Practical implementation
To access the main radio unit, you need to remove the center console. First, dismantle the climate control unit, then unscrew two screws and remove the decorative panel:
The fastening of the decorative trim is hidden under the climate control unit
We discussed all dismantling actions in detail earlier. The cassette recorder body is held in place by latches on both sides. To disconnect them, use the metal plates (similar to skewers) that are included in the repair kit. When the latches are loosened, the body is pulled towards itself.
The standard radio unit has been removed
After the unit has been dismantled, it is better to immediately disconnect all connectors. And no matter how highly qualified the installer is, the following advice should not be neglected:
When carrying out any work on electronics, you must first remove the negative terminal from the battery. This is how you can protect yourself from unforeseen consequences.
It remains to consider how to make the connection.
Tips for assembling chipboard cabinets
It would seem that it couldn’t be simpler - take and connect several sheet panels to form a single unit. The parts are fastened to each other with self-tapping screws. However, even before assembly, it is recommended to coat the edges of the panels with sealant. Then, all the parts are connected and wait for the fastening material to dry.
The screws can be screwed in when you are sure that the geometry of the structure is not broken.
In part “3”, using a “ballerina”, a hole is made for the speaker. The body can be covered with carpet, and sound insulation must be added inside. The result of all efforts looks like this:
As soon as the hole for the speaker appears on the body, all seams from the inside are coated with sealant. To prevent the material from getting on the skin of your hands, use plastic gloves.
The review provides patterns of parts intended for assembling the subwoofer and its subsequent installation in the Lada Kalina station wagon. The subwoofer body in question can easily be placed in the trunk close to the left fender. For the manufacture of the case, chipboard with a thickness of 17 mm is used.
Let us note one important point: to make the upper and lower walls of the subwoofer, you will need an electric jigsaw. The design in question has no other features.
A little theory
After purchasing a new speaker, you need to measure its parameters. Based on the obtained values, the volume of the housing in which the speaker will be placed is calculated. The housing type can be one of the following:
- Bass reflex;
- Closed box;
- Housing with passive acoustic radiator;
- And so on.
The presence of boxes with holes (bass reflex, etc.) can lead to undesirable consequences. At a minimum, dust will collect inside. For a car, a housing with an acoustic radiator or even a “closed box” is better suited.
Various types of acoustic design
According to the drawings given below, it is possible to make a “closed box” class sub, the internal volume of which is 30 liters. Let's start manufacturing.
Case wall patterns
The design in question itself consists of ten parts that can be cut from a sheet of chipboard. The edges of some parts (5–8) should not be perpendicular to the surface of the sheet. However, the absence of inclined edges can be compensated for with sealant. Here are the drawings in a simplified form:
After assembly, the case looks like a monolithic block:
Subwoofer housing assembly
Each part is first made from corrugated cardboard for “fitting”.
You can try to assemble the body after you are sure that each of the parts will take its place in the structure. If necessary, an incorrectly manufactured element is replaced.
Tips for assembling chipboard cabinets
It would seem that it couldn’t be simpler - take and connect several sheet panels to form a single unit. The parts are fastened to each other with self-tapping screws. However, even before assembly, it is recommended to coat the edges of the panels with sealant. Then, all the parts are connected and wait for the fastening material to dry.
The screws can be screwed in when you are sure that the geometry of the structure is not broken.
In part “3”, using a “ballerina”, a hole is made for the speaker. The body can be covered with carpet, and sound insulation must be added inside. The result of all efforts looks like this:
Sub in the trunk of the Kalina-2 station wagon
As soon as the hole for the speaker appears on the body, all seams from the inside are coated with sealant. To prevent the material from getting on the skin of your hands, use plastic gloves.
Box for a subwoofer for VAZ 2110 and Lada Priora (sedan) in the wing (right or left). Volume 26 liters, made of plywood and covered with carpet. Production g.o. Tolyatti.
We connect the amplifier and subwoofer to the radio.
We connect the standard radio of Kalina 2 lux to the amplifier and subwoofer.
General plan for connecting an amplifier to an MMC:
1. We stretch the red wire to the amplifier from the battery. We connect a fuse (pre-flask) next to the battery.
2. Connect the minus and ground (black wire) to the body and to the amplifier.
3. Connect the subwoofer and speakers to the amplifier.
4. Remove the instrument console (where the radio is installed). Remove mms.
5. We stretch and connect the speaker wires from the amplifier to the radio using a mini-ISO connector. (Standard wires will not work)
And now in more detail on points 4 and 5:
The first step is to remove the lower part where the climate control system is located; it is advisable to use a “plastic card”. After removing it, we will see 2 screws that hold the console, unscrew them and remove the instrument console, you can lightly pull the display visor, the radio is also attached to two self-tapping screws on both sides. Access to the back of the mms is open.
Connect the wires to the radio:
We will need a mini ISO adapter. The blue and green plugs are in their places, we don’t touch them, we connect the mini ISO adapter next to the yellow cell.
Power cable to plus to battery with fuse
Next to the battery we connect a fuse (pre-flask)
Carefully fold and assemble in the reverse order, try not to touch the remaining wires that function with the display and do not forget to reconnect the light sensor and alarm from the inside of the console if you disconnected them for ease of access, and here is the result of 2 hours of work.
How to choose the right subwoofer, see here.
source
Subwoofer for the wing of the Kalina-2 station wagon
The review provides patterns of parts intended for assembling the subwoofer and its subsequent installation in the Lada Kalina station wagon. The subwoofer body in question can easily be placed in the trunk close to the left fender. For the manufacture of the case, chipboard with a thickness of 17 mm is used.
Let us note one important point: to make the upper and lower walls of the subwoofer, you will need an electric jigsaw. The design in question has no other features.
Lada Kalina Sedan Kalinvagen › Logbook › Subwoofer
Another plan that I wanted to implement after buying the car is a sub. I love electronic music, especially Drum'n'Bass. The last word directly hints that a sub is needed. I didn’t want to waste my time on any kind of hammering, buzzing mystery, so I started looking through advertisements for the sale of used vehicles. Found a set of Crunch GP4150 and JBL GT5-12 in a box. I asked people on VKontakte - they said it was normal. I arrived at the meeting place with the seller, the seller is a man about 35 years old in a Priora. Let me listen. Well it plays fine. Only one thing spoils the sound - the Priora. Everything in front of your eyes makes noise in it, right down to the last button. The seller said that I would have to do a Shumka in Kalina. Yeah right now. Kalina is not some kind of Priora. Even though she is older, the interior did not respond to the sub at all! Only the trunk lid rattled from the street.
I bought the wires. I honestly don’t remember how thick the power wire was, but it was all based on advice on the Internet. And I also grabbed the corrugation for the power cable.
A little theory
After purchasing a new speaker, you need to measure its parameters. Based on the obtained values, the volume of the housing in which the speaker will be placed is calculated. The housing type can be one of the following:
- Bass reflex;
- Closed box;
- Housing with passive acoustic radiator;
- And so on.
The presence of boxes with holes (bass reflex, etc.) can lead to undesirable consequences. At a minimum, dust will collect inside. For a car, a housing with an acoustic radiator or even a “closed box” is better suited.
According to the drawings given below, it is possible to make a “closed box” class sub, the internal volume of which is 30 liters. Let's start manufacturing.
Case wall patterns
The design in question itself consists of ten parts that can be cut from a sheet of chipboard. The edges of some parts (5–8) should not be perpendicular to the surface of the sheet. However, the absence of inclined edges can be compensated for with sealant. Here are the drawings in a simplified form:
After assembly, the case looks like a monolithic block:
Subwoofer housing assembly
Each part is first made from corrugated cardboard for “fitting”.
You can try to assemble the body after you are sure that each of the parts will take its place in the structure. If necessary, an incorrectly manufactured element is replaced.