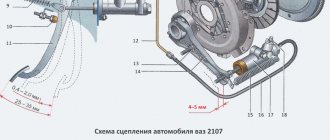
VAZ 2107 clutch: device
The “Seven” has a dry single-disc clutch. The clutch hydraulic master cylinder is located directly under the pedal, when pressed, the pusher moves, acting on the master cylinder piston, creating pressure. The brake fluid that fills the hydraulic drive is squeezed out and flows into the working cylinder.
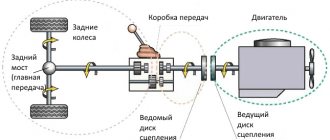
The piston of the working cylinder is connected to the clutch fork by a pusher. When you press the pedal, the latter moves the fork, it displaces the release bearing and separates the support and pressure discs. As a result, the torque from the crankshaft flywheel is no longer transmitted to the gearbox and it becomes possible to change gear.
If the clutch unit malfunctions, when you press the pedal, the gearbox shaft continues to rotate and changing gears becomes difficult or even impossible. If the clutch is adjusted incorrectly, the discs may slip, which is accompanied by accelerated wear.
You cannot continue to drive a car with a faulty clutch - both the clutch discs and the gearbox may be damaged. Therefore, at the first sign of a malfunction, you should start repairing and adjusting it.
Signs of a slipping clutch
The driver can detect slippage as follows:
- Difficult gear shifting, a kind of crunching sound.
- The car moves poorly and begins to slip.
- When driving fast in lower gears it jerks (working jerks).
- Loss of power when climbing.
- Vibration or noise occurs.
- Pedal device failure.
Why is this happening?
To understand why the clutch slips on a VAZ 2107, you need to understand its structure and operating principle.
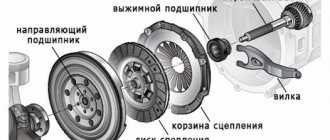
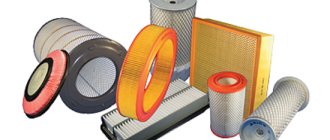
The entire mechanism consists of the following elements:
- crankcase;
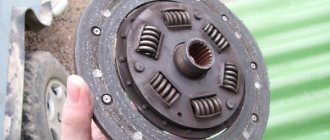
- driven disk of the basket;
- riveted friction linings;
- diaphragm spring;
- pressure plate;
- hydraulic clutch release.
The parts are placed in a steel basket; The driven disk contains splines and damper springs that ensure smooth gear shifting.
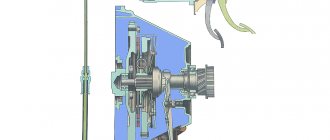
The operating principle is based on friction between the working parts. The clutch connects the power unit and the transmission and transmits torque from the engine flywheel to the intermediate shaft of the vehicle's gearbox. When you press the pedal, the disc moves away, the connection between the motor and the gearbox is disconnected, and the rotation of the gearbox shaft stops. When the pedal is released, the flywheel and gearbox shaft are connected, and rotation is transmitted to the gearbox.
The coupling device slips for the following reasons:
- Oil leakage, liquid getting on the surface of the basket parts.
- Overheating of the drive disk. When the temperature is exceeded during use, the discs expand. This phenomenon is not noticeable on the go. It is determined during inspection of the part. Soot deposits and fumes are visible on the surface.
- Wear or delamination of friction linings. The elements not only wear out, but can also get burned. An unpleasant odor appears in the car interior.
- Damaged or worn compression spring. If there are defects, the spring is not able to create the required pressure on the disk.
- No gaps in the shutdown hydraulic drive.
- Reduced freewheel parameter.
Experts combine the reasons why this happens into 2 groups:
- The hitch does not fully engage (drive). Due to the increased distance of the pedal to the platform.
- The clutch does not fully engage (slips). The discs slip relative to each other, and the pedal stroke decreases.
How to check whether the clutch is slipping or not
To check the system yourself without special technical devices, perform the following steps:
- Turn on the engine and set it to neutral.
- Release the parking brake.
- Press the gas lever.
- Engage first gear.
- Squeeze the pedal.
- Squeezing is done several times.
When the assembly is operating correctly, the engine stalls. If the engine does not turn off, or there are extraneous sounds (clicks, creaks, knocks) and a burning smell, the clutch is considered faulty. Particular attention is paid to pedal travel. The lever should lower smoothly, without jerking or interruption.
What to do when the clutch slips
Depending on the cause of slipping, the progress of repair and restoration work is determined.
If the fault lies in the pressure spring, it must be replaced with a new one. When the friction linings are worn, the driven disk is replaced. When repairing or replacing some linings, be sure to inspect the gaskets. If they are damaged or have burnt spots, they are also replaced. If oily liquid gets on parts of the driven disk, it is necessary to treat the surface with kerosene or white spirit and clean it with fine-caliber sandpaper.
Grease may get on the surface of the flywheel and pressure plate if the fluid level in the gearbox housing increases excessively or if there is a leak in the rear crankshaft bearing. To solve the problem, carry out visual diagnostics and eliminate the cause of the leak, then clean the parts.
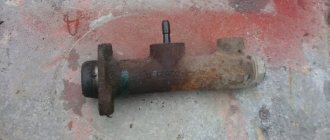
Replacing the clutch master cylinder VAZ 2107
The simplest way to repair a VAZ 2107 clutch is to change the worn cylinders (main and slave). Their price is low, and the labor intensity of the operation is much lower than when carrying out repairs. Therefore, car owners often prefer to replace rather than repair clutches.
Let's start by replacing the master cylinder. The order of operations is as follows:
- Drain the brake fluid from the clutch reservoir into another container. This can be conveniently done using a syringe.
- Loosen the clamp and remove the hose from the master cylinder fitting.
- Unscrew the fitting of the metal tube going from the master cylinder to the slave cylinder and disconnect the tube.
- Using a 13mm wrench or a socket with an extension, unscrew the two nuts securing the master cylinder to the body bulkhead and remove the master cylinder.
The new clutch master cylinder can now be installed. Before doing this, you should check the condition of the flexible hose of the clutch reservoir. If it cracks at the end, it needs to be trimmed slightly or replaced with a new one.
When installing a new cylinder, it is necessary to ensure that the clutch pedal drive rod fits inside the cylinder. For convenience, you can ask your partner to slightly press the clutch pedal and hold it. Then follows:
- Install the master cylinder onto the studs and tighten the nuts.
- Attach and tighten the metal tube fitting.
- Place the pipe from the clutch reservoir and tighten the clamp.
- Fill the reservoir with brake fluid, following the level marks.
The clutch master cylinder has been replaced.
Replacing the clutch yourself
When replacing the clutch, you should carefully inspect all the parts being removed; it is quite possible that you will not need to replace the entire assembly; it will be enough to change only some parts.
The clutch is replaced in the following sequence:
- The battery terminals are disconnected.
- The gear shift lever is disconnected from the transmission.
- The exhaust pipe is disconnected from the resonator, then the working cylinder is disconnected from the gearbox housing. The cardan is disconnected from the gearbox itself.
- The bolts securing the starter to the transmission housing are unscrewed, but before doing this, the two lower nuts that secure the transmission to the engine block must be loosened.
- The gearbox is removed, then the clutch basket is dismantled. After removing the basket, the clutch disc is released
- At this stage, if necessary, the master cylinder and other components are replaced, for example, the clutch fork or antennae on the basket are changed.
- Assembly and installation of the unit is carried out in the reverse order.
When assembling, all parts must be thoroughly washed, but under no circumstances should this be done in gasoline or oil. Lubrication is carried out only with brake fluid.
The clutch is one of the most important components in a car, without which it simply will not move. Therefore, this complex system requires proper attention and care. Malfunctions in the clutch operation can lead to spontaneous movement of the car, and this is a direct threat to the lives of others.
Replacing the clutch slave cylinder VAZ 2107
Removal of the working cylinder should be done from the inspection hole or using a lift. The order of operations is as follows:
- Remove the return spring from the slave cylinder bracket.
- Unscrew the fitting of the tube coming from the master cylinder. To prevent brake fluid from leaking from it, you can put a cap on it, removed from the cylinder bleeder fitting, or direct it into a container prepared in advance.
- Unscrew the two bolts connecting the slave cylinder to the gearbox and remove them together with the plate.
- Remove the clutch slave cylinder.
This is interesting: Test drive Suzuki Wagon R
The new working cylinder is installed in the reverse order of removing the old one.
After replacing any of the cylinders, the hydraulic drive system must be pumped. The work must be carried out together with a partner. This is done like this:
- Place a hose on the fitting of the working cylinder and immerse its end in a prepared container for brake fluid.
- Depress the clutch.
- Unscrew the fitting on the working cylinder 1 turn.
- Wait until air bubbles stop coming out and tighten the fitting.
- Repeat the operation until air stops coming out of the fitting. At the same time, monitor the fluid level in the clutch reservoir.
- Tighten the fitting and put on the cap.
There are several ways to bleed the clutch on a VAZ 2107, here is a video about the most popular ones
Replacing the clutch basket
Replacing the basket is done less frequently than replacing the driven disk. The basket needs to be changed if the drive disk overheats (then colored spots appear on it), breakage or wear of the diaphragm blades and springs. To access the clutch, you need to remove the gearbox.
- In the engine compartment, remove the “-” terminal from the battery and unscrew the starter bolts;
We remove the terminals from the battery. In the passenger compartment, remove the gearshift knob; Remove the gear knob. Remove the exhaust pipe from the hole;
Remove the exhaust pipe from the exhaust manifold. Unscrew the driveshaft from the main gear, mark the connection points on the flanges; Unscrew the propeller shaft Unscrew the cross member of the rear gearbox support; Unscrew the gearbox cross member
Removing the gearbox When dismantling the clutch itself, you need to unscrew the basket bolts from the flywheel. To distribute the load evenly, the bolts are unscrewed 1-2 turns in turn. After removal, the basket must be inspected for wear of the disk, integrity of the springs, and diaphragm.
VAZ 2107 clutch repair
Repairing clutch cylinders is somewhat more difficult than replacing them, but much cheaper.
Once the cylinders are removed, disassembly can begin. Let's start with the master cylinder:
- Use a thin screwdriver to remove the retaining ring.
- Remove the fitting and gasket.
- Remove the boot by prying it off with a screwdriver.
- Unscrew the cylinder plug using a 22mm wrench.
- Pull out the retaining ring and use a screwdriver to remove the inside of the cylinder.
To restore the master cylinder, the rubber seals must be replaced. It is also necessary to check the condition of the spring, the inner surface of the cylinder and the piston. If there are burrs or damage, parts must be replaced.
Before assembly, parts should be thoroughly cleaned and dried. It is unacceptable for gasoline or oil to get inside the cylinder - they destroy the rubber seals.
Assembly is carried out in the reverse order of disassembling the cylinder.
The clutch slave cylinder, despite some design features, is repaired in the same way as the main one.
After repairing the cylinders and installing them in place, it is necessary to bleed the hydraulic clutch drive.
PREPARATION FOR CLUTCH REPAIR
What you need to prepare in order to repair the clutch yourself:
- A set of keys
- Screwdriver (preferably thin)
- Special pliers-pullers
- WD-40 or similar rust remover
- Knife
- Brake fluid
- Bleeding hose
- Bleeding container
- Syringe
That's probably all that is needed.
Expanding pliers (circlip pliers)
Replacing the clutch master cylinder on a VAZ-2104-2107
The main purpose of the clutch master cylinder is that it transmits force to the slave cylinder from the clutch pedal using working fluid.
If the master cylinder is faulty, vehicle control will be impaired and it will be impossible to disconnect the transmission from the engine.
How to determine if the clutch master cylinder is faulty:
- Periodically check the level of working fluid in the tank. A sharp decrease in it will indicate a system malfunction;
- check for leaks in the main and working cylinder housings;
- failure of the clutch pedal, which occurs due to the entry and accumulation of air in the clutch system;
- underpressure of the pedal and vibration of the gear shift lever.
Main types of faults:
- there is a leak in the master cylinder;
- cuff wear;
- piston wear;
- the inside of the case is damaged (chips, scratches, etc.);
- For all classics of the Auto VAZ family, the clutch device is the same, including for 2107. The sequence of actions is the same.
There are two ways to eliminate a malfunction of the master cylinder - replacement with a new one and repair. What can be repaired:
- replace rubber cuffs;
- frame.
These actions do not always lead to the desired effect, especially on an old car with decent mileage. It is recommended to replace the master cylinder with a new one. Its cost is not high, approximately from 450 to 500 rubles. It's better to buy the original.
iMarker › Blog › Symptoms of a faulty clutch
When the vehicle is used intensively, various clutch malfunctions may occur. There are malfunctions of the clutch itself and malfunctions of the clutch drive. Clutch malfunctions include:
wear and damage to the driven disk linings; deformation of the driven disk; oiling of the driven disk linings; wear of the splines of the driven disk; wear or breakage of damper springs; broken or weakened diaphragm spring; wear or breakage of the clutch release bearing; flywheel surface wear; wear of the pressure plate surface; jamming of the clutch release fork.
Depending on the type, the clutch drive may have the following malfunctions:
a) mechanical drive
jamming, elongation or damage to the cable; damage to the lever system; b) hydraulic drive
clogging of the hydraulic drive; violation of the tightness of the system (leakage of working fluid, presence of air in the system); malfunction of the working cylinder (damage to the cuff).
Wear and breakdown of clutch structural elements occur mainly due to violation of vehicle operating rules: starting at high speeds, foot on the clutch pedal while driving.
One of the reasons for breakdown or wear may be the limiting service life of the clutch elements. This applies to a greater extent to the clutch driven disc, which has a limited resource. If the operating rules are followed, this element will serve regularly for over 100 thousand kilometers. For “racers” the clutch rarely lasts up to 50 thousand km.
The cause of clutch failure can also be poor quality components. When purchasing spare parts, preference should be given to original parts.
Oiling of the friction linings of the driven disc occurs when oil gets on them due to wear or damage to the oil seals of the engine or gearbox.
Clutch malfunctions are easily diagnosed by external signs. However, one external sign may correspond to several clutch malfunctions. Therefore, specific clutch malfunctions are usually identified during its disassembly.
External signs of clutch malfunctions are:
incomplete disengagement (the clutch “drives”); incomplete engagement (clutch “slips”); jerking when the clutch operates; vibration when engaging the clutch; noise when disengaging the clutch.
Incomplete shutdown is accompanied by difficulty shifting gears while the engine is running, noise, crackling noise when changing gears, and increased free play of the clutch pedal.
“Slipping” of the clutch is characterized by a burning smell from the friction linings of the driven disc, insufficient vehicle dynamics, engine overheating, and increased fuel consumption.
External signs and corresponding clutch malfunctions:
deformation of the driven disk; wear of the splines of the driven disk; wear or damage to the driven disk linings; broken or weakened diaphragm spring; working cylinder malfunction; clogging of the hydraulic drive; violation of drive tightness; jamming, elongation or damage to the cable; damage to the linkage system
Replacement
The cost of this type of work in a car service starts from 550 rubles. But for most car enthusiasts, this operation is not so difficult to perform on their own.
- new GVC;
- brake fluid;
- set of wrenches with extension;
- syringe or rubber bulb.
- Pump out the fluid from the hydraulic drive reservoir using a syringe or rubber bulb.
- Remove the expansion tank and move it to the side so that it does not interfere with work.
- Unscrew the tube with a 13mm wrench. Move it a little.
- Loosen the clamp and disconnect the rubber hose that goes from the tank to the cylinder.
- Unscrew the two nuts with a 13mm socket wrench and an extension.
- Remove the master cylinder from the studs.
- Replace the GCS with a new one.
- Reassemble everything in reverse order.
Bleeding the clutch
The replacement has been made, but you should not hit the road without bleeding the clutch system. The process is similar to bleeding the brakes and is carried out in the following sequence:
- Brake fluid is poured into the reservoir.
- A hose is put on the master cylinder fitting, the other end is lowered into a bottle filled with liquid. This will show how air leaves the system during the pumping process.
- The operation requires an assistant. One sits in the car and presses the clutch pedal 5-6 times on command, after which he leaves it pressed. The second one opens the fitting until the release of air stops. This is done several times until all air is removed from the clutch system.
- Tighten the fitting and add fluid to the reservoir.
Conclusion
After replacing the clutch master cylinder and bleeding the entire system, you can safely hit the road without fear that the clutch will fail and the car will lose control because of it.
Tips and tricks
When purchasing a new part, owners should remember the quality of the unit, since there are often cases when a cheap product suffers from a short service life. There are many fakes of the VAZ 2104 clutch master cylinder on the market, which are characterized by low quality workmanship and a short service life. The optimal solution is to purchase parts from the manufacturer, which in its production complies with strict standards and GOST norms. At the same time, using the identification number, it is always possible to determine the batch number in the event of a manufacturing defect.
Also, when choosing a new part, owners need to pay special attention to the quality of workmanship. There should be no backlash in some of the moving parts; the parts should maintain optimal mobility. The presence of cracks, stains of unspecified liquid, and burrs on the body is unacceptable. Also, the body, like the rest of the parts, must be numbered with the standard stamp of the manufacturer.
During the repair process, you must always keep a drain container for used brake fluid on hand. Also, before repairs, it is necessary to purchase about a liter of such a substance to make up for losses from opening the system. It is also necessary to remember that reassembling the system after repair must be done in exactly the reverse order. Otherwise, new faults may appear. Moreover, during the assembly process, all parts must also fit tightly to each other, in order to avoid breakdowns in the future.
Dismantling the hydraulic drive
To perform the operation we will need:
- container for operating fluid and a large-volume syringe.
- set of wrenches and sockets;
- screwdriver and pliers.
The order of work is as follows:
- Brake fluid is pumped out from the expansion tank of the master cylinder of a VAZ 2107 car using a syringe. A rubber tube is disconnected from the drive, from which the remains are also poured into the prepared container. If liquid gets on paint surfaces, they must be wiped with a damp cloth.
- Using an open-end wrench set to “10”, unscrew the fitting of the pipeline connecting the main and working hydraulic drives.
- Using a “13” socket and an extension adapter, unscrew the nuts holding the assembly to the engine compartment panel.
- To remove the master cylinder from the studs, simply press the clutch pedal, this will move it out of place, after which you can pull it out by hand.
The work on removing the unit is completed, and you can begin installing the spare part.
Hydraulic drive installation
Replacing a mechanism involves purchasing it in a retail network or via the Internet. Installation work is performed in the following sequence:
- The clutch master cylinder of the VAZ 2107 is put on the studs and pushed all the way to the base.
- The nuts are screwed onto the fasteners and tightened with a wrench to “13”.
- The union nut of the pipeline laid to the working hydraulic drive is screwed into the main cylinder.
- The rubber tube is connected to a plastic connecting element and secured with a clamp.
- The expansion tank is filled with brake fluid, which enters the main and slave cylinders of the clutch through tubes. Replacing the fluid in the system is mandatory due to wear products.
This is interesting: Carburetor adjustment Nail Poroshin
Upon completion of installation of parts, it is necessary to inspect and check the tightness of the nuts. Replacing the main or working clutch drive of a VAZ 2107 car ends with bleeding the system.
Clutch master cylinder VAZ 2107
The VAZ 2107 hydraulic clutch drive is the best option for rear-wheel drive vehicles. An important role in the hydraulic drive system is played by the clutch master cylinder (MCC).
Purpose of the GVC
The GCS converts the force of pressing the pedal into working fluid pressure (WF), which is transmitted through pipelines using the working cylinder piston (WCC) to the fork rod. As a result, the latter rotates on a hinged support and moves the pressure bearing, turning the clutch (MC) on or off. Thus, the GVC performs two functions:
- converts pressing the clutch pedal into fluid pressure;
- transmits pressure to the working cylinder.
Operating principle of the GCS
To create pressure in the hydraulic system you need:
- working environment;
- cylinder with piston;
- the force that causes the piston to move.
The VAZ 2107 MS drive uses brake fluid (ROSA DOT-4 is recommended), which practically does not compress and does not have a negative effect on rubber products.
The piston moves through a rod connected to the clutch pedal. The pressure in the system is created by analogy with a medical syringe due to the fact that the piston and the hole through which the gas is ejected have different diameters. The system differs from a syringe in that the GCS provides for the forced return of the piston to its original position. In addition, the heating of the fluid and moving parts during operation is taken into account.
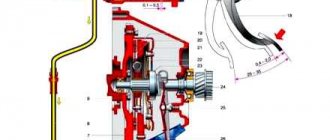
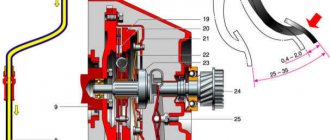
The pedal moves the pusher, which, in turn, moves the piston and creates pressure in the hydraulic drive system
The GCS works as follows. Working fluid through hole 19 is supplied from the tank into the working cavity 22 in front of the piston. When you press pedal 15, pusher 16 moves and, resting against piston 7, moves it forward. When the piston closes holes 3 and 19, the pressure of the liquid in front of it will begin to increase sharply and will be transmitted through the pipelines to the RCS piston. The latter will turn the fork through the pusher, and its front ends will move the clutch with the release bearing (VP) forward. The bearing will press on the friction spring of the pressure plate, which, moving towards the VP, will release the driven disk, and the clutch will disengage.
When the pedal is released, the reverse process will begin. The pressure on the piston will disappear, and due to the return spring 23 it will begin to move to its original position. At the same time, the RCS piston and the fork return spring will also begin to move in the opposite direction and create pressure in front of it, which will be transmitted back to the RCS through the pipeline. As soon as it becomes greater than the force of the return spring of the GCS piston, it will stop. Through the bypass channel in piston 21, the inner surface of the floating sealing ring 20, which acts as a check valve, will be under pressure. The ring will flatten and block the bypass hole 3 in the cylinder body. As a result, a slight excess pressure will remain, which will remove all the play resulting from wear of the pushers, fork eyes and release bearing. As the temperature in the working chamber of the cylinder increases, all parts and working fluid will expand. The pressure in front of the piston will increase, and it will move back a little, opening compensation hole 3, through which excess liquid fluid will flow into the tank.
This explanation is necessary in order to understand how important it is to monitor the serviceability and cleanliness of the GVC. If the compensation hole in the piston or housing becomes clogged, the temperature inside the cylinder will quickly rise, which will create excess pressure in the master cylinder. It can squeeze out the gaskets and fluid will begin to leak. The pedal will become stiff and the O-rings will wear out faster.
Location of the GVC
Since the pusher must be positioned horizontally and fit exactly into its piston, the GCS is mounted on the front partition of the engine compartment on the left side. It is impossible to install it any other way - it is screwed onto two studs welded to the partition. No additional conditions are required to dismantle it. Access to the fastening nuts, pipeline fittings and reservoir hoses is provided by simply lifting the hood lid. At the same time, the main brake cylinder should not be confused with the main brake cylinder (MBC), which is located nearby, a little further from the sidewall of the left wing. The GTS is larger and more complex; more tubes fit into it.
What is a hydraulic drive
The clutch in a car is controlled using a pedal. The force from it to the disk can be transmitted in two ways:
- Using a cable.
- Hydraulic drive.
You may be interested in: Tuning the Octavia A7.
External finishing. Tuning the engine and interior The simplest and most common is the first method, while the “seven” uses the second. Its essence, without going into details, is as follows.
The hydraulic drive consists of two cylinders connected by tubes and hoses. It is designed so that pressing the clutch pedal leads to a significant increase in pressure in the system. It is mechanically transmitted to the driven disk and disconnects the transmission from the engine. The key elements of the system are two VAZ-2107 clutch cylinders: the main and the slave. One of them transforms the force acting on the pedal into excess pressure in the system tubes, the other does the opposite work, acting on the driven disk.
You will be interested in: Brake pads for Mazda-3: review of manufacturers, advantages and disadvantages, replacement features, owner reviews
Selection of GVC for VAZ 2107
The best option for replacement is to purchase a GCS designed specifically for classic VAZ models. Clutch master cylinders from UAZ, GAZ and AZLK vehicles are not suitable. The same applies to foreign analogues - foreign cars with rear-wheel drive are equipped with GVCs, which only highly qualified specialists can adapt to the VAZ 2107 (different sizes, different threads for pipelines, different pipe configurations). However, you can easily replace the original cylinder with a GCS from a VAZ 2121 and from a Niva-Chevrolet.