The instrument panels for the VAZ-2114 are all the same type, but there are slight differences in the printed circuit boards and wiring organization. The lamps are installed identically. Over time, the stove lights dim or the lamps burn out. All this can be repaired with your own hands and without contacting all sorts of services that are reluctant to take on such minor repairs.
When the backlight bulb of the VAZ-2114 stove regulator burns out, you can simply change the bulb, or you can do tuning. We will give two ways, which one to choose - decide for yourself.
Method No. 1
- Let's remove the terminals first (so that a small light bulb replacement doesn't turn into a big fire).
- We disassemble the torpedo in the place where the regulator is located.
- There are two lamps there, one is located directly on the regulator itself, and the second is located on the air flow control levers (hot, cold, on the legs, on the glass). It's better to check both.
- At the same time, it is possible to solve problems that arise with heating air ducts, since from the factory their nozzles are made in such a way that they do not fit tightly together, and accordingly, the operation of the stove becomes noisy and ineffective.
- We change the lamp (you can look for a diode, the service life is longer), put on the terminal and check it on the disassembled dashboard.
- If everything is fine, then we assemble it in reverse order.
Order of Operations
- Remove the radio cover using a screwdriver, carefully threading the tool under the socket. First we pull it out from the bottom, then the top part of the lining.
- The electrical wires leading to the cigarette lighter must be disconnected.
- Now we find the screws on the dashboard and unscrew them.
- Remove the handles from the damper sliders and the heater switch by pulling them towards you.
- Now you need to remove the dashboard panel, it is held not only by screws, but also by other fasteners, so first you will have to loosen it a little.
- Now you need to disconnect the wiring from the panel: from the clock, from the alarm, from the headlights and other devices.
- On the back surface we find cartridges. It's easier to unscrew them with small pliers. Release the cartridge by turning it counterclockwise. Half a turn is enough. We do the same with the rest of the cartridges - they are all designed the same.
- We check the lamps with a tester and determine which ones are faulty. Or we change the entire combination, for example, to LEDs. We screw in the light bulbs tightly, remembering that they operate under conditions of vibration and shaking.
- We install all the cartridges in place. We use pliers again. Turn half clockwise until it stops.
- Now we connect the panel to the instrument connectors and check the functionality of all the light bulbs: from the ignition to the hazard warning lights.
- If everything works correctly, we fix the panel and perform the installation in the reverse order, before installing the radio cover.
Method No. 2
If you don’t have extra money for a tuning device with diodes, and we’ve already dismantled the torpedo. You can do “luxury tuning” of the backlight of the stove control.
- We take 10 centimeters of white LED strip and two pieces of 5 centimeters each, blue and red (the store even sells 5 centimeters each).
- We make this design:
- We glue pieces of LED strip onto the textolite plate (white on top, red and blue on the bottom) and attach them to self-tapping screws;
- You can also substitute bushings to bring them closer to the scale itself (but this is not necessary).
- We solder the wires from the tape (can be placed on terminals) to the standard backlight wires and be sure to insulate them with heat shrink or blue electrical tape.
- To prevent your eyes from being too blinding at night, we stick a film on the back side (for example: Oracal 8300 073), maybe in two layers.
- We collect. It should look impressive.
This is the philosophy of the domestic auto industry: they give you a foundation, and then you do it yourself. Here the backlight, here the headlights were replaced, the steering wheel is sporty, the suspension is lower. And look, the car began to drive better. But it’s still worth it, the cabin should be comfortable, it’s like a second home. After replacing the heater light bulb, you can light up the footwells and stick tape to the sills, so that when you drive, you can see from afar that the car is positively charged.
Usually, a heating device, if it is not a fireplace, requires high-quality heat release, and not pleasing the eye with lighting delights. But for a car heater, the backlight is not much less important than the heat it emits. Its front part, together with the switch, being a component of the car’s dashboard, should facilitate clear orientation of the driver and be accessible to his gaze at any time of the day, especially in the evening or at night. That is, the lighting of the stove carries a purely functional load, which, however, does not in the least prevent it from being beautiful. This is exactly what many drivers are striving for today, replacing standard backlight bulbs with LED strips.
How to make light at a VAZ
Before we start looking at the various instructions for restoring lighting, one important note. The new light bulb must be removed from the packaging and installed, holding it with your fingers exclusively by the metal part. The glass bulb must not be touched, otherwise the new light will not last long!
However, if it is not possible to grasp the base, if there is no other way to insert the lighting element, then it is better to put rubber gloves on your hands before grasping the glass part.
Now let's talk about Ladas. First of all, let's see how to fix the sign lighting on a VAZ 2114. We will only need a flat-head screwdriver. Also read about replacing the windshield washer pump and replacing the rear window of a VAZ 2110.
- First of all, turn off the lighting and open the trunk. Using a screwdriver, we pull out the lampshade towards us.
- Disconnect the wiring plug.
- Having pulled out the rubber seal, we replace the lighting element.
- We collect everything on the way back.
As you can see, this is a fairly simple operation. It is much more difficult to do, for example, replacing the backlight of the VAZ 2114 stove controls - there you will have to dismantle the plastic panel.
Next, let's turn to Kalina. To change a burnt-out lamp from Kalina, we will also take a flat-head screwdriver.
- We use a screwdriver to pry the lamp off from one side, and then pry that side out.
- We also snap out the second side.
- Having taken out the lampshade, disconnect the electrical wiring from it.
- We are reinstalling the lighting element.
- We do the assembly in reverse order.
It turns out that this process also does not cause problems. Here, by the way, it would also be much more difficult to replace the extinguished light bulb of Kalina’s instrument lighting. There it is also necessary to first completely dismantle the instrument panel.
Well, let's discuss the procedure on the Priora hatchback. On a sedan, you just need to open the trunk and pull out the dome light. To replace the license plate light on a Priora hatchback, take the same screwdriver.
- By snapping off the pistons, we dismantle the fifth door trim.
- Carefully disconnect the wiring terminal.
- Turning the base 90 degrees, we take out the lighting element.
- After installing the new part, we assemble everything as it was.
The backlight of the VAZ 2114 stove does not work - why does this happen?
Since the “native” lighting of the stove on this car uses incandescent light bulbs, which do not have a long service life, most often their burnout leads to the disappearance of the lighting effect on this device. In addition, possible causes of this trouble may include:
- oxidation of contacts in connectors;
- violation of the integrity of electrical wiring;
- blown fuses, which disables the entire lighting system on the dashboard;
- damage on the common contact board.
VAZ 2114: what to do when the stove heats up but doesn’t shine
Usually, a heating device, if it is not a fireplace, requires high-quality heat release, and not pleasing the eye with lighting delights. But for a car heater, the backlight is not much less important than the heat it emits. Its front part, together with the switch, being a component of the car’s dashboard, should facilitate clear orientation of the driver and be accessible to his gaze at any time of the day, especially in the evening or at night. That is, the lighting of the stove carries a purely functional load, which, however, does not in the least prevent it from being beautiful. This is exactly what many drivers are striving for today, replacing standard backlight bulbs with LED strips.
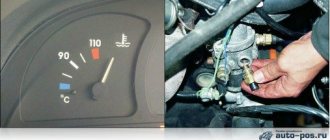
How to replace the stove light and its regulator
If you are replacing burnt-out stove light bulbs with the same ones or LED ones, you will need the following tools and materials:
- crosshead screwdriver;
- pliers;
- knife;
- new incandescent light bulbs or their LED equivalents.
The backlight replacement process proceeds as follows:
- The first step is to disconnect the terminals through which the supply voltage is supplied.
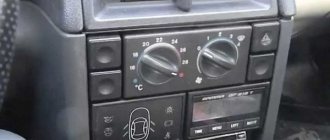
- Then you will have to disconnect the dashboard from the dashboard to gain access to the inside of the stove heating regulator. This is the most difficult stage of replacing the backlight. To do this, you need to remove 9 screws.
How to remake the lighting of a VAZ 2114 stove using LED strip
Many drivers, not content with simply replacing light bulbs with similar ones or even LED ones, decide to tune the heater lighting using strips with LEDs.
To do this, they use 2 strips with white LEDs 10 cm and 5 cm long and 2 pieces of strips with red and blue LEDs, 5 cm each. In addition to these, for such a modification of the stove lighting you will also need:
- crosshead screwdriver;
- knife;
- pliers;
- soldering iron;
- textolite plate;
- self-tapping screws;
- glue;
- insulating tape or shrink tubes.
The tuning process of altering the backlight using LED strips goes like this:
- The on-board network is disconnected from the battery.
- The instrument part of the dashboard is dismantled to gain access to the stove lighting bulbs.
- The textolite plate is cut to length in accordance with the internal size of the stove scale.
- Pieces of LED strip are glued onto the textolite plastic prepared in this way. White LEDs are arranged as the top section of the strip, and strips with blue and red LEDs form the bottom row, located right next to each other.
- A textolite plate with LEDs is attached to the inside of the dashboard using self-tapping screws.
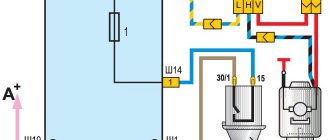
- The wires from the light bulb sockets are unsoldered and soldered to the contacts on the tapes: in the stove regulator, where a 5-centimeter piece of white LED strip is placed, and on the stove scale, where 3 multi-colored pieces are placed. In this case, be sure to observe the polarity (white wire is positive, and black wire is negative). The contacts are carefully insulated with electrical tape or heat-shrinkable tubes.
- A light filter film (most often Oracal 8300–073) is attached to the back of the stove scale, which dims the excessive glare of the LEDs.
Such a transformation will not only make the stove regulator more visible, but will also introduce a new bright element into the overall ambience of the car interior.
Manufacturing of LED backlight
Sometimes simply replacing the VAZ 2114 stove light bulb seems like an insufficient measure to motorists, and they resort to completely redoing the lighting using an LED strip. For such tuning, you will need to purchase a 10-centimeter piece of white LED strip and 2 pieces of blue and red tape, 5 cm each (many electrical stores agree to sell even this length. Otherwise, you will have to buy a longer piece and cut a piece from it).
The tools for installing the LED strip will be the same as in the previous case. You will also need a soldering iron, electrical tape (or heat-shrink tubing) and a PCB plate.
The lighting of the VAZ 2114 stove with an LED strip is mounted in the following order:
- disconnect the on-board network from the battery;
- remove the stove scale compartment cover;
- take ready-made pieces of LED strip or cut existing ones to length;
- take a textolite plate and cut it to the size of the internal cavity of the stove scale;
- Paste pieces of tape onto the plate in the following order: white on top, blue on bottom and red next to it. It should be glued so that the tapes are placed almost right next to each other;
- attach the plate with the tapes located on it to the inside of the torpedo using self-tapping screws;
- solder the wires of the “native” backlight to the contacts on the tapes. When doing this, be sure to observe polarity (how to check it was discussed above);
- insulate solder joints using heat shrink or electrical tape;
- apply a filter film to the back of the scale (many car enthusiasts recommend using Oracal8300-073). It will help make the light softer and less blinding to the eyes. If one layer does not seem enough after a trial run, you can stick a second layer;
- put the cover back in place;
- connect the battery.
If, after turning it on, it seems to you that the light is pleasant to the eye, but you want a little more contrast, you can unscrew the plate with ribbons and mount it again, but not directly to the body, but through small bushings that will help bring the LEDs closer to the scale.
Lighting made in this way will not only make the VAZ 2114 stove regulator more visible, but will also noticeably transform the interior appearance of the cabin.
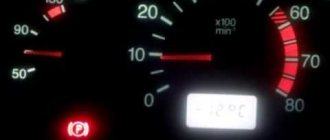
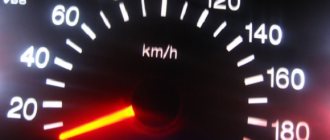
A dashboard is needed in a car so that the driver can always be aware of the state of the power unit, the amount of fuel in the gas tank, the speed of movement, etc. Any motorist understands without further explanation that it is unsafe to drive a car if the dashboard is faulty. The reasons for the malfunction of the instrument panel may be different, but in today’s article we want to talk about the malfunction of the instrument panel backlight in the VAZ 2114 car.
Basically. Without backlighting of the instrument panel, you can drive in the daytime, but what about in the dark, because without backlighting the driver will not be able to see the readings of a single indicator.
Experience of car enthusiasts
I finally decided to change the light bulbs in the heater lights, which were not working for me when I bought the car. Before this, I scoured the Internet and found out that there are two ways to replace these light bulbs. The first way is to disassemble the entire torpedo, etc. and so on. The second way is to get to them through the dial of the stove controls. I used the second method. Tools: Phillips screwdriver, small pliers, flashlight for illuminating the lamp replacement process. First, the red and blue socket is removed, the rods under this socket are pushed apart with a screwdriver, and the old light bulb is carefully pulled out with pliers. Then he goes across the road to the nearest auto store, shows the salesman the old light bulb, and buys the same new one. A new light bulb is inserted using the same method. All! The backlight works! Whoever needs it, use this method, everything works. The main thing is that your hands do not shake and do not drop the lamp with tweezers or pliers))))
If, after turning it on, it seems to you that the light is pleasant to the eye, but you want a little more contrast, you can unscrew the plate with the ribbons and mount it again, but not directly to the body, but through small bushings that will help bring the LEDs closer to the scale. As a result, the lighting will become less diffuse.
In order not to remove the entire dashboard, you can limit yourself to removing only the translucent scale on the stove. The method is rough, but effective. To do this, use a thin and wide screwdriver to pry the scale on the right (you can’t do it on the left because of the protrusions there!) and at the same time pull the middle of the scale toward you with your fingers so that it bends slightly in an arc. After this, the light bulb will be visible behind the plastic guides, which must be moved apart. Then, using tweezers with non-slip ends, remove the light bulb from the socket and replace it with a new one. When returning the scale to its place, you need to insert it from left to right, again slightly bending it in an arc.
Easy replacement of light bulbs in the dashboard of a VAZ 2114
Reading time:
Any driver knows how to track the condition of the car: using instrument readings. In the dark, illumination is responsible for their visibility. But all electrical devices have a limited lifespan, including incandescent light bulbs. They are used in the dashboard of the VAZ-2114. Replacing the light bulbs in it is not difficult, but painstaking.
Why lamps burn out or stop working: causes and consequences
Burnt-out lamps complicate the driver’s control over the car’s instrument readings.
The operating conditions of the backlight are not ideal: shaking, temperature changes, possible power surges in the on-board network, and so on. When driving, you must turn on low beam headlights. Along with it, the instrument lighting also turns on. This can shorten the life of the lamps, and over time, not the entire panel is illuminated evenly.
The main danger of lamps burning out in the instrument cluster is that some of them are control lamps. In this case, you may not know about the failure of individual machine components. And uneven illumination looks ugly.
Solution
The stores offer several options for light sources for replacing lamps in the instrument cluster:
- traditional incandescent lamps,
- LED in a plastic socket,
- SMD LED is a more expensive and reliable option, a super-bright diode.
The choice will always depend on financial capabilities and lighting preferences
The number of backlight and control lamps is up to 19 pieces. It varies slightly depending on the design of the instrument cluster and the modification of the vehicle. Many car owners choose LEDs due to lower energy consumption and longer service life.
This backlight is brighter and gives an interesting bluish color instead of the standard green. But due to the design of the diode, the brightness control of the instrument illumination will not work, always turning it on at full power. On a long road trip at night, this can be distracting and irritating to the eyes.
But in any case, the choice of light sources is yours.
If you are going to install LEDs, it is recommended to first check them with a tester for the absence of a short circuit.
Step-by-step instructions for replacing light bulbs in the dashboard of a VAZ-2114
- We release the decorative cover of the front panel. For this we need screwdrivers: a short Phillips and a flathead one. Lower the steering column to the lower position using the height adjustment lever to keep it out of the way. The photo shows the mounting locations for the casing:
- There are four screws on the bottom of the visor and above the steering column. Unscrew them with a short Phillips screwdriver.
- Using a flathead screwdriver, pry off the decorative cap to the right of the row of switches. There is another fastening screw under it.
- Also, remove the handles from the heater switch and damper control sliders by pulling them towards you.
- If you have a car radio, you will also have to remove it.
Unfortunately, complete dismantling is not possible. Arrows indicate locations for removal - Pull the front panel cover towards you. He must move. There is no need to remove it completely - there will be enough space to access the mounting screws on the sides of the instrument cluster.
Carry out your actions carefully - Unscrew the fastening screws with a long screwdriver. The combination will be released and you can tilt it towards yourself. Pull out the two blocks with wires. Don’t be afraid to mix them up - there is a color marking, and the asymmetrical shape of the connector will prevent you from connecting it incorrectly.
The arrow indicates the location of the cartridge handle - On the back cover of the instrument cluster there are cartridge handles. Arm yourself with small pliers. This will make it easier to unscrew them. To release the cartridge, half a turn counterclockwise is enough. You can safely take out all the cartridges - they are the same. Next, you can check the lamps with a tester and replace the burnt ones, or replace them all with LEDs at once. Try to ensure that they fit tightly in the cartridge, otherwise the contact will be unreliable.
- We reassemble in reverse order. We insert the cartridges into the seats so that the antennae fall into the grooves, carefully turn them with pliers until they stop. We connect both blocks to the connectors of the instrument cluster.
- Let's check if all the lamps are working:
- raise the handbrake and turn on the ignition: so let’s check the handbrake, generator, oil pressure and check lamps,
- turn on the hazard warning lights - check the warning lamp and direction indicator lamps,
- pull the headlight switch lever towards you - temporarily turn on the high beams, check the warning lamp,
- turn on the dimensions - see if the scales are evenly illuminated, and if the warning lamp, if any, is on.
This is interesting: We repair DENSO injectors ourselves
If everything works correctly, we fix the instrument cluster and the front panel casing, and replace the heater switch handles and damper controls.
Check the brightness and functionality of all devices
Congratulations, now the instrument lighting and warning lights are working properly, and you will always be aware of what is happening with the car. The overall aesthetics of the front panel will also improve - the evenly lit front panel looks beautiful.
Video of another option for carrying out work
As they say: neither nail nor rod!
Source: https://auto-gl.ru/prostaya-zamena-lampochek-v-pribornoy-paneli-vaz-2114/
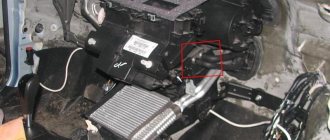
Why the instrument panel does not work
Disassembled dashboard
The first thing you need to figure out is why the instrument panel on the VAZ 2114 does not work. If the backlight goes out, there may be several reasons for this:
- The incandescent lamps burned out, the LED lighting groups stopped working;
- The connectors have oxidized;
- The electrical wiring is faulty, there are defects in the circuit;
- The fuse box has stopped working;
- Damage appeared on the common contact board;
- The dimensions system is damaged;
- There is no minus on the body (weight).
The backlight of the VAZ 2114 instrument panel does not light up: do-it-yourself repairs
The dashboard on the VAZ 2114 allows the driver to control engine data, monitor the remaining amount of fuel, his speed, and other data. The panel should be maintained in working condition so that the backlight not working does not cause discomfort, and the sensors show real values.
Bright backlight
But quite often, VAZ 2114 owners discover that the instrument panel lights do not light up. If such a situation occurs, appropriate action should be taken immediately to eliminate it.
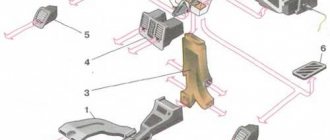
Removing the dashboard
Panel disassembly diagram
Therefore, now we’ll figure out how to disassemble the instrument panel on a VAZ 2114:
- Unscrew the three screws, remove the trim and the protrusion from below. It comes out of your car's body bracket;
- Now remove five more screws located on the right console trim;
- Remove the screen; Disconnect the negative terminal from the battery;
- Disconnect the wiring harness connector from the cigarette lighter;
- Remove the handle from the lever;
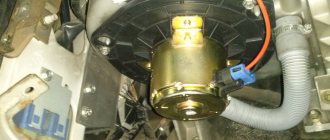
- The fasteners for the electric fan of the heating system, that is, the stove, also have to be removed;
- Unscrew the steering wheel block bracket fixing bolts;
- Remove LEDs, lamp sockets and decorative inserts on the panel;
- Unscrew the hydraulic corrector illumination lamp. For this you will need a key for 21;
- Now all that remains is to remove the screws at the top and bottom.
Thus, we figured out how to remove the dashboard on your VAZ 2114. Be sure to cover the electrical circuit with something after the measures have been taken to prevent moisture, dust and all kinds of contaminants from getting there.
Replacing the backlight
To improve the quality of your dashboard lighting, it is advisable to install new LEDs in place of the old ones. They provide excellent illumination, consume minimal energy, and guarantee a high level of data reading.
Replacing light bulbs is not such a difficult task, it’s just that you can have a lot of trouble during removal and installation))) Light bulbs with a T-4 (T-4.2) base are the same. Music provided by My affiliate program VSP Group. Connect!
FakeHeader
Comments 8
How did you light the ashtray? Tell me more please
Well, there is a stock backlight, right?
Damn, but my ashtray doesn’t light up, which means it’s not illuminated
the light bulb probably just burned out
Damn, but my ashtray doesn’t light up, which means it’s not illuminated
everything there will be highlighted there at least as it should be
Well, there is a stock backlight, right?
Thanks, I'll watch it
How did you light the ashtray? Tell me more please
you cut off the tape in my case, only 3 light bulbs, soldered two wires, filled it with hot glue, then heat shrinked it on top... then to do all this, the center console was removed. At home, I calmly unscrewed the housing where the ashtray is inserted, removed the green light filter that is located under the white and plastic ones. socket where this regular light bulb is inserted, I pulled it out, took out a standard light bulb and soldered it to the side contacts of the wiring of my tape, glued the tape to the top of the ashtray body, cut the white plastic, inserted the wire into it so that it came out of it and put everything in place and connect all this socket to the standard one plug
The instrument panel must always be in good working order. The accuracy of information about the state of components and systems that the driver receives from various sensors depends on this. Intensity of use, vibration, temperature changes, and voltage drops in the on-board network significantly reduce the backlight resource. Therefore, replacing light bulbs in the dashboard of a VAZ 2115 and other models is a problem that recurs with unenviable regularity. There is no point in delaying repairs, since some of the lamps are control lamps. If they do not work, the driver may miss important information about the failure of important vehicle modules. How to replace broken lighting equipment with your own hands will be discussed in this article.