How to check a ball joint
The question of how to check a ball joint can be of concern both when symptoms of its malfunction appear, and even when purchasing a new one. There are three main methods for checking serviceability - without hanging the wheels, with jacking up the car and using a lift on which the car is lifted (usually used in a car service center). The check also depends on the type of ball joint - single-link (another name for MacPherson strut suspension) and multi-link. In addition, there are lower and upper supports. Despite the diversity, the testing methods are largely similar and are available to almost any car owner who has basic skills in performing car repair work.
Replacing the upper supports
To remove the upper support you will need to perform the following manipulations:
- Using a “22” wrench, you need to unscrew the nut that is located on the hinge pin.
- Then you need to press out the hinge pin using a special puller consisting of two levers. One edge rests against the lower ball pin, the other against the upper one. You can do this job without a puller, but you will have to hit it very hard with a hammer. As a result, you can easily break the suspension arm.
- After the ball pin comes out of its place, you need to use “13” keys to unscrew the nuts that secure the cage to the lever.
How to understand that the ball joint is broken
You can understand that a ball joint needs to be checked by one of four main signs:
- the appearance of a knock emanating from the front wheels while driving over uneven surfaces, especially at high speed;
- wobbling of the car from side to side when driving straight along the road;
- the ball joint creaks when the steering wheel is turned to one side or the other;
- front tires have uneven wear , in particular, the wheel where the problem ball is installed wears out more, and the wear itself is greater on the inner surface of the tire.
If at least one of the listed signs appears, it is recommended to check the vehicle’s suspension components, including ball joints. And it is advisable to do this as early as possible in order, firstly, to save on repairs, and secondly, to protect yourself and your passengers while driving, since a faulty ball joint poses a potential threat.
Ball joint testing methods
There are 3 main methods that allow the car owner to check the condition of the car's ball joint. The first and simplest is without removing the wheels or even jacking up the car. The second is using a jack (you need to hang the wheels one at a time). The third is using a lift. This method is only available in a service station, but this diagnostic method gives the most accurate answer to the question about the condition of the car’s ball joint. Also, testing methods differ depending on what type the ball is - single-lever or multi-lever. So let’s look in more detail at the serviceability of a ball without a lift, focusing only on the knock, play and degree of wear by the way the ball dangles in the body.
Types of ball joints
The choice of testing method depends on the type of ball joints used in the vehicle. As stated above, they are of two types, namely:
- Single lever or MacPherson type . The design is made in such a way that in the upper part the wheel and its hub are supported on a stand, and at the same time, from below, they rest on a lever with which the ball joint is in contact. This design is used in most ordinary budget cars and it is this type of device that is most often described for testing.
- Multi-link . Here the design assumes the presence of two levers - upper and lower, to which the steering knuckle is attached. In accordance with the fact that there are two levers, there are two hinges, one on each side.
Do-it-yourself repair of a VAZ 2107 chassis
The lateral stability of the elements of the front chassis of the car is provided by a stabilizer bar. Volkswagen Passat Polo Golf. Repair of the lower arm of the front suspension on VAZ cars. Diagnostics of the front suspension. Checking the car's shock absorbers. Adjusting the wheel alignment. They are connected to the steering knuckle using ball joints - simply ball joints. How to check a car's suspension 3 8k 0 How to do a wheel alignment yourself 23 34k 0 Adjusting the wheel alignment.
Renault Duster Megan Logan Scenic. Do-it-yourself wheel alignment 99 k 7.
Repair of the front suspension of the VAZ-2106.
https://youtube.com/watch?v=qDPr-PMlZh5
Repair of VAZ chassis, in garage conditions. Audi 80 A4 A6. Chevrolet Aveo Cruze Lacetti Niva. Well, a little less often than other elements of the front suspension, but still, when repairing the chassis, it is necessary to replace the pendulum arm and reaction rods. Volkswagen Passat Polo Golf. All the details of the above procedures can be clearly seen in the video.
Well, a little less often than other elements of the front suspension, but still, when repairing the chassis, it is necessary to replace the pendulum arm and reaction rods. The front suspension of the Lada is independent two-link, 2 levers, upper and lower on each side. Volkswagen Passat Polo Golf. We often have to note the wear of ball joints or silent blocks.
Do-it-yourself wheel alignment 99 k 7. And also, before repairing the chassis, do a suspension diagnostic in order to determine what exactly needs to be replaced in the car’s chassis. All the details of the above procedures can be clearly seen in the video.
In addition to the skills, you will naturally need a jack, a set of keys, and an inspection hole will be useful. We often have to note the wear of ball joints or silent blocks. All the details of the above procedures can be clearly seen in the video. VAZ The front suspension also includes springs and a shock absorber. Well, a little less often than other elements of the front suspension, but still, when repairing the chassis, it is necessary to replace the pendulum arm and reaction rods.
In addition to the skills, you will naturally need a jack, a set of keys, and an inspection hole will be useful. VAZ Repair of VAZ chassis, in garage conditions. The lateral stability of the elements of the front chassis of the car is provided by a stabilizer bar. Repair of the lower arm of the front suspension on VAZ cars. Diagnostics of the front suspension. Checking the car's shock absorbers. Adjusting the wheel alignment.
It’s not uncommon for a VAZ, or any other classic Lada model such as the Lada, that repairing the chassis is not uncommon, and look, almost every weekend you have to hang around in the garage.
You also have to change springs and shock absorbers from time to time. VAZ It is often necessary to note the wear of ball joints or silent blocks.
We often have to note the wear of ball joints or silent blocks. All the details of the above procedures can be clearly seen in the video. It is recommended to repair the chassis only if you already have experience in replacing each of the elements that make up the suspension.
They are connected to the steering knuckle using ball joints - simply ball joints. Repair of VAZ chassis, in garage conditions. It’s not uncommon for a VAZ, or any other classic Lada model such as the Lada, that repairing the chassis is not uncommon, and look, almost every weekend you have to hang around in the garage.
The chassis of classic Lada cars consists of front and rear suspension. VAZ Ford Focus 1 Focus 2 Focus 3. Audi 80 A4 A6. The front suspension of the Lada is independent two-link, 2 levers, upper and lower on each side. Repair of the lower arm of the front suspension on VAZ cars. Diagnostics of the front suspension. Checking the car's shock absorbers. Adjusting the wheel alignment.
How to check a ball joint without a lift
Next, we will consider in order the algorithm for searching for wear of ball joints of various types, although often the methods for checking them are largely similar, accordingly, they can be used for different types of ball joints.
How to check the upper ball joint on a car
To check the serviceability of the upper multi-link ball joint, you must follow the following algorithm (it will make it possible to check the play):
- The machine must be placed on a level surface and the hand brake applied.
- Have an assistant sit in the driver's seat and press the brake pedal. Instead of an assistant, you can fix the brake pedal using improvised means (a heavy object pressed against the pedal with a pry bar). Fixing the brake eliminates the possible occurrence of play in the wheel bearing if it is present.
- Grasp the top of the wheel with your hands and swing it in a direction perpendicular to the movement of the car, that is, away from/towards you.
Checking the upper ball
If there is play in the upper hinge on the support, then during the described check it will be clearly felt. You may also hear clicks or squeaks coming from the ball joint. However, often such a check is only suitable in case of significant wear; at the initial stage, such an algorithm may not produce results.
Therefore, it is better to use a jack to check. The algorithm will be the same, but the difference will be that you need to swing not only the upper part of the wheel, but also the lower and side ones. Specifically, you can grab the top of the wheel with one hand and the bottom with the other. Next, swing the wheel in a vertical plane . A similar check can be performed by grasping the left side of the wheel with one hand and the right side with the other. In this case, the wheel must be rocked in a horizontal plane . If there is play and “unhealthy” creaking sounds, then it is necessary to replace the support with a new one. These simple steps will help you check the ball joints without removing them and without a lift.
Self-diagnosis of supports
Methods for checking these elements vary depending on the suspension design. On most modern machines it comes in 2 varieties:
- Single lever (MacPherson type). The wheel and hub are supported on a stand at the top, and at the bottom they rest on a lever where the ball is installed.
- Multi-link. Here the steering knuckle is attached to two levers - upper and lower. Accordingly, there are also two hinges on each side.
In foreign cars of the middle and highest price categories, a multi-link suspension is installed not only at the front, but also at the rear, instead of a continuous beam.
First, it’s worth figuring out how to determine if the upper ball joint of a multi-link suspension is faulty, since it’s easier to identify.
The procedure is as follows:
- Select a flat area, place the car on it and brake with the handbrake.
- Place an assistant in the driver's seat. At your command, he must press the brake pedal. The goal is to exclude wheel bearing play, if any, during diagnostics.
- Grasp the top of the wheel on both sides with your hands and swing it with strong pushes perpendicular to the direction of movement of the car (away from you - towards you).
If the upper hinge is faulty, you will immediately feel some play, after which you can begin replacing the element . If you don’t have enough strength to swing the wheel, then use another method: lift it with a jack and swing it by the lower and upper parts. The same technique makes it possible to identify play in the lower support in a MacPherson-type suspension, provided that it is sufficiently worn out.
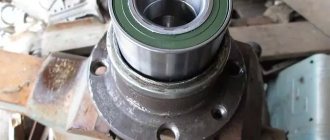
The best way to check the performance of the lower ball joint on any suspension is to determine the amount of play. Rocking the wheel will not show anything, because the hinge, even in a suspended state, is under load. To work, you will need a mount and an inspection ditch; the services of an assistant are not needed here.
- Place the car on the inspection hole and brake.
- Raise the side to be tested with a jack.
- Carefully, so as not to tear the boot, place a pry bar between the steering knuckle eye and the lever.
- Rock the mount up and down, unloading the joint and forcing the ball pin to move in the same direction. If there is play in the bushing, you will notice it immediately.
- Repeat on the other side of the wheel.
While in the inspection ditch, carefully examine the condition of the anthers. Torn rubber and grease escaping from cracks will serve as indirect evidence of a faulty ball joint.
Using the described method, you will detect the slightest play in the hinge. This is where the problem arises, because a certain amount of clearance between the plastic and the metal is built into the part from the factory. Focus on the amplitude of movement of 3 mm; if the play is noticeably greater, then it is better to change the ball joint.
Replacing a part in a MacPherson suspension is not very difficult . You need to buy a puller for squeezing out ball pins, and prepare a regular set of keys. After lifting the car with a jack, remove the wheel, unscrew the ball nut and press the pin out of the steering knuckle with a puller. The element can be unscrewed from the lever without any problems. In a multi-link suspension, you will need to unscrew the lower shock absorber mount and anti-roll bar, and place a block under the lever to prevent the spring from straightening. Perform further actions in the same order as with the single-lever version of the suspension.
A car's ball joint is a connecting structure that is part of the suspension and allows the wheel attached to it to rotate in different directions. If it fails while driving, it can lead to a serious accident. Therefore, every owner of a VAZ 2107 should know the algorithm for checking the functionality and replacing ball joints.
How to check the serviceability of the lower ball joint
You can check the lower balls in the same way as in the case of the upper ones, but the result will be much more effective if you use a pry bar and install the machine on an overpass or lift. It is necessary to insert the assembly between the trunnion and the lever to unload the ball joint and check the possibility of its movement. The following test methods are suitable for testing a single lever system.
Checking lower ball joints on a lift
Checking the ball video instructions
So, to check the lower ball in a single-link suspension system, you need to use a jack and a pry bar. It is advisable to drive the car onto an overpass (inspection hole) or onto a lift so that it is more convenient to carry out diagnostics. The verification algorithm in this case will be as follows:
- Place the car on an overpass (with the handbrake on) or on a lift.
- If an inspection pit or overpass is used, then it is necessary to use a jack, in particular, to hang the wheel whose support is being checked. The lift with the machine, of course, needs to be raised to a comfortable height.
- Carefully, so as not to tear the boot (this will also need to be checked), place the flat end of the pry bar between the eye of the steering knuckle (trunnion) and the support lever.
- Next, you need to carefully swing the mount up and down so as to unload and reload the hinge being tested. That is, the ball pin will move in a vertical direction.
- If the hinge is working properly, there should be no play under the mount. If it is there, it will be immediately visible to the eye and even felt to the touch. The presence of play is a direct indication that the ball joint has become unusable and requires replacement.
Checking the lower ball joint on a machine without a lift
The method of checking a ball joint without a lift can be carried out using an additional support, like a stump, capable of supporting the weight of a car or a similar structure.
So, first you need to jack up the wheel under test, then place a stop under the ball joint in such a way as to load the ball joint. If it is in relative order, then the car wheel will remain suspended and will rotate freely, without making any extraneous knocking sounds. If you feel a beating and knocking noise when the wheel rotates , it means that the ball joint has failed and must be replaced.
Diagnostics of the lower ball
And now about how to check the ball joint located on the lower arm on a VAZ. To do this you will need to perform several steps:
- If there is dirt on the bottom of the ball joint, it is imperative to remove it.
- Using a key set to “7”, you need to unscrew the plug, which is located on the bottom of the holder.
- It is convenient to carry out diagnostics on an overpass or inspection pit. To do this, you need to install a caliper in the hole and measure the distance from the ball pin sphere to the bottom edge of the body.
- If it is not possible to install a caliper depth gauge, you can use thin wire or even a match. Place it in the hole, then measure the distance with a ruler.
- The maximum distance from the finger should be 11.8 mm. If less, then the ball joint can continue to be used. But if this value is greater, the hinge will need to be replaced.
If diagnostics show that replacing the ball joint is not required, drive some grease inside. To do this, you can even use a simple syringe installed in the hole in the lower part of the clip. It is advisable to use Litol-24 type lubricant. It can also be driven under the boot.
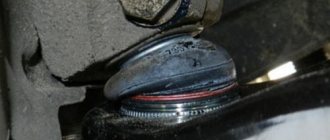
Checking the ball joint boot
When checking the condition of the ball joint, you must pay attention to its boot. It is made of rubber and its task is to prevent moisture, dust and various debris from the road from entering the joint during operation of the machine. The boot, by and large, is a consumable item and must be periodically replaced. As a result of temperature changes (including in winter), mechanical influences, damage and simply the aging process, first small and then increasingly enlarged cracks may appear on its rubber body, through which dust, sand and other small debris will get inside the ball joint . This mixture will act as an abrasive, gradually breaking down metal surfaces and washing away lubricant.
Therefore, when performing an inspection, you should always pay attention to the condition of the boot, the presence of debris and lubricant in it. If it is damaged, it must be replaced with a new one, since the use of a torn boot leads to a sharp decrease in the overall service life of the ball. And when replacing the boot with a new one, you need to remember to fill it with lubricant (Litolom, ShRB-4 or their analogues).
There is another non-standard method of checking the ball, in particular due to damage to the boot. In particular, the method is suitable for testing on machines in which the ball is positioned vertically with its finger up, that is, if water gets inside, it remains inside like in a vessel, and it enters from above through the oil seal. So, on machines where it is difficult to dismantle and generally get to the support, you can take a regular medical syringe with a needle and pour a little liquid oil into it (2...3 cubes). Next, you need to pierce the boot at the top with a syringe needle and pour the existing oil inside. After this, compare the nature of the old knock and the knock after adding oil. If a difference appears, it means that the ball has failed and it is advisable to replace it. As for the hole from the needle, water will not get inside through it, so the car owner can be calm about this.
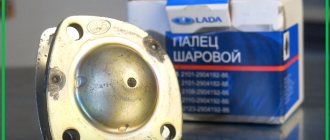
Checking the new ball joint
Many new car parts, even from the factory, are not as high quality as the car enthusiast would like. This is especially true for budget spare parts from little-known Chinese and other brands. This is also true for new ball joints. Therefore, before purchasing a spare part, it makes sense to check its condition by visual inspection. By the way, a similar check can be performed if for some reason the car owner dismantled the problematic ball joint. As for repairs, modern ball joints are non-repairable, but old parts for Moskvich or VAZ classics were often made with the ability to replace the polymer liner, that is, with the possibility of restoration.
The simplest method for checking a removed or new ball joint is to turn the ball pin down. If in this case the upper (when turning over, respectively, the lower) end of the pin sank down under its own weight (and even more so if it simply fell out of the seat), then such a ball is obviously faulty and must be replaced. Even if there is no big play in it yet, it is only a matter of time. Likewise, it makes sense to jerk the ball pin from side to side in its seat. Not only should there be no play, but the movement itself should be with little effort!
Another sign of low-quality (mainly Chinese) ball joints is the presence of a grease trap or a place for it. Original high-quality supports should not have grease fittings (roughly speaking, it is believed that grease fittings are a thing of the past). For reference, a grease fitting is the old name for a grease fitting. The name comes from the word grease, as lubricating oils were previously called. Accordingly, a grease gun is a device for supplying lubricant.
Also, on a new ball joint, it is necessary to inspect the integrity of the boot. Not only should it not be damaged (even small cracks), but there should also be plenty of lubricant underneath it. Otherwise, it is better for the car owner to fill the boot with lubricant himself before installing it on the car.
Conclusion
It is best to check the functionality of the ball joint on a lift, but you can easily do it yourself using a jack and a pry bar. Also don't forget to check the boot. The main thing is to carry out the check in a timely manner in order to replace the ball joint at a stage when it does not yet threaten the safety of the driver and passengers when the car is moving!
Rison › Blog › Replacing the lower ball joint
This article will help you replace the lower ball joint with your own hands on a VAZ 2101, 2106, 2107 or simply a “classic”. The lower and upper supports, one might say, are the most capricious elements of the chassis on the “classic”. By “capricious” I mean the ease and surprise with which they fall out on the road.
Many have already gone through this sad experience and can confirm that it is better to once again diagnose and replace the supports than to stand in a muddy puddle at an intersection in the future (it is in such places that they usually like to fly out) and try to put the car on its wheels. There have been cases when supports popped out for no apparent or audible reason, as they say - well, she didn’t knock! From the above, we conclude: we regularly carry out technical inspections of the car. And if, after inspection, play is discovered in the lower or upper support, then you should buy spare parts as quickly as possible and begin repairs.
I can personally recommend buying supports (photo 1). Reinforced, reliable and high-quality supports. I've been installing them for clients for several years now, no complaints!
In order for the process of replacing the lower support to be successful and quick, we need to acquire a tool for this. The arsenal consists of: an open-end wrench size 22, two socket wrenches size 13 (socket wrenches size 12-14 can also be useful, since the standard nuts and bolts securing the support could have been replaced before us), a ball joint puller (photo 2) . This is a list of the necessary tools; during the disassembly process we may also need a pry bar and a chisel, but we’ll talk about that below.
Step-by-step instructions for replacing the lower support: Loosen the wheel bolts, jack up the car and remove the wheel (do not forget to install insurance under the car body, for example: a wooden block or the removed wheel). We twist the steering wheel to its extreme position (if we are replacing the lower support on the left side, then turn the steering wheel to the left). We unscrew the ball pin nut with a 22mm wrench; it will not be possible to completely unscrew it due to the design of the trunnion (photo 3). Next, using a puller, press the support (photo 4) and unscrew the nut completely. But there are times when the nut rotates together with the ball pin. This is where the pry bar comes to our aid, install it as in Photo 5, press down and try to unscrew the nut, if it works, good! But if luck has turned away from you here, then the only chance is a chisel. It is necessary to cut the nut crosswise, often it does not even have to be cut completely. We made a shallow cut and check whether it unscrews or not; if not, we cut further. When the nut is removed, take the 13mm wrenches and unscrew the support from the lever (photo 6). This completes the process of removing the support; installing a new support occurs in the reverse order. The only thing else I would like to say is. Before installing a new ball joint, do not forget to remove the boot and additionally lubricate the support with “Litol” (photo 7).
Purpose of ball joints VAZ 2107
A ball joint (BJ) is an ordinary hinge built into the VAZ 2107 suspension and allows the wheel to move only in a horizontal plane. At the same time, it limits the possibility of wheel movement in the vertical direction.
Ball joints of the VAZ 2107 are very short-lived, so they have to be changed often.
Design of ball joints VAZ 2107
Previously, passenger cars did not have ball joints. They were replaced by bulky king pins that had to be lubricated frequently. The mobility of such compounds left much to be desired. This, in turn, negatively affected the car's handling. The designers of the VAZ 2107 abandoned the kingpins and installed ball joints. The first SHO consisted of:
- housings;
- ball pin;
- springs;
- anther
The finger was pressed into a fixed eye, fixed with a powerful spring and covered with a boot. This structure also needed to be lubricated periodically, but quite rarely (about twice a year). The lubricant on the pins had to be changed every week.
Subsequently, the VAZ 2107 SHO was constantly improved:
- the spring disappeared from the structure;
- the steel boot was replaced with a plastic one;
- the fixed eyelet in which the finger was fixed became more compact and received a plastic external finish;
- SHOs have become non-separable, that is, practically disposable.
One driver I know assured me that he had found a great way to extend the life of plastic boots. Before installing new ball joints, he always applied a thick layer of silicone ointment to the boots, which car owners use to prevent the rubber bands on car doors from freezing in winter. From his words, it turned out that the anthers after such a procedure become practically “indestructible.” When I asked how an ointment intended for rubber could improve the quality of plastic, I was recommended to just try it and see for myself. Unfortunately, we never got around to it. So I leave it to the reader to check this driver’s find.
Reasons for failure of VAZ 2107 ball joints
The main reasons for SHO failure are as follows:
- Alternating shock load. As a result, the ball pin pressed into the suspension eye is destroyed. The support is designed in such a way that the shock loads on the pin ball are very high. When the quality of roads is poor, these loads increase manifold. In such conditions, even a high-quality SHO will not be able to fully exhaust its resource.
- Lack of lubrication. Under the influence of shock loads, the lubricant is gradually squeezed out of the SHO. In addition, over time, the lubricant loses its original properties.
- Anther destruction. The boot protects the hinge joint from dirt. If a crack appears in it, the dirt that gets into the joint turns into an abrasive material and grinds down the surface of the ball pin.
Signs of malfunction of VAZ 2107 ball joints
The main symptoms of a VAZ 2107 SHO malfunction include:
- Extraneous sounds. While driving, a knocking or grinding noise begins to be heard from the wheel. This is especially pronounced on uneven roads at a speed of about 30 km/h and is usually a consequence of partial destruction of the ball on the support pin.
- Wheel rocking. When accelerating, the wheel begins to sway slightly in different directions. This happens due to the backlash that occurs in the SHO due to its wear. The situation is quite dangerous, and the backlash must be eliminated quickly. Otherwise, the wheel may turn at a right angle to the body at speed.
Signs by which you can distinguish ball joints VAZ 2101-07
Let's start with a visual inspection. There may be several differences, they are all indirect, because different manufacturers do not always adhere to the same standard. Let's look at several signs, the totality of which can clearly determine the top and bottom of the ball joint. There are small guarantees that all of the listed differences will be on your copies, but knowing all the possible ones, you can accurately answer the question on today’s topic.
To clearly recognize the differences, you need to remove the protective boot. Now let's visually inspect.
- The lower part of the body near the upper supports is made in the form of a sphere, as if a ball was pressed into it. The lower ones have a flat bottom. This is done so that more lubricant can fit under the liner.
An obvious difference between the lower ball is the presence in the bottom of the body of a hole with a screwed-in plug bolt (look at the photo above).
This is for the oiler to add lubricant and check for wear. Some manufacturers also have space for an oil nipple on the upper hinges. Therefore, this is not a 100% sign of difference
Visually, the lower one looks more massive and has more weight than the upper support. This is an indirect sign. There were almost identical specimens. Having removed the boot, you can find a hundred percent difference - the housing cover, where the finger moves, has a certain shape.
So on the lower support it is oblong, elongated. This is due to the fact that the lower ball pin moves in one direction, given by the shape of the support body. The upper one can “move” in all directions, so the hole for the finger has a round shape.
The force with which the joint can be moved
Since the forces for which the supports are designed are different, when installing, try to move the ball pins. You can move the upper one with your hand, with a certain effort, it will begin to move. In most cases, nothing will work from the bottom. The finger will not move with your hand. For these purposes, you will have to use a lever to break it and move it apart. Because it is the lower hinge that takes on the largest load, so its design is made to “digest” shocks when driving over uneven roads. This is not a 100% sign. Some fingers will be the same. You can move the upper and lower supports freely by hand - this is an indicator of the low quality of manufacturing of the hinges.
In some cases, markings are indicated on the back of the support body: “B” - upper, “H” - lower, or on the ball pin.
Important! Such signs of differences in supports are not suitable for all cars. They are relevant only for VAZ classics
For example, the Niva boasts identical supports installed on the upper and lower suspension arms.
This is due to the design features of the chassis. In the Zhiguli VAZ 2101-07, the lower ball is installed in the lever with the finger up. Therefore, the wheel, moving over uneven roads, tries to “rip out” the pin from the joint body, so it must be reinforced to withstand the impacts of the wheel. It is the classic VAZ models that can most often be found with the wheel turned outward.
On Niva they got rid of such a miscalculation in the suspension. The supports are mounted pin down on the upper and lower arms. Therefore, the cone where the ball pin is pressed does not hit the pin, tearing it out of the cracker, but rather the lever. The lower joint does not experience such stress, so there is no need to install a reinforced ball joint down. On Nivas, the suspensions have identical upper supports in a circle; there is no need to learn to distinguish them.
Now you know what is the difference between the upper and lower ball joints of the VAZ 2106, VAZ 2107 and other domestic classics and what will happen if they are mixed up in the suspension arms. Why these signs of differences are only suitable for Zhigulis of the classic family - we learned from this article; Niva owners should not worry.
Diagnostics of ball joints VAZ 2107
You can make sure that the cause of the grinding or squeaking is the ball joint in various ways.
- Aurally. An assistant will be needed for this. Two people rock a car with the engine turned off, simultaneously pressing on both sides of the car's hood. If at the same time an uncharacteristic sound is heard from one of the wheels, the corresponding wheel is worn out or needs lubrication.
- Detecting the backlash of the sho. The wheel, on which the support has most likely failed, is raised with a jack by about 30 cm. An assistant from the interior presses the brake pedal as hard as possible. After this, you should forcefully rock the wheel, first in a vertical plane up and down, then to the right and left. When the brakes are locked, play will immediately appear. Even if it is insignificant, the SHO still needs to be changed.
Selection of ball joints for VAZ 2107
The main element of any SHO is a ball pin, the reliability of which determines the operational life of the entire assembly. A high-quality ball pin must meet the following requirements:
- the finger should be made only of high-alloy steel;
- the ball of the finger must necessarily undergo a cementation procedure (surface hardening), and the body of the finger must be hardened and then cooled in oil.
Other support elements are produced by cold heading followed by heat treatment.
This technology for manufacturing SHO is quite expensive. Therefore, there are only a few companies that produce high-quality supports for the VAZ 2107. These include:
- Belebeevsky;
When choosing ball joints for the VAZ 2107, you should beware of fakes. There are quite a lot of such products on the market. Some of them are made so well that they can mislead even a specialist. The only criterion to distinguish a fake from the original is the price. Low-quality SHOs cost half as much as real ones. However, saving on details on which the driver’s life literally depends is unacceptable.
Replacement of ball joints VAZ 2107
Ball joints on the VAZ 2107 cannot be repaired. On the first “sevens”, collapsible ball joints were installed, from which a worn ball pin could be removed and replaced. Modern supports cannot be disassembled. Moreover, even if we allow for the possibility of disassembly, it will still not be possible to repair the SHO, since ball pins for the VAZ 2107 have long been discontinued.
To replace the SHO you will need:
- a set of new ball joints;
- jack;
- a device for squeezing supports out of the eyes;
- set of open-end and socket wrenches;
- hammer;
- flat blade screwdriver.
Procedure for replacing ball joints
Replacing ball joints on a VAZ 2107 is carried out as follows.
- The wheel on which it is planned to replace the wheel is jacked up and removed.
- Using a 22mm open-end wrench, unscrew the nut securing the upper ball pin.
Video: replacing the ball joint of a VAZ 2107
Thus, technically replacing ball joints on a VAZ 2107 is quite simple. However, in practice, squeezing the ball pins out of the lugs will require considerable physical strength. Therefore, any car owner should realistically assess their capabilities before starting work on replacing the car.
Checking and replacing ball joints of the VAZ-2107 front suspension
Upper ball joint clearance
The clearance in the upper ball joints is checked using tool 02.8701.9500.
Place the car on a level, level surface with a hard surface, lift the right front part of the car and remove the wheel.
2. Place a wooden block 10 with a height of 190 mm under the lower ball joint and lower the car onto it.
3. Install bushing 9 onto the nut of the upper hinge fastening bolt closest to the casing, place base 8 on the bushing and lightly secure it with screw 4.
4. While moving the device, set lever 3 to a vertical position so that its lower end rests against the brake protective casing 2, and tighten screw 4.
5. Install indicator 7 into the base rack 8 until its leg stops against lever 3, with a tightness of 2–3 mm, and tighten bolt 6.
6. Attach bracket 16 to hub 15 with two wheel mounting bolts, put torque wrench 1 on the hex head of bracket 16 axle and, with a torque of 196 Nm (20 kgf m), turn the key towards and away from the car, sum up both indicator readings.
7. The total indicator readings should not exceed 0.8 mm.
8. Repeat the operations for the left front wheel suspension.
Condition of the lower ball joints
9. Place the car on a flat, horizontal surface with a hard surface and, lifting the right front part of the car, remove the wheel.
10. Place 1 wooden block 5, 280 mm high, under the hub, and lower the car onto it, clean the lower part of the hinge from dust and dirt and remove the conical plug.
11. Measure the distance “h” with a depth gauge of caliper 4 as shown in the diagram.
12. Repeat the operations for the left front wheel suspension.
13. If h is 11.3 mm, then remove the hinge from the car and carefully inspect it.
There should be no cracks on the hinge body, and no dirt in the lubricant.
If there is dirt in the lubricant, cracks on the hinge body, or if h is 11.8 mm, replace the hinge.
Of course, not everyone has a device and an indicator. Then you can quite easily check the condition of the ball joints.
Checking the upper ball joint
1. An assistant presses the brake pedal and holds it during the check in order to eliminate the possible influence of the clearance in the hub bearings.
With sharp movements we swing the wheel by its upper part in a plane perpendicular to the longitudinal axis of the car.
You can check the condition of the ball joint in another way.
1. Using a mounting spatula, pump the upper arm alternately up and down and check for play between the pin and the ball joint housing
2. If play is detected, the upper ball joint must be replaced.
Checking the condition of the lower ball joint
We clean the lower part of the ball joint from dirt and use a 7 mm wrench to unscrew the plug.
If the test is carried out on an inspection pit or overpass, then use a caliper depth gauge to measure the distance from the lower end of the support to the spherical surface of the ball pin.
If the condition of the lower ball joint is checked on a flat horizontal platform and it is impossible to use a caliper due to its length, then, having unscrewed the plug, insert a piece of wire into the ball joint and put a mark on it flush with the end of the ball joint.
Using a caliper, measure the distance from the upper end of the wire to the mark.
If this distance is more than 11.8 mm, replace the ball joint.
To lubricate the joint, screw a grease nipple into the ball joint and use a blower to supply lubricant into the cavity of the support, making sure that the protective cover of the support does not swell.
Replacing ball joints
We hang and remove the wheel.
Using a 22mm wrench, unscrew the self-locking nut from the ball pin of the upper support.
Using a tool, press the ball pin out of the steering knuckle.
If there is no device, then you can press out the ball pin by hitting the steering knuckle eye with strong hammer blows, while simultaneously squeezing the upper arm away from it with a mounting blade.
Using two 13mm wrenches, unscrew the three nuts securing the ball joint to the upper arm
The ball joint with a protective cover is attached to the lever through a pressure plate
It is not possible to completely unscrew the lower ball joint nut immediately, since it rests against the steering knuckle lever.
Therefore, using the “22” key, first unscrew it 3-4 turns.
We install the device and press the ball pin out of the steering knuckle.
We completely unscrew the self-locking nut and, raising the steering knuckle, remove it from the ball pin.
Using 13mm wrenches, unscrew the three nuts securing the ball joint to the lower arm.
It is attached to it without a pressure plate
Before installing new ball joints, make sure they are lubricated and the protective covers are intact.
To completely remove the steering knuckle from the front suspension arms, use a tool to press out one ball pin and insert a suitable stop in its place.
Press out the second ball pin. Install the ball joints in the reverse order.
How to independently check and replace ball joints on a VAZ 2107
The car's ball joint is an important part of the front suspension. This is especially true for classic VAZs, in which there are twice as many of them compared to front-wheel drive ones. If you drive on worn ball joints, then when they fail, the wheel will fall to one side and the car will be in an emergency. Therefore, it is necessary to monitor their condition and replace them on time.
Purpose and design of the part
The ball joint (SHO) of the VAZ 2107 is a hinge that is fixed in the suspension. Thanks to this design, the wheel can only move horizontally and cannot move in the vertical plane. SHOs have a small resource, so their condition needs to be monitored and changed as necessary. Which happens quite often. Damaged anthers must be replaced, as dust, water and dirt penetrate through them, which greatly increases the wear of the balls.
The first cars did not have ball joints; their function was performed by kingpins, requiring constant lubrication. They had insufficient mobility, which made driving difficult. On the VAZ 2107, manufacturers installed SHOs, the body of which contained a spring and a pin. The assembly was protected by a boot on top.
The finger was secured in an eyelet, which was always stationary. The connection was secured by a powerful spring. The entire assembly was covered with a steel boot. This design also required periodic lubrication, but it did not need to be updated as often - twice a year. The pins had to be lubricated once a week.
The designers improved the ball by removing the spring, and replaced the steel boot with a plastic one. The eyelet in which the finger was pressed was made less bulky and refined with a plastic finish. The design became non-separable, which made the ball joints disposable parts.
Why do problems arise with SHOs and what are the symptoms of their failure?
Ball joints may not fully perform their functions during long-term operation for the following reasons:
- Lack of lubrication. The SHO constantly experiences shock loads, which gradually squeeze out the lubricant. When there is a shortage of lubricant, parts rub against each other, which accelerates their wear. In addition, during operation the lubricant loses its characteristics.
- Shock loads. They cause destruction of the pin located in the suspension eye. The knot is designed in such a way that the ball on the pin experiences significant loads. Since the quality of the road surface often leaves much to be desired, the load increases several times.
- Damage to the boot. A boot is installed to protect the hinge joint. It prevents sand, water and dirt from getting onto the support. It is necessary to monitor the condition of the anthers. They are made of rubber, so they are especially susceptible to wear in sub-zero temperatures and hot weather. If cracks, tears or other defects appear on the product, it must be urgently replaced. If this is not done, moisture and abrasive particles from the dirt will get into the hinge and grind down the surface of the pin ball.
- Big gap. With prolonged use, the pin ball gradually wears off, increasing the gap in the steering knuckle, which can lead to loosening of the part. When driving off-road, this can cause your finger to be knocked out of the eyelet.
Signs of wear and tear on the VAZ 2107:
- Wheel rocking. When the car picks up speed, the wheel sways slightly from side to side. The reason is play, which occurs due to wear on the parts of the ball joints. This is dangerous, as a moving car can turn the wheel perpendicular to the body. Therefore, the backlash must be urgently eliminated.
- Suspicious noises and sounds. When driving on a bad road, unpleasant sounds are heard from the side of the wheel: knocking and grinding. They can be heard especially clearly at low speeds – less than 30 km/h. Usually the cause of the noise is a slight break in the ball pin.
- Creaking sound when turning the steering wheel. The reason is a lack of lubrication on one of the ball joints, which becomes unusable
- Uneven wear of rubber on slopes. The reason may be a malfunction of the ball joints or other problems associated with the wheels.
If the listed symptoms appear, you need to check the SHO.
Diagnostics of ball joints
The frequency of diagnostics depends on the area in which the vehicle is operated. In large cities with good roads, checking can be done after 100 thousand kilometers. In rural areas where there are no roads, it is advisable to check the suspension and ball joints as often as possible, at least after 20 thousand km. You can check the SHO in several ways:
- Aurally. The engine stalls. The driver and assistant rock the car by pressing on the hood on both sides. If you hear a suspicious sound from one of the wheels, then there may be a problem with the corresponding wheel drive. It will either need to be replaced or lubricated.
- Checking ball pins. The method is applicable only for the latest releases of “sevens”, which are equipped with special holes that allow you to control the wear of the product through them, without resorting to disassembling the support. If the pin is worn by more than 6 mm, the SHO must be replaced.
- Determination of play of ball joints. To do this, the wheel on which there is a suspicion of a failed wheel brake is raised by 30 cm using a jack. The assistant in the cab presses the gas pedal all the way. Then you need to grab the upper edge of the wheel with one hand, and the lower edge with the other, and forcefully swing it up and down. Then do the same in the horizontal plane, swinging the wheel left and right. When the brakes are locked, the presence of play will immediately become apparent. Even with minimal play, the ball needs to be replaced.
Self-replacement: step-by-step instructions
The main part of the ball joint, on the quality of which the service life of the entire hinge joint depends, is the ball pin. It must be made of high-alloy steel, its ball must undergo a cementation procedure so that its surface becomes more durable, and its body is hardened. The technology for manufacturing high-quality SHOs requires large material costs. Therefore, only a few companies can afford it for the manufacture of ball joints for the VAZ 2107. Among them:
Italian made Pilenga
Belebeevsky
When purchasing kits, you should be wary of counterfeits, so you should buy from trusted sellers or specialized stores. It's not worth saving. High-quality products always cost more.
The first VAZ 2107 models used collapsible ball joints. Therefore, they could be disassembled and worn parts replaced. In the latest “seven” SHOs they install non-separable products.
For the replacement procedure you need to prepare:
- jack;
- new repair kit;
- puller for squeezing out the support;
- hammer;
- screwdriver;
- a set of keys.
The replacement process is a sequence of steps:
- Using a jack, we raise the car and remove the wheel on which we will change the support.
- We take the key at “22” and unscrew the nut that secures the pin in the upper steering knuckle.
- Using a puller, squeeze the pin out of the steering knuckle. You can use a hammer and hit the pendant several times. At this time, pry the part to be removed with a long lever and pull it up.
- Next, we unscrew the three bolts with a “13” key, thanks to which the upper SHO is held on the lever and take it out along with the cover and plate. Let's check her condition. If the finger moves freely, without effort, the support must be replaced.
- Using a wrench set to “22”, loosen the fastening nut of the lower SHO. Extrude the lower finger in the same way as the top one. Now there is nothing stopping you from completely unscrewing the nut.
- Unscrew the fastening nut holding the ball pin. Then we unscrew the three bolts securing the SHO to the lever. We take out the ball joints. We replace it with new parts, after applying a little lubricant under the boot.
- We assemble the suspension in the reverse order of disassembly.
Technically, replacing the SHO with a VAZ 2107 is not difficult. The only difficulty that arises is in pressing the ball pins out of the steering knuckle; considerable physical effort must be made. Therefore, it is advisable to be in good physical shape. Otherwise, the replacement is not difficult.
How to check ball joints on a VAZ 2107
The suspension of any car consists of many different parts that have different functions. One of these parts is a ball joint, which is a connecting part that allows the front wheels to rotate in different directions. If a part malfunctions, serious consequences can arise, so we will figure out how to check the ball joint of a VAZ 2107, and what may be needed for this.
Purpose and design of ball joints
A ball joint is a joint that is one of the fundamental parts of the front suspension of a car. In a car's design, these elements are designed to allow the front wheels to move left and right. The hinge is subject to heavy loads, so it has a short service life, which means it needs to be replaced often.
Ball joints on domestic cars began to be used relatively recently, and before that the ability to move the front wheels in a horizontal plane was realized through king pins. The pivots need frequent lubrication, and the slightest lack of lubrication reduces the mobility of the joints, which means the controllability of the vehicle deteriorates. In the design of the VAZ-2107 car, kingpins are not used, but instead, ball joints are used, which are structurally simpler and 10 times smaller.
The design of the ball joint is as follows:
- Body or base.
- The ball pin is a movable element of the part.
- Boot or protective cover - prevents water and dust from penetrating into the connection.
- Plastic liner inside the case. It is located between the ball part of the pin and the base of the part.
To ensure the mobility of the finger inside the housing, a lubricant is used, which not only improves the mobility of the part, but also protects the internal parts from corrosion and increases service life. The front suspension of the VAZ 2107 has two ball joints per wheel. These are upper and lower devices that differ in design. The upper devices have a poured design inside the housing, and the lower ones consist of metal-ceramic liners. This was done for a reason, but for the reason that the upper and lower ball joints experience different degrees of load.
Signs indicating a ball problem on the seven
Driving a car with faulty ball joints is extremely dangerous, since at any moment when turning the steering wheel the part can fall apart, which will lead to an emergency. It is for this reason that owners of all vehicles need to check the serviceability of the part. You can determine the malfunction of the SB on a VAZ 2107 by characteristic signs:
- When driving the car, extraneous sounds appear in the form of knocking and grinding. The sound is especially pronounced when driving on uneven roads, as well as at a speed of about 30-40 km/h. Knocks and grinding noises indicate that the part has signs of damage to its integrity.
- Failure of ball joints can be diagnosed by vibration of the wheels. A faulty part causes the wheel to have play in the vertical plane, which, when moving at high speed, causes the car to become unstable on the road. The faulty part must be replaced, and urgently, since in the future the amount of play will only increase.
- When the steering wheel is turned to the sides, a metal grinding noise occurs, which is the reason for the lack of lubricant inside the steering wheel.
- When driving, the car may periodically be pulled to the side, due to play in the ball joint, the position of the wheel changes.
- If the parts in question fail, uneven wear of the rubber also occurs. Even if the wheel alignment has been replaced, then after that you need to set the wheel alignment, otherwise tire wear will continue to increase.
All these signs of a malfunction of the SHO are indirect, therefore, to clarify the need for replacement, you will need to diagnose the VAZ 2107 suspension.
Self-diagnosis of ball joints on a VAZ 2107
Grinding and squeaking of a car can occur not only when there is a malfunction of the ball joint, so you should not immediately start replacing the ball joints until a diagnosis has been made. Diagnostic manipulations will allow us to say with 100% certainty that this part needs to be changed.
Ball joints belong to the category of non-repairable parts, therefore, if they malfunction, they must be replaced with new ones.
Diagnostic procedures for determining a malfunction of the shutter on a VAZ 2107 consist of the following manipulations:
- First of all, a simple check is performed, which is based on the fact that two people stand near the front wheels and press alternately on the hood. If a creaking or grinding noise occurs when pressing, then we can say with 100% certainty that there is a faulty part in the suspension design.
- Diagnostics of ball joints continues, which is based on identifying play. To do this, you need to jack up the part of the car that is suspected of having a faulty part. There is no need to remove the wheel; it just needs to be suspended. To prevent the wheel from moving forward and backward, you need to fix the brake pedal in the depressed state, then grab the wheel with your hands from above and below and begin trying to swing it towards and away from you. Repeat the procedure, holding hands on the left and right. The presence of even a slight play indicates a malfunction of the shock absorber, which cannot be repaired, but only replaced. Please note that play can also be caused by a loose wheel bearing.
- The boot of the VAZ 2107 ball joint is inspected, which should be in good condition. If it is torn or has microcracks on the surface, then there is a high probability that water and dust have gotten inside, which means that the process of corrosion destruction will soon or has already begun. If the boot is faulty, the part should also be replaced, otherwise it will soon fail, which will entail the need for emergency repairs of the front suspension.
- Checking the stroke of the ball pin. If the finger moves freely on the removed part, this indicates that the ball part has severe wear and therefore further operation is impossible. The ball pin must move with force and is difficult to move manually.
When buying new supports, you need to pay attention to the manufacturer so as not to fall for a fake. It is also worth remembering that a good ball joint will never be cheap, so buy only original models that with 100% certainty will last at least 20-30 thousand kilometers. We recommend reading the article about replacing the ball.
Which ball joints are better to choose for VAZ 2110
The desire of every driver is to be able to get from one point to another without any problems.
But such a wish does not always come true. One of the most annoying problems that can occur on the road is the suspension. When something is broken in it, the car begins to behave badly and does not obey the steering wheel. Each suspension system mechanism brings its own surprises and troubles. Today we’ll talk about ball joints, their choice, as well as how to replace this element yourself.
Let's say right away that a ball is a reliable, durable and at the same time structurally simple element, which is used when it is necessary to fix a part rotating in a vertical plane.
Malfunctions
The ball is not particularly friendly with dirt, so getting it on the part can lead to unpleasant consequences. To protect against contamination, the design of the element includes a boot, with the help of which dirt and sand practically do not penetrate inside.
Actually, it is the boot that is the weakest point of the ball joint, due to which it is often necessary to completely replace it. This is all due to the poor quality of the material from which the boot is made and the harsh operating conditions. As a result, the boot cracks, bursts, dirt gets inside, and the support fails.
Worn element
Verification methods
To determine that the ball joint is the culprit for your car’s slightly “inappropriate” behavior on the road, you need to check this point.
To do this, there are three main verification methods, each of which has its own characteristics.
Way
Actions
The car is being jacked up
In this case, firmly grasp the wheel and wobble it. If there is noticeable play, the ball is worn out and requires replacement.
Place the car on the inspection pit
A pry bar is inserted into the gap between the suspension arm and the ball from below. By the movement of the wheel, you can immediately notice the presence of play. Replacement required
Send your car to a service center
Specialists using the appropriate equipment will conduct diagnostics, determine the degree of wear of the support, and come to the appropriate conclusion about the need for replacement. You can change it there too
Why is replacement required?
Operating a vehicle with a faulty ball joint can not only reduce ride comfort, but also seriously affect the safety of the driver, his passengers and other road users.
Initially, a faulty ball joint only makes unpleasant knocking noises, but at any moment you can simply lose the wheel. You understand what consequences this can lead to if you drive at high speed.
If you find signs of a suspension malfunction, immediately go to a service station or look for the cause and fix it yourself.
Spare part selection
So, to start replacing the ball joint on your VAZ 2110, you will first need to purchase a new part. This is not difficult to do, since the current range is very diverse and wide.
Although it is this diversity that often becomes the reason for difficult choices. Among so many options, you need to settle on just one. But your task is to find the highest quality and reliable spare part that can serve for more than one season.
In this regard, we invite you to familiarize yourself with the principles for choosing a high-quality ball in our table.
Element
Requirement
The ball body is welded in two parts. Moreover, on one side the seam should be noticeable, and on the other - not
Inspect the ball pin. It should be hardened, gray in color with scale. Make sure there are no traces of paint on the part. On quality parts, rolled threads are used
When scrolling, you need to apply a lot of force and watch for the absence of snagging. This is a sign of a quality part. It is not uncommon that turning by hand is too difficult and requires a wrench. This is normal and even good
In addition to the ball itself, responsible manufacturers include a nut and boot in the packaging. If these elements are not available, you should refuse to purchase.
In fact, there are many good manufacturers, but most VAZ 2110 owners choose supports manufactured by Trial-Lux, BelMag, and the most popular ones are Trek
Which of the options on the market is better is up to you to decide. But be sure to focus on the selection criteria presented above.
Replacement
You have decided that you will carry out the replacement work yourself. Well, that's right. Extra money saved is never a bad idea.
Today, the service for replacing ball joints costs an average of 2-3 thousand rubles.
Replacement consists of two stages:
- Dismantling old ball joints;
- Installation of new elements.
Dismantling stage
We will start, of course, with removal:
- Put the car on the handbrake, disconnect the negative terminal on the battery, place anti-roll bars under the wheels and lift the car using a jack on the problem wheel. You need to think about safety first if you are doing car repairs yourself;
- Loosen the wheel mounting bolts and then remove it;
- Remove the nut that holds the ball pin;
- Using a puller, press the support pin out of its seat. If you don't have a puller, use a pry bar and a hammer. The support is pryed up with a pry bar, several blows are applied with a hammer, as a result of which the problematic part comes out;
- Using any strong lever you can find in the garage, move the suspension arm down a little;
- Now the ball is easily removed from its place. This stage requires the presence of an assistant, since it is quite difficult to complete the entire range of dismantling work with two hands. To be more precise, it is inconvenient.
Internal lubrication
That's it, the old ball is dismantled, so you can start installation. We can say that the installation takes place in a clear reverse order. But there are some nuances here.