Tuning optics VAZ 2113, 2114, 2115
Tuning optics is not difficult, even if you are relatively new to this matter. The main thing here is to first decide which option for modifying the rear headlights you want to use for your VAZ 2114. Today, several basic ideas are especially popular.
| Tuning type | Peculiarities |
| LED overlays | A popular and affordable option. There are many ready-made overlays offered on the market, but you can also make them yourself. To create the overlay you will need fiberglass, LEDs and epoxy glue |
| Diode rings | This modification option involves a complete replacement of the rear optics with diode rings. To manufacture them, you will need serious experience in working with electronic devices. |
| Powerful lamps | This type of modification also involves the use of a tint film for headlights. Due to the tone, bright light will be better focused. But powerful lamps have disadvantages - they increase fuel consumption, load the generator and overheat the wiring. Since the engine power of the VAZ 2114 is not high, it is not entirely reasonable to use this option |
| Individual LED elements | The most original modification option, since it allows you to express your own imagination as much as possible. But you will have to spend time and effort creating a pattern of diodes and installing them |
From a cost-saving point of view, purchasing individual LEDs will be more profitable than purchasing finished products. But in this case, you must be sure that you will be able to get high quality devices. Otherwise, it’s better not to take risks and spend more money.
• LED overlays
. Today, LED overlays are the most common option for tuning taillights with your own hands. At the same time, the vast majority of VAZ 2114 car owners prefer hand-made LED trims. There is a good reason for this - factory-made trims are not visually presentable and, for the most part, are not suitable for the lights of this car. Making LED overlays manually is not so difficult - just stock up on epoxy glue and fiberglass;
• diode rings
. Since any tuning implies the ability to work with electrical devices, making diode rings should not cause problems even for a novice auto mechanic;
• use of high power lamps
.
In most cases, this method is used before treating the glass with tint film, because the pure light of this type of lighting is too bright and can blind other road users. The effectiveness that such lamps create is offset by excessive fuel consumption and the prospect of overheating of the wiring. It is better not to use such tuning in relation to the VAZ 2114 car, since the power reserve of this car is below average; •
DIY
installation of individual LEDs This method is the most creative; it opens up a wide field for imagination. Among the disadvantages is the extra time spent, which will inevitably entail developing a design and installing the LEDs themselves on the lights. One of the advantages is the reduced cost of separately purchased LEDs.
LED headlight covers
If you decide to attach LED trims to the top of the headlights, then you will need a soldering iron and experience working with electricians.
- 1) First, prepare a board with diodes; then they should be easily attached to the machine’s wiring.
- 2) Make a stabilizing circuit. This is necessary so that the diodes in the size mode do not shine at full strength, but in the stop mode they shine at full strength.
- 3) For those who love creativity, we can suggest making diodes in the form of arrows on the rear optics, which will light up when the car turns. We can say for sure that such tuning will not go unnoticed.
Important step
Why is replacing optics in a car an important and responsible process? Because for the slightest violation (if, for example, the headlights are too dark), a fairly decent fine is provided.
That is why before starting work, it is worth carefully studying the depth of darkness. That is, if the car owner has a luxurious white car, then black optics will not always be in place.
And indeed, if you look closely at a variety of photos of headlight tuning made by yourself, you will notice that they do not go into too black shades and tones.
The best option (for any make of car) is to use a dark shade on some small area of the headlights.
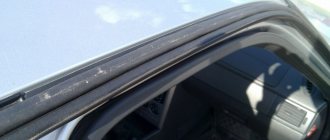
Most often, experienced craftsmen recommend changing only the top line located along the cut of the hood. Then the optics will look different, it will be slightly narrowed, which will give it more style.
LEDs as an impetus for development
With the advent of LEDs, the development of tuning rushed forward sharply. More and more new and unique solutions began to appear; no other light bulbs can achieve such a visual effect as diodes.
Using LEDs you can decorate the interior, doors, and optics. If it is now fashionable to install so-called angel eyes in front, then special elements based on diodes are most often mounted for the rear lights.
LEDs
LEDs have not only decorative, but also practical properties. Due to them, safety increases, since the level of luminescence is higher. But most importantly, such an option for modifying optics is permitted by the legislation of our country and not only that.
Typical faults and methods for their elimination
There are many reasons why taillights may fail or partially not work, but the main one is failure of the flexible printed circuit board. This is, in fact, the most sore spot of the rear light devices of the VAZ 2115.
Often, flimsy contact pads that pretend to be light bulb socket contacts fail, although in fact there are no sockets in the flashlights - a plastic ring that fixes the light bulb, a plastic pressure pad (all with latches) and contact pads on the board. It couldn't be simpler, but funnier too.
The service life of such a “cartridge” is six months maximum. Considering that the car was produced for 15 years, then this approach of the developers to the flashlight, the design of which has not changed over all these years, is surprising, to say the least. But the fact is clear.
Converting the board to cartridges
You can, of course, regularly change the flexible board - this is not a problem. But, firstly, the board costs money and, in principle, should not be a consumable item in order to buy it in packages. And, secondly, when someone is dead, for example, you won’t immediately notice “stop”, which means that at any moment we risk getting “in the butt” in the literal sense of the word.
Therefore, it’s better to tinker and do what the VAZ designers should have done a long time ago - replace all this flexible hack with normal cartridges. So, we go to the store, buy three ordinary plastic lamp sockets: one for a single-helix P21W, two for a double-helix P21/5W lamp. They are practically the same in size and appearance.
You will also have to buy a set of four-pin male-female car connectors. The photo below shows only an option, but there are many types of such connectors. In addition, any others for a larger number of contacts will do.
How to disassemble the rear light board? Elementary and without any tools. For speed, you can use an awl, the tip of a knife or a screwdriver, but you can do everything with your bare hands. We press the latch (photo on the left) and pull out the plastic imitation of the cartridge. Everything else will fall apart on its own. We remove all three cartridges.
We completely disassemble the panel - remove the plastic lamp clamps, remove the flexible board. We mark places for new cartridges, while focusing on the position of the old ones.
We remove the mounting posts for old cartridges and everything that interferes with the installation of new cartridges using, for example, a soldering iron. We drill holes of such a diameter that our new cartridges fit in there tightly and do not dangle. If there is no appropriate drill, drill with a smaller diameter, then bore with a round file.
For the turn signal bulb we use this socket - it takes up less space, but you can put another one - just cut it a little (however, this one also had to be cut a little).
We install the cartridges in their places and fix them in any available way. In the photo below they are simply soldered with a soldering iron. Not exactly aesthetically pleasing, but reliable. But this “aesthetics” will still not be visible. We take out the wires of the “turn” cartridge through the hole made.
All that remains is to solder the connectors: – one – to the light bulbs, the other – to the flashlight power harness, having previously cut off the old one.
We install the board in place in the lantern, connect the power supplies, and check.
Modified board installed in its original place
The cartridges we have chosen are, of course, optional. This is how the author of the photo below came out of the situation. He used metal cartridges.
Replacing the power connector
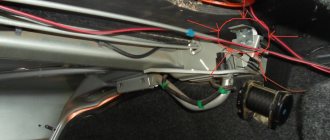
Sometimes the sockets in the rear light work like clockwork, but the connector, which is integral with the flexible circuit board, fails. If you don’t want to work on installing cartridges, you can solder a regular block to the board tracks, and replace the standard block on the power harness with its mating part. The idea itself looks like this:
The photo above shows a modification of the flashlight for the VAZ 2114. For our 2115, everything looks the same, only there will be 4 wires, and the block can be taken with 4 contacts, and not 6. Well, it would be nice to protect the soldering area from moisture with a sealant or hot glue gun.
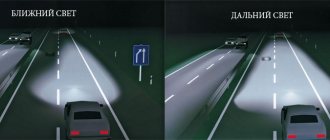
Operating modes of LED optics
If you decide to install LED headlights yourself, then it will be useful for you to learn about the operating modes of this type of optics.
Depending on the manufacturer, the optical control unit may have several operating modes:
- urban;
- bad weather mode (rain);
- all-weather mode;
- high speed;
- as well as the mode for driving through complex intersections (the author of the video is Big Test Drive).
As a result, in order to adjust the level and position of the light beam, it is not necessary to completely change the lighting angle. To do this, it will only be enough to turn off those few diode elements that blind the driver of an oncoming vehicle. You will not suffer from this, and the driver of the oncoming car will not be “blind”. It should be noted that the Audi automobile concern recently tested various adaptive light systems, and the results of these tests were interesting.
In particular, a dull darkened spot clearly covered exactly the area where the control unit detected the oncoming light beam. And even if this beam moved in different directions, the dark spot followed it without slowing down. Moreover, this did not affect the quality of the light beam of the vehicle in any way. The shadow simply covered the oncoming light, but at the same time, the sections of the road necessary for the motorist were always well lit.
Of course, the Audi company produces only high-quality lighting systems, you can’t argue with that. If you opt for cheaper Chinese options, then the situation here is somewhat different. Firstly, such systems can be equipped with only a few mode functions - for example, only all-weather and rain or rain and city. Secondly, on cheaper options the quality really leaves much to be desired.
It is not a fact that a “smart” control unit that automatically adjusts the direction of the light flux will be truly smart. Therefore, when choosing optics, it is better not to opt for cheap options - after all, we are talking about the safety of the person behind the wheel. In the video below you can see what the tuned headlight optics on a Lada Priora car looks like (the author of the video is Alexander Kuleshov).
LED headlight covers
If you decide to attach LED trims to the top of the headlights, then you will need a soldering iron and experience working with electricians.
- 1) First, prepare a board with diodes; then they should be easily attached to the machine’s wiring.
- 2) Make a stabilizing circuit. This is necessary so that the diodes in the size mode do not shine at full strength, but in the stop mode they shine at full strength.
- 3) For those who love creativity, we can suggest making diodes in the form of arrows on the rear optics, which will light up when the car turns. We can say for sure that such tuning will not go unnoticed.
Functional purpose of devices
To make a homemade LED flashlight for a car, you must first of all know the purpose of this device. Otherwise, the new tuning may not meet the functional responsibilities of the lighting fixture. The rear lights of a car are part of the vehicle's lighting system. At the same time, they perform a number of functions, which include the following points:
- when driving in reverse, such headlights provide high-quality illumination of the road surface;
- inform other traffic participants driving behind the car about its presence on the road surface in bad weather conditions, as well as in the dark;
- informing behind driving motorists about the driver’s intention to turn left or right;
- transmitting information to other drivers about an accident or vehicle stop.
Car at night on the road
To perform these functions, the rear lights will always be painted white. In addition, they have a much larger beam of light than brake lights. This device combines such lighting devices as:
- stop signal;
- turn signals;
- marker lights;
- reverse signal.
As you can see, the taillights are a total lighting installation. It is placed on any machine symmetrically and in pairs. Very often, such a headlight is a single unit, which includes all the lights and signals listed above. Somewhat less commonly found in vehicle configurations are lights consisting of two blocks. They are installed on each side in pairs. As a result, not two, but four lighting fixtures will be installed at the rear of the car. Many modern vehicles have a diode tail light, namely its turn signals. But not all domestic cars can boast such modern taillights. Therefore, many car owners prefer to do such tuning themselves.
Manufacturing of overlays
To make your own overlays you will need the following tools and materials:
- Working taillights and a set of LEDs;
- Stationery knife;
- Fiberglass;
- Paints and varnishes;
- Masking tape;
- Epoxy adhesive.
The instructions are suitable for homemade decorative decorations or purchased ones. The diode strips are attached with tape or its alternative:
- The taillights need to be covered with masking tape. After this, you need to apply fiberglass cloth to the tape.
- LED overlays will be installed in it, then the fiberglass needs to be impregnated with epoxy glue. It should be applied in 2-3 thin layers. All irregularities must be removed, and then wait for complete drying, which in normal garage conditions lasts 12 hours.
- When the glue has dried, you can remove the workpiece and then outline the contours of the future decoration with tape or a marker. After this, the designed profile is cut out with scissors. Once the two shapes are cut out, you can move on to putty. The dried surface should be sanded with fine-grained sandpaper. Afterwards the primer is applied, and then the main coat of paint.
- After 100% drying, a protective varnish is applied. LED covers are installed on the rear lights. Tuning is complete.
Tip: LED lamps can be used to decorate not only the rear lights. VAZ owners often install LED strips as turn signals and fog lights on the front optics. Another interesting option is to decorate the rims and dashboard.
Removal, disassembly and tuning
We have figured out the design of the lantern and its circuitry, we know how to change light bulbs, now we will try to make a little tuning of these lighting devices. But first, let's learn how to remove the lantern, disassemble (more precisely, break) and assemble (i.e., repair).
Removing the rear light
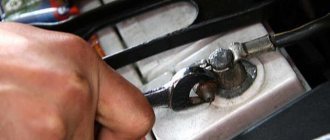
We open the trunk lid, find a pocket in the upholstery that covers the back of the lamp, and open it. We remove the power supply, take out the board with the lamps. All these steps are described in detail in the “How to replace lamps” section. We bend the upholstery along the edges of the lantern and find 4 nuts located around the perimeter. In the photo below, two of them are marked with arrows.
We unscrew them with a key 8. Pull the lamp in the direction of the arrow in the photo below, remove it from the body.
Disassembly
Like most previous VAZ models, the rear light on the 2115 is non-separable, so we’ll break it. The most common option is to simply cut the glass around the perimeter. The author of the next photo used an angle grinder for this.
We walked along the perimeter, where we couldn’t reach with a cutting wheel, and used a piece of a hacksaw blade for metal. Carefully pry up the glass with a screwdriver and, with a little force (in one place it is glued to the edge of the body, which cannot be reached with a saw), disconnect it.
Healthy. Instead of a grinder with a huge disk, it is better to use circular attachments on a drill attached to a conventional drill. Such attachments cost around 300 rubles and are always useful on the farm.
Assembly
Of course, we will assemble the flashlight after tuning, but we will place this item next to disassembly. We assemble using a soldering iron and sealant. We apply the glass to the body, grab them together with a heated soldering iron at a dozen points - just so that the structure does not fall apart.
Now we carefully go around the perimeter with a soldering iron, soldering both parts of the lantern together so that it is not only strong, but, if possible, airtight.
Well, to ensure that moisture does not get inside the lantern, we coat the seam with sealant.
Once the sealant has dried, the rear light assembly can be considered complete.
Tuning
Let's look at a simple but very interesting way of tuning rear lights. Its beauty is not only in its simplicity, but also in the wide choice of appearance of the lighting device and at the same time in the extremely low price of the work. We will only tune the brake lights/dimensions, but if desired, the same can be done with the turn indicators or fog lights (you can disassemble the internal rear lights using the same algorithm).
The essence of the method comes down to the following: we cut out an overlay from thick cardboard that repeats the size of the side light window. In principle, there are two such windows in each lamp on the VAZ 2115, but we will make one out of two by cutting off the aluminum partition separating them on the body reflector.
In this overlay we cut out whatever we want. Look at several methods and, if desired, repeat them or cut out your own.
And then we have two ways - grab these masks to the glass with a glue gun or paint the glass from the inside according to a template with opaque red paint. Red - so that the mask is not visible from the outside when the lamps are off. You can paint either the cut out parts using a cardboard template as a stencil, or vice versa - mark the cut out places with a marker, remove the template and paint over the rest. If we leave the masks on and not paint them, then, naturally, they should be red so that they do not show through.
Tuning front and rear lights on a VAZ 2107
Headlights for the VAZ 2107 are perhaps one of the most basic areas of tuning. The simplest and cheapest tuning that you can do yourself is to install LEDs instead of standard lamps in the headlights and rear lights. In this case, at low cost, you can specifically transform the exterior of your car.
Do-it-yourself LED tuning of VAZ 2107 headlights
For the “Seven” you can easily find, buy and install non-standard headlights or individual lighting elements. The cheapest solution is to install LEDs instead of standard lamps or in addition to them. This allows you to transform the appearance of your car at a minimum cost.
Tuning the rear lights of a VAZ 2107 is also often done by changing lamp lighting to LED.
For tuning with LEDs you will need:
- resistors;
- panel or box for mounting lighting elements (LEDs);
- drill;
- drill;
- sealant;
- wires;
- LEDs.
The box or panel must be adjusted to the size of the headlight and installation holes for the LEDs must be drilled. Depending on the number and parameters of the LEDs used, resistors are connected in series to provide the required circuit resistance. The resistor values are selected individually. The sealant is used to secure the LEDs in the holes.
Important: when connecting LEDs, polarity must be taken into account. In addition to the original appearance, tuning with LEDs has other advantages:
In addition to the original appearance, tuning with LEDs has other advantages:
- low power and, as a result, low load on the on-board network;
- durability and reliability;
- diffused light that does not blind other road users.
If your budget allows, you can tune the VAZ 2107 headlights by replacing the standard units with ready-made tuning products. The advantage of this solution: beautiful design and excellent quality with minimal time investment.
Installation of xenon headlights on a VAZ 2107
Xenon headlights are characterized by a particularly powerful luminous flux, which requires additional focusing using lenses. Full-fledged xenon headlights are expensive and include, in addition to the power supply and lamps, an automatic beam height adjustment system and a headlight glass washer. Each of the elements is extremely important for safety:
- correct focusing and adjustment of the light flux is necessary so that oncoming drivers are not blinded by bright light;
- Without a washer, dirty headlight glass overheats and may burst.
If you do not have the funds to install xenon headlights of appropriate quality, it is better not to install fakes, endangering yourself and other road users, so we do not recommend installing this type of lighting and did not describe the connection
Tinted headlights and taillights
Another type of do-it-yourself headlight tuning is tinting. Some people resort to it when upgrading both headlights and rear lights. You need to be very careful when choosing headlight tints.
Important: before tinting your headlights, you should remember that tinted headlights may result in an administrative fine. You also need to understand that tinted headlights reduce the brightness of the light, which makes night driving more dangerous.
In order for tinting to have a minimal effect on the quality of the car's light, the glass should only be partially tinted. This solution is effective and quite safe. Partial tinting can also help you avoid a fine - not the entire headlight is darkened, but a certain sector.
- remove the headlight;
- take out the glass;
- thoroughly wash and degrease the glass surface;
- stick the film.
When tinting your taillights, install more powerful and brighter bulbs so that the side lights and brake lights are clearly visible to other drivers. To tint the rear lights, it is also better to remove them from the car.
Sources
- https://semerkavaz.ru/ehlektrooborudovanie/vsjo-o-farakh-i-fonaryakh-na-vaz-2107/
- https://provaz07.ru/elektrooborudovanie/blok-fara-vaz-2107.html
- https://7vaz.ru/jekspluatacija/zamena-stekla-fary.html
- https://shiestko.ru/obsluzhivanie/kak-snyat-faru-na-vaz-2107.html
- https://vipauto-barnaul.ru/obsluzhivanie/kak-snyat-faru-vaz-2107.html
How to make a diode ring
In order to make a taillight based on a diode ring, you will need the epoxy-based adhesive mentioned in this article. The basis for creating a lighting device will be the diode rings themselves or the LED strip. The headlight housing will be made from large or small reflectors, which are quite easy to find on the market if desired. You will also, of course, need paint (you can choose based on your personal aesthetic preferences). Most often, to work with VAZ 2114 cars, a coloring agent with a chrome-plated tint is used.
To make a lighting device, follow this algorithm:
- first of all, mount the diode rings in tin cylinders prepared in advance (as a rule, cans left over from drinks or food are used);
- in jars - carefully cut out the holes so that they look like wells. In this case, there should be two wells: external and internal. If, for example, a jar is suitable for an external well, then the internal one can be simply and cheaply made from a painted half-liter plastic glass;
Install a cylinder for mounting diode rings in each internal well with one standard Soviet-made reflector. They, among other things, must create illumination in accordance with the standard scheme: orange conductors, white reversing lights, red fog lights. After this, a large reflector may contain a certain number of elements that will look quite advantageous inside the module. The entire remaining space can be decorated with an LED ring;
Cylinder with mounted diode ring, install diode ring reflectors. At the same time, in order for their adhesion to the body to be normal, you will need fixing ribs made of a substance such as epoxylin;
Installation of reflectors of diode glass rings can be equipped with additional surfaces, also secured with epoxylin.
LED rings on car tail lights
If this algorithm is performed correctly, tuning the VAZ 2114 can be considered complete.
The emergence of modern LED elements has led to the creation of a new stage in car tuning. Motorists began to decorate the car interior, doors and, of course, optics. If the front optics are decorated with “angel eyes,” then the owners of VAZ 2114 and other cars prefer to install LED elements on the rear lights. The taillights on the VAZ 2114 are easy to tune, but almost all of them involve the installation of diodes.
Installation of LED lights in taillights
Unlike LED strips, which are installed on the outside of the car's lights, the diodes are inserted directly into the headlights themselves. At the same time, the car owner’s skills in working with a tool such as a soldering iron will be very useful. Before starting tuning, the motorist must prepare the diodes and board. If everything is done correctly, then next time the LEDs will be easily connected to the wiring of the VAZ 2114. Among other things, a stabilization circuit must be installed. For its manufacture, the best choice would be special stabilizer devices, which are sold under code 7812. They are needed so that the LEDs, when operating in side lighting mode, produce a small amount of power, and when idle, the maximum possible power.
If you want to make your car as original as possible, you can install LEDs on the taillight in the form of an arrow pointing to the right and left, respectively. This will look very presentable and is achieved by laying out LED lamps in the required form.
Original LED lights
Tuning of this kind requires a large number of tools and consumables (especially when it comes to installing LEDs yourself). You will need to stock up:
- a set of LED lighting fixtures (along with resistors);
- fastening elements for these diodes;
- sticky tape;
- a substance that acts as a sealant (preferably based on silicone compounds);
- epoxy based adhesive.
Many novice motorists in such a situation will be interested in the question of how many LEDs will be required. It is impossible to give an exact answer to this, since much depends on the characteristics of a particular type of lantern. In any case, it is better to buy a few extra LEDs (they have the unpleasant property of burning out). It would be more rational to use white LEDs as diffusers. The best choice for turn signals is orange, for brake lights - red, and for reverse lights - clear.
Do-it-yourself installation of LEDs in the rear lights of a VAZ 2114 is carried out according to the following algorithm:
- Remove the lamp from the car body.
- Pull out the reflectors and reflectors from the lantern (after cutting you can get to them).
- Completely disassemble the rear lights of the car, separate the glass.
Tail lights prepared for LED installation - Mark with a felt-tip pen the places where the LEDs will be attached in the future.
LED installation matrix - Glue round fragments cut from adhesive tape on the inside.
- Cover all surfaces of the side marker lights and brake lights with silver paint.
- After the paint has dried, remove the adhesive tape.
- Install the reflectors with epoxy-based adhesive.
- Open all newly formed joints with a sealing agent.
Installation of LEDs - Attach the LED boards to the wiring of the VAZ 2114 car and place them in the internal frame of the lamp.
- Install a stabilization circuit (its purpose will be the LED connection).
- Assemble the blocks for controlling the turning lights and connect them to the taillight wiring.
- Install the modules using epoxy adhesive.
LED lights for VAZ 3114
If all optical components work normally, then the tuning of the VAZ 2114 can be considered complete.
conclusions
What do we get in the end? It is precisely that LED PTFs do not provide any big advantages over standard halogen ones. Currently I'm driving with my neighbor on. In winter, when there is a lack of current, I simply turn off the headlights (at a traffic light, for example), if I see that there is not enough current to charge the battery. At the same time, I’m not afraid of breaking my fogs in the next hole
Again, fashionable LED lighting devices attract unnecessary attention, and when undergoing maintenance, it is advisable to remove them, since a meticulous master may ask for a certificate. Again, the factory DRLs in the headlights look much more aesthetically pleasing
If you compare homemade ones with good factory copies, then there is no economic feasibility to assemble yourself, and ready-made LED PTFs for 3-4 thousand rubles apiece are worth the money. Another thing is that they ordered from China can be 2-3 times cheaper than if bought in Russian online stores. Thus, I closed this issue for myself, and I don’t plan to make any more additional lighting devices on diodes (PTF, DRL). The only thing is that I’ll probably assemble a 100 Watt chandelier.