F125 Radiator fan of the engine cooling system Reserve F225 Rear window heating Mounting block, rear window heating relay (contacts). Electrical package controller, contact “10” of XP2 block. Rear window heating element.F310Right headlight, high beamRight headlight, high beam lamp. Instrument cluster, headlight high beam indicator. F410 Left headlight, high beam F510 Sound signal Mounting block, horn turn on relay. Sound signal. F67.5 Left headlight, low beam F77.5 Right headlight, low beam F810 Alarm signal Mounting block, relay for turning on the alarm sound signal. Alarm sound. F925 Priora Reserve heater fuse F107.5/10 * Interior lighting, instrument panel, brake light Instrument cluster, contact “20”. Brake light switch. Brake light bulbs. Interior lighting unit. Interior lighting. The door sill light on the right front door. Additional brake signal.F1110/20*Windshield wiper Mounting block, high speed windshield wiper relay. Switch for cleaners and washers, contact “53a”. Wiper and washer switch, contact “53ah”. Heated rear window switch. Mounting block, rear window heating relay (winding). Windshield wiper motor. Rear window wiper motor (2171,2172). Windshield washer motor. Rear window washer motor (2171,2172). Airbag control unit, pin “25”. F1220/10*Instrument terminal 15 Instrument cluster, pin “21”. Electrical package controller, contact “9” of block X2. Electromechanical power steering control unit, contact “1” of block X2. Reversing light switch. Reversing lamps. Parking system control unit, contact “11” and “14”. F1315 Cigarette lighter fuse Priora F145 Left headlight, side light, license plate light, trunk light Side light bulbs (left side) Instrument cluster, main light indicator License plate lights Trunk light Electrical package controller, contact “12” of block X2F155 Right headlight, side light Side light lamps (right side) Glove box light F1610 Terminal 15 ABS Hydraulic unit, contact “18” F1710 Left fog light F1810 Right fog light F1915 Seat heating Heated seat switch, contact “1” About front seat heatersF205/10*Immobilizer control unitRecirculation switch (switch on) Mounting block, relay for turning on low beam headlights and side lights (automatic lighting control system) Heater electric fan relay Automatic lighting control switch Windshield wiper and external lighting control unit, contacts “3”, “11” Controller for the automatic climate control system, contact "1" Automatic window cleaning system sensor (rain sensor), contact "1" F217.5/5 * Rear fog lights Light signaling switch, contact "30" Diagnostic block, contact "16" Clock Automatic climate control system controller, contact "14"F22-/20*ReserveWindshield wiper motor (automatic mode) Mounting block, windshield wiper relay and high speed windshield wiper relay, (contacts)F23-/7.5*ReserveWiper and exterior lighting control unit, contact " 20"F24-F30ReserveF3130Electrical accessories control unitElectrical accessories controller, terminal “2” of block X1 Electrical accessories controller, terminal “3” of block X1 Driver’s door module, contact “6” Threshold light of the left front doorF32Reserve
* - for the “Norma” configuration with air conditioning and “luxury”
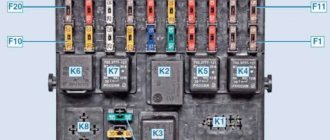
Relay “Norma” “Norma” with air conditioning “Lux”
| K1 | relay for turning on the electric radiator fan of the engine cooling system | Reserve | Relay for turning on the low beam and side lights of the headlights (automatic lighting control system) |
| K2 | rear window heating relay | ||
| K3 | starter activation relay Priora | ||
| K4 | additional relay (ignition relay) | ||
| K5 | space for backup relay | ||
| K6 | windshield washer and wiper relay | ||
| K7 | headlight high beam relay | ||
| K8 | horn relay | ||
| K9 | alarm relay | ||
| K10 | Reserve | Fog light relay | |
| K11 | Reserve | Front seat heating relay | |
| K12 | Reserve |
Location of Priora fuses under the hood
- F1 (30 A) – power supply fuse for the electronic engine control system (ECM);
- F2 (60 A) – fuse for the power supply circuit of the engine cooling system fan (power circuit), additional relay (ignition relay), rear window heating, electrical package controller;
- F3 (60 A) – fuse for the power supply circuit of the electric fan of the engine cooling system (relay control circuit), sound signal, alarm signal, ignition switch, instrument cluster, interior lighting, brake light, cigarette lighter;
- F4, F6 (60 A) – generator power circuit fuses;
- F5 (50 A) – fuse for the power supply circuit of the electromechanical power steering
Relay and fuse box for Halla air conditioner
- right electric fan power supply fuse (30 A);
- fuse for the power supply circuit of the left electric fan (30 A).
- right electric fan relay;
- additional relay (sequential activation of left and right electric fans);
- left electric fan relay;
- heater fan power supply fuse (40 A);
- compressor power supply fuse (15 A);
- heater fan relay;
- compressor relay.
Panasonic air conditioner relay and fuse box
- Heater fan maximum speed
- Right fan
- Fan sequential relay (low speed)
- Left fan
- Left fan fuse (low speed)
- Right fan
- Heater fan
- Compressor
- Heater fan
- Compressor
Additional mounting block Priora
- F1 (15 A) – main relay and starter interlock circuit fuse;
- F2 (7.5 A) – fuse for the power supply circuit of the ECU (controller);
- F3 (15 A) – Priora fuel pump fuse;
- K1 – main relay;
- K2 is the place where the Priora fuel pump relay is located.
Attention!
The relay and fuse diagram may differ depending on the configuration and production date of the vehicle. Current diagrams of the mounting block are presented in the operating manual for the date of manufacture of the vehicle (download from the official website).
Let us remind you that on our website you can find detailed instructions for repairing the Lada Priora with your own hands.
Keywords: Lada Priora mounting block | Lada Priora torpedo
91 5
Found an error? Select it and press Ctrl+Enter..
Source: https://xn--80aal0a.xn--80asehdb/do-my-self/repair/repair-lada-priora/page,1,4,218-shema-rele-i-predohraniteley-priory.html
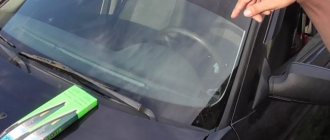
Fuse box in the passenger compartment of VAZ-2170, -2171, -2172
The fuse box in Priora is located at the bottom of the dashboard, on the left side of the steering wheel. To get to it, you need to open the cover, which is held on by three latches. Rotate each locking knob 90 degrees and pull the lid down and it will snap open.
Fuses in the interior mounting block
1, 2 – tweezers.
F1 (25 A) - radiator cooling fan . If your fan does not work, check its motor by applying 12 V directly to it from the battery. If the engine is working properly, then most likely the problem is in the wiring or connectors. Check the serviceability of relay K1.
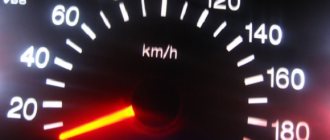
The fan in the Priora usually turns on at a temperature of 105-110 degrees. Do not allow the engine to overheat, watch the arrow of the temperature sensor.
If the fan runs constantly and does not turn off, check the coolant temperature sensor located on the thermostat. If you remove the connector from the working sensor, the fan should turn on. Check the wiring to this temperature sensor, as well as the contacts of relay K1, move this relay, clean the contacts. If this is the case, replace it with a new relay.
F2 (25 A) - heated rear window . Check together with fuse F11 and relay K2. If the rear window does not fog up, the heating element threads may have broken. Inspect all the threads and if you find a break, seal it with special glue or varnish, which can be bought at car dealerships for 200-300 rubles.
Check the connection contacts at the terminals to the heating elements at the edges of the glass, as well as the switch on the dashboard and the wiring from it to the rear window.
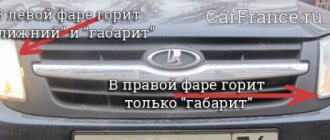
F3 (10 A) - high beam, right headlight . F4 (10 A) - high beam, left headlight . If the headlights do not shine on high beam, check the K7 relay and the headlight bulbs. The steering column switch, wiring or connectors may also be faulty.
F5 (10 A) - sound signal.
If the signal does not work when you press the steering wheel button, check relay K8. The signal itself is located under the radiator grille; you can get to it by removing the plastic casing from above. Check it by connecting the voltage to 12 V. If it doesn’t work, try turning the adjusting screw, or replace it with a new one.
F6 (7.5 A) - low beam, left headlight . F7 (7.5 A) - low beam, right headlight . When replacing lamps, be careful; there are separate lamps for the low and high beams, so they can be easily confused. It is better not to install lamps in high-power headlights; the reflectors may melt and the desired effect will not be achieved.
Most low beam headlight problems that cannot be corrected by conventional means can be related to the light control module (LCM). The low beam relay is only available in cars equipped with a light sensor, it is located in the place of relay K1; on most cars this relay is not in the mounting block; the low beam circuit goes through the MUS block.
It happens that the tracks in the block burn out; if there are problems, it is better to replace it with a new one.
If the windshield wipers turn on spontaneously when the low beam is not working correctly, the problem is most likely in the windshield wiper control unit, located in the center of the dashboard, the topmost block, next to the radio, is best reached from the glove compartment, or by hand through the removed console covers at the feet.
F8 (10 A) - alarm signal . If the alarm does not work, also check relay K9.
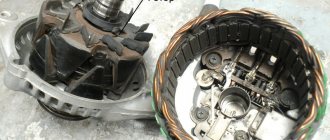
F9 (25 A) - stove fan.
If your stove does not work in any mode, the problem may be with the stove speed controller or with the engine. Check the stove motor by applying 12 V voltage directly to it.
If it doesn't work, remove it, open the cover and check the condition of the brushes.
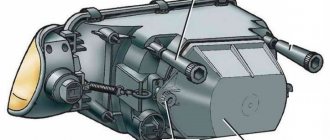
If the stove does not work only in the first modes, but works in the last mode, most likely you need to replace the heater resistance, located under the hood on the fan scroll.
The price of these resistors is about 200 rubles. Also check that the filter and all pipes are clean and that air flows normally into the stove. If the stove fan squeaks or turns with difficulty, try lubricating it. If the stove turns on and off, check the connectors and contacts in them, they could have melted or oxidized, in this case, replace the connector.
If the car has an air conditioner, the thermal fuse may burn out; it is located near the additional resistance; the fan fuse in the configuration with the air conditioner is located under the hood in the power fuse box.
F10 (7.5 A) - instrument panel, interior lights, brake lights.
If your instrument needles and gauges on the panel stop working, most likely the problem is in the connector that fits it. Check to see if it has fallen out and inspect its contacts. It may also be due to burnout of the tracks on the panel board. In this case, you need to disassemble the panel and inspect it. It can be easily disassembled by unscrewing the screws on top under the trim, on the bottom near the fuse cover and on the side.
https://www.youtube.com/watch?v=-Vg6E20ipq4
If your brake lights do not work, none of them including the additional interior light, most likely the problem is in the switch, which is located at the base of the brake pedal, check and replace it. If some of the brake lights work and some don't, the bulbs are most likely burnt out. To replace the lamp you need to remove the headlight. To prevent the lamps from burning out, replace them with better ones.
F11 (20 A) - heated rear window, windshield wipers . If the heating does not work, see information about F2.
If the front wipers do not work, check the tightness of the nuts on the shafts and the operation of the gear motor by removing it and applying 12 V voltage to it. If the motor is faulty, replace it with a new one. Removing the motor is problematic due to the design, so it is better to contact a car service.
The price of a new engine is about 1,800 rubles (if the car is not under warranty). Also check the steering column switch, it may be faulty or its contacts have oxidized.
F12 (10 A) - pin 15 from devices.
F13 (15 A) - cigarette lighter . If your cigarette lighter does not work, check its contacts and wiring. Typically, problems with the cigarette lighter occur due to a short circuit after using non-standard or low-quality connectors. To replace the cigarette lighter, you need to remove the center console.
F14 (5 A) - left-hand side lamps . F15 (5 A) - right-side lamps .
If your headlights stop working and the dashboard backlight does not light up, most likely the problem is in the light control module (LCM), check all the connectors and contacts in them; if the module is faulty, replace it with a new one.
If the dashboard lights work, but the dimensions do not, most likely the problem is in the wiring or contacts. Don't forget to check the lamps themselves.
F16 (10 A) - Pin 15 from ABS.
F17 (10 A) - left fog lamp . F18 (10 A) - right fog lamp . If the PTF stops working, the lamps may have burned out, check if there is voltage in their connectors.
If there is no voltage there, then in addition to the fuses, there is either wiring, or connectors, or a relay. Also check the power button in the cabin.
The lamps in the “foglights” can be replaced by unscrewing the bumper or one side of it, or by unscrewing the fender liners and turning the wheels towards the headlight being replaced, or you need to unscrew the protection from below.
You cannot install xenon in the PTF, because there is no tilt angle corrector and there is a high probability of blinding oncoming drivers.
Source: https://granta-service.ru/diagnostika/ne-gorit-blizhnij-svet-na-lade-priora-prichiny-kakoj-predohranitel.html
Content
The easiest way, without a doubt, is to entrust everything to the reliable hands of a trusted auto electrician, but it is not too difficult to cope with some problems on your own - if you have the smallest amount of free time and a primitive acquaintance with the basics of electrical circuits.
The low beam of the headlights does not light up, but the high beam is on - this phenomenon can be due to several reasons. And most of them are quite easy to fix. Moreover, this can happen to your car at a completely inopportune moment: on the highway, for example, when you need to switch to low beam so as not to blind oncoming drivers with headlights. Let's try to deal with all the flaws one by one, and consider: what might be the most common options for repairing and troubleshooting such an important segment as low-beam lighting.
Wiring
First of all, when the low beam stops working, check the reliability of the connections in all the blocks involved in the low beam electrical circuit. Their contacts often simply oxidize and after cleaning the problem is eliminated. Sometimes also due to vibration the connectors come loose and the circuit breaks.
The contact groups need to be cleaned of oxides - a needle file or a school eraser is suitable for this. A nail file will also work (this tool will probably be found in any car lady’s purse).
Sometimes the light does not come on because the button that turns it on fails. There are contacts inside it, which, in turn, can also be damaged by corrosion. It is not difficult to verify that the starting device has failed - just disconnect the wires from it and short-circuit them. If this is the reason, then the light will come on. There is no point in repairing a button that has become unusable - it is easier to replace it with a new one.
Lamp burned out
Naturally, if any light source does not turn on, the first thing that comes to mind is that the light bulb has burned out. The design of car lamps is such that the low beam may indeed be absent, but the high beam remains available. Halogen lamps have two filaments. It is quite possible for one of them to rupture - in this case, the light for which it is responsible will be absent.
To replace the bulb, the services of an auto electrician are not required. It is enough to open the hood with the ignition off, remove the protective box on both sides of the headlight, pull out the contact group, disconnect the spring clips, remove the burnt out bulb and install a new one.
A little subtlety:
The flask should be wiped with alcohol before installation, otherwise it will burn instantly. It is also not recommended to handle the bulb with unprotected hands: there is always some greasy and damp secretions on them, which can damage the light bulb. The best way to do this (replace the lighting) is with a dry cloth or rag.
Fuse blown
An equally common reason why headlights do not light up. The block where all the car fuses are grouped is opened, the pinout of their location is taken and the required one is looked for. A burnt jumper is in most cases visible to the naked eye. Even a schoolboy can handle sticking a whole part into place, so a trip to the service station in this case will probably also be unnecessary.
By the way, if fuses blow with unenviable regularity, it means there is a breakdown somewhere in the wiring. Either wire the entire circuit yourself, or visit a professional electrician - problems with the wires can lead to all sorts of troubles, including a fire.
Wire problems:
And in very different places. You will have to check all the connectors at the connection to the relay and the fuse box. They may be poorly screwed and fall off; may oxidize and not pass current. In the first case, it is enough to tighten the clamping nuts; in the second, clean the contacts.
You should also check the power button: very often the wire that leads to it becomes oxidized or comes loose. We can say that in domestic cars, first of all, you should inquire about the button, and only then go somewhere deeper.
The low and high beams on the Priora disappeared
passerby
Group: Active users Messages: 2184 Registration: 22.5.2011 Contact by nickname Quote User No.: 1606 Thank you said: 662 times
Warnings: (0%)
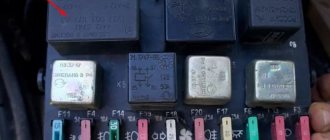
This means that there is no voltage reaching from the battery to the relay, or from the relay to the steering column, or from the steering column to the light bulb
try this: 1) connect "" from the battery to any of the fuses (in the green circle) without removing the fuse (there is a metal pimp on top of the fuse, touch it with the plus from the battery), if the headlights come on, then everything is ok from the fuse to the lamp, if it does not light up, then look at the wiring from the fuse box to the lamp; 2) turn on the low or high beam in the cabin using the steering column, then throw "" from the battery to the 87 relay leg (the relay will naturally need to be removed) what is in the red circle (the number of the relay leg is signed at the BOTTOM of the relay), if the headlights come on, then there is no voltage to the relay it reaches, if they don’t light up, then either there is no voltage reaching the steering column or from the steering column to the fuses
PYSY: I wrote it for the Nubirka first, so it may not be suitable for Doninvest Orion
Amateur to communicate
Group: Users Messages: 104 Registration: 10/14/2013 Age: 37 Contact by nickname Quote User No.: 4436 Thanks said: 26 times
Warnings: (0%)
This means that there is no voltage reaching from the battery to the relay, or from the relay to the steering column, or from the steering column to the light bulb
try this: 1) connect "" from the battery to any of the fuses (in the green circle) without removing the fuse (there is a metal pimp on top of the fuse, touch it with the plus from the battery), if the headlights come on, then everything is ok from the fuse to the lamp, if it does not light up, then look at the wiring from the fuse box to the lamp; 2) turn on the low or high beam in the cabin using the steering column, then throw "" from the battery to the 87 relay leg (the relay will naturally need to be removed) what is in the red circle (the number of the relay leg is signed at the BOTTOM of the relay), if the headlights come on, then there is no voltage to the relay it reaches, if they don’t light up, then either there is no voltage reaching the steering column or from the steering column to the fuses
PYSY: I wrote it for the Nubirka first, so it may not be suitable for Doninvest Orion
In the morning I tried the manipulations you described. As a result: 1) according to point 1, the headlights light up 2) according to point 2, the headlights do not light up.
Accordingly, if I understood correctly, then it is necessary to ring the segments: up to the steering column, the steering column itself and the steering column - fuses EF25, 26, 30, 31.
passerby
Group: Active users Messages: 2184 Registration: 22.5.2011 Contact by nickname Quote User No.: 1606 Thank you said: 662 times
Warnings: (0%)
I was a little blunt, because the relay could be turned over and pin 87 would change with pin 30, so we do this: turn on the low or high beam in the cabin, then take out the relay and throw “” from the battery to pin 87 and see if the headlights come on, and then throw “” from the battery to pin 30 (pins 87 and 30 will be located diagonally), if the headlights come on, the voltage does not reach the relay, if it does not light up, then either there is a break from the relay to the steering column or from the steering column to the fuses there is a break
Then you can throw "" from the battery to the 5th pin (the color of the wire will be brown) of the steering column, if the headlights come on, then there is a break somewhere from the relay to the steering column, if the headlights do not light up, there is a break somewhere in the steering column to the fuses
power supply to the steering column comes from Ef12 (25 A)
PYSY: you have the wrong numbering of fuses PYSY: here https://nubira-club.com/index.php?showtopic=10088 there are electrical diagrams for the nubir (low/high circuit diagram on page 94, fuse numbering on page 54)
Amateur to communicate
Group: Users Messages: 104 Registration: 10/14/2013 Age: 37 Contact by nickname Quote User No.: 4436 Thanks said: 26 times
Warnings: (0%)
I was a little blunt, because the relay could be turned over and pin 87 would change with pin 30, so we do this: turn on the low or high beam in the cabin, then take out the relay and throw “” from the battery to pin 87 and see if the headlights come on, and then throw “” from the battery to pin 30 (pins 87 and 30 will be located diagonally), if the headlights come on, the voltage does not reach the relay, if it does not light up, then either there is a break from the relay to the steering column or from the steering column to the fuses there is a break
Then you can throw "" from the battery to the 5th pin (the color of the wire will be brown) of the steering column, if the headlights come on, then there is a break somewhere from the relay to the steering column, if the headlights do not light up, there is a break somewhere in the steering column to the fuses
READ Which injectors to put on Priora
power supply to the steering column comes from Ef12 (25 A)
PYSY: you have the wrong numbering of fuses PYSY: here https://nubira-club.com/index.php?showtopic=10088 there are electrical diagrams for the nubir (low/high circuit diagram on page 94, fuse numbering on page 54)
For the winter, what kind of napkin is better to take?
Non-standard reasons
Sometimes the abnormal operation of headlights is caused by completely unusual factors. There was an indescribable incident when the owner removed the headlight cleaners from his Niva because they had not functioned for a long time. As a result, he lost low beam on both headlights. And it took me a while to guess the reason! During the experiments, the owner found out that to obtain low beam, the presence of at least one of the motors is required, and it does not matter which one - left or right.
In the end, he simply short-circuited the connector, as if simulating the presence of a headlight cleaner. There were no further problems with light. So if you tapped all the links of the chain, but have not established the reason for the headlights, try to remember if you recently made any improvements to the design of your car. Perhaps in the process of these changes some engineering design was violated, which is the reason for the disappearance of light.
However, if such simple, although usually effective, measures do not produce the desired effect, you will still have to remember the phone number of a familiar auto electrician. Otherwise, you can spend a lot of time looking for reasons and never find them.
Block in the engine compartment
The power fuse box is located in the engine compartment under the hood, near the left strut support. To get to it, you need to open the lid by prying the latch.
1 (30 A) - engine control system circuit . If there are problems with the electronic control unit, short circuits or other malfunctions, this fuse may blow out.
2 (30 A) - vehicle on-board circuit . 3 (40 A) - vehicle on-board circuit .
4 (60 A) - generator circuit.
5 (50 A) - electric power steering circuit.
6 (60 A) - generator circuit.
In case of any problems, it is important not to panic, to think soberly and logically. The most important thing is to diagnose and establish the cause of the breakdown. If you don’t have enough experience or nerves, it’s easier to sign up at the nearest car service center if it has a competent electrician.
I hope this article will help you deal with electrical problems and quickly fix any Priora malfunctions. If you have any experience or information, please leave a comment below, useful information will be added to the article.
15 January 2015 2,320,591
The relay and fuse box is also called the mounting block or black box. In the event of a car breakdown related to electrical equipment, the fuses and relays are first checked. If a fuse is blown, you must first determine the cause of its blown before replacing it.
Checking and adjusting the operation of the mechanism
Regular preventative examinations will help you avoid sudden breakdowns. According to the manufacturer's recommendations, these are carried out at least once every 3 months. Unscheduled, you will need to look under the hood if the Priora's light has become dim. Regardless of the reason, a key at “6” is required for operation.
The car owner must check the air pressure in the tires. Even a slight deviation from the norm will negatively affect the efficiency of lighting devices. After this, the vehicle is installed on the most level surface of the garage. Lada Priora is placed at a distance of 5 m from a smooth wall. The further procedure is as follows:
Direct adjustment is carried out in the vertical and horizontal plane. In order to adjust the position of the light spot as accurately as possible, you should first turn on the low beam. The setting is made for each headlight separately. In order to comply with technical recommendations, when adjusting one of the headlights, the second one must be covered with material that does not transmit light.
If you don’t have one at hand, then you just need to turn off the power. Only after this does the transition to high beam adjustment take place. The lighting adjustment process ends with a mandatory check. A vehicle rolls out of a garage onto the street at night.
The high beam turns on, and then the low beam. A visual inspection is carried out. If asymmetry of the light spots is noted, then the adjustment is made again. In some cases it is necessary to visit a service station.
Technically difficult stages
More difficulties will arise at the next stage. If the luminous flux is lost due to a short circuit, you will need to remove the glass from the headlight. It is fixed using a fairly dense sealant, so you will need an installation cutter. A standard industrial hair dryer will not work here. Prolonged thermal exposure will destroy the structure of the lighting element.
Use a cutter to carefully pry off the surface of the glass and slowly cut the sealant. After this, both parts are separated. The work is completed by replacing the failed element and restoring the integrity of the headlights.
To check, you need to turn on the lighting device, making sure that it is working correctly. If for some reason the high or low beam does not turn on, you need to make sure the wires are connected correctly.
Correctly setting the headlights is the key to the safety of the driver and other road users. The slightest failure will significantly impair road visibility at night. In many ways, this contributes to an increase in the number of possible accidents.
Common optical problems and how to fix them
- One of the breakdowns may be a non-working LED on the DRL. This problem often occurs due to dampness, so to solve it, you need to disassemble the structure, dry it thoroughly and reassemble it.
- Often the LED may simply burn out. In order to correct the situation, you need to resolder it and replace it with a new one. During this action, it is important to carefully solder the contacts and ensure that no moisture gets in, otherwise a breakdown or short circuit will occur again.
- You probably need to replace the wires and clean the contacts. If possible, it is better to cover the wires with corrugation.
- When installing lamps on LADA Priora, you must follow the base diagram. For different cars, even similar ones, they vary greatly. For example, the base of the Priora is a little close to that of the LADA Granta.
- It is important to install only lighting equipment of a certain type in a LADA Priora car. After all, to avoid problems, it is better to follow the factory advice. For this car, these are the low beam H7 and the high beam lamp AKG12-55-2 (h2), there are other options, but this one is very common. You need to look for analogues using this example.
Front of the car
Guaranteed short circuit
However, in 99% of cases it turns out that if the dimensions and instrument lights do not light up, then replacing these fuses will do nothing and their test will show that everything is in order with them.
In fact, there is no mysticism. In almost all cases, such a malfunction occurs immediately after installing the glove compartment, replacing its backlight lamp or switch.
Attention. Before replacing the glove compartment light bulb, be sure to remove the negative terminal of the battery, otherwise the instrument panel light may go out.
The fact is that if you do not remove the negative terminal from the battery and start disassembling the glove compartment. a short circuit in the glove compartment lighting circuit is guaranteed - the socket contacts are inevitably shorted to ground if the car is not de-energized.
Even if we did not disassemble the glove compartment, but the side lighting and instrument lighting disappeared, with a high degree of probability the wiring harness could fray and short out. leading to the switch and to the glove compartment light. which will also cause a short circuit and blown fuse F21. He is responsible for the rear fog lights.
READ Low beam on VAZ 2109
If you do everything correctly, the dimensions will light up again.
2304-17-9-12 (Copy)
Disconnect the ends of the two wires from the contacts of the low beam lamp.
Disconnect the ends of the two wires from the contacts of the low beam lamp.
We install the new H7 lamp in the reverse order.
2304-17-9-07 (Copy)
Remove the headlight cover by removing its hooks from the hinges on the headlight body.
Priora low and high beams gone, what should I do?
Remove the headlight cover by removing its hooks from the hinges on the headlight body.
l25582
To replace the side light bulb in the headlight, remove the socket with the bulb.
To replace the side light bulb in the headlight, remove the socket with the bulb.
2304-17-9-11 (Copy)
2304-17-9-13 (Copy)
By pulling, we remove the socket with the side light lamp from the headlight housing.
By pulling, we remove the socket with the side light lamp from the headlight housing.
Repair and replacement of individual elements
Wear of headlight elements, physical damage or short circuit are only a small part of the reasons why the luminous flux is lost or noticeably weaker.
In this case, you need a “10” key and a Phillips screwdriver. To begin, carefully remove the negative terminal from the battery and the front bumper. Only after this Lada Priora is ready for work:
- release the lock;
- disconnect the bundle of wires;
- Unscrew the screw for the side mounting of the headlight on the Priora;
- remove 4 clips;
- Unscrew the housing fastening bolts.
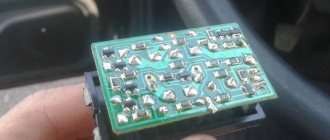
How to turn on headlights without MUS
You can turn on the headlights when the light control module has failed by dismantling and removing the chip from it. On the chip you need to find contacts numbered 10 and 12 and insert a copper wire jumper between them. After installing the jumper, the headlights turn on when you turn the ignition key.
Contacts between which you need to insert a jumper (marked with a red circle)
This method will help you get to the nearest service station in the evening. It is not recommended to use the jumper for an extended period of time as it does not provide proper contact and can cause heat to build up, putting you and your vehicle at risk.
- Which fuse is responsible for the power windows on the Priora?