Turn signals do not work on VAZ 2107, 2105, 2104, reasons
The direction indicators (turn signals) of VAZ 2107, 2105, 2104 vehicles may not work due to a malfunction of them themselves, or failure of any elements of their electrical circuit.
There are several options for failure of turn signals:
Causes of the malfunction: the direction indicator of the VAZ 2107, 2105, 2104 does not work
— One turn signal does not work, reasons
The indicator light is burnt out
A broken filament is visually visible in a burnt-out light bulb. In some cases, a light bulb may appear normal in appearance, but will not work. Therefore, we replace the light bulb with a new one or a known good one.
The contacts in the light bulb socket have oxidized
We turn the light bulb several times in the socket, or remove it and clean the contacts.
The circuit board track has crumbled (for the rear lights)
Visually inspect the board track for shedding. We call her to see if there is a break.
No "mass"
We check the condition of the black wire running from the turn signal block to the place of attachment to the car body. We check the reliability of contact with the body. If necessary, we clean it.
Electrical wiring faulty (positive wire)
According to the diagram, we check the positive wire of the turn signal for a break.
If at least one turn signal fails, the remaining serviceable turn indicators begin to blink at double frequency.
— Two turn indicators do not work: at the front - in the front headlights and on the wings, or at the rear - in the taillights
Burnt out light bulbs
A broken filament is visually visible in a burnt-out light bulb. In some cases, a light bulb may appear normal in appearance, but will not work. Therefore, we replace the light bulb with a new one or a known good one.
Contacts in light bulb sockets have oxidized
We turn the light bulb several times in the socket, or remove it and clean the contacts.
The circuit board tracks have crumbled (for the rear lights)
Visually inspect the board track for shedding. We call her to see if there is a break.
No "mass"
We check the condition of the black wire running from the turn signal block to the place of attachment to the car body. We check the reliability of contact with the body. If necessary, we clean it.
Electrical wiring faulty (positive wire)
According to the diagram, we check the positive wire of the turn signal for a break.
— The direction indicators on one side of the car (on the right or left) do not work.
The turn signal relay is faulty
The steering column switch is faulty
The contacts do not close when the switch lever is moved, or the wire block is not seated tightly.
Turn signal bulbs burnt out
Contacts in light bulb sockets have oxidized
No "mass"
Electrical wiring faulty (positive wire)
— All direction indicators do not work
The turn signal relay has failed
The steering column turn signal switch is faulty
The contacts do not close when the switch lever is moved, or the wire block is not seated tightly.
Fuse blown
No. 10 or (F10) in the relay and fuse mounting block. There may be a short circuit in the circuit. We look for it one by one, turning off the elements of the circuit.
Open circuit in the turn signal circuit
— Turn signals do not blink
Turn signal relay faulty
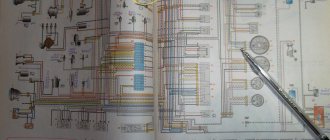
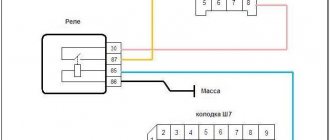
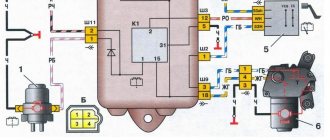
Wiring diagram for turn signals VAZ 2105, 2107
To check and check the continuity of wires when searching for a break, you can use this diagram (it is suitable for both VAZ 2107 and 2104).
Notes and additions
To diagnose the malfunction “the direction indicators of VAZ 2107, 2105, 2104 do not work,” you need to know the design features of their device and circuit.
The VAZ 2107 (2105, 2104) car has six direction indicators: one in the front headlights, one on the front wings, one in each rear lights. They work in pairs: either the left or starboard side. Power is supplied to each bulb separately through the ignition switch, steering column switches and turn signal relay in the mounting block. The negative wire for each light bulb is separate, fixed to the body. The circuit is protected by fuses. The relay is responsible for pairwise blinking of the turn signals. The bulbs are inserted into a two-pin socket.
More articles on electrical equipment of VAZ 2107, 2105, 2104 cars
VAZ 2107 fuses and relays, electrical diagrams
Often when operating a VAZ 2107 we encounter electrical problems. At one point, one of the electrical appliances, such as a stove or low beam headlights, refuses to work. Dimensions, cigarette lighter, turn signals and other components of the vehicle's electrical circuit may also stop working without warning.
To find the cause of the malfunction, you first need to understand whether voltage is supplied to a particular device and check the fuses and relays of the VAZ 2107. The most important thing in the circuit is the fuse. It protects the device from overloads and failure. If there is any short circuit or if the current in the circuit increases significantly, the fuse will blow. Therefore, first of all, let's open the hood of the car and check the fuses.
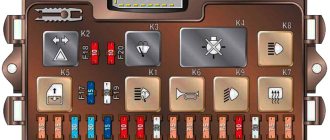
Fuse box VAZ-2107
The VAZ-2107 fuse box is located in the engine compartment, to the right of the engine (if you look in the direction of travel of the car). It contains the main fuses and relays. To check whether any of them have burned out, you need to open the hood and the plastic cover of the block, on which the names of the fuses and their nominal values should be indicated.
R1 - relay for turning on the heated rear window . If the heating does not work, check this relay, as well as fuse F5, replace the burnt or faulty ones. If the relay and fuse are working, check the contacts for connecting the wires to the heating strips on the rear window (on the side closer to the side doors)
R2 - headlight high beam relay . Works in conjunction with fuses F12 and F13. If only one headlight does not shine on high beams, most likely the problem is in the lamp, which is time to be replaced or in fuse F12 or F13 (right/left headlight, respectively)
R3 - headlight low beam relay . Works in conjunction with fuses F16 and F17. If the low beam does not work in both headlights, it is most likely the problem with this relay. First of all, replace it with a working one. If it doesn’t help, both lamps could have burned out (this happens) or their fuses.
1 — connector for the relay for turning on the headlight cleaners and washers . If your car does not have these devices, then the presence of a relay is not necessary.
2 — connector for the horn relay . In the figure, a jumper is installed so that the sound signal works without this relay.
3 — connector for the cooling system fan motor relay . In the figure, a jumper is installed so that the fan operates without this relay. Be careful with this connector.
Failure to contact the jumper in the absence of a relay can cause the fan to fail, and this can lead to overheating of the coolant and, accordingly, the engine.
When the first signs of overheating appear (according to the temperature sensor and boiling of the liquid), turn off the engine as soon as possible.
4 — tweezers for replacing fuses 5 — spare fuses
6 - tweezers for replacing the relay
Try to always have spare fuses of different ratings, so that if they blow out on the road, you don’t have to look for the nearest car shop.
VAZ-2107 fuses
F1 (10 A) - lamps in the reversing lights, heater (heater electric motor), heated rear window . If your reverse light does not work, check this fuse, then the lamp itself, and it may also be the reverse light switch (on the rocker or gearbox).
If the heater does not work, but this fuse is intact, the fault may be in the wiring or in the heater motor itself, as well as in the switch on the panel.
F2 (10 A) - electric motors for windshield wipers, headlight cleaners, windshield washer pumps and headlights . If the wipers or washer do not work, check this fuse and connector 1 for the relay. A relay or jumper must be installed in it. It could also be the wiring or the wiper motor itself.
If the windshield washer does not work, check the fluid level in the washer reservoir. In winter, poor-quality or untimely replaced fluid can freeze in the washer system pipes. The washer nozzles may also become clogged. Or the issue may be in the pump itself (located in the washer reservoir), if, for example, it has already served its purpose or was often turned on without windshield wiper fluid.
F3 (10 A) - reserve
F4 (10 A) - reserve
F5 (20 A) - rear window heating element and relay contacts for its activation . If the rear window heating does not work, also check relay R1. If the relay and fuse are working, check the tightness of the connection on the contacts of the heater and the integrity of its elements (no breaks).
F6 (10 A) - cigarette lighter, clock . If the cigarette lighter does not work and this fuse is intact, the problem may be in the contacts of the connector itself. Disassemble the panel with the connector to access the contacts and check their condition.
F7 (20 A) - sound signals and their relays, cooling fan . If the sound signal does not work and this fuse is intact, check the signal device itself. The problem may be in its windings or contacts. Also check the condition of the contacts on the steering wheel (in the signal switch). Another reason may be hidden in the relay. Check connector 2. It should have a working relay installed or, if it is missing, a jumper.
If the radiator fan does not work, but this fuse is working, check the connection to the coolant temperature sensor and its operation. It happens that the wire from the fan gets under the hood onto the manifold or engine housing and fuses. Also check the operation of the fan by applying voltage to it from the battery.
THIS IS INTERESTING: Kia Sorento injector repair
F8 (10 A) - hazard warning light button (with a lamp), direction indicators and their indicator lamp (when the emergency lights are on) . This fuse is responsible for the operation of the alarm system. If it doesn't work, but the turn signals work individually, it's most likely the problem.
F9 (7.5 A) - rear fog lamps.
If the rear fog lights do not work and this fuse is intact, check the lamps in the lamps, as well as all contacts and wiring, as well as the correct connection of the wires in the power button on the dashboard.
F10 (10 A) - turn indicators (only in turn signal mode), tachometer, battery charge level sensor Turn indicator lamps on the dashboard Electro-pneumatic valve Fuel sensor and fuel end lamp on the dashboard Coolant temperature sensor on the dashboard
Parking brake lamp on dashboard
Brake system fault lamp on the dashboard Battery charge lamp Throttle valve closing lamp Electric fan relay Fan thermal switch
Generator excitation winding.
Most problems with turn signals and dashboard lamps can be resolved by replacing this fuse. I will not describe each point in detail here. If this fuse is intact, but some system does not work, look for the cause in another part of the circuit, as well as in the devices connected to it.
F11 (10 A) - brake lamps, interior lighting, driver's seat belt lamp.
If your brake lights do not light up and this fuse is intact, check the brake light switch, the lamps themselves and the connector contacts. The interior light bulb may also have burned out or is in the off position. Check the contacts of the wires suitable for the interior lighting switch connectors.
F12 (7.5 A) - high beam lamp in the right headlight, windshield wipers and headlight washers . If the high beam does not work, also check the high beam relay R2. If the high beam in one headlight does not work, then most likely it is a fuse or the lamp itself. If the high beam does not work in any of the headlights, the problem may be in the relay or in the light switch (on the steering column), its contacts and wiring, as well as in the headlight switch button.
F13 (10 A) - high beam lamp in the left headlight, high beam lamp on the instrument panel . Similar to the previous one.
F14 (10 A) - clearance lamps in the left headlight and in the right lamp, license plate lighting lamps, engine compartment lamp, light switch lamp on the dashboard . If the lamps do not work, but the fuse is intact, you should check the lamps themselves, the wiring, and the strength of the contact connections of the connectors. You also need to check the switches of these lamps.
F15 (20 A) - clearance lamp in the right headlight and in the left lamp, cigarette lighter lamp, dashboard, storage box
F16 (10 A) - low beam in the right headlight, windshield wipers and headlight washers
F17 (7.5 A) - low beam in the left headlight
Fuse and relay block VAZ 2107
When diagnosing electrical faults, it is very convenient to use a multimeter. Using it, you can ring any connections and devices to check their functionality. If you know how to use it and have at least minimal knowledge of electrical engineering, I think it will not be difficult for you.
Fuses and relays in Lada Granta
Source: https://vmiredorog.ru/tehpomosch/129-blok-predohranitelej-vaz-2107-poisk-i-ustranenie-neispravnostej-elektriki/
Turn relay VAZ 2107
Turn signals are designed to inform other road users about an upcoming maneuver. If they malfunction, the likelihood of an accident during maneuvering increases greatly. The most common cause of such a breakdown is a non-functioning VAZ 2107 turn relay. Traffic regulations prohibit operating a car with faulty light signals, so if such a malfunction is detected, it must be eliminated as soon as possible. This work can be performed by service station specialists.
However, replacing the turn relay is a fairly simple and not very labor-intensive operation, available even in the field. Therefore, knowledge about the design and method of replacing the VAZ 2107 turn signal relay will not be superfluous for owners of the “Seven”.
Turn relay VAZ 2107
Unlike other lighting devices, the direction indicators operate intermittently and flash. A special device is responsible for the operation of the indicators - the VAZ 2107 turn signal relay. In addition to ensuring the blinking of the lamps, the relay performs a signaling function. It notifies you of the operation of the turn signals with audible signals - clicks.
At first, a thermal relay was installed on VAZ cars, in which the contacts were closed (opened) by a nichrome string, which heated and cooled due to the current passing through it. In later models, which include the “seven,” a relay with an electronic circuit and an electromagnet is used. The blinking frequency of the direction indicator lamps is determined by the settings of the electronic circuit. This design has fewer moving parts and contacts, and is therefore more reliable.
The device also performs the function of a VAZ 2107 emergency flasher relay, causing the lamps to flash when the hazard lights are turned on.
Turn relay VAZ 2107: malfunctions and replacement ()
Turn signals are designed to inform other road users about an upcoming maneuver. If they malfunction, the likelihood of an accident during maneuvering increases greatly. The most common cause of such a breakdown is a non-functioning VAZ 2107 turn relay. Traffic regulations prohibit operating a car with faulty light signals, so if such a malfunction is detected, it must be eliminated as soon as possible. This work can be performed by service station specialists.
However, replacing the turn relay is a fairly simple and not very labor-intensive operation, available even in the field. Therefore, knowledge about the design and method of replacing the VAZ 2107 turn signal relay will not be superfluous for owners of the “Seven”.
Turn relay VAZ 2107
Unlike other lighting devices, the direction indicators operate intermittently and flash. A special device is responsible for the operation of the indicators - the VAZ 2107 turn signal relay. In addition to ensuring the blinking of the lamps, the relay performs a signaling function. It notifies you of the operation of the turn signals with audible signals - clicks.
At first, a thermal relay was installed on VAZ cars, in which the contacts were closed (opened) by a nichrome string, which heated and cooled due to the current passing through it. In later models, which include the “seven,” a relay with an electronic circuit and an electromagnet is used. The blinking frequency of the direction indicator lamps is determined by the settings of the electronic circuit. This design has fewer moving parts and contacts, and is therefore more reliable.
The device also performs the function of a VAZ 2107 emergency flasher relay, causing the lamps to flash when the hazard lights are turned on.
Malfunctions of turn signals VAZ 2107
The main symptom of a malfunction is non-functioning direction indicators. However, the reason may not be only the relay. There are several possible breakdowns:
- The turn signal lamps are constantly on and do not blink. This indicates a malfunction of the electromagnetic part of the VAZ 2107 turn signal relay - the contacts are stuck in the closed position and do not open. This could be either a burnt-out contact of the electromagnetic relay or a failure of the electronic circuit of the turn relay. Regardless of the specific reason, there is only one way out - replacing the VAZ 2107 turn signal relay.
- Lights flash too slowly or quickly. The reason may be either in the electronic part of the turn relay or in the discrepancy between the current consumption of the lamps and the nominal one. If one of the lamps has burned out or lamps that consume less current are installed, the turns will flash more often than necessary. The same phenomenon occurs if the wire going to one of the lamps is broken, or the lamp socket or base is oxidized. A similar phenomenon occurs when installing LED lamps instead of incandescent lamps. When installing more powerful lamps, the blinking frequency decreases. If all the lamps are in working order and the malfunction did not appear after replacing the lamps, the reason lies precisely in the turn relay or poor contacts in the lamp power circuit.
- The direction indicator lamps do not light up. The cause of the malfunction may be a broken turn switch, a burnt-out (faulty) turn relay, an open circuit, or a blown fuse. It is better to start checking from the last one
THIS IS INTERESTING: How to remove wipers on a Chevrolet Cruze
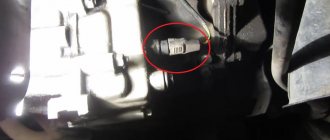
Location of the turn relay VAZ 2107
Depending on the type of engine power (carburetor or injector), the relay may be located behind the dashboard or in the mounting block located under the hood. The relay design is the same for all modifications of the VAZ 2107, but the replacement procedure differs depending on the installation location.
Replacing the turn signal relay for a VAZ 2107
The design of the relay does not provide for the possibility of its repair. If a malfunction is detected, the part must be replaced.
If the relay is located in the mounting block, to replace it, simply follow these simple steps:
- open the cover of the mounting block;
- pry with a screwdriver and remove the old relay;
- install a new relay;
- close the cover of the mounting block.
- Unscrew and remove the button (handle) of the daily mileage counter.
- Remove the decorative handles from the interior heater control levers.
- Remove the decorative plug from the dashboard mounting screw.
- Unscrew the screw.
- Unclip the dashboard fasteners by prying it up with a screwdriver.
- Unclip the wire connectors from the instrument panel.
- Unscrew the speedometer cable by hand.
- Remove the dashboard.
- Unplug the wire terminals from the relay by turning.
- Unscrew the relay mounting nut.
- Connect wire terminals
- Reinstall the relay and tighten the mounting nut.
- Connect the wire terminals to the dashboard.
- Screw the speedometer cable to the dashboard.
- Place the panel in place by snapping the fasteners into place.
- Tighten the screw that secures the dashboard.
- Install decorative handles on the heater control levers.
- Screw on the trip odometer handle.
- Install the decorative plug onto the self-tapping screw.
After this, you need to connect the ground wire to the battery. Replacing the turn signal relay is now complete.
Source: https://semerkavaz.ru/ehlektrooborudovanie/rele-povorotov-vaz-2107/
Malfunctions of turn signals VAZ 2107
The main symptom of a malfunction is non-functioning direction indicators. However, the reason may not be only the relay. There are several possible breakdowns:
- The turn signal lamps are constantly on and do not blink. This indicates a malfunction of the electromagnetic part of the VAZ 2107 turn signal relay - the contacts are stuck in the closed position and do not open. This could be either a burnt-out contact of the electromagnetic relay or a failure of the electronic circuit of the turn relay. Regardless of the specific reason, there is only one way out - replacing the VAZ 2107 turn signal relay.
- Lights flash too slowly or quickly. The reason may be either in the electronic part of the turn relay or in the discrepancy between the current consumption of the lamps and the nominal one. If one of the lamps has burned out or lamps that consume less current are installed, the turns will flash more often than necessary. The same phenomenon occurs if the wire going to one of the lamps is broken, or the lamp socket or base is oxidized. A similar phenomenon occurs when installing LED lamps instead of incandescent lamps. When installing more powerful lamps, the blinking frequency decreases. If all the lamps are in working order and the malfunction did not appear after replacing the lamps, the reason lies precisely in the turn relay or poor contacts in the lamp power circuit.
- The direction indicator lamps do not light up. The cause of the malfunction may be a broken turn switch, a burnt-out (faulty) turn relay, an open circuit, or a blown fuse. It is better to start checking from the last one
Self-diagnosis of car lighting devices
There are several situations in which you can determine that optics need diagnostics:
- The turns do not flash, but light up. Such a malfunction indicates the failure of the relay, in particular, we are talking about its electromagnetic component. The electromagnet itself could close in one of the positions, as a result of which it cannot return to its initial state.
- The turning lights flash very quickly or very slowly. In this case, the problem may lie not only in the relay. In some cases, this type of malfunction occurs when the driver uses inappropriate lighting sources. So when purchasing new light bulbs, you need to make sure that they correspond to the rating set by the car manufacturer.
- The optics don't work at all. That is, the turning light bulbs do not flicker, and the corresponding indicators on the dashboard also do not light up. In addition, there are no characteristic clicks that appear when turning on the turning lights. With such symptoms, there can be many reasons for the problem; we will tell you more about their diagnosis below (the author of the video is the Steel Horse channel).
This is interesting: First and subsequent maintenance of the Lada Granta: maintenance, features
As for diagnostics, it is performed in several stages:
- First of all, you need to make sure that all sensors and indicators on the device are working. If they do not function, then it is necessary to diagnose the safety devices.
- If all devices are operating in normal mode, then you next need to turn on the light alarm button and diagnose all light sources in the headlights. That is, check the front, rear, and side (if any) lights.
- If the alarm does not function when activated, you need to check the functionality of the relay, and also check the power supply at the terminals. To do this, remove the relay from its mounting location, and then, using a test light, connect one of its contacts to the installation site (to the positive), and the other to the car body or battery. There is no need to turn on the ignition. If there is no power, then most likely the reason lies in a failed safety device, a broken hazard warning button, or a damaged electrical circuit. Also, the essence of the problem may lie in poor contact in the connecting plugs.
- If there is a plus on the contacts, then try shorting the two relay terminals using copper wiring. If all electrical circuits, as well as the connection plugs, are working properly, then all turn signals should light up. In this case, the fault must be looked for in the relay.
- If the lights do not light up after the steps you have performed, then most likely the cause of the malfunction lies in the emergency light control button. However, in practice this happens quite rarely; there is often a short circuit in the circuit. By the way, it is a short circuit that can lead to a breakdown of the relay, therefore, before replacing the failed element, you need to eliminate the short circuit.
- If the emergency signal is functioning, this indicates that the safety devices and relays are working; accordingly, you need to start diagnosing the button itself. First of all, you need to diagnose the positive terminal, as in the case of checking the relay, while the ignition, as well as the hazard warning button, must be activated. If the diagnostics showed that there is no plus, this indicates that the button itself needs to be checked in more detail. Remove it from its seat and check the connection circuit. If there is no power, then you need to look for a break in the wiring from the tidy to the button itself. If there is power, then it will be necessary to short-circuit the terminals at the installation site, the ignition does not turn off, after which the direction indicators must be activated (on either side). When the lighting sources are turned on, the control button must be replaced, but if there is no power, then you need to check the power in the emergency relay. If there is no power, the problem most likely lies in a break in the connecting electrical circuit from the control key to the block with safety devices.
This is interesting: What to do and how to open the lock in the car if the driver's door is jammed
Replacing the turn signal relay for a VAZ 2107
The design of the relay does not provide for the possibility of its repair. If a malfunction is detected, the part must be replaced.
If the relay is located in the mounting block, to replace it, simply follow these simple steps:
- open the cover of the mounting block;
- pry with a screwdriver and remove the old relay;
- install a new relay;
- close the cover of the mounting block.
- Unscrew and remove the button (handle) of the daily mileage counter.
- Remove the decorative handles from the interior heater control levers.
- Remove the decorative plug from the dashboard mounting screw.
- Unscrew the screw.
- Unclip the dashboard fasteners by prying it up with a screwdriver.
- Unclip the wire connectors from the instrument panel.
- Unscrew the speedometer cable by hand.
- Remove the dashboard.
- Unplug the wire terminals from the relay by turning.
- Unscrew the relay mounting nut.
- Connect wire terminals
- Reinstall the relay and tighten the mounting nut.
- Connect the wire terminals to the dashboard.
- Screw the speedometer cable to the dashboard.
- Place the panel in place by snapping the fasteners into place.
- Tighten the screw that secures the dashboard.
- Install decorative handles on the heater control levers.
- Screw on the trip odometer handle.
- Install the decorative plug onto the self-tapping screw.
After this, you need to connect the ground wire to the battery. Replacing the turn signal relay is now complete.
VAZ turn signal relay - do-it-yourself diagnostics and replacement
Turn signals are perhaps a very important part of any vehicle. Carrying out maneuvers on the road becomes quite a dangerous task if the turn signals do not work. The VAZ 2107 turn signal and hazard warning relay is responsible for the correct operation of the direction indicators. This device is used on all cars of the classic family. Let's consider why a turn signal relay is needed, how is a relay malfunction determined and how is it replaced?
Purpose of the turn signal and hazard warning relays
Everyone knows that direction indicators and hazard warning lights blink during operation. This is necessary in order to attract the attention of other traffic participants. The flickering of lamps cannot be confused with any other signal supplied by lighting devices. A small device called a turn signal relay . In addition to the blinking of the turn signals, the relay provides another function - creating the necessary sound signal (click), which indicates that the turn signals are in operation.
The Zhiguli used two types of relays, which differ both in their design and in their operating principle.
- The first type is electromagnetic type relay, which is mounted in the engine compartment of the car. The basis for the operation of the electromagnetic thermal relay is a special nichrome string, which, when heated and cooled, closes and opens the direction indicator circuit. These types of relays were used on early models of the “classic” family: VAZ 2101-2102 and VAZ 2103.
- The second type of relay began to be used on VAZ 2106 and higher vehicles. It is an electronic circuit built on semiconductor circuit elements. In addition to semiconductors, the relay also includes an electromagnet, which performs the functions of closing and opening. The frequency of operation of the electromagnet (or flickering of lamps) is achieved using a “key”, or a special electronic circuit.
How to replace the fuse block on a VAZ 2106
VAZ 2106 fuse box - change
Usually, changing fuses on a VAZ 2106 is carried out at the most sudden moment. After all, they can fail at any moment. For this purpose, the driver is always required to have a set of new fuses with him, so that if they fail, they can be quickly replaced. But it also happens that repairing the fuses alone does not solve the problem.
Then only changing the fuse block in the VAZ 2106 helps.
The old mounting block becomes unusable and thus, only changing the fuse block for the VAZ 2106 is the only correct solution.
It should not be said that after changing the fuse box on a VAZ 2106, the driver will not be distracted for a long time by eliminating problems associated with electronic components.
A thorough inspection of the block and its diagram
On a VAZ 2106, changing the fuse box, which is also called the black box, is carried out after a painstaking check of it and the relay. As is clear, any mounting block consists of a circuit that the driver can find on the cover from the inside. For example, the circuit diagram of the mounting block on a VAZ 2106 car consists of fuses running from left to right:
VAZ 2106 fuse box diagram
- number 1 – responsible for lamps, sound signals, cigarette lighter and front door alarm lights, as well as a clock (the power of this type of fuse is 16 A);
- numbers 2 with a power of 8 A - is responsible for the operation of the windshield wiper and relay, as well as the operation of the windshield electric motor and heater;
- 3 – responsible for the left high-beam headlights and the turn-on warning lamp;
- fuse 4 is responsible for the right high-beam headlights;
- fuse 5 – monitors the operation of the left low-beam headlights;
- fuse 6 – is responsible for the operation of the right low-beam headlights;
- numbers 7 – controls the left front side light and the right rear side light, as well as the license plate lamp;
- numbers 8 are responsible for the right front side marker light and the left rear side light, as well as the engine compartment lamp and warning lamp;
- numbers 9 - responsible for the oil pressure indicator, cooling water temperature, brake light, turn signals, battery warning light, tachometer, reverse lamp, trunk lamp;
- numbers 10 – responsible for the voltage regulator and the generator excitation winding;
- fuses 11-13 – which are spare;
- fuse 14 – regulates the rear window heating element;
- numbers 15 are responsible for the electric motor of the engine cooling system fan;
- numbers 16 are responsible for the emergency signal indicators.
Replacing fuses and block VAZ 2106
Changing the fuse block of the VAZ 2106 is carried out after you arm yourself with a mounting block of blade fuses from the GAZ 3110, which is perfectly suitable. Apart from this, you need to prepare a wire with a cross-section of about 2 square meters. mm, which will serve to create jumpers. Changing blade fuses for a VAZ 2106 begins with the following steps:
- the block is unscrewed and pulled down as far as the wires allow;
- jumpers are prepared at home (only 5 of them need to be made);
- changing VAZ 2106 fuses to blade fuses involves making homemade jumpers according to the diagram;
Recommendation. It is worth keeping in mind that the Volgov version has 13 fuses, and the VAZ version has 16, with three spare ones. The new mounting block will not have spare fuses, so number 11 will correspond to 14 (see the diagram above), 12-15, etc. Changing fuses to blade VAZ 2106 specifically for this reason involves working with homemade jumpers.
- we make jumpers like this;
Homemade fuse jumpers
- fill the block with jumpers;
- replacing the fuse box with blade VAZ 2106 should ultimately look something like this;
Changing the fuse box for a new VAZ 2106
- we remove the Z-shaped fasteners, because they are no longer useful;
- we turn the old block towards us and carefully examine it in order to understand which wires go where;
Advice. In this case, it is useful to know that where one connector is located is the input, and where two are located is the output. Apart from this, changing the VAZ 2106 safety block should be carried out based on the following principle. Because the new mounting block will mainly use two connectors, the placement of the wires will be very close to each other. And therefore, when throwing jumpers, it is necessary to insulate the branches with heat shrink to avoid short circuits.
- First, we install the input of the first fuse in the new mounting block;
- after that we connect the first of the fuses;
- evenly transfer all the fuses from the old block to the new one;
- Ultimately, a block comes out with 5 jumpers, which go into the connectors in pairs;
- changing the safety block on a VAZ 2106 is certainly carried out by transferring it from an old block;
- after the work is completed, you need to secure the block;
- the block has mounting lugs on the right and left, which are perfectly suitable for the VAZ 2106 (you just need to bend one of the lugs a little to the side);
- the new mounting block is fixed with standard nuts;
- You can change the fuse box of a VAZ 2106 by bending it down or up, whichever you prefer.
THIS IS INTERESTING: Nissan Almera classic clutch replacement
Recommendation. It should be noted that replacing the fuse box on a VAZ 2106 by setting fusible ratings will no longer work. After all, the standard GAZ 3110 has fuses with a current strength of 5 to 25 A.
For the VAZ 2106, such ratings are naturally not suitable, because eight-amp and sixteen-amp fuses are included here.
But there are no fuses of that rating, and for this reason they are installed instead of eight-amp fuses - 7.5 A, coffee-colored, and instead of 16-amp fuses - 15 A blue. This is an aspect that should be taken into account.
If you compare it with the diagram above, the new version will look like this:
- numbers 1, 11 and 12 – 15 A;
- numbers from 2 to 10 and 13 – 7.5 A.
Types of fuses
The choice of fuses must always be approached carefully. This video will help you find out a lot of interesting things about fuses. If you select fuses incorrectly, this can lead to serious problems that can even lead to a car fire.
Well, most motorists will agree that everyone spends a lot of time choosing expensive parts, and rarely pays attention to fuses. First, you need to be able to identify the fuse.
So, any of them has a certain current strength, expressed in Amperes.
In the photo below we see fuses of various ratings:
Fuses of various amperages
Amperage is distinguished not only by the numbers marked on the parts, but also by color. For example, brown fuses may indicate a rating of 7.5 A, and blue or green fuses may indicate a rating of 16 or 20 A, respectively. Previously, old Russian cars were equipped with PR type fuse blocks, which were manufactured at the Lyskovo plant.
In such a block, only three fuses were installed on textolite plates, and a tinned copper wire was clamped between the contacts. On the VAZ model 2101, other cylindrical models of fuses began to be installed. In such a block, the role of the conductor was played by zinc-coated foil.
And, in the end, in the near future, more reusable plug-in options began to appear, which replaced the cylindrical disposable ones. The above tips on how to change a block with your own hands will help many car owners. A step-by-step summary reveals many necessary aspects that provide valuable information.
Of course, you can save a lot of money, because the cost of services of this type is now very high. This is especially true for repairs that must be carried out by manual labor.
Source: https://avtotrue.ru/kak-zamenit-na-vaz-2106-blok-predohranitelej/
Diagnostics of malfunction of the direction indicator relay VAZ 2107
If one day the turn signals stopped working. It's time to check what happened and, if possible, replace the faulty part of the circuit. Malfunctions of the turn signal relay can be recognized by several signs:
- The turn signals light up but do not flicker . This directly indicates a breakdown of the relay, or rather, its electromagnetic part. In this case, the electromagnet has closed in one of the positions and cannot return to its original state.
- The turn signals blink too quickly or too slowly . This can happen, but not only due to the fault of the turn signal relay. Sometimes the flickering speed of lamps can change if the turn signals use lamps that are not of the same power as those specified by the manufacturer. However, it wouldn't hurt to install a new relay as a test.
- The turn signals don't work at all . This means that the turn signal lamps and the lamp on the dashboard do not blink and there are no corresponding relay clicks. However, as in the second case, the malfunction does not always concern the turn signal relay. Sometimes the reason is a faulty hazard warning button.
Do-it-yourself repair of direction indicators and hazard alarms
If the turns disappear, as well as the car’s emergency signal, then you can try to solve this problem yourself:
- If the safety element and relay break down, the failed parts must be replaced. If the reason lies in a short circuit, then before replacing it is necessary to check all electrical circuits in which it could occur. Only after the cause of the short circuit and power surges has been eliminated, the devices need to be changed.
- If the hazard warning button is faulty, you just need to replace it. We have already talked about how to diagnose this part.
- As for electrical circuit diagnostics, it is carried out using a tester. If damaged sections of the wire are identified, they must be replaced. When laying them, make sure that the wiring does not come into contact with moving body elements. It is also recommended to additionally insulate new wires to increase the reliability of the insulation.
- If the reason is the light bulbs, then all burnt out light sources must be replaced. In the front and rear headlights, the lamps are changed by removing the protection from the headlights, disconnecting the power circuit from the lamp, as well as unscrewing the light source from the seat and replacing it with a new one. If the lamps in the side headlights do not work, then, as a rule, to dismantle the lighting sources, the lamp itself must be pryed off with a screwdriver, then disconnect the power cord and remove the device.
- If the reason lies in the steering column switch, then this device needs to be disassembled and checked. As a rule, the cause of switch failure is poor contact or abrasion. In this case, the failed switch is replaced with a new one. As for the contacts (no matter where - on connections or buttons), it is advisable to clean them.
- You should also check all the plugs and connectors, because it is quite possible that the problem is poor contact on them. Acidified contacts must be cleaned with a wire brush or sandpaper. If the contacts are burnt out, they will need to be replaced.
Replacing turn signal and hazard warning relays (+ Video)
After detecting any of the listed malfunctions, the turn signal relay must be replaced. Depending on the modification (carburetor or injector), the location of the breaker relay may differ noticeably. Carburetor VAZ 2107 vehicles require installation of the relay behind the dashboard in the vehicle interior. However, starting with an injection engine, the relay can be located in a mounting block in the engine compartment.
In order to remove the relay located in the mounting block, you just need to pry it up and pull it up. After this, a new element is installed in its place.
In the case of a relay located behind the panel, things are much more complicated. Before removing the relay, you must pry the dashboard using a screwdriver and remove it. If the length of the wires allows, you can pull it a certain distance, but if they are too short, it is recommended to pull out the plugs and unscrew the speedometer drive cable. Set the panel aside and disconnect the contact wires from the relay. Now unscrew the ground from the breaker and remove it. Install a new one in place of the old relay and insert the contact wires into it. After this, assemble the dashboard and install it in its original place. This completes the replacement of the turn signal relay.
That's all you need to know about the turn signal relay.
Turn relay VAZ 2107
Unlike other lighting devices, the direction indicators operate intermittently and flash. A special device is responsible for the operation of the indicators - the VAZ 2107 turn signal relay. In addition to ensuring the blinking of the lamps, the relay performs a signaling function. It notifies you of the operation of the turn signals with audible signals - clicks.
At first, a thermal relay was installed on VAZ cars, in which the contacts were closed (opened) by a nichrome string, which heated and cooled due to the current passing through it. In later models, which include the “seven,” a relay with an electronic circuit and an electromagnet is used. The blinking frequency of the direction indicator lamps is determined by the settings of the electronic circuit. This design has fewer moving parts and contacts, and is therefore more reliable.
The device also performs the function of a VAZ 2107 emergency flasher relay, causing the lamps to flash when the hazard lights are turned on.
Why turn signals 2107 do not work
The electrical circuit of the direction indicators on the VAZ 2107 includes: 2 lamps in the front headlight unit;
2 lamps in the rear lights; 2 lamps on the right and left sides of the car; relay-interrupter; 2 fuses; Understeering's shifter; hazard warning button; indicator lamp on the instrument panel. If the turn signals stop working, then you need to look for the reason in these devices. The operation of the direction indicators on the "seven" is considered normal when the signal flashes at a frequency of 1-1.5 times per second. Therefore, when at least one lamp burns out, the rest of the working lamps begin to blink at double the frequency, and the indicator lamp located on the speedometer, instead of blinking, will be constantly on. When replacing a burnt-out lamp, pay attention to its power. You need to install a working lamp in the socket of the same power, otherwise the direction indicators will not work normally when turned on.
If the breaker relay fails to operate, you will not hear its clicking sound, and the turn signal lamps will either light constantly or not light at all. This relay is not located in the mounting block, but behind the instrument panel, and in order to get to it, this panel will have to be removed. And there you will see two relays, so figure out which one works for the direction indicators and which one works for the ignition switch.
If the 10 amp fuse blows, neither the right nor left turn signals will operate, but the 8 amp fuse protects the hazard warning light circuit. The fuse markings are located on the inside of the mounting block cover. The fuse rating can be determined by its color. Before replacing a blown fuse, it is necessary to find the reason for its failure, otherwise the new one will face exactly the same fate.
Less often, but there are still cases that the reasons for the direction indicators not working are under the steering switch and the hazard warning button, as well as a lack of contacts in the blocks or a burnt-out track in the mounting block board.
Malfunctions of turn signals VAZ 2107
The main symptom of a malfunction is non-functioning direction indicators. However, the reason may not be only the relay. There are several possible breakdowns:
- The turn signal lamps are constantly on and do not blink. This indicates a malfunction of the electromagnetic part of the VAZ 2107 turn signal relay - the contacts are stuck in the closed position and do not open. This could be either a burnt-out contact of the electromagnetic relay or a failure of the electronic circuit of the turn relay. Regardless of the specific reason, there is only one way out - replacing the VAZ 2107 turn signal relay.
- Lights flash too slowly or quickly. The reason may be either in the electronic part of the turn relay or in the discrepancy between the current consumption of the lamps and the nominal one. If one of the lamps has burned out or lamps that consume less current are installed, the turns will flash more often than necessary. The same phenomenon occurs if the wire going to one of the lamps is broken, or the lamp socket or base is oxidized. A similar phenomenon occurs when installing LED lamps instead of incandescent lamps. When installing more powerful lamps, the blinking frequency decreases. If all the lamps are in working order and the malfunction did not appear after replacing the lamps, the reason lies precisely in the turn relay or poor contacts in the lamp power circuit.
- The direction indicator lamps do not light up. The cause of the malfunction may be a broken turn switch, a burnt-out (faulty) turn relay, an open circuit, or a blown fuse. It is better to start checking from the last one