Application of electric speedometer
The Gas 3310 electric speedometer is designed according to a standard design, which appeared in large quantities on foreign cars back in the mid-70s. It was used before, but on inexpensive models a classic cable drive was more often installed. A mechanical drive is quite accurate, but it depends on too many factors. More precisely, the accuracy of his testimony. Accuracy is affected by:
- outer diameter of the wheel;
- degree of tire wear;
- degree of wear of the speedometer gearbox;
- the level of error of the speedometer itself;
- gear ratio of the main pair.
As you can see, there are more than enough reasons for the mechanics to display speed incorrectly, and we have not named all of them. The use of an electric speedometer also does not provide any guarantee that the speed indicated on the scale is the reference speed. All the same factors intervene, only purely electrical troubles are added - missing or bad contacts, different-sized radio components and similar nuances.
Why can the speedometer lie?
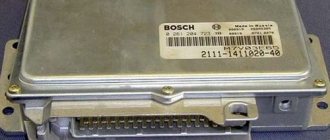
Engine control system sensors (ESM sensors)
In the case of this device, it is easy to understand its greater inaccuracy. First of all, this reduces the risk of the driver breaking the speed limit and receiving a fine. In the background is the fact that with underestimated speed readings, car owners would sue car manufacturers and prove that accidents and fines are the fault of the meter’s malfunction.
The whole problem is that it is much more difficult for it to show accurate data than the rest of the car's measuring instruments. This depends on the fact that driving speed is most often measured by the speed of rotation of the wheels. In turn, this speed is affected by the size of the wheel, and this is a variable figure.
Now they produce devices that have an inaccuracy of 10%, but the speed must be 200 km/h. This is usually a variable parameter, that is, when driving at a speed of 110 km/h, the deviation will be 5-10 km/h, and if you drive 60 km/h or less, then the inaccuracy is quite insignificant.
GAZ 2705 | Checking the condition and replacing the speed sensor
Important sensors in the VAZ 2109 (carburetor)
Checking the condition and replacing the vehicle speed sensor (VSS)
The VSS is mounted on the transmission housing and is a variable reluctance sensor that begins to produce voltage pulses as soon as the vehicle speed exceeds 4.8 km/h (3 mph). Pulses from the sensor are sent to the PCM and are used by the module to control the duration of the opening time of the fuel injection injectors and the transmission shift. On models with manual transmission, one VSS is used, on models equipped with AT, there are two speed sensors: one is connected to the secondary shaft of the gearbox, the second is connected to the intermediate shaft, and the failure of any of them leads to problems with transmission shifting.
1. Disconnect the sensor wiring harness connector. Using a voltmeter, measure the voltage at the connector (harness side). The positive probe of the voltmeter should be connected to the terminal of the black and yellow wire, the negative one to ground. The connector must have battery voltage present. If there is no power, check the condition of the VSS wiring between the sensor and the fuse mounting block (on the left under the instrument panel). Also make sure that the fuse itself is working properly. Using an ohmmeter, check for continuity between the black connector wire terminal and ground. If there is no continuity, check the condition of the black wire and the quality of its terminal connections. 2. Jack up the front of the car and place it on jack stands. Support the rear wheels with wheel chocks and shift the transmission to neutral. Connect the electrical wiring to the VSS, turn on the ignition (do not start the engine) and test the signal (blue-white) wire terminal on the back of the connector with a voltmeter (connect the negative probe to body ground). While holding one of the front wheels stationary, manually turn the opposite one - the voltage should range from zero to 5 V, otherwise replace the VSS.
3. Disconnect the wiring from the appropriate speed sensor. Using an ohmmeter, measure the resistance between the two sensor terminals. The nominal value is approximately 400 ÷ 600 Ohm, otherwise replace the sensor.
1. Disconnect the electrical wiring from the speed sensor. 2. Unscrew the mounting screw and remove the sensor from the transmission housing. 3. Installation is carried out in reverse order. Don't forget to replace the O-ring.
Third option
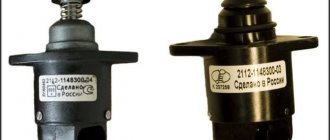
The Gazelle Next speed sensor is somewhat different from previous models. It is electromagnetic and has four wires going to the controller. Previous sensors only had three wires. A new type of device is shown in the photo.
The sensor has part number A63R42.3843010-01, is equipped with a 22 mm nut on the housing and is screwed into the gearbox housing.
Gazelle speed sensor does not work
The vehicle speed sensor (VS) is designed on the principle of the Hall effect and outputs a frequency-pulse signal to the controller.
The frequency of the signal is directly proportional to the speed of the vehicle. The controller uses this signal to control engine idle speed and, through the idle speed control, controls the air supply bypassing the throttle valve. The DSA produces approximately 6004 pulses for every kilometer traveled by the vehicle. Based on the time interval between pulses, the controller determines the speed of the vehicle. In addition, this signal can be used by the speedometer installed on the instrument panel. The appearance of vehicle
speed sensor To get to the speed sensor on the Gazelle, you need to unscrew all the screws securing the hatch around the gear shift knob:
We pull out and disconnect the sensor chip. Checking the functionality of the DSA should begin with the presence of grounding on pin “3” and supply voltage (+12V) on pin “1”. The black wire is negative and the yellow wire is positive, the green wire goes to the controller and to the instrument panel, as can be seen from the diagram:
Where number 66 is our speed sensor. We also see that the positive going to our sensor comes to the reverse switch, so if the reverse lights light up when you turn on reverse gear and the ignition, then you don’t have to check the fuse.
But here is the electrical circuit, after assembling it, you can check the speed sensor itself:
Or connect another (known good) sensor to the connector, turn on the ignition and turn the sensor shaft and look at the speedometer needle, it twitches - that means everything is fine, the sensor should be replaced.
In my case there was no negative on the black wire. I cleaned it up and wound up additional mass:
I soldered the twist and insulated it well:
I passed the wire under the rubber mat and screwed it between the seats to ground:
CONNECTING THE WINDING ON UAZ, VAZ.
To connect to a speed sensor
A winder with a chip is better suited, to do this, turn on the ignition, connect the winder to the
speed sensor
, the green LED should light up, use a screwdriver to set the desired speed.
Do not connect it to foreign cars, the chip is similar, but the pinout of the wires is different, the winding will burn out immediately!
CONNECTING THE WINDING TO GAZELLE BUSINESS, GAZELLE.
Speed sensor chip
The gazelle is round, the mating part is expensive to find, so the connection is wired. On the winding, the wires are labeled on cambrics.
Here is the pinout of the chip for the gazelle speed sensor.
We insert the winding wires, turn on the ignition, the green LED will light up, use a screwdriver to set the desired speed.
INSERTING THE WINDING INTO THE WIRING.
Many people are not happy that they have to constantly crawl under the car, here are instructions on how to connect the winder behind the instrument panel (on the Patriot, the Patriot with the new panel and on the Gazelle, the connection is the same, the chip is behind the XP3 panel). To connect, first prepare the winding, you will need wires, a soldering iron, electrical tape, tools and find a toggle switch for six pins with two switching positions, these are great:
Next, solder the wires according to this diagram:
Afterwards we remove the instrument panel, the XP3 chip, in the photo there are wires to which you need to connect.
There is a double signal wire, we cut both. After everything is connected, we check and set the desired speed, we hide the toggle switch where we find it convenient.
Now, when driving in the first position of the toggle switch, everything works normally, in the second position the speedometer will work by winding, and you can drive the car.
Points for inserting into the speedometer of the UAZ Hunter, “bun” with the AP speedometer.
Firmware VAZ M17.9.7
Firmware for VAZ “classic”
Lenovo S750 Firmware, ROOT, installing TWRP, BackUp firmware
Description
: Lenovo S750 Firmware, ROOT, installing TWRP, BackUp firmware
How to order the device?
You can buy a device that stops the mileage of your car from our company by following a few simple steps.
You can contact us in any way convenient for you, indicated in the “Contacts” section
Our company consultant will tell you which device is suitable for your car.
After receiving the consultation, you will be asked to pay for the selected device
After payment for the order, we deliver the device throughout the Russian Federation
The devices presented on the site are intended for research and development only (off public roads). The device allows testing on vehicles in laboratory testing conditions, as well as various tests on a dynamometer stand. The device prevents the number of kilometers from being recorded while testing is being carried out on the vehicle.
Speed sensor is interchangeable 534.3843 GAZ-3110, UAZ-3160, UAZ-3165
Match by number
Gas 3423843 Speed sensor GAZ, UAZ injector (round connector) 6 imp. (534.3843) (GAS) G-PART
zommer 3423843 Speed sensor 406 dv.3110,3310,UAZ (6/imp round (ZOMMER/3423843)
Soate 3423843 Speed sensor GAZ-3110, GAZ-3302, 6 imp. round connector with wire
Pekar 3423843 Speed sensor (6-imp, O-fork, not bad) G, Euro-3 CUMMINS 2.8 “Pekar”
China 3423843 Speed sensor GAZ-3110, GAZelle (round connector/6 imp)
Energomash 3423843 Speed sensor 6 pulse round connector
AvtoVAZ 3423843 Speedometer sensor 342.3843 GAZ, UAZ (49.3843)
Manover 3423843 Speed sensor 6-pulse (round connector with wire) GAZ-3110, UAZ-Patriot analogue OEM NO 342.
AVAR 3423843 Speed sensor 5-speed gearbox 6-imp. circular connector "EMERGENCY"
Cartronic 3423843 Speed sensor for GAZ 3302, 3110 doors. 406 (6 imp. round) CARTRONIC
Electrics 3423843 Speedometer sensor 342.3843 3110 (round connector, 6 pulse) (speed meter)
Kursk 3423843 SPEED SENSOR GAZ-3110 6 IMP. SCHETMASH
UAZ 3423843 Speed sensor (speedometer drive) GAZ-3102, 3110, 2217, 2705, 2752, 3302; UAZ-3160 ** "PEKAR"
Russia 3423843 speed sensor G-3110,U-3160.65 (6 imp. round size) art. 342.3843 (Schetmash, Kursk)
ZMZ 3423843 Speed sensor GAZ, UAZ/6 imp./round connector/534.3843/35172.03/Energomash/
Kaluga 3423843 Speed sensor 5-speed gearbox 6-imp. circular connector "Kaluga", pcs.
see also
Speed sensor malfunction
- 5 0 20k
Checking engine sensors
- 373 2 202k
Speed sensor
- 0 1 48k
If the engine stalls while idling , then most likely you will need to check several sensors (mass air flow sensor, air sensing sensor, speed control valve, air pressure sensor) in order to determine the culprit. Previously we looked at verification methods:
Now, checking the speed sensor yourself will be added to this list.
If this sensor malfunctions, it transmits erroneous data, which leads to disruption of not only the engine, but also other components of the car. The vehicle speed meter (VSM) sends signals to the sensor, which controls the operation of the engine at idle speed , and also, using PPX, controls the air flow bypassing the throttle valve. The higher the speed of the car, the higher the frequency of these signals.
Possible device malfunctions
Why doesn't the speedometer work?
There are many reasons, let’s look at the main ones:
- The device does not work. The problem is unscrewing the nuts that connect the flexible pulley to the device and transmission, if this is the case, then they just need to be tightened. A non-working device may be the result of a broken cable; if this is the case, it will have to be replaced. In some cases, the device roller jams in Gazelles, then there is nothing left to do but replace the entire device.
- The needle on the scale begins to fluctuate, and extraneous sounds may appear. Initially install the device shaft, and the bend radius of the cable must be at least 1.5 cm. If the reason is that the flexible pulley is loosely attached to the device or transmission, the fixing nuts must be tightened completely. If there is no lubricant on the cable, it must be added. If there is dirt where the cable is installed on the transmission, this may cause the needle to wobble, so the dirt should be removed.
- The adjustment of the instrument needle is incorrect - another type of malfunction. If the cable is installed incorrectly in the casing of the flexible shaft, it must be reinstalled there. Please note that the thrust bushing B must be located on the transmission side.
- The arrow of the device has hit the limiter and does not rise higher; this may be a consequence of a broken spiral spring; the only option is a complete replacement.
How to wind up the speedometer of a Lada Largus - All about repair and construction
Video instructions for installing the speedometer winder for Largus, Logan, Sandero, Duster, Almera
Video instructions for installing the Speedometer Knob for Lada Largus into the OBDII diagnostic connector. It will pay off less.
Spinner, speedometer winder for Lada Largus 2012-2017
Installing the Mileage Winder Largus Logan Duster Sandero Almera Terrano in OBDII
Video instructions for installing the speedometer winder for Largus, Logan, Sandero, Duster, Almera
Lada Largus speedometer twister, winder, winder
Check the mileage on LADA LARGUS. Spinner LADA Largus
Reduce mileage of Lada Largus
Winding a speedometer at home at no cost
Rewinding (winding) the odometer (Speedometer) based on NE555N Instructions
Twist, winder, speedometer winder for Lada Largus 2012 - 2017 -
The vehicle must be checked for serviceability. And most importantly, the backrest now reclines completely without even removing the headrests. We start the engine and gradually increase the engine speed. Now you need to snap the thrust sleeve onto the retaining ring. Lightly rock the nozzle to remove it from the ramp. After the screwdriver has gone inside, you need to carefully press the window in your direction, using your other hand to help pull the seal.
I'm still grinding the brakes, despite the fact that the hydraulic corrector is in the maximum raised version, position 2, if I'm not confused. Buy a repair kit to attach the rack to the steering rod. Others argue that this is not worth doing; 8212 the disk will become uneven and the car will shake when driving. In total, you can count about 13 different options. We bend one long thin wire of suitable length in half and push it into the braid. Moreover, where there are ups and downs.
How to disable the speedometer on the Lada Granta
Self-replacement of the VAZ 2115 speed sensor
Views: 2629
Below you can see the technical specifications on how to disable the speedometer on the Lada Granta. Express your opinion about the car in the comments.
Category: Repair instructions
Original name: ????? ????? ???? ?????? ??? ???? ??????
Release date: 09/13/2021
Duration: 4:20
Quality: TC
Posted by admin: at the request of Srdjan
Answer from a car owner named Koechler: The car is strong, practical, moderately comfortable... If maintained correctly, it does not rust at all. “Holds the road” perfectly. Consumption on the highway is up to 6.5 liters, in the city a little more than 9.0. The car is fully adapted for our roads and operating conditions, both in terms of suspension and interior strength, and in the unpretentiousness of the engine to operating conditions. The interior, despite its external dimensions, is quite spacious. Very practical for the city. You can transport large items in the cabin: there was a case when I was once transporting an old Saratov refrigerator to my neighbor’s grandmother, with the rear seats folded down and the back door closed. The three-door car is convenient because when transporting your granddaughters to nature, you are not afraid that the rear side doors will accidentally open. Spare parts are not a problem, the difficulty of repairs is that I have never contacted the service (except for diagnostics using the on-board computer), everything is very simple. In winter it starts at any frost (up to - 45) without warming up. The interior is very warm in winter... It doesn’t heat up in summer. I wanted to sell it twice, but changed my mind: for the harsh operating conditions in which my Golf is used, I don’t yet see an alternative. Golf 5 - capricious...
Laughter in the topic: Wife, indignant: - Just look - this fucking dog chewed up all MY credit cards!! Husband, calling and stroking the dog: - H-a-a-a-a-a-a-a-dawg dog, a h-a-a-a-a-dear dog.
Description: Dimensions are as follows: length - 3325, width - 1100, height - 1699 mm. The wheelbase is 2629 mm. Ground clearance 181 mm. The car is equipped with a hybrid power unit. The 2-cylinder engine is equipped with a system that provides engine power output. There are 4 valves per cylinder. The diameter of one cylinder is 72 mm, the piston stroke is 76 mm. The engine crankshaft accelerates to 2000 rpm. Maximum torque is maintained up to 4000 rpm.
Speed sensor "Gazelle", device and replacement
Gazelle cars have been produced since 1994 and have undergone many changes during this time. At different times, different methods of determining speed were used on them.
First option
Early cars were equipped with a mechanical speedometer driven by a flexible shaft of the GV 310 model. The flexible shaft was installed at one end on the gearbox housing, and the other was attached to the speedometer housing. The drive was carried out from a helical gear mounted on the secondary shaft in the gearbox. It is located closer to the rear shaft bearing.
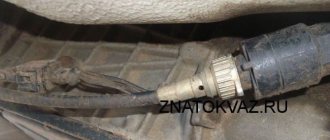
The speed sensor of the Gazelle in this case was the speed measuring device itself. The flexible shaft rotated the magnetic disk, creating a magnetic field. Its intensity depended on the shaft rotation speed. This field turned the spring-loaded needle. The Gazelle speedometer drive cable is shown in the photo.
Drive maintenance consisted of timely lubrication of rotating components and control over the route of the cable. The radii of cable bends should not be more than 150 mm.
Restyled version
Since 2003, cars began to be equipped with a new instrument cluster with an electronic speedometer. The new Gazelle speed sensor was designated DS-6 and was installed on the gearbox housing on the left side. The sensor had a mechanical drive similar to a cable. The same device was used at Gazelle Business.
The operation of the sensor is based on the Hall effect principle. Any change in speed is recorded by a sensor and transmitted in the form of voltage pulses to the controller of the electronic control unit. They have a lower limit of about 1 Volt and an upper limit of at least 5 Volts.
There is a proportional relationship between the speed and pulse frequency, so the sensor error is small. As the speed increases, the pulse frequency also increases, but the sensor has a design limitation - the pulse counter readings cannot be higher than 6004 per kilometer. The controller calculates the speed based on the number of pulses and the time intervals between them. The received signal is transmitted to the speedometer located on the dashboard of the car. The photo shows the electronic sensor of the Gazelle.
The design of the sensor is quite simple and, in general, it does not cause problems for car owners. Replacing the Gazelle Business speed sensor is quite simple. Before starting work, it is advisable to disconnect the battery from the vehicle's on-board network. To remove the sensor, it is necessary to remove the hatch located next to the gear shift lever. The sensor can also be accessed from below. To loosen the fastening nut, a wrench with a jaw size of 22 mm is required. After loosening the nut, the sensor can be easily unscrewed by hand and removed from the drive. On the other hand, it is equipped with a regular connector with plastic latches.
Sometimes there is an oil leak through the sensor drive, which oils the contacts and disrupts operation. The drive itself is fixed with a clamping bracket, to remove which you need to unscrew one 10 mm bolt. After this, the drive can be removed from the box housing to replace the ring rubber gasket.
Third option
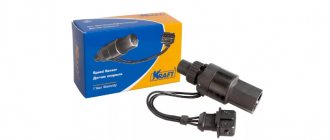
The Gazelle Next speed sensor is somewhat different from previous models. It is electromagnetic and has four wires going to the controller. Previous sensors only had three wires. A new type of device is shown in the photo.
The sensor has part number A63R42.3843010-01, is equipped with a 22 mm nut on the housing and is screwed into the gearbox housing.
Gazelle speed sensor - operating principle, replacement procedure
The Gazelle speed sensor operates on the Hall effect principle, that is, it supplies a pulse-frequency signal to the controller of the electronic control unit. The activity of the pulses coming from the sensor is directly dependent on the speed at which the vehicle is moving. The higher the speed, the more frequent the impulse; however, during normal operation of the device, it should not exceed 6004 impulses per 1 kilometer traveled by the machine.
Paying attention to the time interval between pulses supplied by the Gazelle speed sensor (DS-6), the controller processes the information received and, having determined its speed, transmits its readings to the speedometer on the car’s dashboard. To replace the speed sensor, you will need to unscrew the hatch mounting screws near the gearshift lever on the Gazelle gearbox. It is attached using an ordinary plastic plug connection, inside of which there are contacts protected from external influences by the housing.
The main reasons why the speedometer does not work
There may be several reasons for the malfunction, but the main two are:
- Failure of the speed sensor.
- Short circuit of the radio wires.
The first problem can be fixed by yourself if you change the speed sensor itself. Experts do not advise correcting this error yourself if you do not have certain skills in carrying out such work. In this case, you can contact specialized services.
Closing wires
The speedometer may not work correctly or may not work at all due to the fact that the wires in the radio are shorted.
The whole point here is that the wires initially all pass through the radio, and after that they go to the instrument panel itself. Manufacturers made such a system so that the driver has the opportunity to automatically adjust the volume of the radio depending on the situation on the road.
It should be noted here that such a problem with wires exists only in older versions of cars that were produced before restyling. In new versions there is no such reason anymore.
If the radio was installed incorrectly, the wires that go to the panel can often be cut or damaged. This is what causes problems. To correct this situation, you need to remove the radio and connect the two wires (green). If this does not help, then the problem may be with the speed detector. The pointer drive, which is made of plastic, may also be damaged. But you won’t be able to fix such problems yourself. We need to visit the service station.
The speed sensor is acting up
Logan is equipped with parts with two types of contact arrangements:
To understand which one is needed, you need to initially disassemble the sensor and check it.
MR8200547283 - speed sensor article number (not suitable for everyone!)
It is worth noting that the price of components from the car manufacturer is quite high, and therefore experts advise choosing Romanian spare parts, the cost of which is lower. You can also use Korean components. But you need to be prepared for the fact that they will not last long. The sensor itself is located in the engine compartment on the gearbox. To change it, you need to perform the following actions.
Replacement process
- Remove the filter (air). You will need a head and a wrench. The sensor is located under the filter (it is possible without removing it, but this is not entirely convenient).
- Press on its fastening and, rocking, pull it out of its seat.
- Clean the area before installing a new sensor.
- Insert new spare part.
- Replace the filter.
After this, you need to check the operation of the part. If the problem has not been resolved and the speedometer does not work, then you need to call an electrician for help, as the problem may be in the instrument panel.
It should also be noted that, along with the problems listed above, the speedometer problem may be related to the odometer settings. If this is the case, then a complete replacement of the instrument panel will be required. In this case, it is also recommended to seek help from specialists.
Causes of speed sensor failure
It often happens that after repair or installation of ABS, the speed sensor may also fail. In this case, neither the speedometer nor the emergency braking system will work as expected. The problem must be resolved by the company that installed or repaired the ABS.
Sometimes the speed sensor can fail due to oil getting into it. A sign of such a malfunction may be that the speedometer needle begins to shake when the car hits bumps on the road. Cleaning the element from oil will help here. But this will help correct the cause for a short time. Most likely, such a part will have to be replaced with a new one.
Trite - the speed sensor is “dead”
The most obvious cause could be the speed sensor. It is worth noting that on vehicles equipped with ABS, this meter is located on the wheels, but vehicles without the ABS function are located in the gearbox.
To troubleshoot the problem, you need to find the sensor. Next, we disconnect the wire plug from the sensor and use a multimeter to take measurements that will accurately show its performance. It is worth noting that the wire block fits quite tightly and removing it from its seat can be a problem. Therefore, you may have to make a lot of effort.
If, however, it turns out that the sensor is faulty, then it is worth removing the old meter and installing a new one. If it doesn't help, you should look for the problem elsewhere.
The reason for the speedometer not working
It didn't take long to find the reason. After removing the speed sensor everything became obvious
As you can see, severe corrosion led to the fact that the third contact rotted away completely. This was caused by a previous incorrect repair. Apparently, the connector had an unreliable contact. And instead of replacing the connector or repairing it, a piece of copper wire was inserted into it
This did not allow the connector to be hermetically connected and the moisture quickly took its toll. Here is the third contact removed from the connector
In general, everything was resolved by replacing the speed sensor and treating the connector with contact agent
Well, the process of replacing the sensor is a completely different story, which you can read about here.
Why does the speedometer on the Gazelle not work?
At the moment, Gazelle cars are operated both with the old instrument panel and with a modern, new panel. On the old instrument panels there is a mechanical speedometer with a cable drive from the secondary shaft of the gearbox. The new instrument panels already have an electromechanical drive, and the electronic sensors installed on the gearbox can be six or ten pulse. Their markings are respectively 342.3843 for a 6 pulse sensor, and 344.3843 for a 10 pulse sensor. This is in case they are found as spare parts.
On mechanical speedometers, the main faults will be associated with the flexible cable located in the sheath. Let's say the speedometer doesn't work. Initially, it is necessary to check whether, under the influence of vibrations, the union nuts with which the cable sheath is attached to the speedometer and to the gearbox have not been unscrewed. If this happens, the cable disengages and the transmission of torque stops. A broken or jammed cable in its sheath also leads to a failure of the speedometer.
Another malfunction is a large fluctuation of the speedometer speed indicator needle, as a result of which the driver, based on these readings, cannot accurately determine at what speed his car is moving. The reasons for this malfunction may be the lack of lubrication inside the sheath, which leads to braking of the cable and, as a result, to its uneven rotation. The same thing can happen if the shell fastening nuts are not unscrewed, but only loosened. If the speedometer drive cable, for some reason, was removed and then installed by the driver himself and he allowed it to bend with a radius of less than 150 mm, then this will also make it difficult for the cable to rotate, which will cause the speedometer speed indicator needle to oscillate.
There are cases in which the speedometer needle, when the car starts moving, immediately falls to the maximum speed reading of 180 km/h. The cause of this malfunction will be a breakdown of the spring, which, when the movement stops, returns the speedometer needle to 0. In this case, the entire instrument panel will have to be replaced.
In case of failure of the drive gears located in the gearbox, you need to know that Gazelle cars can be equipped with different engine models (for example: 402, 405, 406), then the drive gears will have a different number of teeth so that the drive cable always gave 624 revolutions per 1 km of run. If the wrong gears are installed, the speedometer readings will not correspond to the actual speed of the car and its mileage.
Gazelles currently produced have a speedometer with an electronic display showing the distance traveled, and the speed indicator also works from a signal supplied by a 10-pulse sensor installed on the gearbox in the place where a flexible cable stood on old cars. You can find out the reason for a non-working speedometer only by replacing the sensor or the instrument panel itself, but first you need to check the condition of the connecting blocks.
On Gazelle cars, troubleshooting on mechanically driven speedometers can be done independently, but if modern speedometers fail, it is better to entrust troubleshooting to a specialist who understands these devices.
Gazelle Speed Sensor
Gazelle speed sensor does not work
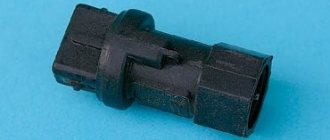
The vehicle speed sensor (VS) is designed on the principle of the Hall effect and outputs a frequency-pulse signal to the controller. The frequency of the signal is directly proportional to the speed of the vehicle. The controller uses this signal to control engine idle speed and, through the idle speed control, controls the air supply bypassing the throttle valve. The DSA produces approximately 6004 pulses for every kilometer traveled by the vehicle. Based on the time interval between pulses, the controller determines the speed of the vehicle. In addition, this signal can be used by the speedometer installed on the instrument panel. The appearance of the vehicle speed sensor is shown in Photo-1.
To get to the speed sensor on the Gazelle, you need to unscrew all the screws securing the hatch around the gear shift knob:
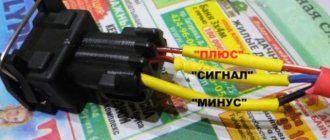
We pull out and disconnect the sensor chip. Checking the functionality of the DSA should begin with the presence of grounding on pin “3” and supply voltage (+12V) on pin “1”. The black wire is negative and the yellow wire is positive, the green wire goes to the controller and to the instrument panel, as can be seen from the diagram:
Where number 66 is our speed sensor. We also see that the positive going to our sensor comes to the reverse switch, so if the reverse lights light up when you turn on reverse gear and the ignition, then you don’t have to check the fuse.
But here is the electrical circuit, after assembling it, you can check the speed sensor itself:
Or connect another (known good) sensor to the connector, turn on the ignition and turn the sensor shaft and look at the speedometer needle, it twitches - that means everything is fine, the sensor should be replaced.
In my case there was no negative on the black wire. I cleaned it up and wound up additional mass:
I soldered the twist and insulated it well:
I passed the wire under the rubber mat and screwed it between the seats to ground:
CONNECTING THE WINDING ON UAZ, VAZ.
To connect a speed sensor to a chip, a winder with a chip is better suited; to do this, turn on the ignition, connect the winder to the speed sensor chip, the green LED should light up, and use a screwdriver to set the desired speed.
Do not connect it to foreign cars, the chip is similar, but the pinout of the wires is different, the winding will burn out immediately!
CONNECTING THE WINDING TO GAZELLE BUSINESS, GAZELLE.
The gazelle speed sensor chip is round, the counter part is expensive to find, so the connection is wired. On the winding, the wires are labeled on cambrics.
Here is the pinout of the chip for the gazelle speed sensor.
We insert the winding wires, turn on the ignition, the green LED will light up, use a screwdriver to set the desired speed.
INSERTING THE WINDING INTO THE WIRING.
Many people are not happy that they have to constantly crawl under the car, here are instructions on how to connect the winder behind the instrument panel (on the Patriot, the Patriot with the new panel and on the Gazelle, the connection is the same, the chip is behind the XP3 panel). To connect, first prepare the winding, you will need wires, a soldering iron, electrical tape, tools and find a toggle switch for six pins with two switching positions, these are great:
How to track your mileage on NEXT.
The mileage on Next is stored in the instrument panel and in the engine.
The total cost of equipment for mileage correction on NEXTs is several times higher than the cost of correction. Therefore, it is much cheaper to turn to us for help.
Odometer correction
In order to check the mileage in the speedometer we need
We connect it to the speedometer.
We launch the program, select a script for working with panels of the NEXT family.
Then we read the processor data and edit it. We put the shield in place.
Correction in the engine.
In order to check the mileage in the engine we will need:
- Universal loader CombiLoader
- Software module for working with the engine ECU
- Adapter J2534 Scanmatic 2 PRO
- Editor for mileage recalculation
We connect CombiLoader and Scanmatic to the computer. We connect the Scanmatic to the OBD connector of the car and read the ECU configuration file.
Then we edit the mileage using any dump editor and load it back into the engine control unit.
We connect the diagnostic scanner and check the mileage in the engine.
After this procedure, the car will undergo any inspection, including at dealers for warranty repairs.
Removing and installing the Gazelle instrument panel with your own hands. Installation of winding.
To remove the Gazelle instrument panel and install the winding device, you will need a screwdriver, a 8-mm head, a knife for stripping wires from insulation, electrical tape, and a special pin for pressing the contact stopper in the instrument panel connector. A special pin is very well made from a hardened self-tapping screw, slightly ground with emery.
First of all, remove the plugs under the panel.
Unscrew the four screws securing the instrument panel frame and remove the frame.
Unscrew the four screws securing the instrument cluster
Carefully remove the instrument cluster from the panel and disconnect the four wiring connectors.
We find the X3 connector block.
We expose the ground wire in a circle in a section of 7-8 mm.
We open the bundle of copper conductors in the middle - for example, with a pin to press the contact stopper - until we obtain a hole between the conductors with a diameter of 2-3 mm.
We insert the stripped 15-20 mm into the resulting hole. ground wire of the winder, wrap it around the exposed ground wire of the wiring.
Carefully wrap the twist with electrical tape.
We do the same for the yellow wire “switchable 12 volts”.
What devices are used to wind electronic speedometers?
Considering the variety of cars available and methods for processing data from the speedometer, several different options have been created that allow you to correct the distance traveled. The circuit of such a device can be made both on discrete elements and on microprocessor systems, but all finished products are divided into the following types:
CAN twister
This device is designed for use on modern machines. Here you need to know that CAN is a special bus through which data is exchanged between car electronics units. And its design implies the presence of a diagnostic connector, through which, knowing the exchange protocol, you can gain access to individual devices.
Accordingly, thanks to this, you can adjust the contents of the necessary memory cells, achieving the desired result. It is impossible to detect with diagnostic equipment that memory cells have been changed.
You can buy a high-quality spinner on the website https://can-podmotka.ru
Pulse twister for OBDII
This device is intended for use with foreign cars that do not have a CAN bus. This device is connected via a special OBDII diagnostic connector. In this case, the speedometer receives a sequence of pulses simulating signals from the speed sensor, as a result of which the readings of the distance traveled change.
Speed generator
This circuit simulates a speed sensor. Instead, the generator turns on and produces a sequence of pulses that arrive at the speedometer and cause its readings to change. Mostly suitable for electromechanical devices and domestic cars - VAZ, UAZ and others manufactured before 2006.
Suitable for cars equipped with ABS. Its work is based on controlling the speed and rotation of the wheel. A spinner connected to the corresponding connector simulates the operation of the wheels, and the controller, receiving this information, begins to change the speedometer readings.
Additionally, it is worth noting that the determining factor when choosing a device for winding the speedometer is the car model and its production date. In some cases, changes in the speedometer readings on a VAZ or UAZ will be completely different from those on a KAMAZ or MAZ.
You can make a winding device yourself or buy a ready-made one, but the most important thing is to determine whether it can be used on a given machine. If used incorrectly, you can simply burn the electronics.
As strange as it may seem, sometimes it becomes more important not to twist the speedometer, but, on the contrary, to wind it up. There are a number of reasons, both objective and subjective, that force one to do this. More than one device has been created that allows you to solve the problem, and you can choose a device that takes into account the production date of a particular car and allows you to carry out this procedure without consequences.
How to disable the speedometer on Renault Logan: photo tutorial
In some cases, there is a need to turn off the speedometer on Renault Logan. There are several ways to disable it, and all methods will be discussed in this article. Of course, in order to perform such an operation, you need to know a little about the design of the car, especially with regard to electrics.
What is a speedometer for?
The instrument panel is on
A speedometer is an instrument element of a car that displays the speed of movement. On older generation machines, it was mechanically driven, that is, it had a cable that rotated, thereby showing a change in speed.
Improvements in automobile production have led to the fact that this device has become an electronic format. That is, a sensor is installed in the gearbox that transmits a signal to the dashboard, which actuates the speedometer drive. The dial shows how fast the car is moving.
The process of turning off the speedometer
Diagram of sensors and electrical equipment
There are several possible ways to turn off the speedometer. Of course, many motorists do not look at it at all when driving, but all manufacturers install it so that the driver controls the speed, because this is directly related to safety.
Speed sensor
Disabled speed sensor
The first way is to disable the speed sensor, which is responsible for transmitting speed data from the gearbox housing.
In order to turn it off, you need to crawl under the car from below and, having disconnected the wiring block, as well as the fasteners, unscrew the readout.
This method is extremely not recommended, because then the ECU does not see the readings and this can lead to a number of errors that will lead to other breakdowns. Therefore, even “Kulibins” do not want and do not recommend doing this, not to mention professional craftsmen.
Chemistry with wires
Part of the wires, including the one responsible for the speedometer
This method is used precisely by the “Kulibins” who do not know a safer method. So, what do you need to perform this unique action? Basic electrical tape and wire cutters.
Now you need to trace the wires that come out of the speed sensor. To turn off the speedometer you need to disconnect it, usually cut with wire cutters. Next, the wire is isolated and the signal coming to the dashboard disappears.
Restyled version
Since 2003, cars began to be equipped with a new instrument cluster with an electronic speedometer. The new Gazelle speed sensor was designated DS-6 and was installed on the gearbox housing on the left side. The sensor had a mechanical drive similar to a cable. The same device was used at Gazelle Business.
The operation of the sensor is based on the Hall effect principle. Any change in speed is recorded by a sensor and transmitted in the form of voltage pulses to the controller of the electronic control unit. They have a lower limit of about 1 Volt and an upper limit of at least 5 Volts.
There is a proportional relationship between the speed and pulse frequency, so the sensor error is small. As the speed increases, the pulse frequency also increases, but the sensor has a design limitation - the pulse counter readings cannot be higher than 6004 per kilometer. The controller calculates the speed based on the number of pulses and the time intervals between them. The received signal is transmitted to the speedometer located on the dashboard of the car. The photo shows the electronic sensor of the Gazelle.
How to fix the speedometer on a gazelle? Additional method.
Another fairly simple way to check the speedometer sensor is to monitor the operation of the needle at the moment the gazelle starts. If the needle rises to the maximum possible speed mark (180 km/h) immediately after the start, then the malfunction can only be eliminated by completely replacing the shield. Simply replacing a faulty spring (which caused this arrow behavior), which returns the pointer to the minimum value (0 km/h) immediately after the car stops moving, will not work.
The driver will not be able to find out the real speed of the gazelle if inappropriate drive gears are installed in the gearbox. You should not forget the fact that there can be 3 engine models in a gazelle (402, 405, and also 406). This should remind you of the different number of teeth, due to which the cable will operate within 625 rpm.
Today, the Gazelle is equipped with a built-in speedometer with an electronic (not, as before, a mechanical) display that displays the distance traveled by the car. In this case, the operation of the speed indicator on the straight line depends on the signals supplied by the 10-pulse sensor (which replaced the flexible cable). To find out the possible reasons for the speedometer not working correctly, the sensor (or the entire panel) will need to be replaced. But before that, it’s worth checking the connecting blocks, the condition of which also determines the operation of the device and how serviceable it is.
Of course, specialists will be able to quickly and better determine the causes of problems, since they have a better understanding of devices such as the speedometer. But independent repairs are possible, however, with one condition - your car is equipped with an exclusively mechanical drive. Be that as it may, the best way out of such a situation would be to have the gazelle checked by a service station master.
How to check the speedometer on a gazelle. Where to begin?
How to check the speed sensor?
After some time, the car owner may discover that the speedometer on the gazelle does not work. This means an inevitable inspection, starting with the sheath cable. It is with this part of the car that problems arise more often than with others. The first thing to inspect is the union nuts (fastening the gearbox and the cable sheath built into the mechanical speedometer), since due to constant vibration vibrations they could become unscrewed. Shifted nuts can be seen by frequent jumping of the cable, as a result of which torque will not be supplied. The cable break can then be checked directly in the sheath. A phenomenon such as cycling may well cause the speedometer to fail.
After the reasons have been found and eliminated, it is necessary to adjust the mileage; if with a mechanical speedometer this can be done independently, then in the case of an electronic mechanism you should contact specialists who will correctly adjust the mileage without causing harm to the car and all electronics.
The malfunction in most cases consists of wide fluctuations (strong deviations) of the speed indicator needle, which becomes a reason for the owner/driver of the gazelle to doubt the speed readings of the device. The cause of the problem may well be missing lubrication on the shell (internal). It is because of this that the cable rotates incorrectly (unevenly), as a result of which it begins to slow down. The situation is similar with the loosened nuts with which the shell is attached to the gazelle
It doesn’t matter what the reason was for removing and reinstalling the cable, if the owner performed this procedure, exceeding the permissible bend (radius more than 15 cm), the rotation of the cable will become difficult, and the indicator arrow will begin to fluctuate, preventing an accurate determination of the vehicle speed