News on request VAZ 2109: how to remove glass from the rear door - don’t pass it by. Do-it-yourself car diagnostics and repairs will help you save nerves, strength and health. How to repair a car yourself at home. We will help you with repairs and repair the car yourself. We know how to restore a car with minimal investment. I have attached video instructions.
Category: Car repair
Laughter on topic: – I found a video of naked women on your phone! How will you explain this to me? - Well, don’t you know how it happens? I wanted to take a photo, so I clicked the video.
Published by Admin: at the request of Ibrahim
Car owner criticism: Fuel consumption on the highway.
As a rule, replacing the rear window on a VAZ 2109 is a responsible matter and requires special knowledge. But this does not mean at all that replacing the rear window in a VAZ 2109 cannot be done by yourself.
Replacing the rear side window on a VAZ 2109 on your own
Replacing a side window Compared to the windshield of a car, replacing the rear side window on a VAZ 2109 is carried out less frequently. Side windows are located in both the front and rear doors of the car. These include fixed body products (luggage side windows), fixed body glasses in minibuses and commercial vehicles. Replacing the side glass on a VAZ 2109 can be done calmly and on your own. In some cases, side windows break due to mechanical force; these are situations when the keys remain inside the car. Also, don't forget about theft.
Note! The cost of the work directly depends on the method of assembling and disassembling the door in the car. It is not at all necessary to immediately contact a service station, since installation of the purchased glass does not take much time, 2-3 hours is quite enough.
How to remove the windshield on a VAZ 2109, glass removal and installation
How to remove and install rear window
Removing the rear window is similar to the front fragment, only removing the rubber seal should begin not from the middle, but from the edges in the upper part. After the tape is pulled out along the top layer, the auto glass is removed in or out. The rear window is installed on a VAZ model 2109 using a rope or cord. Algorithm of actions:
- The rope is inserted into the frame to the middle, into the groove, which will be closer to the outer glass part.
- On the other side, a similar operation is carried out. The rope cords must cross. Drowning into the groove until it stops.
- The auto glass is placed in the opening. The structure is slightly pressed: not inward, but downward.
The finish is the removal of the rope. It should not be pulled vertically, but horizontally. The seal is being installed. It should first be wetted so that it becomes soft. After drying, the material will harden and fix the edges of the glass.
Required Tools
First you need to select a new canvas. Craftsmen recommend choosing double glass with a polymer layer or single-layer tempered stalinite. Required equipment and related materials:
- nylon cord - about 5 meters;
- rubber hammer;
- slotted screwdriver;
- sealant;
- anti-corrosion agent and primer.
Preparation involves choosing a comfortable room for work; you also need to select equipment, purchase new glass and dismantle the old fragment.
You can put the old seal on the glass or purchase a new element to make the job easier.
Installing new glass
Let's figure out how to correctly insert the rear window on a VAZ- 2109 . You will need strong rope and a screwdriver. Insert the center of the cord into the middle of the upper half of the seal.
Subscribe to our feeds on social networks such as. VKontakte, Instagram. Yandex Zen, and Telegram: all the most interesting automotive events collected in one place.
Removing the seal
Before installing a new one, the old windshield of the VAZ 2109 must be carefully dismantled. To do the replacement yourself, you will need a slotted screwdriver with a slot width of 10–12 mm. If you plan to reuse the seal, make sure the screwdriver is relatively dull so as not to injure its blade. Before replacing the windshield, it is recommended to remove the windshield wipers. Even bent, they create interference.
READ McLaren SUV Rendering Shows the Ultimate Mid-Engine High-Performance Coupe
Start dismantling the windshield on a VAZ 2109 from inside the cabin, from the middle of the top edge. In profile, the seal resembles the letter “H”. Between the lower halves of the legs of this letter is the edge of the windshield, and between the upper halves of the legs is the edge of the frame, smoothly turning into the roof of the body. You must carefully press the upper leg of the letter “H” closest to you and push it out of the body. Both legs of the upper part of the seal profile will be on the outside of the frame, and you will see the exposed metal of the edge of this frame.
After pushing out the first section of the seal, expand the area step by step. The most difficult step is the first, then the seal goes out almost without resistance. With a little luck, you can push the edge of the seal out without damage. Expand the removal area gradually in both directions from the center until the upper corners of the windshield are free.
If you are replacing the side glass of a VAZ 2109 located behind the rear door, start from the middle of the long side.
Change the rear window on a VAZ-2109
Before you start, go to a store or market and get a new rear window for your car. It is important that it is clearly suitable for your model (particular attention should be paid to heating and its design features).
After this, prepare the necessary tools. You will need it for work. new glass (this is logical), special glue (the best option is a two-component composition), a new rubber band (the old one should be thrown away), a string for cutting glass, special suction cups (needed to hold and lift the glass). In addition, you will need duct tape, a knife, sandpaper and solvent.
It is advisable to work in a well-lit room with sufficient room to maneuver. If the weather is good outside, then you can live right next to the garage. A partner's assistant when replacing the rear window is highly desirable. Regardless, such work is extremely difficult to manage.
So, after carrying out the preparatory activities, you can go directly to work. Here you need to go through three stages:
Required Tools
First you need to select a new canvas. Craftsmen recommend choosing double glass with a polymer layer or single-layer tempered stalinite. Required equipment and related materials:
- nylon cord - about 5 meters;
- rubber hammer;
- slotted screwdriver;
- sealant;
- anti-corrosion agent and primer.
Preparation involves choosing a comfortable room for work; you also need to select equipment, purchase new glass and dismantle the old fragment.
You can put the old seal on the glass or purchase a new element to make the job easier.
Sources:
https://vaz-russia.com/remont/zamena-zadnego-bokovogo-stekla-na-vaz-2101-vaz-2107.html https://ru.megasos.com/wiki/zamena-zadnego-stekla-na -vaz-2109 https://vaz-russia.com/remont-vaz-2108/zamena-lobovogo-stekla-na-vaz-2108-vaz-2109-vaz-21099.html https://autofluids.ru/remont -i-servis/kak-vstavit-zadnee-steklo.html https://infokuzov.ru/remont/steklo-lobovoe-vaz-2109
Glass replacement
It is better to buy glass and a glass holder as a set for replacement.
To replace, you need an extension, a wrench, an 8 and 10 mm socket and an assistant.
The side glass is blocked with a screwdriver to prevent it from falling out. The door trim is removed. A felt-tip pen marks the places where the glass frame is attached to the door on the frame and on the door. The bolts securing the glass frame to the window regulator are turned out.
The window regulator bar must be fully raised. The cable on the roller from the bottom of the glass is dismantled. Then the seals (velvet covers) are carefully removed.
Hold the glass during this time so that it does not fall out. After removing the seals, the glass is lowered down about 10 cm, tilted to the side and removed from the groove.
The new glass is installed in the reverse order. Apply WD-40 or a similar lubricant to the glass frame, insert the glass and leave to dry. After the grease has dried, the glass is installed in the door. New glass is installed in the seals.
If the seals have become unusable, new ones are cut out of rubber, while the old ones are used as patterns.
The glass with seals is inserted into the groove, aligned and lowered into the stopper. The window lifter handle is lowered to its lowest position. The glass is fixed with bolts and the cable is installed in its original place.
The operation of the window regulator is checked and, if necessary, the cable tension and the position of the seals are changed.
Side glass replacement process
To change the side glass on a VAZ 2109, you need to prepare a screwdriver, as well as size 8 and 10 keys. The rear left door consists of an armrest, a window sill, side and turning glass, a window lifter handle, as well as a handle for the internal lock drive. Now let’s pay attention directly to the list of necessary work, without which it is impossible to change the glass:
- Before starting the process, the glass must be set to its upper state. Using a screwdriver, pry off the upper plugs of the upper fixing screw of the armrest.
- The three fastening screws of the armrest are unscrewed, after which the element itself is dismantled.
- Using a screwdriver, bend the socket of the handle of the installed window lifter from the upholstery.
- The cladding slides along the handle, which is subsequently dismantled.
- The window lifter handle with socket is removed.
- Use a screwdriver to pry up the lining of the handle of the internal lock drive.
- The door trim is pryed with a screwdriver in the area where the holders are located, then it is removed.
Note! The upholstery is attached to the door using 7 plastic holders.
- The protective film is turned upward and pressed against the side glass.
- Remove the two fastening screws of the glass chute. The gutter cannot be removed separately as it is attached with a seal.
Replacement of rear side windows of VAZ 2109
- Unscrew the fastening nut of the front chute, after which it is dismantled.
- Put on the window lifter handle (see How to install a window lifter on a vase yourself), then lower the glass down into the stop until it stops.
- Remove the two screws from the glass pressure plate, carefully removing the pressure plate.
Note! The glass is placed on the limiter in the same position.
- The fastening nut of the window lifting cable tension from the roller is weakened.
- The branches of the cable are compressed, its tension is weakened, and the cable located on the guide roller below is dismantled.
- The glass is removed from the stopper and lowers down, moving forward by 10 cm.
- The lower edge is slightly tilted towards itself, the glass is carefully moved through the door trim and removed downwards.
- New glass is first installed in prepared seals, and only then in the door frame.
- It is leveled and lowered into the limiter, secured with a screw from the pressure plate. Install the cable on the previous rollers.
Side rear window of VAZ 2109
- The front gutter is mounted so that the fasteners engage well with the guide element of the turning glass.
- The rear chute is mounted so that its upper part, together with the nut, easily fits under the side door frame.
- The side glass is placed in the gutters. The fastening screws of the rear gutter are screwed together with the fastening nut of the front.
- The window lifter handle is turned as far as possible in the direction of lowering the glass. The cable is tensioned well, the tension roller moves and its fastening nut is tightened.
Replacing the side one on a VAZ 2109
- The remaining parts that were removed to replace the glass are mounted in the opposite sequence.
Note! The window lifter handle should be placed so that with the glass raised to the limit, it deviates from the vertical to approximately 45 degrees forward.
Add a commentAdd a comment We recommend readingHeated rear window of a VAZ 2110: design and repairReplacing the rear window of a VAZ 2109: how to do it correctlyRemoving the windshield of a VAZ 2109:how to do it correctlyVAZ 2109: replacing a window lifter on your own
Glass (side, windshield and rear) is an invariable attribute of every car. Their main purpose is to provide the motorist with the necessary visibility and protect them from negative environmental influences (rain, cold, heat, hail, and so on). In fact, it is thanks to the glass that complete comfort in the cabin is ensured.
Cons of glass
But glass (especially side glass) has a big drawback - it is sensitive to mechanical stress. Thus, even a small stone hitting one of the side windows can lead to a crack or complete destruction of the surface. In such a situation, the only way out is replacement. Many car enthusiasts go to a service station and shell out considerable sums for the work of a master. What for? Replacing the front or rear windows on the doors of VAZ-2108-21099 cars is not difficult. The main thing is to strictly follow the instructions and have the necessary tools at hand.
We replace the front windows on a VAZ-2108-21099 along with a window regulator
The first thing to start with is to buy replacement glass. It is advisable to give preference to the product for your car model (this point can be clarified with a consultant in the store). In this case, the damaged glass must be removed as carefully as possible.
Before you start disassembling the glass, be sure to remove the door trim and remove the rear view mirror (it will interfere with operation). Then proceed in the following sequence:
- Remove all seals from the glass (both external and internal).
- Remove the latches of the protective film and remove the latter (this can be done using a screwdriver).
- Pull the top of the seal off the glass.
- Raise the window using the handle until the window lifter slider mounting bolts are accessible. After this, unscrew the bolts and hold the glass.
- Lower the glass to the very bottom until it stops.
- Unscrew the nuts that secure the window regulator.
- Remove the middle mounting nuts that hold the lift guide in place.
- Unscrew the nut holding the lower part of the guide mount.
- Unscrew the nut holding the upper part of the guide mount. At the same time, hold the window regulator.
- Carefully remove the window regulator from the doorway.
- Turn the glass a little and remove it through the top of the opening.
- Immediately pay attention to the quality of the clip. If the glass surface does not fit tightly or there are obvious signs of damage on the frame, then it is better to immediately make a double replacement (that is, change both the glass and the frame).
If you are planning to change the window regulator, be sure to look at the markings on the bracket. Usually this place indicates which vehicle the device is intended for. For example, on the window regulator for the “eight” there will be a VAZ-2108, and on the “nine” - VAZ-2109 and so on. In addition, after the main inscription there will be two more numbers - they indicate the type of glass (right or left).
- Install the new glass and window regulator in reverse order.
- Check the functionality of the device. Make sure that the glass opens and closes normally, without excessive force or distortion.
We replace the rear windows on a VAZ-2108-21099 along with a window lifter
When replacing rear windows, the sequence should be as follows:
- Lower the glass to the very bottom, all the way.
- Remove the trim from the door on which the glass is being replaced (the principle here is the same as on the front door).
- Remove the glass seals (top and bottom). The sequence doesn't matter.
- Remove three fasteners (two of them are located at the top, and one at the bottom). A screwdriver is enough to remove them. Remove the protective film from the door.
- Unscrew the two mounting bolts that secure the glass frame to the window regulator slider. Hold the glass while performing this work.
- Unscrew the three lift guide fixing nuts (two located slightly below, one above).
- Unscrew the nuts that hold the window lift mechanism.
- Carefully remove the window regulator from the door so as not to damage the mechanism. Inspect it. If there are defects, replace them.
- Remove the seal located on the outside of the glass (without this, further work will not be possible).
- In the same way, remove the seal located on top of the door.
- Turn the surface of the glass and carefully remove it through the top. If it is damaged, be very careful (it may fall apart when dismantled). It's better to wear gloves to avoid accidentally hurting your hands.
- Make sure that the glass is pressed tightly against the frame and that there are no obvious gaps. If there is obvious damage to the clip, it is best to replace it immediately along with the glass. Otherwise, after the first rain and detection of a leak, you will have to remove the glass again.
- Install the glass on the car, return the window regulator and seals to their place. Screw all the screws into place and then check the operation of the mechanism (before installing the casing).
If necessary, treat the window lift cables with a special lubricant (in case of replacing any of the front or rear side windows).
Inspect the quality of the glass rise, the absence of distortion, and the tightness of contact with the frame. If there are no complaints, then you can safely finish the work and be proud of your achievement.
Conclusion
Changing the side windows in the front and rear doors and replacing (if necessary) the window regulator is a matter of a maximum of 30-40 minutes per glass. At a service station they may ask for 1,000-2,000 rubles for such work. Thus, when replacing it yourself, the savings are significant. All that remains is to decide on this step, buy replacement glass, prepare a minimum set of tools and act. Good luck.
Home•Vaz•2109•Body
In order to remove the rear door on a VAZ 2109, follow these steps:
Open the door and remove the two bolts securing the limiter bracket to the B-pillar
Unscrew the two bolts securing the upper and lower door hinges to the B-pillar and remove the door. Installation of the VAZ 2109 rear door is performed in the reverse order of removal. Before final tightening the bolts securing the hinges to the B-pillar, close the door and position it so that the gaps in the openings around the entire perimeter are the same. Then carefully open the door and finally tighten the fastening bolts.
Replacing the window regulator and glass on a VAZ 2109
In order to install the rear door glass on a VAZ 2109 or replace the window regulator, follow these steps:
Lower the window all the way down and remove the rear door trim in the same way as removing the front door trim. The photo shows the location of the rear door trim mounting pins
Remove the inner lower glass seal
Remove the three holders, two on top and one on the bottom, using a screwdriver. Remove the rear protective film from the door
Unscrew the two bolts securing the glass frame to the window lifter slide, holding the glass. Carefully lower the glass down
Unscrew the two lower and one upper nuts securing the window lifter guide
Unscrew the three nuts securing the window lift mechanism
Remove the window regulator from the door
Remove the outer lower glass seal
Remove the upper seal of the rear door of the VAZ 2109
Turn the glass back and remove it from the door
Check the tightness of the glass in the frame. If the clip does not fit tightly, replace the glass along with the clip. Installing the rear door glass of a VAZ 2109 with a window lifter is performed in the reverse order of removal.
We install the rear window in a VAZ 21099 car
Rear window installation
in the vaz
21099 with your own hands)
- after removing the seal, pierce the thread with glue and pull it along the perimeter with an assistant;
— If the glass is damaged, be very careful when removing it. In this case, please note that it will not be possible to reuse the product (for example, if you remove it due to clouding or small cracks).
When doing the work, be very careful and try not to touch the body of the car (otherwise you will need to restore it).
- Prepare a hole for installing new glass
Once the old glass has been removed, do not rush to immediately “sculpt” a new one. It is advisable to perform several useful manipulations:
— Treat the edges with a degreaser. This will thoroughly clean the hole and prepare it for installing a new seal. Remember, the cleaner the installation site, the better;
- Put on the seal. There is a nuance here. If you were able to carefully remove the rubber band (which is very rare), you can leave it. But, as practice shows, it is best to apply new sealant;
— Laying the “elastic band” is done starting from the corners. After this, you can gradually press the seal on the four sides;
— After installation is complete, install a special lock (it looks like a small wedge). If you look at it from the outside, it looks like the letter "P". Insert it so that it is in the central part and runs along the entire length of the seal.
Replacing the windshield and rear glass of a VAZ-2110 car
We glue glass when replacing it, losing the tightness of the adhesive seam, or straightening a damaged body.
Cutting and gluing all glass is done in the same way, so we will consider in detail only the operation of replacing the rear window.
We remove the rear pillar linings in the cabin (see the article - “How to remove the roof lining of a VAZ-2110 car”).
We pry it with a screwdriver and remove three pistons securing the two corner panels to the side posts.
Inside, use a Phillips screwdriver to unscrew two plastic nuts securing each panel to the rear pillars.
Remove the corner panels.
Disconnect the wires from the glass heating element.
Removing the glass trim
Remove the trunk lid.
Remove the trunk seal.
To cut glass, you need to make a hole in the glue seam to pass the string through it.
To do this, we pierce the adhesive seam with steel wire...
...or make a cut with a string in the lower corner of the glass.
We pass a string through the hole and attach holders to its ends.
Having sawed the adhesive seam around the entire perimeter with a string, we remove the glass.
When subjected to a strong impact, the tempered rear window shatters into small fragments (for example, as a result of an accident).
In this case, before gluing in the new glass, you need to clean the opening from fragments and cut off the old adhesive seam with the remaining glass.
We cut off the old glue seam with a sharp knife, leaving a layer 1-2 mm thick.
To glue glass, you need a kit that includes a tube with glue, a degreaser and a primer (primer), as well as a “gun” for squeezing the glue out of the tube.
We degrease the edge of the glass at the place where the glue is applied and the window opening along the entire perimeter
Apply primer to the glass...
...and a window opening.
We put a frame on the glass.
Squeezing the glue out of the tube, apply it with an even roller 10-12 mm high along the entire perimeter of the glass.
We apply the glass with edging to the window opening, ensuring uniform gaps with the body panels
To prevent the glass from sliding down, place wedges under it.
Polymerization of the glue continues for two to three hours.
At this time, you cannot move the car, close the door windows or slam the doors, because An increase in air pressure inside the car can cause the glass to break off.
It is advisable to operate the car no earlier than 24 hours after gluing the glass.
Windshield replacement
In preparation, remove the front pillar trim, trim and windshield trim.
Remove the windshield trim.
Remove the front door outer seals.
It is more convenient to cut the windshield from the bottom corner, first placing both string holders on the outside
Having cut about 20 cm, draw one end of the string inward and continue cutting until the glass is completely separated
Further operations are the same as when replacing the rear window
With headlight removed
Replacement of headlight glass VAZ 2109
To improve operating efficiency, the headlights must be removed. Its installation is located in the engine compartment:
- Therefore, it is necessary to lift the hood and put on a gasket.
- The headlight is attached to four screws using nuts.
- Unscrew them with head number 10.
- The whole body moves towards itself; if necessary, apply a little pressure on the front bumper.
- Disable the two power timers.
- Remove the adjuster, turn your head to the left, remove the headlight.
It is advisable to carry out further work indoors at a temperature of 18 0 C. This is necessary:
- Place the spotlight on the table;
- Unscrew the turn signal housing;
- Remove the windshield wiper stops;
- Remove the remaining glass from the headlight housing, you can use a knife;
- Carefully clean the glass of any remaining glue;
- The solvent degreases the contact surfaces of the headlight and glass.
Note: Be careful not to get any solvent on the reflector; if necessary, wipe it with a dry cloth.
The sealant is applied in a thin layer to the body along the edge of the glass:
- After 3 minutes, all the parts that need to be glued together.
- Turn the headlight onto the glass, first place a piece of tarpaulin or any fabric on the table.
- Place a wooden rod under one edge of the glass to level the headlight housing support post.
Note. The work must be done carefully to prevent glue from getting into the housing.
- Leave the glued parts for one day.
- Faro stepped into place and connected all the parts.
After the work is completed, it is necessary to adjust the installed headlight. To do this, you need to contact a specialist car service. There, at a special stand, this procedure will be carried out professionally. The price of glass will largely depend on the manufacturer and quality. Since market prices have a wide range: from 100 rubles. up to 750 rubles. for one glass. Glasses are represented on the market by factories in Kirzhach, Avtopribor Plant LLC in Dimitrovgrad, BOSCH and others. Therefore, you need to weigh everything carefully, listen to the advice of sales consultants. After this, you can safely begin car self-service. When you do the work yourself to replace a headlight, you need to read the instructions, watch the video, study the photo carefully.
Without removing the headlight
Replacement headlights for VAZ 2109
In summer, this work can be done outside without removing the headlights:
- Choose a paved concrete sidewalk in an area where there is no wind.
- To fill the pillow with water, this must be done to avoid the ingress of dust and sand during cleaning and applying glue.
- To get the job done, you must wear cotton gloves. This hand protection eliminates the possibility of injury when removing broken fragments.
The note. Carefully remove any remaining glass.
To make the job easier, try to carefully hammer the glass. Clear away any remaining fragments. Using a screwdriver, clean off any remaining old glue around the perimeter of the headlight. Dampen a cloth with solvent and degrease the reflector. Also wipe the inside of the glass with solvent. After this, clean the place of the sticker in the headlight housing again (see “Do-it-yourself headlight repair in vases”). Gradually, carefully squeeze the glue out of the tube. Apply a thin coat around the edge of the headlight along the inside edge of the glass. Wait 3 minutes. After this, press the glass against the spotlight, try to glue it in the middle.
Conclusion
This is all. With such simple instructions, you can install a rear window on a VAZ-2109 and save a significant amount. Good luck.
Replacement of the rear window of a VAZ 21099 is done in the case when it is not possible to repair the rear window or the rear window was broken as a result of an accident. Also, the rear window is replaced if the rear window heating is damaged. In some cases, repair of the rear window heating on a VAZ 21099 can be done, but in most cases, the rear window will need to be replaced.
Replacing the rear window on a VAZ 21099 takes on average 2-3 hours. In warm weather, after replacing the rear window, you can immediately pick up the car. If the outside temperature is less than +10 degrees, then it is better to let the car sit for another 2-3 hours so that the glass can properly adhere to the glue.
GMC Rear Window Replacement Cost:
| Type of rear window VAZ 21099 | Replacement |
| Rear window of VAZ 21099 in glue | 1,800 rub. |
| Rear window VAZ 21099 trunk lid | 2,000 rub. |
| Rear window VAZ 21099 sliding | 2,500 rub. |
Rear window
The rear window has the same protective function as the windshield from external influences: air flow, dirt and small particles from the road surface. The dimensions of the rear window in the “seven” are 1360 * 512 mm.
How to replace
Removing and installing the rear window in the “seven” is practically no different from similar actions with the front glass, but there are some features:
- In the lower corner of the rear window, you need to remove the trim and remove the corner element, do the same on the second lower corner;
- We begin removal from the lower corners, having first removed the edging from the seal.
Heated rear window
Initially, the “seven” released from the factory was equipped with a heated rear window. This function is needed to ensure that the rear window does not become covered with moisture and does not freeze in the cold season.
Often the heating mechanism fails and requires repair. To make repairs, you need to know the electrical circuit of the heating device (see figure below).
Rear window heating circuit. Source https://www.drive2.ru/b/458811634815604345
Frequent breakdowns
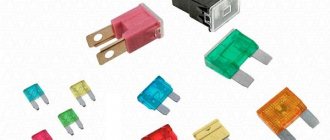
- The fuse has failed;
- The condition of the heater terminals is broken;
- Failure in the connector leading to the control unit;
- Damage to the heating element itself. You can check it with a multimeter; it should show a resistance of about 1 ohm on working filaments.
Rear window grille
This car tuning element gives the car a sporty look. At the same time, the grille serves as protection from sunlight and car headlights on the road, and protects the glass from rain.
Installation is simple: using a plastic plate, the grille is installed under the rubber seal on the outside of the glass.
Removing the front door trim
Plastic spikes or “herringbones” for fastening may break during the process of removing the skin. We purchase in advance a quantity sufficient for the update. It is better to buy double white-orange or transparent clips.
- Open the door and remove the 3 screws securing the podium. The screws are unscrewed with a Phillips screwdriver. The podium carefully turns down and detaches from the body.
Do not remove the casing with jerks or sudden movements. The sockets that attach the trim to the door can be damaged.
- We remove the wires from the locking mechanism from under the top of the casing. We remove the door trim of the VAZ 2114, evenly moving it away from the door.
- After removing the trim, you can replace the glass, the trim itself, repair window regulators, install acoustics, etc.
If you are planning to replace the trim, before purchasing it, compare the dimensions of the trim installed in your car with the new one in the store. The location and diameter of the holes for the handle and for fastening may not be the same.
Installation of the casing occurs in the reverse order.
How to replace the windshield, also known as the windshield, on a VAZ 2108-VAZ 21099?
Removal:
Note! The glass on the Samara family car is secured with a rubber seal and therefore it is much easier to remove, unlike more modern cars, for example the VAZ 2110, on which the windshield is directly glued into the body!
1) First, in order to successfully remove the old windshield, remove the wipers from the car. (How to remove wipers, read the article: “Replacing windshield wipers”)
2) Now use a screwdriver to unscrew the screws that secure the side pads on both sides.
3) And then remove them.
4) Now tuck the edges of the rubber glass seal behind the body.
Why replacement is required
You need to re-stick the windshield if you find any defects:
- leak,
- crunching, squeaking when driving,
- the appearance of long cracks or large defects,
- complete destruction of the shield by airbags in an accident.
Replacing and installing auto glass is a responsible and labor-intensive task. You should not start work without reading the instructions and preparing the necessary materials.
Replacing the window regulator
To replace the window regulator, you need an extension, a wrench and a 10 mm socket.
Having freed the front door from the trim, remove the 2 bolts securing the glass to the bar. Usually they are tightened tightly, so it is more convenient to use the head as a lever.
Remove three nuts securing the electric motor, one nut under the glass, two in the center and one nut at the bottom of the door.
After removing all the nuts, disconnect the power plug from the electric motor.
After removing the structure, the electric motor is first checked. If it is faulty, it is replaced. If the cause of the breakdown is not obvious, replace the window regulator.
How much does a new front door glass cost and the labor to replace it?
Approximate retail prices for front side windows for VAZ “classic” cars, glass manufacturer - Russia, Bor Glass Plant OJSC:
- Front door glass 2104.05.07 Bor (dimensions - 430x5x710 mm) - 375 rub.
- Front door glass 2101.02.03.06 Bor (420x5x500 mm) - 315 rub.
- Front door glass 2101.06 Bor rotating (230x10x380 mm) - 215 rub.
* Prices are indicated for car dealerships in Moscow and the Moscow region.
The cost of replacement work at a car service starts from 500 rubles.
Causes and consequences of damage
Driving on poor quality roads in Russia forces car owners to look for a new windshield at least once every year and a half. Even a very small pebble flying from under the wheels of a car can lead to damage to the part.
There are two types of damage:
- Chips. If only a chip appears on the surface, the driver is lucky. This means that the first layer is damaged; it is not necessary to install a new spare part.
- Cracks. You can't hesitate. At any moment, glass can crumble into pieces due to a hole in the road, and this will lead to an accident.
How to choose
Don't buy cheap copies. Products with a suspiciously low price are either made of low-quality materials or are sold as disassembled parts. An inexpensive consumable will require replacement after just six months of use.
It is advisable to find an original spare part. It will definitely fit the car, and the quality will be higher than that of its analogue.
Inspect the part carefully. The surface must be smooth, without scratches, even and transparent. The reflection must be clear and clear. If it is cloudy, do not rush to shell out money.
Check markings, manufacturer and type. Information must be clearly written. Blurred markings are one of the main signs of a fake.
The price of consumables ranges from 1000 to 3000 rubles.
Economy segment
Xyg (China) - the best Chinese parts on the market. Pass ultraviolet rays. The material is not of the best quality: poor visibility, the image is distorted. Weak structure. This consumable will have to be changed twice a year. Overall, the price is reasonable.
Borovskoye KMK (Bor, Nizhny Novgorod region). The spare part is made of soft material, chips and scratches quickly appear. Doesn't take punches well. Cheap, but short-lived.
Premium segment
Pilkington (UK). European quality. Resistant to scratches, chips do not appear the first time. Will last a long time.
Borovskoye AGC-glass (the plant was purchased by the Japanese Company AGC-Glass). Decent choice. Japanese quality, quite high price. The company provides energy-saving, multi-layer shock-resistant and colored lacquer-coated glass.
How to change the rear window of a car with your own hands
Of course, it's not often that a car's rear window cracks. But still, many car enthusiasts are worried about such a breakdown. After all, sometimes they have only one option left - replacing the rear window. We list the situations in which it is necessary to replace the rear window:
- consequences of a traffic accident;
- a stone flying from under the wheels of a speeding oncoming car created a very large crack on the highway;
- reinstallation of a standard window with a similar one from another modification of the car;
- Body repairs are being carried out, while the glass element interferes with the work.
Next, we will consider several cases of replacing a defective rear window, applicable to both domestic and imported cars.
Let us first note that with this repair there are certain difficulties associated with the rubber seal or the adhesive seam.
How to reinstall a VAZ element
If we describe the replacement of the rear window on a VAZ 2106, then we must take into account that the “six” does not have window heating. To work here, in addition to an assistant, we need:
- flat screwdriver;
- blanket;
- nylon cord 5 m;
- soap solution, brush.
Also read about repairing a crack in a car windshield and replacing a rear engine mount.
Begin.
- From the trunk side, use a screwdriver to pry up the trim trim in each of the lower corners and remove it.
- We remove from the inside, in the cabin, all decorative trims covering the edges of the window.
- Starting from one of the lower corners, bending the seal with a screwdriver, gradually squeeze the glass out along with the seal. The bottom corner of the window is released first, and then everything else.
- We pull out the glass by the bottom and side parts. Having taken it out completely, remove the seal from the middle to the edges.
- We inspect the seal and also clean its drainage holes with a screwdriver.
- We put the seal on the new part removed from the blanket, first moving along the bottom side, then along the side, then along the top side and again along the side.
- We insert the rope into the groove of the seal intended for the edge of the body along the entire perimeter, and at the end of the process there should be ends of the rope of 20 cm each.
- We coat the upper part of the seal and the edge of the body on which the rubber element will be placed with a soap solution.
- We place the part of the window where the ends of the rope come out onto the edge of the body. The assistant goes into the salon and begins to carefully pull out the ends of the rope. At the same time, we press on the outside and tap on the glass with our hand. As a result, the window should sit in its place along with the seal.
- We put everything that was removed back in place.
This is the process for the Six. And here's how to replace glass on a VAZ 2109. We remind you that this car has a fifth door at the back. To carry out the work, again with an assistant, take the following:
- flat screwdriver;
- white spirit, rags;
- tight rope 5 m;
- soap solution.
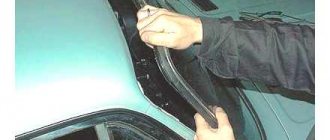
- Having removed the windshield wiper, insert a screwdriver a maximum of 5 mm, bend it back and take out part of the seal. We repeat the procedure around the entire perimeter with caution. We take out the rubber element in this way in parts, since it is very fragile!
- Disconnect the heating filaments.
- Carefully remove the window.
- We degrease the edges of the new element prepared for installation with white spirit.
- We put the seal on our new body part - from the corners to the sides.
- Next, we insert the so-called lock - we insert a shiny part with a wedge profile around the entire perimeter into the seal. Lubricate the seal groove intended for the body with soapy water.
- Now we act according to the already studied scenario. Insert a rope into the groove of the rubber element. An assistant from the interior gradually pulls it out, while at the same time pressing from the outside along the glass surface. Initially, you can completely place the bottom of the window into the opening, and do not insert the rope into the lower part.
- At the final stage we turn on the heating.
By the way, replacing glass on a VAZ 2114 happens in exactly the same way, only there may no longer be a lock. The same applies to changing the rear window of a VAZ 2110, however, you do not need to remove the windshield wiper - it is missing. But when replacing glass on a VAZ 21099, you will also have to install a lock. Although it can be inserted after installing the glass.
What to do with the same part of foreign cars
Now let’s discuss the same operation in relation to some popular budget foreign cars. To replace the rear window of Renault Logan we will need:
This car has a glass element glued into the body, so we proceed as follows, again with an assistant.
- We detach the interfering decorative elements.
- We pierce the glue seam with an awl.
- We insert a string into the hole formed.
- Next, together with an assistant located inside the cabin, we pull the string along the entire perimeter of the window.
- Carefully remove the dismantled part.
- Cut off the old seam, leaving about 1 mm of glue.
- Next, we treat the edge of the window and the edge of the opening with the activator, and then with the primer from the kit.
- We install rubber pads around the perimeter.
- After waiting half an hour, apply the adhesive composition to both edges.
- We install the window in its normal place.
- We glue it with masking tape until the glue dries completely (about 3 hours).
- Remove the tape. We install decorative elements.
- Turn on the heating. By the way, we automatically replace the broken rear window heating, since the new part is already equipped with working heating threads.
At this point the procedure can be considered complete. As you can see, it is radically different from the technology described for the VAZ. It's all due to the method of fastening. By the way, it is also used by Daewoo Matiz.
However, gluing the transparent element of the Matiz’s rear door is even easier than that of Logan – the amount of work is less. But car enthusiasts are often worried about another problem - replacing the rear window heating button on a Matiz. The fact is that these machines do not have a heating relay, so the button often fails. So, rather than constantly replacing a broken rear window heating button, it is better to install a relay inside the circuit. To install it, just study the video on replacing a broken heated glass relay on similar cars.
At the same time, replacing the rear window washer nozzle on such cars is often carried out simultaneously with reinstalling the window, since the washer is located directly on the wiper. By the way, the windshield wiper must be removed before removing the window.
It should also be added that in the case of replacing a broken rear side window, in the absence of a door, you need to act using the principles of the described technologies.
Price of glass works
This entire operation can be entrusted to servicemen if there is no assistant and time, but there are extra funds. For information, we provide data on the cost of the procedure. They are average. Moreover, they are indicated in relation to large Russian cities. Look at this table here.
| City | Price |
| Moscow | 1400 rub. |
| St. Petersburg | 1500 rub. |
| Ekaterinburg | 1000 rub. |
Here are the prices for work for VAZ cars. Of course, a particular car service may charge a little more, but the difference is unlikely to be strong. If the work is carried out with glued elements, then the cost approximately doubles.
So, the instructions that were given in the article should help the car enthusiast if he nevertheless decides to carry out the procedure on his own with an assistant.
How to replace a windshield
Replacing a car windshield includes the following operations:
- dismantling the interior racks and removing all accessories from the inside of the part,
- removing the plastic frill and wiper brushes,
- cutting off the adhesive base by machine,
- extrusion of the shield,
- inspection of sites,
- cleaning and degreasing,
- corrosion removal,
- padding,
- applying the composition,
- installing the part in place,
- gluing the rubber seal,
- Reassembly of the interior and purifier system.
New glass comes with a seal. If it is missing, you will need to purchase an additional elastic band. The old part negatively affects the appearance and does not adhere tightly to the surface.
Replacing the rear window of a VAZ 2109: how to do it correctly
- 1 What types of glass are there for car windows?
- 2 How to properly remove the rear window of a VAZ 2109 2.1 Preparing the rear window for installation
- 2.2 How to install the rear window of a VAZ 2109 car
Installation of rear window VAZ 2109
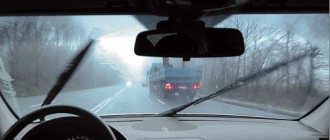
You can drive a car without a rear window. Its technical capabilities are not impaired; it can be used on roads. The only thing is that the driver and passengers of the car will experience great discomfort inside the cabin. All precipitation, dust and wind enter the cabin, and the temperature outside and inside the car will be almost the same, which is especially noticeable in winter. The article suggests learning how to change the rear window on a VAZ 2109, to protect the interior from all weather conditions and external troubles, with your own hands.
Windshield installation
It is better to install the prepared installation kit into the car body together with an assistant and do it in the following order.
- Attach the kit with the seal to the outside of the frame. Pass the free ends of the mounting cord into the vehicle interior.
- Start installation from the middle of the bottom contour of the frame. While your assistant holds the kit pressed against the frame with its bottom edge, you begin to carefully pull the mounting cord into the interior.
- The cord carries along the inner leg of the letter “H”. Due to deformation, it goes over the side of the frame and, as the cord is pulled out, it takes its normal position on the interior side. In this case, the outer leg remains outside, and the side of the frame, as expected, is placed between them.
- Carry out the installation symmetrically, with small movements, alternately pulling out one or the other end of the mounting cord. The assistant should constantly push the installed glass into place with light blows of his palm.
What types of glass are there for car windows?
In the latest VAZ 2109 models, car glass is manufactured using high technology. Such products differ from simple glasses in their high strength and design features. They allow all road users to protect themselves in the event of an accident from injury due to broken glass. The production of rear glass is carried out using one of two technologies:
- Triplex. This technology is most often used for the manufacture of rear windows, windshields, side windows, and inserts in hatches. Triplex is translated from Latin as “triple”; the design involves multilayer glass production: two or more layers of organic or silicate glass. During the manufacturing process, they are glued together with a special film, then pressed at a certain temperature. When broken, broken parts of glass remain on the film, which prevents them from breaking into numerous fragments that have very sharp edges.
- Stalinite. In this case, the glass is tempered: at first it is heated to a certain temperature, then it is cooled evenly and gradually in the air flow. During destruction, the glass breaks into a large number of small fragments with blunt edges, which causes the least harm to the driver and passengers in the event of an accident. They are used less often on modern cars, but the lower price is a temptation to install such elements.
Tip: When purchasing a rear window, you need to carefully consider the markings on it. It is made using the chemical etching method, black in color, the place of application is clearly visible in the photo.
Marking of the rear window of VAZ 2109
Optics VAZ 2108, 2109, 21099
Black headlights with angel eyes and lens for VAZ 2108, 2109, 21099
Red and white rear diode lights for VAZ 2108, 2113, 2109, 2114, 21099
Torino hy-200 rear lights red with white stripe for VAZ 2108-21099, 2113, 2114
Rear LED lights are black with a white stripe on VAZ 2108-21099, 2113, 2114
LED rear lights red with a gray stripe for VAZ 2108-21099, 2113, 2114
Tinted skyline taillights with LED turn signal for VAZ 2108-21099, 2113, 2114
Torino hy-200 rear lights tinted for VAZ 2108-21099, 2113, 2114
led orange sal-man turn signal repeaters in a black housing with the inscription se on VAZ 2108-21099, 2110-2112, 2113-2115, Lada Kalina, Priora, Granta
Fog lights "Kirzhach" for VAZ 2101-07, 2108-099, Niva 4x4, white
led yellow turn signal repeaters sal-man Black with the inscription se on VAZ 2108-21099, 2110-2112, 2113-2115, Lada Kalina, Priora, Granta
Rear lights with a red stripe on VAZ 2108-21099, 2113, 2114
Protective rear light cover left DAAZ for VAZ 2108-21099, 2113, 2114
Chrome headlights with lens and angel eyes for VAZ 2108, 2109, 21099
Protective rear light housing right DAAZ for VAZ 2108-21099, 2113, 2114
Rear LED lights Xx 0013j for VAZ 2108-14
Wiring for connecting fog lights (PTF) on VAZ 2108, 2109, 21099
Fog lights "Osvar" for VAZ 2101-07, 2108-099, Niva 4x4, white
Rear LED lights with stripe for VAZ 2108-2114
Alternative optics or sports headlights. All VAZ tuning experts know what it is. External styling of VAZ 2108, 2109, 21099 begins with replacing the front and rear factory headlights with sports ones. Alternative optics immediately makes the Lada Samara stand out on city roads.
Alternative optics for the Lada Samara have their own advantages. Alternative optics can completely replace the standard VAZ 2108-099 headlights. It is easy to install, without any modifications or changes. The design of alternative optics uses modern LED elements, the service life of which is almost unlimited. The rear lights are suitable not only for the VAZ 2108-099, they can easily be installed on the VAZ 2113, 2114. LED daytime running lights have appeared in the front alternative headlights of the VAZ 2108, 09, 099. The use of round LED strips called angel eyes, as an addition to alternative optics, raises the tuning of VAZ 2108, 2109, 21099 to the top of alternative transformation.
The rear sports lights impress with their design solutions. The names of alternative rear lights for VAZ 2108, 2109, 21099, 2113, 2114 speak for themselves - “Wave”, “Zigzag”, “Eyes”, “Rings”. Tinted, with a red stripe, red with a gray stripe, gray with a white stripe, black with a white stripe. According to the availability of light sources - mixed, LEDs plus incandescent lamps. LED lights.
The alternative optics “ProSport” stands out for its exquisite design. “ProSport” headlights for VAZ 2108, 09, 099 have similarities with respectable German cars:
Angel eyes in ProSport headlights for VAZ are installed by default. ProSport taillights are typically tinted and have a round reflective element. In general, a special feature of “ProSport” is round elements, chrome and LEDs. ProSport sports headlights are equipped with glass that is resistant to external factors. The combination of these features makes headlights for VAZ 2108, 09, 099, 2113, 2114 a highlight of external tuning.
Of course, alternative optics for VAZ 2108, 2109, 21099 and alternative rear lights will change the appearance of the Lada Samara car.
How to properly remove the rear window of a VAZ 2109
You will need to replace the rear window after an accident, tinting or unexpected damage to the installed element.
Installing the rear window of a VAZ 2109
Before installing new glass, you must remove the old one. For this:
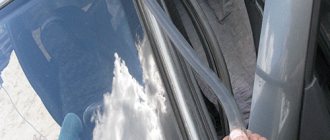
- The screwdriver is inserted into the seal that holds the glass. You need to deepen the tool by about five millimeters.
Tip: There is no need to insert the screwdriver deeper, otherwise the hole will be too deep.
- The seal is pushed out.
- First, a small piece is pulled out.
Tip: Do not pull on this piece and try to pull out the entire seal; due to the fragility of the product, it can be torn.
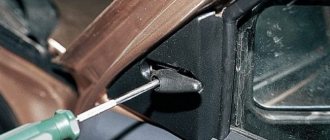
- The screwdriver is carefully moved a few centimeters, as shown in the photo.
The screwdriver is inserted into the seal
- Another small piece comes off from the seal.
- This continues until the seal is completely removed.
- Removing the rear window of a VAZ 2109.
Tip: It is often not possible to keep old glass intact, but this does not matter. The main thing is to keep the body intact, otherwise it will need to be repaired.
Preparing the rear window for installation
The instructions indicate that before installing a new rear window, you must first do the following:
- Wipe the edges thoroughly with degreaser to facilitate installation of the seal. The cleaner the glass, the better the seal will fit.
Tip: If the old seal can be removed carefully, it can be reused. But this is difficult to do. Therefore, it is advisable to use a new seal.
- Put on the seal. Spread it first in the corners and then press it onto the sides of the glass.
- Install the lock, which is a small wedge resembling the letter P. It is inserted so that the device is located in the center of the seal, but runs along the entire perimeter of the inserted element.
Before installation, the wedge must be stretched slightly. Otherwise, it may not be enough. Usually it stretches up to 20 cm. The wedge is mounted as follows:
- The long part is inserted first, then the short one. This needs to be done around the entire perimeter of the rear window. If part of the lock is left over, it needs to be cut off so that it does not interfere with subsequent actions.
How to install the rear window of a VAZ 2109 car
To successfully replace the rear window, you need to purchase a strong rope, the length of which is the same as the perimeter of the glass. The order of work is as follows:
- The middle of the rope is determined and this part is inserted from the upper side of the seal.
- There are two grooves on the seal. The groove is located closest to the top of the rear window.
- Using a screwdriver, insert the rope into the groove all the way to the middle of the glass area.
It turned out that one end of the rope hangs freely on one side, the other is stuck into the seal.
- The rope is inserted from the opposite side until it intersects with the end from the previous rope.
- After crossing, you need to place the end of one on the other, the ropes should overlap each other. The overlap should be from 5 to 10 centimeters.
- The loose ends extend into the interior.
- The glass is placed in the opening. The lower part of the opening fits into the outer groove.
- Lightly presses on the glass. It should press well into the seal and fit easily into place.
- The rope on both sides pulls towards itself.
- Half the rope is stretched to the bottom corners of the rear window.
- With a smooth movement, the glass slides into place.
- The rope is pulled out and the glass is carefully seated in the opening.
- The location of the seal is controlled so that it does not come out.
- The glass is seated in the opening all the way.
After four days of driving, the glass finally settles into place, which is facilitated by the vibrations of the car when moving. All work can be done at a car dealership, but then the price will be much higher. How to remove the rear window on a VAZ 2109 can be clearly seen in the video.
Replacement principle
When replacing the windshield on a VAZ 2109 car, it is necessary to take into account its dimensions. When purchasing, it is important to compare the auto glass article number with the data indicated on the factory element. The size of the frontal fragment is standard, as on all VAZ models. Rules and nuances of replacement:
- The rubber seal should fit tightly in all corners, and the structure itself should fit into the side, top and bottom sides of the frame.
- Installation of glass requires the installation of an internal lock. The locking mechanism is an important element during installation; it is shaped like a wedge. It needs to be installed in the center, but the wires should be routed around the entire perimeter.
- Careful removal of the structure is required first. It is important not to damage the frame.
- If the size is slightly off, it can be easily corrected with a rubber mallet.
- Anti-corrosion treatment of the element and frame is also necessary. It is recommended to use a rust modifier and primer. After drying, sealant is applied to the frame, then sealing material is installed. The external and internal grooves of the frame are lubricated.
The length of the nylon cord is equal to the size of the car glass. It is better to purchase this material with a diameter of at least 4 mm. The quality of the cord is checked by touch; it must have a slippery surface. The nylon fits into the grooves of the seal.
Removing the seal
Removal of the sealing element will be required when replacing the windshield frame or the most transparent part. Removal is carried out from the passenger compartment, strictly according to the instructions:
- The windshield wipers are removed.
- Use a slotted screwdriver with a width of 10–12 mm to pry off the seal. The tool should be used carefully so as not to damage the rubberized material if you plan to use it in the future. You should start from the middle of the top edge. By pressing the top part with a screwdriver, the glass can be easily removed.
- When part of the sealing fragment is removed, the auto glass will already be movable. It is necessary to expand the area between the metal and the seal.
When you manage to remove most of the rubber, it will be possible to pull out the glass structure.
Removing old glass
To understand how to remove a VAZ windshield, you should refer to such a device as glass holders. A device with vacuum suction cups will allow you to carry out the process in an accelerated mode. This tool is installed on the sides of the glass. After fixation, a jerk is made upward. You can't do this without an assistant. If the glass holder is not found, a screwdriver will help.
Using a slotted screwdriver, the remaining sealant is pushed out. An assistant must hold the glass to prevent it from falling out of the frame. If the work is carried out alone, then you can play it safe by laying soft material on the hood of the car. Then the glass is pushed out of the cabin.
Windshield installation
Installation of a windshield is required if the product has been used for a long time and there are cracks. The impact of aggressive detergents, temperature changes, ultraviolet radiation, precipitation, and high humidity affects. To find out how to install VAZ auto glass, you should read the instructions, also prepare an installation kit and invite an assistant. Installation starts from the middle of the bottom contour of the frame:
- The seal is applied to the frame.
- The cord is laid. The loose ends are sent inside the cabin. The lock and wires are laid.
- After laying the sealing tape, the glass is inserted and the cord is pulled out.
To ensure that the glass element is firmly in place, it should be tapped slightly with your palms. It is important that the rest of the cord fits into the niche and that the seal does not stick out anywhere.
After the first trip on transport, final shrinkage will occur. The last step is to return the windshield wipers to their place.
Search
rear window replacement
on VAZ-2109
Rear window The car is a real assistant for the driver. It is through him that we see what our client can do, what is happening behind us, and correctly assess the situation. However, glass is a very fragile material, and if a stone or other loose object gets caught in it, it can crack or shatter into a large number of small pieces. For a temporary solution, of course, cover the gap with a thick film. But this, of course, is not an option. In the future, the rear window will need to be replaced.
The car owner may have postponed this work until later, fearing serious expenses. In fact, our client is left to do everything possible to find the funds to purchase new glass and glue. The rest of the work is completed independently within 1-2 hours.
Replace the rear window on a VAZ-2109
Before you go to the store differently in the market and get a new rear window for your car. It is important that it fits your model correctly (pay special attention to heating and design features).
Then prepare the necessary tools. To do the job you need - new glass (this is reasonable), special glue (ideally a two-component composition), new sealing rubber (you will need to throw out the old one), a string for cutting glass, special suction cups (necessary for holding and lifting the glass). Additionally, tape, a knife, sandpaper and solvent are useful.
It is best to work in a well-lit area with sufficient maneuverability. If the weather outside is perfect, you can stay right next to the garage. Helping your partner replace the rear window is highly desirable. It is difficult to cope with such work without outside help.
What you need after the previous steps, start specifically. There are three steps here:
- Remove the old glass. This work is performed in the following order:
— Take a flathead screwdriver and press it against the rear window 4-5 mm in places. Proceed without fanaticism - you do not need to insert the screwdriver deeper (this will only complicate the task);
— Move the screwdriver evenly around the perimeter. Walk at a distance of 4-5 cm in some places and stop;
- tear off a piece of sealant;
You may also like
— Evenly, step by step, go over one hundred percent of the entire print area, pulling it out in small pieces;
- since you have completely “removed” the upper part of the side corner, you can pull the eraser intensively;
— After removing the seal, pierce the glue with a thread and pull it with an assistant around the perimeter;
Removing glass from the trunk lid 2109 2114
Conventional glass
even a schoolboy can control the trunk lid.
Removing the rear window on a VAZ 2109 from Seryoga)))
Is it correct to remove the rear window
with nine nine.
— If the glass is damaged, be very careful when removing it. With all this in mind, please be aware that reusing the product (for example if you remove it due to clouding or a small crack) will not be possible.
When doing the work, be very careful not to touch the surface. car body (otherwise you will have to restore it).
- Prepare a gap for installing new glass
When the old glass fails to take off , do not rush to “sculpt” a new one right away. It is better to perform some of the necessary manipulations:
- treat the edges with a degreaser. This will do a great job of cleaning the gap and preparing it for the new seal to be installed. Remember that the cleaner the installation site, the better;
- apply sealant. There is an aspect. If you managed to carefully remove the “elastic band” (which does not happen often), then you have the opportunity to quit. However, practice shows that it is better to apply a new sealant;
- laying the gums, starting with the development of the corners. Then, of course, press the seal evenly on all four sides;
- install a special lock (it looks like a small wedge) as a result of installation. If you look from the outside, it looks like the letter "P". Attach it so that it is centered and runs the entire length of the print.
Before installing the lock, it is better to pull it a little. Otherwise you won't like its length. The wedge installation is done like this. Install the long section first and the small section at the end. In this case, some part of the wedge remains unused; it is better to cut it. Otherwise it will interfere with future work.
When should new glass be installed? There are two options - the old glass is damaged or you decide to glue a shadow. At the beginning, our client remains clear - to do without a shift. In this case, we are talking about tinting; it is better to do this work without disassembling. Practice shows that it is almost impossible to remove the rear window without damage.