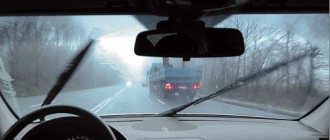
Modern cars have a heated rear window to maintain good visibility in damp and frosty weather. When it doesn't work well, it's extremely inconvenient to drive, and breakdowns, as a rule, happen completely inappropriately.
Fortunately, you can restore the heating yourself if you have some idea of how it works. Below you will find detailed instructions on how to do this.
Principle of operation
Electricity is used to heat the rear window: threads of thin metal with increased resistance are stretched across the canvas. Under the influence of current, they heat up and dry the water droplets.
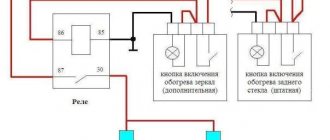
The principle of operation of this system is simple: the positive charge of the battery goes through the ignition switch to one of the switching devices, and the negative charge through the car body to the other. When the heating button is pressed, the devices close an electrical circuit, which includes the threads stretched onto the rear window.
Simple repair
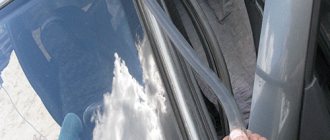
Let's imagine that your grate has several lines that don't get hot. You can find the break by simply inspecting the entire length of the grille's silkscreen. This is easier to do on hatchbacks, minivans and SUVs because you can lift the tailgate and inspect the lines against the sky. If you have a sedan, you will have to crawl back and poke your head into the space above the rear parcel shelf. Otherwise, you will have to take a reliable DC voltmeter and test it electrically.
Set your voltmeter to 20 volts and connect a couple of postage stamp-sized pieces of aluminum foil to the terminals. This will prevent the dipstick from scratching the grille.
Small aluminum foil flags on the contact tips will prevent further damage.
You can simply place pieces of aluminum foil on the glass and press them lightly with your finger to make a connection with the grill. If the window is large, an extra pair of hands may help.
Start by measuring the voltage along the entire length of the grid. With the ignition and rear window defroster turned on, you should see 12 volts on the voltmeter when a piece of foil is positioned at each end of the grille. Now move one piece to the center of the grid and measure again. The voltage should read 12 volts if the gap is between the foil, and less if the gap is outside the foil pieces. In the same way, measure the voltage on a grill strip that is working fine and you should see at least 6 volts in the center because you've just turned your defrost grill into a giant rheostat. By moving pieces of aluminum along the broken line, you will only see 12 volts on the voltmeter until you reach the break, where the voltage immediately drops dramatically. This will allow you to determine the location of the break.
Repairing the grill is easy. Many stores and many department stores in large department stores that sell auto parts will sell you a repair kit. Wipe the area with rubbing alcohol and then pat dry with a clean white paper towel. Do not use glass cleaner as it may leave traces of wax or silicone. The kit may include an adhesive template to apply around the tear, but you can use regular opaque tape. Opaque tape can be used to make a new line that exactly fits the width of the old grille if the tape in the kit is too thick or narrow. Paint a stripe of conductive paint across the gap. Let it dry for 10-15 minutes and remove the tape.
Fixing minor tears in the rear defroster grille lines is as simple as covering them with tape and applying special conductive paint.
If you have multiple damaged grill lines, simply repeat the process. If the lines are broken in more than one place along the length, you will have to go back to step number one and find the next break.
Source
Symptoms of a problem
Typically, motorists do not immediately notice that the rear window heating does not work (or does not work well). This is discovered just at the moment when a good view is needed, but for some reason the glass remains foggy. Based on how the problem manifests itself, you can determine its location and cause:
- The heater activation indicator does not light up. Check that the ignition key is turned to the on position and that the engine is running (in some cars, heating is only possible in this case). If you have taken these points into account, but the glass has not dried, it means that the switching device or the wiring connector may be faulty. You need to look in the machine manual to see where these items are located and replace them with new ones.
- Glass dries slowly. If you notice that in relatively warm weather the process of evaporation of droplets from the surface is delayed, then most likely the voltage in one of the electrical connectors has lost. You need to measure its level with a voltmeter at the input terminals. A difference of even one volt affects the quality of heating. In this case, you need a professional to fix the problem (unless you are one yourself).
- Glass dries unevenly. This happens most often: one of the threads on the rear window breaks, and moisture remains in this place. The fact is that thin metal elements can easily be damaged if, for example, you scratch the surface of the glass with a hard object, carelessly put things on the shelf behind the rear seat, etc.
In the latter case, it is quite possible to cope with the breakdown yourself.
Doesn't work, what's the reason?
Actually, there are only two main reasons, and both of them lie in the power system:
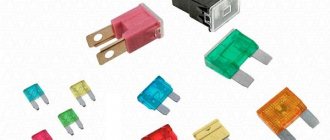
- Fuse. YES it can really burn out. This happens for various reasons, maybe it’s just a minor short circuit and that’s all. Thus, your heating will not work completely. You need to find the fuse and check it . This is the first and mandatory step.
- If it is intact, then we need to check the voltage on the wires that go to the main “buses” (wide side strips). As a rule, they have ordinary metal contacts. We just take a multimeter and measure it, if there is voltage and it’s about 12 Volts, that means the power is suitable here, everything is fine.
- The thin lines themselves. To be honest, they can’t all burn out at once. As a rule, from one to three, or at most four, “threads” burn out. Therefore, if part of your window comes off (from fogging or ice), but part does not. It is the non-working threads that need to be looked at.
- Examine this thin strip and you will see the break point. This will be the burnt part, there may be a little black around it (although the thread is originally brown). Also, the thread will seem to open, this place needs to be connected in order to restore functionality.
On my own behalf, I would like to add that the fuse rarely lights up, mostly it is a break in the “threads” of the glass; they need to be restored.
How to find the location of a broken glass heating filament
Now let's talk about how to check where the rear window heating thread has broken. To do this, you will need a voltmeter or ohmmeter of your choice. Do the following:
- Inspect the rear window - sometimes the break is visible to the naked eye: the thread is interrupted and resumes after a few millimeters.
- Turn on the heating and see where the water drops have not dried. Take a magnifying glass and look at this area more closely.
- Let the heating function remain active. One metal rod of the voltmeter needs to be connected to the positive heating terminal, and the second should be drawn along the thread from the side of the clamp with the “-” sign. Keep an eye on the indicators: the break will be where 0 volts is displayed.
- Take an ohmmeter and attach one probe to the common wire (the negative of the battery is connected to it), and carefully lean the other one against the center of each thread in turn. The break is where the resistance jumps to 4-6 ohms.
Diagram and marking of fuses and their replacement
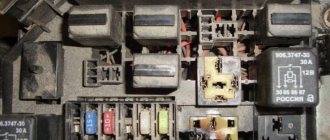
If you turn over the cover of the Lada Kalina fuse box, you can see the markings and which fuse and relay are responsible for what. Also, it can be seen in the vehicle’s service and technical book.
Fuse box diagram
Let us indicate and decipher the fuse number, amperage and what it is responsible for:
F1 - (10) - Instruments: immobilizer control unit, hazard warning switch, instrument cluster. If, when starting the engine, the starter does not turn and the immobilizer icon flashes, then you need to pay attention to this fuse. F2 — (30) — Electric windows. Read more about why window lifts may not work here. F3 - (10) - Hazard warning switch F4 - (20) - Windshield wiper F5 - (25) - Heater, electric power steering control unit F6 - (20) - Horn F7 - (10) - Instrument cluster, interior lighting F8 - (20 ) — Heated rear window F9 — (5) — Side light (right side) F10 — (5) — Side light (left side) F11 — (7.5) — Immobilizer control unit F12 — (7.5) — Low beam (starboard side) F13 — (7.5) — Low beam (left side) F14 — (10) — High beam (starboard side) F15 — (10) — High beam (left side) F16.17 — (10) — Fog lights F18 — (15) — Heated seats F19 — (10) — ABS F20 — (15) — Cigarette lighter F21 — (10) — Reverse lock F22 — (15) — Electrical package control unit F31 — (50) — Control unit electric booster
Repair materials
To fix problems with the rear window defroster, you will need:
- paste or glue capable of passing current (special ones, sold in automotive supply stores);
- or copper-brass powder and paint;
- or zinc chloride, material for joining workpieces POS-18, soldering iron;
- as well as a repair kit for heating filaments (if the gap is very large, several centimeters).
More serious problems
Is the fuse ok? The grille is intact and attached to the glass, but there is simply no defrosting effect? Look for a faulty switch, relay or breaker. To do this, you will need a schematic diagram or extensive experience in identifying wiring problems. Start at the fuse and follow the wire. If the switch is bad, you will be able to plug it in externally and get 12 volts from outside for diagnostic purposes. But you may have to replace the breaker - which may be built into a large electrical control box hidden under the dash. Check your vehicle's manufacturer's manual for more detailed steps. If you don't have one, you'll have to determine the problem the old way. Trace the path of current from the fuse to the switch, then to the breaker and back to the glass.
Remember, the breaker will turn off the current within 5-10 minutes, so you need to do your research within that time, or you will be looking for current when there shouldn't be any.
There will be a relay somewhere in the circuit to switch the high voltage current required for the grid to function. It may (or may not) be combined with a breaker. The procedure will be as follows: connect the relay outputs to an external source to check whether it is in working condition. You can either connect 12 volts to the relay coil to force it to retract, or bypass the relay with a heavy gauge wire to check if the grille wiring between the relay and the window is good. A separate relay won't cost much and can be purchased at many auto parts stores, but if it comes with a breaker you can pay up to RUB 4,000.
Don't try to circle the timer. Rear window defoggers consume a significant amount of electrical current - 10-20 amps, depending on consumption. Most modern cars have a breaker circuit to turn off the grille after enough time. There are two reasons for this. The first is to reduce the load on the generator, which (especially in winter) also supplies energy for the headlights, heater and windshield wipers. Add in the extra drain on the battery to start the car in cold weather, and the alternator may simply not have the power it needs to keep the battery charged.
The second reason is simpler - the grate can overheat if it heats up for too long. Imagine accidentally turning it on on a hot summer day during a long trip. The heat from the grill combined with the heat from the sun will cause the glass to crack or accelerate the wear of the window's rubber seals.
How to fix a heated rear window with your own hands
Now let’s figure out how to repair the heated rear window of a car with your own hands. There are several ways:
- Using paste (glue). Apply the paste to the break site, extending two centimeters beyond the intact thread. Dry with a special hairdryer (not for hair, but for various materials) or let it dry naturally for a day.
- Using a repair kit. If the break in the rear window heating threads is several centimeters, then this is the best method. Unpack the stencil and stick it on the desired area. Carefully place the new thread into the empty space. Apply a layer of the resin included in the kit on top. Once it dries, apply another coat. There should be 4-5 of them in total.
- Using paint and copper-brass powder. This can already be called restoration using improvised means. Take a copper-brass alloy ingot and file it. Mix the resulting fine powder with paint in a 1:1 ratio until it becomes pasty. Glue the electrical tape as a stencil and apply the resulting composition to the tear site.
- Using a soldering iron. Apply zinc chloride to the desired area, apply solder to the soldering area and touch the wire with a soldering iron. This way you can also repair a large tear.
There are other tips on how to restore heating, but to use them in practice you need unsafe reagents: sulfuric acid, copper sulfate, etc. It is best, especially for motorists without experience in self-repair, to use a paste or a special repair kit.
Danger!
Let's be clear: High resistance wire is applied primarily through paint onto glass. It is very easy to scratch or tear off, and will not work if the scratch breaks the integrity of the wire. This means that any heavy object (box, furniture) that someone placed in the car could scratch the wire. Even a credit card can rip it off. Don't pack the trunk with stuff or allow cargo to slide back in your minivan so that it touches the glass. If the glass has a defroster grill, the only thing that should touch the glass is a soft cloth dampened with glass cleaner. If you need to clean the rear window, rub gently and in the direction of the grille, not across it.
When is other heating system components needed to be repaired?
In 95% of cases, broken threads are to blame for rear window heating malfunctions. Therefore, we will dwell in detail on how to fix this particular problem. But other options for system malfunctions are also possible. You should know about them too.
When is it necessary to repair the heated rear window contacts?
If the heating system button turns on and lights up, but not a single thread heats, then most likely the problem is in the relay or in the heater contacts. You need to find the relay in the electrical circuit of your car and check its functionality with a multimeter. If faulty, replace it. If the relay is working, check the contacts.
Phased renovation
The first thing you need to do is diagnose it and purchase a repair kit. There may be several options for a repair kit, and the repair technology in each case is discussed below.
Finding a Cliff
In addition to visual diagnostics of the condition of the threads, there are several more methods that are more reliable and effective:
- Visual diagnostics require activating the heater when the rear window is foggy. Where the threads are broken, the surface will warm up almost instantly, while in other areas visibility will be problematic.
- Using a voltmeter requires activating the ignition and then turning on the heating system. One probe should lie on the vehicle ground, and the second near the center of the heating tape. First wrap the second probe with foil. The break will be localized in the area where the voltage rises to 12 V or drops to zero. Ideally, this parameter should not exceed 5 V.
- The second method of using a voltmeter involves fixing one probe to the positive terminal of the heater, and the second one must be moved along the negative terminal strip. The problem area will be where the voltage is zero.
- Using the ohmmeter requires activation of the kilo mode. The device must be analog, with an arrow. The probes should be located near the system terminals, which are located in opposite directions from each other. Use distilled water to wet the cotton wool, which must be smoothly passed over the tape. As soon as the needle of the device moves, you will be able to detect the cliff area.
Repair with conductive glue
Repair of the rear window heating threads can be carried out using conductive adhesive. It is designed for temperatures from -60 to +100 degrees. You should not choose kits with glue, which cost 150-200 rubles. Often they do not last long or may not be effective at all. A cost of 300-400 rubles would be optimal for such a set.
Work order:
- Please read the instructions included with the kit. You should have a clear understanding of the options for applying the composition and the speed of its complete drying.
- Prepare the problem surface. Soak a rag in the alcohol solution and wipe the area.
- Lightly sand the edges in the break area with grade-grade sandpaper. It is enough to simply remove plaque and carbon deposits in two movements.
- Use tape to cover the strips along the thickness of the sides. It should not overlap the thread, but also avoid going too far away from the tape. Focus specifically on the width of the thread.
- Proceed to apply conductive glue to the prepared area using a brush or syringe. The instructions will tell you how many layers to apply. The overlap on the working areas of the tape should be 1 cm to the left and right.
- Remove the tape and wait until the composition dries completely. This will not happen before 24 hours.
- Check the functionality of the system after drying.
Repair thread kit
Among the popular and reliable manufacturers of repair kits, which include threads, it is worth highlighting Quick and Permatex. Such options are suitable for repairing even large areas, even spruce we are talking about 10 cm. The equipment includes heating tapes, polymer resin in the form of a spray can and stencils.
Heater repair involves the following steps:
- determine the rupture zone and prepare a thread of the appropriate size;
- remove the protective film and use resin to fix the thread in the required area;
- After complete drying, repeat the manipulations and check the result after 2 days.
Alternative method
Traditional methods are also suitable for restoring threads. The only difference between them is the material used:
- Wood shavings combined with paint. The first material can be obtained from a bar of copper and brass, which must be processed with files. Choose a paint that matches the color of the heating tapes. Mix the ingredients in equal proportions until you reach the consistency of a soft dough. Use masking tape or tape to create a stencil. Paste the stencil and activate the heating. Contact can be determined by a characteristic hissing sound. Apply the mixture using a stencil. This method eliminates the need to wait a day. You can operate the car immediately after the manipulations.
- Soldering of the broken area is carried out using zinc chloride. Give preference to solder with a minimum tin content - POSS-4-6 or POS-18. A copper or silver core is suitable for repairing a large section of tape.
- The shavings can be used in combination with glue, which replaces the paint mentioned in the first method. A suitable option would be BF-2.
Source
Heated windshield wipers
There is a specialized option for heating the windshield, which is installed in the windshield wipers and is easy to install with your own hands.
In order for the wiper to easily and quickly clear the ice that freezes on the windshield, a special device was invented.
The windshield wiper contains a device that produces current that heats the blade tips. When cleaning glass with such wipers, the ice melts and is cleared off effortlessly in a few seconds.
The second option also works when connected to the cigarette lighter, but its plug does not need to be disconnected to turn it off. Turning off, as well as turning on, is carried out simply by the remote control.
Thus, you should choose only based on your preferences; they are the same in design. There are also glass heating filaments that are easy to make with your own hands, but they are installed inside the car.
Diagnostics and repair
Now let’s learn more about how to diagnose and restore the damaged area. Let's start with checking.
How to find a damaged thread?
To troubleshoot, you can use one of several methods:
- First you need to make a visual diagnosis. If the car glass is fogged up, then activate the CO. Fogging will remain on the damaged area of the surface after all the other threads have warmed up and the auto glass has fogged up. This self-check option is considered one of the simplest.
- Also, diagnostics of performance can be carried out using a tester - a voltmeter. To do this, you will first need to turn on the ignition and press the CO activation button. Then one probe of the tester will need to be grounded, that is, connected to the car body, and the other one will need to be wrapped in regular food foil, and then brought to the heating path. When carrying out diagnostics, a voltage value should appear on the voltmeter display, which will be no more than five volts (this is ideal). If the voltage value is near zero or increases to twelve volts, this will indicate that a break has occurred on this track. Thus, it will be necessary to diagnose all tracks.
- There is another way to check CO using the same voltmeter. In this case, you will need to connect one contact of the tester to the positive terminal of the CO, and the others will need to be moved along the track, only from the side of the negative terminal. In the place where the track is damaged, the voltage value will sharply drop to zero.
- If you do not have a voltmeter, but have an ohmmeter, then you can also check the system with such a device. In this case, the tester probes will need to be connected to the negative as well as the positive contact of the CO. Then you will need cotton wool - a small piece needs to be moistened in distillate, and then passed along the incandescent path. The moment the arrow on the tester starts moving, you will find a break (video author - Over 9000).
How to make repairs yourself?
If you are faced with a problem with the CO not working, then you don’t have to trust specialists to repair it - you can do everything yourself. There are several methods for restoring CO.
So, how to repair the system:
- For repairs, you can purchase a repair kit. As a rule, repair kits for performing this task have identical parameters and characteristics - with their help you can restore no more than 10 cm of the damaged section of the track. The repair kit includes the threads and a bottle of polymer resin. In this case, you will first need to accurately determine the damaged area; to do this, you can resort to one of the methods described above. When the repair location has been determined, you need to turn off the CO and remove the film from the car glass. Then the surface is carefully cleaned and degreased, after which a new track is applied to the damaged area. Using a special brush, which should also be included in the kit, you need to apply the polymer resin to the surface, and when it dries, repeat this step again. After completing these steps, you will need to wait at least 24 hours, only after that the CO can be turned on.
- As an option, to restore the CO’s functionality, you can purchase a special conductive paste. How to restore CO paste - one layer of it is applied to the damaged section of the track, but keep in mind that in this case you will need to grab the undamaged thread on both sides by about 2-3 cm. In this case, you will also need to wait at least 24 hours before further use CO. To dry the paste faster, you can blow the car glass with a hairdryer.