Domestic G8s are equipped with non-contact ignition systems. This means that the process of accumulating the energy necessary to ignite the combustible mixture is controlled using a distributor. In this article we will tell you where distributor 2108 is located on a VAZ car, what are the signs of its breakdown and what the car owner needs to know about replacing the unit.
Trambler VAZ 2109
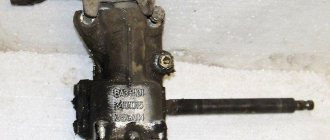
The VAZ 2109 distributor (also known as the ignition distributor) is an electromechanical device in the car’s ignition system, designed to supply a spark to the spark plug. The distributor is installed only on carburetor car models; it is not available on injection models. The principle of operation of the ignition distributor is to mechanically close the contact from the ignition coil to the high-voltage wire of the corresponding cylinder, depending on the position of the camshaft. The ignition distributor shaft is driven by the camshaft of the vehicle engine. A runner is installed on the shaft. This slider rotates and transmits a spark to the high-voltage wire of the corresponding engine cylinder.
Distributor
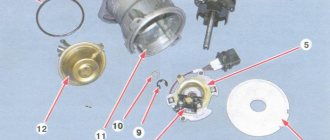
VAZ 2109 distributor device
Two important devices located inside it: 1) Hall sensor. 2) Vacuum corrector. The Hall sensor is the most important of all sensors in VAZ carburetor models. Let's take a look at his device. The Hall sensor is installed inside the body of this device and works on a special drum with slots. Signals from the sensor enter the switch and allow it to accurately determine the switching time of the ignition coil to form a spark. The vacuum corrector is connected by a tube to the engine intake manifold. Depending on the vacuum in the manifold, the corrector diaphragm adjusts the ignition timing through a special lever. If the engine is running at low speeds, the vacuum is weak and there is no need for adjustment. However, at high engine speeds, it becomes necessary to supply a spark a little earlier; it is for this function that the vacuum corrector is designed.
Distributor malfunctions
1) Burning of the distributor cover contacts; 2) Failure of the Hall sensor; 3) Burning and failure of the slider.
Distributor slider
4) Poor contact of the Hall sensor connector. If the distributor malfunctions, the car either does not start at all or starts with difficulty.
Checking the VAZ 2109 distributor
You can check the performance of the distributor as follows: a) Disconnect the central wire of the distributor, bring it to ground and crank the engine and see if there is a spark from the ignition coil. If there is no spark, then there may be many options, one of them is failure of the Hall sensor. b) If there is a spark, then it is necessary to check separately for the presence of a spark on all high-voltage wires to the spark plugs. c) If there is no spark at all from the distributor, the slider has most likely failed. It is also necessary to check the integrity of the resistor on the slider. Using a multimeter we measure its resistance, it should be equal to 1 kOhm. If the multimeter shows megaohms, or even an open circuit, then the resistor has burned out. d) If the spark is weak, or not on all cylinders, take fine sandpaper, remove the distributor cover, the slider and clean their contacts.
Price.
The price of a distributor for VAZ is about 20 dollars. Well, as always, it depends on the manufacturer and quality: some are a little cheaper - 17-18 dollars, others are more expensive - 22-25 dollars. But the average price on the market is $20.
Distributor cost
Removal and installation of VAZ 2109 distributor.
Dismantling and installing the distributor is not difficult; there is only one important point that should not be forgotten. Before removing the distributor, be sure to leave marks on the body indicating how the ignition is adjusted. Because if you loosen the nuts, and then come to your senses that you didn’t make the marks, then that’s it - the train has left, you’ll have to adjust the ignition again.
Making marks on the distributor
And of course, we remember or mark how the high-voltage wires were installed, so that later we can connect them in the correct sequence. And so, keeping this point in mind, there is nothing complicated: disconnect the high-voltage wires, remove the vacuum corrector hose, disconnect the Hall sensor connector, disconnect the throttle cable fasteners, loosen the nuts securing it to the engine and that’s it, the distributor is in your hands.
You should also keep in mind that the ignition system of the VAZ 2109 is non-contact, that is, the distributor from classic VAZ models with a contact ignition system is not suitable for installation. In classic distributors there is no Hall sensor; there is a capacitor tuned in resonance with the ignition coil.
How is the ignition adjusted?
There are several methods you can use:
- Aurally.
- Using a strobe light.
- Using a motor tester.
The latter, of course, will be the most preferable. But if suddenly there is a need to adjust the ignition of the VAZ 2109 in the field, then you can use the first method. If you have to frequently carry out adjustments, you can solder a small circuit on one thyristor with your own hands. In a matter of minutes, you can make a strobe light from a flashlight with your own hands.
Before starting work, make sure that the camshaft and crankshaft are installed strictly according to the marks. Open the inspection window in the clutch housing; through it you can see the flywheel and the marks on it. Remove the protective cover from the timing compartment, align the camshaft pulley to the mark. Check by looking through the inspection window to see if the mark on the flywheel aligns with the bar attached to the engine block.
Without this inspection, it is impossible to correctly adjust the ignition on a VAZ 2109 car. The operation of the valves will be disrupted and the engine will not function properly. Now, armed with a 10mm wrench, loosen the three bolts (but do not unscrew) that secure the distributor housing. Start the engine and warm it up.
Now turn the distributor body to the side (you will find two inscriptions “+”, “–” and dashes). Accordingly, “–” means early ignition, and “+” later
Change your position a little, listen to the engine, depress the gas pedal and notice how the speed increases
Your guideline should be this - the crankshaft speed at normal settings should be 700-900 per minute. But adjusting the ignition of the VAZ 2109 using a strobe light is much more accurate, it’s just a pity that not everyone has such a device.
A very interesting video about the ignition system of the VAZ 2109 and not only:
https://youtube.com/watch?v=Ud-nuLSxwvk
Operating principle of the distributor
In many ways, the operating principle of the distributor remained unchanged for many years. In VAZ cars, such as VAZ 2109, 2106, 2107, 2108, an ignition system of this type was used almost until the end of the last century.
The basis of the work is the connection of the distributor with the engine crankshaft. When the piston in the first cylinder takes the position corresponding to TDC, the breaker contacts open, a high voltage appears in the ignition coil, directed through a slider located in the distributor cover to the spark plug of the first cylinder.
There the combustion of the fuel assembly occurs, and the crankshaft continues to rotate. In addition to moving the pistons, it causes the breaker cam to rotate. When in another cylinder another piston occupies a position corresponding to TDC, at this moment the breaker contacts in the distributor open again, and a high-voltage voltage is generated in the ignition coil and supplied to the desired spark plug.
This joint rotation of the crankshaft, the breaker cam and the distributor slider ensures that a spark appears where and when needed. However, this does not cover all aspects of how the distributor works. To understand its operation, it is necessary to touch upon such concepts as the angle of the closed state of contacts (UZSK) and the ignition timing angle (IAF)
UZSK
A concept such as UZSK characterizes the time when the breaker contacts are closed. In essence, this is an indirect characteristic of the accumulation of energy in the coil after the completion of spark formation. UZSK directly affects the amount of energy spent on sparking and, accordingly, on engine operation.
Checking the cover
Checking the switch of VAZ 2108, 2109, 21099 cars
Before checking the cap, de-energize the electrical system of the machine by removing the battery terminals, then:
- Using a screwdriver, unscrew the screws securing the cover
- Now you can remove the cover from the ignition distributor
- You can disconnect the armor wires so as not to interfere
- Press the carbon electrode located in the cover with a screwdriver, check its mobility and visually assess its external condition
We check the mobility and external condition of the carbon electrode
- Excessive wear of this electrode or damage to it is not acceptable; if any, the cap must be replaced
- Wash the surfaces (external and internal) of the distributor cap with White Spirit
- We clean all contacts of the side electrodes from carbon deposits with a file; fine-grained sandpaper is also suitable, but not advisable, why - already described above
- The presence of cracks or burns in the lid body is not allowed, only replacement and no gluing
- If any irreparable defects are detected, disconnect the high-voltage armor wires and replace the old cap with a new one
- It is recommended not to save money by buying a new one; the price will be paid off by long-term operation
It seems like that’s it, we’ve sorted out all the points and examined the part from all angles, now you can remove and put on the cover even with your eyes closed. Our video will further clarify unclear points.
Malfunctions in the distributor
Since the 2109 distributor has a minimum of mechanical parts, it is not as susceptible to wear as a distributor with a contact group. However, they exist and you need to be prepared for them.
- The hole for ventilation and pressure compensation on the distributor shank often gets clogged. This leads to the fact that crater gases, having no other outlet, break through the distributor shaft seal and oil the slider.
- Breakdowns to ground occur in the distributor cap due to microcracks.
- Due to poor quality elements, the hall sensor fails;
- The distributor shaft bearing becomes loose.
All these troubles can be solved quite simply, if you don’t mind the time, everything can be eliminated with your own hands. The VAZ 2109 distributor, the price of which is not much more than 1000 rubles, is, in principle, a consumable unit, so making a decision to repair it may be unprofitable in terms of time spent. I wish you the right spark distribution, and good luck on the roads.
Causes of failure
There are several main reasons why a distributor may break and only need to be replaced:
- The appearance of cracks on the cover;
- Broken Hall sensor;
- Burnt out slider;
- Burnt contacts on the cover;
- Loose bearing holding the Hall sensor;
- Poor contact in the Hall sensor plug.
All these situations, in addition to poor sensor contact, are a signal to replace the distributor.
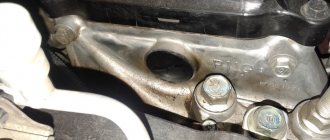
Unit location
Adjustment
In some cases, it is enough to adjust the ignition system to return the engine to its previous performance.
There are several symptoms that indicate this.
| Symptom | Causes |
| Excessive detonation of the piston system | A characteristic feature of this problem is a ringing sound when you press the gas pedal. The reason is early ignition, which can cause deformation of the piston rings. |
| Black smoke from the chimney when starting the engine | This indicates that the ignition is too early. |
| Engine power has decreased, fuel consumption is increasing | Here the ignition is already late, so the mixture cannot burn completely |
| The engine begins to idle unevenly | Caused by both early and late ignition. |
To adjust the distributor, you will need:
- Tachometer;
- Slotted screwdriver;
- Strobes;
- Wrench.
Let's get to work.
- Start the engine, increase idle speed to 800 units. Make sure that the engine temperature is at least 90 degrees.
- Align the crankshaft according to the marks on the cylinder block cover.
- Connect a 12 Volt light bulb to the output wire from the distributor. The second contact goes to ground.
- Turn on the ignition and watch the lamp. If it does not light up, loosen the nut that holds the distributor plate and begin to carefully, slowly turn the distributor body counterclockwise until the lamp lights up.
- Drive several kilometers at speeds up to 50 km/h. If the symptoms of the problem disappear, you have made the correct setting.
- If there are no consistent detonation sounds, you have set the ignition too late. Here the distributor needs to be turned clockwise.
- If there is no positive result, the distributor will have to be repaired or replaced.
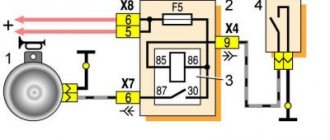
Low and high voltage wires:
High voltage wires:
1. High-voltage wires serve to transmit high-voltage current from the ignition coil itself and to each cylinder spark plug.
2. Cars of the Samara family are equipped with high-voltage wires with a distributed resistance of 2550±270 Ohm/m.
3. Under no circumstances try to start a car with a broken high-voltage voltage circuit, that is, to put it simply: The car’s engine does not need to be started with the high-voltage wires removed, as well as with the ignition distributor cap removed. Such actions can lead to failure of the ignition system elements, as well as breakdown of the insulation, so be careful.
4. It is also not recommended to handle or touch high voltage wires when the car engine is in working condition, because this can lead to electrical injury.
Note! When checking high-voltage wires for the presence of a spark, it is recommended to disconnect the wires with the engine turned off, and if the engine is started, the wires should be secured at a distance of 5-10 mm from the mass of the car, and these wires should not be in your hands, even in only if you hold them with a tool!
Low voltage wires:
1. Every person has encountered such wires in his life; they are most often of small thickness and have a very flexible shape, unlike high-voltage wires.
2. And most often, low-voltage wires have a combined color, that is, they come in both red and blue, and have many other colors.
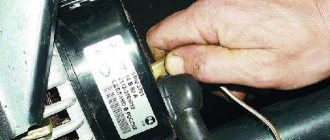
3. A striking example of where the low voltage wires are connected is the same ignition coil, because if you look at it carefully, then on its side you can see two wires, one of which is “red” and the other “blue”. (see photo above)
Adjusting the ignition yourself
To normalize engine operation and fix problems, you need to correctly set the ignition timing of your car. Only if these conditions are met can the engine operate correctly. To diagnose and correct errors in the ignition angle, you will need the following tools:
- strobe (desirable);
- tachometer. Most often, such a tool is built into the autotester, so there should be no problems with it;
- slotted screwdriver;
- wrench 10 (socket or open-end).
Having a strobe light will make all your work much easier, so it is better to purchase it for private use.
Before you start directly adjusting the ignition timing and angle, you need to do some preparatory work. First, place the key in the ignition and start the engine. Afterwards, you need to bring the system to a temperature of 90 degrees and increase the idle speed to 800 rpm (using a tachometer) using the fuel regulator knob on the carburetor body.
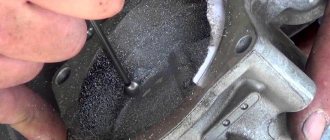
Hatch in the gearbox
After the engine has warmed up, remove the silicone tube that supplies vacuum from the fitting. You will find the adjusting lever on the panel of the ignition torque distributor, otherwise called the distributor. Its base is attached to the carburetor. Place the free edge of the silicone tube close to your finger to find out if there is a vacuum. If there is one, then the finger will stick to the tube. Reduce the number of revolutions until the vacuum disappears.
Next you need to turn off the engine. The tube should be bent until the lumen completely disappears. Use a wrench to loosen the nuts securing the distributor. The picture shows the flywheel and crankcase hatch. On the gearbox housing there is the same hatch with the flywheel scale. Remove the plug and clean the inspection hatch with the scale from dirt. You will see special strips to help you determine the correct ignition timing.
This is where we will focus our attention.
Take a slotted screwdriver and turn the flywheel until it reaches the long scale bar. Before installing the ignition, this long strip must be strictly opposite the triangular cutout on the scale. This position corresponds to the zero position of the ignition angle. With this arrangement, the first and fourth cylinders with pistons are at the extreme dead center.
If you have difficulty seeing the scale and you are not sure that this particular strip is the longest, check its location on the camshaft pulley. To do this, remove the timing belt cover. The desired mark will coincide with the mark on the back cover of his belt.
Now it's time to connect the strobe. To do this you need to follow a simple sequence of actions:
- connect the red wire to the positive on the coil;
- We throw a dark wire over an arbitrary system in the housing;
- We attach the mount to the wires on the fourth cylinder.
If you are not sure about this sequence of connecting the strobe, it is better to check the sequence of actions according to the instructions from the device.
Octane corrector
This is a very important element in the distributor design. Without it, the entire system could not function normally. The unit changes the SOP depending on the fuel that is currently being used.
By its design, this distributor element resembles two plates with an arrow. The same arrow is installed on the engine. There are special lines on it, through which the ignition angle is adjusted. It is almost impossible to do without this part when refueling different types of gasoline.
What can be put on the classics from the existing MPSZ
Coursework Vehicle Safety
Among the most well-known microprocessor systems, Maya, Secu 3 or Mikas MPSZ are most often used. Assembling any of them is not difficult, if you have the skills to correctly see and read the instructions with the diagram, and follow the sequence of installation actions.
When choosing a microprocessor system, you should not be intimidated by the fancy circuitry that product sellers like to show off, offering the services of a familiar electrician for “guaranteed high-quality installation for pennies.” All components can be installed on the classic with your own hands.
When choosing, pay attention to the quality of the block itself. It is considered good form if there is no warping of the plastic parts of the burrs or microcracks. The second indicator is the presence of a large scattering surface in the form of an aluminum base
The microprocessor remains the most capricious part and the choice of place under the hood or in the cabin must be taken very seriously
The second indicator is the presence of a large scattering surface in the form of an aluminum base. The microprocessor remains the most capricious part and the choice of place under the hood or in the cabin must be taken very seriously.
The ignition coils can be separated into a separate unit; alternatively, they can be mounted directly next to the spark plugs on the head cover.
Microprocessor ignition system VAZ 2108
The content of the article:
Computer Electronics MS 2713-02 in VAZ 2108
Winter is the time to collect various rarities and it begins to scare how much work will be waiting this summer. As I said earlier, I am assembling 21083 Sputnik in the maximum FACTORY configuration (Electronica). Some things did not go into mass production, but were released in a small batch, others were generally available mainly only to foreign consumers. It was planned to produce cars with an electronic panel, route computers, electrical packages, ABS systems and... little was realized at the output.
Causes of ignition problems
As mentioned earlier, in order to set the ignition in the electronic system you will have to go into the “brains”, there you can also check the functionality of the sensors, so they greatly influence the operation of the system, regardless of the type of ignition.
On the electronic type, the main causes of failures are:
- Incorrect information transmitted from sensors to the ECU. If the connection to the brain and diagnostics showed strange data coming from one or more control devices, it is necessary to use a “substitution”. The easiest way is to find a car with known good sensors, install them and double-check the results. Here you need to understand that you do not need a new one, but a working sensor, because factory defects are not excluded even on a new mechanism.
- The incoming voltage - correct from a technical point of view is 5V, but if due to a violation of the mechanical integrity of the wires or another problem with the car’s electronics, this voltage changes, the sensor readings will also change after it. If this happens, the ECU begins to adjust engine operation based on incorrect data, which leads to incorrect operation of the entire mechanism as a whole. To check this breakdown, you will need a known-good system of wires leading to the sensor or a donor car into which you can install your sensor and test the system for functionality.
- Broken ECU - if the previous two options did not give a visible result, and installing your sensor and wiring in a working machine does not change its performance, only this option remains. You can try to reflash the “brain” of the car, but due to its low cost, it is better to immediately buy a new ECU and install it on the car.
ECU diagnostics Before moving on to the radical measures proposed in the third option, it is worth additionally checking the correct location of the marks. In cars with contactless ignition, this is the ignition installation of the VAZ 2114, and for cars with an electronic system, debugging is important to check the synchronization of the injection system with the gas distribution mechanism.
Principle of operation
The hall sensor on the VAZ line is a kind of sensor that determines the moment of spark formation in a non-contact ignition. A screen is installed on the distributor shaft, which is equipped with 4 teeth. At the moment the screen rotates, the electromagnetic element of the sensor reads pulses from the teeth and sends a signal to the switch. From it, a pulsed current is supplied to the coil, and from the coil an amplified voltage of 22–25 kV (high voltage current) comes out to the spark plugs.
Reasons for their natural and premature wear
The spark plug operates under extremely extreme conditions:
- high temperature in the working cylinder;
- aggressive environment in the form of a mixture of fuel, air and oil;
- high pressure during ignition;
- high voltage and temperature of electric spark.
The simultaneous action of these factors leads to an intensification of the processes of their natural wear. This process can be significantly accelerated in the following cases:
- reduction of compression, wear of valve stem seals due to oil entering the working volume;
- incorrect setting of the ignition angle, leading to the formation of increased carbon deposits;
- choosing spark plugs that do not match the engine brand;
- misfire in cylinders;
- incorrect gasoline/air ratio due to malfunctions of the flow meter, air leaks;
- incorrect operation of injectors.