The procedure for installing the ISAI tensioner on Zhiguli cars.
- Rotate the crankshaft approximately 1 quarter turn.
- Remove the standard tensioner , remove the remaining gasket, and wipe the seating area.
- Try on the ISAI tensioner. And, making sure that he sits completely in his place. Secure it by previously applying sealant around the flange (installed without a gasket).
- Unscrew the cap nut and, having removed the retainer (a piece of duralumin wire) from it, screw it back into place by hand until it stops.
- Rotate the crankshaft approximately 1 revolution as the engine moves.
- Start the engine. Subsequent adjustments are no longer required.
ISAI Automatic Mechanical Chain Tensioner
poorly tensioned chain begins to vibrate, creates noise and shock loads on the gas distribution mechanism, reducing its service life. The ISAI tensioner always maintains the chain in proper condition and does not require any adjustments during vehicle operation.
All modifications of ISAI tensioners are mechanical, characterized by the highest reliability and long service life. Their operation is not dependent on oil pressure, temperature or cleanliness. The tensioner is “tenacious”. Even if the spring breaks (which is unlikely and has not been recorded over a long period of operation), the tensioner is able to perform its function. Just unscrew the cap nut, tighten the rod with a screwdriver and fix it by placing some kind of retainer (a piece of paper) in the nut. The ISAI tensioner rod comes out smoothly as the chain wears out, without steps. The slot for a screwdriver in the rod is designed for manipulating the tensioner during engine repair and allows you to screw the screw into the initial position with the following fixation without removing the tensioner from the head.
The ISAI tensioner is available in 3 modifications:
- Zhiguli 2101-07. It is installed instead of the standard one, has an increased stroke and does not require any adjustments or maintenance in the future.
- Niva 21214 . Installed in place of the standard hydraulic tensioner. Does not require oil supply or maintenance during use. The oil line pipe is dismantled as unnecessary.
- Gazelle, Volga, Barguzin, Sobol and other cars with engines of the 406 family. Installed instead of standard hydraulic ones. The absence of precision parts, check valves and retaining rings greatly increases the reliability and service life of tensioners.
The tensioner can be used more than once. Such an awkward operation as recharging the hydraulic tensioner is eliminated. They have an oil channel for additional lubrication of chains and their tensioning devices, which generally increases the service life of the motor. An additional supply of lubricant to the chains provides a real opportunity to use chains, which are more reliable and silent.
The slot for a screwdriver in the rod is designed for manipulating the tensioner during engine repair and allows you to tighten the screw to the initial position from the next fixation without removing the tensioner from the head.
Replacing the hydraulic chain tensioner on Niva and Chevrolet Niva
At a minimum, it is necessary to change the timing chain, which is clearly in critical condition, disposable rubber sealing gaskets in the form of rings and oil seals. And, if replacing such a simple device as a hydraulic tensioner does not present any special problems at VAZ, as for the timing chain, this is already a reason for a separate article.
If they coincide, then the work can be considered completed. It is important that the marks coincide as accurately as possible, since the correctness and stability of the engine will depend on this. Dampener Another important element in this system is the Niva Chevrolet chain damper, which prevents the resonance effect from occurring.
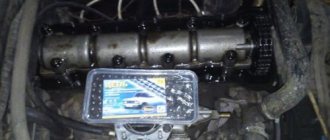
This system consists of the following elements: If it is damaged or worn out, vibrations appear, which can lead to the chain jumping and thereby damaging the motor. Replacement To replace, you will need a ten-size socket wrench and a screwdriver. When the tool is ready, we carry out the following steps: Having opened the hood, it is necessary to adjust the chain tensioner Niva Chevrolet. The cooling pipes are in the area of the front end of the cylinder head, and the hydraulic tensioner itself is located under them.
A photo of the device that is installed on the Chevrolet Niva is located below. How to replace it If a chain stretch is detected and the decision is made to replace only the hydraulic tensioner, then this is an incorrect assumption.
It is necessary to replace all parts: Replacement is done in the following sequence, using all the necessary tools: The tube is designed to supply oil to the hydraulic tensioner. Having loosened the fitting, the tube is removed and moved upward so that it does not interfere with further work. The device is ready to be removed from its mounting location.
The procedure for installing the ISAI tensioner on Gazelle, Volga and other cars with ZMZ engines.
- Remove the air filter and anything that interferes with access to the tensioners.
- Unscrew the aluminum cover of the lower tensioner, first placing a container under it to drain the oil. Remove the factory tensioner.
- Unscrew the aluminum cover of the upper tensioner and remove the standard tensioner. Wipe the planting area.
- Try on the ISAI upper tensioner. It should sit in place until the flange stops.
- If this does not happen and the tensioner does not reach the end, then turn the shaft a little until the chain sag on the tensioner side.
- Secure the upper tensioner.
- Following the same rules, install and secure the lower tensioner.
- Unscrew the cap nuts, remove the fasteners (pieces of duralumin wire) from them and screw them into place until they stop by hand.
- Turn the shaft approximately 1 revolution as the motor moves.
- Start the engine.
Tensioners on ZMZ engines can be installed either simply with a gasket or slightly lubricated with sealant, taking into account that excess sealant can clog the oil groove.
READ What is the fuel consumption of Chevrolet Niva
When reloading the ISAI tensioner, be sure to keep it clean, as Any dirt that gets on the propeller can damage it. If, nevertheless, dirt gets under the screw and the tensioner begins to jam, then this can be corrected using the following method: in the place where the screw is jammed, you need to fix it with a cap nut with a lock (if it is lost, you can replace it with an M4 nut) and then tap it with the nose screw against some powerful object (vise, hammer, sledgehammer, etc.), and then twist the screw in different directions. Any debris caught between the threads will be destroyed and the screw will become mobile. You can also wash the tensioner (kerosene, diesel fuel) under pressure from the cap nut side, immediately unscrewing the screw.
Hydraulic chain tensioner (GNC) 21214
Reg.: 12/06/2004 Threads / Messages: 4024 / 23192 From: Moscow Age: 67 Car: 21214M, 2013
This is a topic about the hydraulic chain tensioner (HNC).
Alexey aka ALER.
Reg.: 12/06/2004 Threads / Messages: 627 / 51712
A rattling noise from the chain appeared when starting a cool engine (it disappears after 2-3 seconds of operation), I bought a new hydraulic tensioner, and with it the rattling generally became virtually unchanged, only becoming quieter at high speeds. And now I’m also thinking about installing an ordinary mechanical one. Who can say anything about this: should I put it or not?
VAZ 21214 2003.
Denis866 In short, I don’t think it’s worth bothering with this. I twisted both of them in my hands, the hydrach is much longer. If only you roll a thread onto the peg that sticks out of the mechanical one, and then screw something in there later. Well, it's so damn unreliable.
In the FAQ, did you decide that it was a chain? Maybe hydraulic compensators? I had such a problem, so I just took them off, took them apart, washed them, assembled them and put them in their place. The noise is gone.
What if it's a chain? Then look at the sedative. Mine, for example, fell apart into 4 parts, one of which flew into the pan.
Reg.: 12.12.2004 Threads / Messages: 5 / 1412 From: Moscow Age: 55 Car: VAZ 21214. 2004.
Reg.: 03/10/2005 Threads / Messages: 5 / 549 From: Tambov (68rus) Age: 45 Car: Nissan Pathfinder 2.5D 2013
Reg.: 12/06/2004 Threads / Messages: 627 / 51712
Well, during the service, the hole from which the oil connects to the hydraulic tensioner was made much smaller, after which the noise became less.
Is it possible that the boot is simply worn out? The engine was opened about 4 thousand times back and everything was OK.
That is, for you, the tensioner was changed without removing the valve cover. If so, then remove it yourself (nothing complicated there) and visually check the boot and the pacifier. And in general, how long did your chain last? Maybe it's time to update it?
Wolf68 Thanks for the advice, I’ve already shelled out 700 rupees as this one flies, I’ll try to sharpen some mechanical parts
Now we have opened the lid, the boot and the damper are almost like new. The marks also match. Everything else looks great too. They just made the oil drain hole in the tensioner much smaller and everything was fine.
The car has driven 22 thousand. (Almost brand new)
Now we have opened the lid, the boot and the damper are almost like new. The marks also match. Everything else looks great too. They just made the oil drain hole in the tensioner much smaller and everything was fine.
The car has driven 22 thousand. (Almost brand new)
Looking for good advice! The chain rattled at idle . They opened it and took a look. The chain guide is broken and the hydraulic tensioner does not seem to work. Everything was changed and reassembled. Started it up and it started making noise again. You increase the speed and everything is OK. We searched for a long time and found it. It turned out that the ventilation ducts of the engine crankcase were clogged. When you take out the oil dipstick, the hair on your head moves. How many resinous deposits are there on it? With all this, there is oil in the engine itself and it’s not bad. I always used semi-synthetic. I bought it in Rus' and at METRO. The last time I changed the oil was 2 weeks ago with a full flush. At the moment it is semi-synthetic BP. In short, all the channels are clogged, oil does not flow into the hydraulic tensioner. With all this, the valve cover and camshaft are in completely clean condition. The mileage of the car is 61,000 km. They say you need to almost go through the engine, look at the rings, and everything else. This is 700-1000 USD.
Scheme of work
The figure below shows a diagram of the operation of the spring-hydraulic chain tensioner of a VAZ 21214 . 1 – camshaft star; 2 – timing chain ; 3 – chain damper; 4 – auxiliary device drive star; 5 – crankshaft star; 6 – tensioner “shoe”; 7 – hydraulic chain tensioner; 8 – line fitting; 9 – oil line; 10 – adapter fitting; 11 – oil pressure sensor (emergency).
Replacing the hydraulic chain tensioner on Niva
The new model Nivki, which is better known to us as the Chevrolet Niva, cutting through domestic roads, inherited the above-mentioned disease from its older brother, the VAZ 21214, which, in turn, is now proudly called Lada 4x4. But the problem is not as scary as its description. In order to keep the power unit in good condition, it is enough to always keep your finger on its pulse: listen to extraneous sounds, regularly carry out maintenance after 60-100 thousand kilometers and not let the problem take its course.
Thanks for subscribing!
If it was not possible to solve the problem of extraneous noise by replacing one hydraulic tensioner with a new one, you can decide to install a mechanical device. Going to car forums for the VAZ 21214, you might be surprised how people almost unanimously give their preference to mechanics. The mechanical tensioner of the “Pilot” series is very popular among the masses. But this does not mean that you should definitely take it; among the mechanics there are a lot of worthy offers, and they are not that expensive. To lengthen the product for the Chevrolet Niva, you just need to weld an additional bushing onto the plunger.
Hydraulic chain tensioner for VAZ 21214 device and principle of operation
Replacing the drive chain hydraulic tensioner
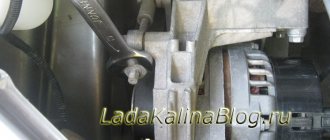
Detailed summary with photos on replacing the hydraulic chain tensioner: The hydraulic tensioner is located under the cooling pipes in the front part of the cylinder head. Using a 10-point wrench with 5 edges, unscrew the tube fitting that supplies oil to the hydraulic tensioner.
We take out the phone.
Using a 10mm socket, unscrew the two nuts that press the tensioner to the cylinder block.
After this, remove the hydraulic tensioner.
Immediately after replacing the tensioner, it is recommended to change the sealing gasket.
Assembly is done in reverse order. If after all the manipulations you start the engine and still do not hear the rattle of the chain, then everything was done correctly.
general information
It has long been clear that the quality of car parts produced at the AvtoVAZ plant is not of the highest level. And timing parts are no exception. The chain has to be tightened constantly, in fact every thousand kilometers. A hydraulic chain tensioner will help get rid of this task. We will talk specifically about this device in this article. Let's take a closer look at the operation scheme and replacement of the device.
How to replace the hydraulic chain tensioner on Niva 21214
With the onset of cold weather, when starting the car, a strange rumbling sound appeared, which disappeared after a few seconds. I’ve only been on the Niva for six months and I still can’t confidently identify all the sounds and knocks, so I blamed the rattling of the exhaust tract. It just so happened that I got to the Nivovod masters (I changed the clutch), and they immediately recognized this sound, which was fraught with major troubles. The technicians advised us to install an automatic chain tensioner (ANT) “Pilot” produced by NPP “Rhodes”. I must say that before the Niva I had a VAZ-21063 and on it I myself installed the above ANC, drove it for more than two years, the impressions were only positive.
After studying relevant topics on our forum, as well as the range of online stores for Niva, the necessary device was purchased for 305 rubles:
Pay attention to the elongated pusher - in one of the stores of the Za Rulem chain, the saleswoman tried to hand me an ANC with a short pusher, for the “classics”. In addition, a new valve cover gasket was purchased (recommended by the technician), which two days later was replaced with a cork gasket due to leaks.
So, having replenished the theoretical knowledge in the field of hydraulics and mechanics, we proceed to the practical consolidation of the acquired skills.
1. We provide unobstructed access to the valve cover:
To do this, unscrew and move aside the corrugation from the air filter and the hoses from the receiver. I didn’t remove the gas pedal drive, it doesn’t really interfere. An orange rubber glove is put on the mass air flow sensor (I always do this to avoid accidental damage to the element of this sensor). We carefully wipe the valve cover from dust and dirt - it is very painful to see sand and dust on the exposed body of the block head later.
2. Unscrew and carefully remove the valve cover, using a headlamp or other bright light source to visually examine the condition of the damper and tensioner shoe. Having made sure of their integrity, just in case, we tie the chain to the camshaft sprocket with a wire (so that it doesn’t accidentally jump off).
3. Here is our lifeless friend:
I didn’t remove the cooling system pipes to make it easier to access; the usual condition of the pipe is in the letter Z, especially when you’re too lazy to unscrew various additional mechanisms and parts :)))
4. We dismantle the old tensioner, clean the mating plane from dirt and oil, install the new ANC according to the manufacturer’s instructions (measure the distance from the flange to the thrust pad of the shoe, lubricate the gasket on the side of the ANC flange with sealant, put the ANC on the studs).
5. Tighten the ANC on stiletto heels, pull out the pin:
The tensioner will click (normally, the rod comes out and snaps into place), we tighten the adjusting bolt with a wrench at the set torque - the instructions say about a force of 26 Nm, this is just “all the way”. I always use a torque wrench, since by nature I don’t measure the force with the diameter of the bolts and nuts, broken threads are my constant headache :(((
6. We proceed to dismantling the tee on the left side of the cylinder block. I used a 21 spark plug wrench. First, unscrew the oil supply tube to the tensioner (it is no longer needed) and remove it from the engine compartment. We spray WD-40 on the tee and, after removing the terminal, unscrew the oil pressure sensor. We do not lose the copper sealing rings. Since I did not drain the engine oil, it flowed out in a thin stream. He quickly screwed the sensor back in, pushed the key further along the sensor, and unscrewed the tee assembly with the sensor. The oil flowed more cheerfully, so having assumed the Z position, I plugged the hole in the block with my finger, with my other hand I managed to unscrew the oil pressure sensor from the tee, put one copper washer on its thread and screwed the sensor into the block without the tee:
How to replace the chain tensioner on a VAZ 21213-VAZ 2131?
Note! The cars of the Niva family are very old models, in my opinion the very first cars went back to 1977 if memory serves, but these are new times and the car is still being produced and refined, so here are the chain tensioners that AvtoVAZ installed on its cars, depending on the year of production, can differ from each other, for example, somewhere up to 2000 or even higher, these cars of the Niva family came with the most ordinary spring chain tensioners, these tensioners are not at all difficult to remove, but they have one drawback (Or maybe an advantage) the fact is that they themselves do not tension; in other words, at times you have to tighten them yourself, which is very inconvenient, but it doesn’t matter to anyone, since it only takes 1-2 minutes to tighten the chain tensioner!
READ Niva 2121 How to Use Transfer Case
Now let’s look at a new type of tensioner that came on cars that were produced much later, so to speak, during the Russian Federation and not during the USSR, so in new times, the so-called hydraulic chain tensioner was installed on this family of cars, its whole advantage is that you won’t need to constantly tighten it, in other words, it was installed at the factory, but you, as they say, forgot about it, but it’s not so simple, if this tensioner suddenly jams or something else happens to it, then you will have to change it to a new one, and you will now learn how to change this type of chain tensioner in this article. (By the way, you can see what a hydraulic chain tensioner looks like in the photo below)
By the way, if you have an ordinary tensioner of an old standard, but it looks like it is shown in the photo, then read more carefully about how to change this unit in the article entitled: “Replacing the chain tensioner on a VAZ 2107”!
Removal: 1) At the very beginning of the operation, use a wrench to unscrew the tube that is connected to the hydraulic chain tensioner itself, and after this tube is unscrewed, disconnect it and move it aside.
Note! In this case, if oil leaks out of this pipe, then immediately, using a bolt of a suitable diameter or using something else, plug the holes in this very tube so that oil does not flow out from there!
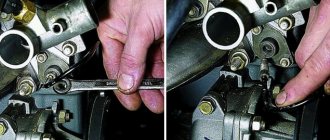
2) Then, using a wrench or a socket with a universal joint (If it is difficult to get to), unscrew the two nuts that secure the hydraulic tensioner to the car engine (One of the nuts is not visible in the photo, but when you look at this tensioner on the car, then you will immediately understand where the 2nd nut is, because it is nearby) and then carefully remove it from the hole in which it is located.
Note! When this tensioner is removed, immediately behind it (Most likely it remains on the engine itself) you will see a sealing gasket, so remove it and if it is torn in any places, or is deformed in any other way, then be sure to replace it with the newest one!
Installation: Installation of a new tensioner occurs in the reverse order of removal, and by the way, after installation, close the hood and sit behind the wheel of your own car, then try to start the car and if that chain rattle disappears, then it means you did everything right and the chain rattled specifically because this same tensioner.
Where is the chain tensioner located?
It is located on the side of the engine, you can easily find it by the way if you approach the car from the right side of the engine compartment (The countdown starts from the back of the car to the front), there is also a battery installed nearby and there is a standard injection receiver in the form of curved pipes ( It is white), so when you stand on this very right side, look for the place indicated in the photo, this is the same tensioner.
Replacing the chain tensioner on VAZ 21213, VAZ 21214, VAZ 2131
Welcome! Chain tensioner - as is already clear from its name, it is needed only to tension the chain so that it does not weaken while the engine is running, so over time this part breaks for various reasons, this happens from time to time simply due to very huge loads. having withstood this tensioner , it breaks, for example, if you keep the engine speed in the reddish zone for a long time, the tensioner cannot withstand and breaks, but it can also break because it is not very strong, for example, there are a lot of these tensioners on the market now with very disgusting properties that They really fail very quickly and after that they will need to be replaced with a new one, and you will learn how to do this from this article.
Note! In order to change the chain tensioner, you will need to stock up on: A main set of wrenches, which will contain the most important keys that you use almost everywhere in the car!
A short :
Where is the chain tensioner located? It is located on the side of the engine, it can be easily found by the way if you approach the car from the right side of the engine compartment (The countdown starts from the rear of the car to the front), there is also a battery installed nearby and there is a standard injection receiver in the form of curved pipes ( It is snow-white), so when you stand on this very right side, look for the place indicated in the photo, this is the tensioner.
Note! In the photo above there is one aspect, there is a completely different tensioner that was never installed on a Niva , so don’t pay special attention to the shape of this tensioner, but just find out approximately where it is and that’s all! (There will still be a tube coming from the original tensioner, you will immediately understand, just take a closer look and it is actually located in the middle part of the engine)
When is it necessary to change the chain tensioner? It changes only in this case, if it has become unusable, how can you realize this, you ask? In general, when the tensioner becomes unusable, the car’s engine begins to operate significantly noisily, since the chain is weakened and thus there is such a roar as if you started the car with a diesel injection system, and not with a gasoline one, because if you hear something rattling in the engine, vibration may also appear, and by the way, this knock should become less as the speed increases, in other words, if at idle the engine is noisy and the chain rattles, then just give a little gas and if this knock goes away (the higher the speed, the weaker the knock should be ) then it is most likely the tensioner, although many other parts may be to blame for this, but first you need to check it, because it is removed very quickly and is also checked accordingly.
Checking the hydraulic tensioner for wear:
1) If you have removed your own old tensioner and think that it is in working condition and there is no point in changing it, then first wash this tensioner in a container filled with gasoline (Rinse the tensioner at your discretion, just if all the dirt comes away from it, it may even work it will improve because small particles of dirt will not interfere with the movement of the plunger itself, but more on that a little later), and after washing, dry this tensioner well or simply blow it out with compressed air.
2) After washing and drying it, let’s look at what it consists of, specifically the plunger itself, which is also indicated under the number 1, and the tensioner housing, which is indicated under the number 2.
3) Now, after examining this material, let’s move on to checking, firstly, inspect the tensioner plunger itself; under no circumstances should there be various kinds of defects on its surface, such as nicks, deep scratches, etc.
4) Then inspect the body itself; there should also be no nicks, dents, etc. on its surface.
READ How much antifreeze in Niva 21213
Note! If you find all of the above listed shortcomings on your chain tensioner, then you will need to change it to a new one!
5) And finally, carry out one more rather ordinary check, namely, grab the tensioner plunger itself with your hand and then try to move it; if this plunger sticks in any place, then change the tensioner with a new one.
Additional video: If you want to find out a little additional information about this tensioner, specifically where it is located, how it is attached, etc. Then watch the video clips below, everything is carefully shown and explained there.
Location of TDC marks Niva Chevrolet
The TDC marks for the first and fourth cylinders of the Chevy Niva are located on the camshaft sprocket (hole a) and on the camshaft bearing housing (protrusion b)
In addition, the top dead centers of the Chevrolet Niva engine are marked in the casting on the camshaft drive chain cover (protrusion a) and on the ring gear of the crankshaft pulley (hole b on the edge of the rim).
Replacing the Chain Tensioner Shoe VAZ 21213
Replacing the chain tensioner on VAZ 21213, VAZ 21214, VAZ 2131
As the name suggests, a chain tensioner is only there to tighten the chain so it doesn't come loose while the engine is running, so over time this part breaks for various reasons, it happens from time to time, it just doesn't hold up very well. huge loads that this tensioner breaks, for example, you rotate the engine for a long time in the reddish zone, the tensioner cannot withstand and does not break, but it can also break because it is not very strong, for example, there are a lot of very disgusting properties about these tensioners, which are valid and they will soon fail and you will need to replace them with a new one and you will learn how to do that in this article.
To replace your chain tensioner, you will need to stock up on: A basic set of wrenches, which will be the most important wrenches that you actually use anywhere in the car!
Where is the chain tensioner located?
It is located on the side of the engine, it is easy to find, by the way, if you approach the car from the right side of the engine compartment (countdown starts from the back of the car forward), there is also a battery installed nearby and a standard receiver for the curved injectors (white) , so when you're standing in the far right corner, look for a spot in the photo that's stretching.
Picture above. this is one aspect, there is a completely different tensioner that Niva cars have never worn, so don't pay attention to the shape of this tensioner, just figure out where it is and that's it! (The tube will still come from the original tensioner. You will immediately understand, just look closer, and it's all in the middle of the motor)
When should I replace my chain tensioner?
You ask how it changes only if it becomes unusable. Typically, when the tensioner becomes unusable, the engine next to the car starts to make a significant sound because the chain is loose and therefore there is a humming noise as if you are driving a car with diesel fuel injection instead of gasoline, because if you hear something... then knocking. there may also be some vibration on the engine, and by the way, this knocking noise should be less as the rpm increases, in other words, if the engine is noisy and the chain is breaking, just give it a little gas, and if this knocking noise works (the higher the rpm, the better it needs knock), then it is most likely tension A-a, but there are many more parts that can be blamed, but you need to check this first because it was quickly removed and inspected accordingly.
READ Changing the Oil in the Lifan X60 Variator
Content
How to replace the chain tensioner on a VAZ 21213-VAZ 2131?
Cars of the Niva family. These are very old models, in my opinion, the very first cars were produced all the way back to 1977, if they remember correctly, and new times are coming around the yard, and the car is still being produced and improved. The chain tensioners that AvtoVAZ installed on its cars may differ from each other depending on the year of manufacture, for example, somewhere up to 2000 and even higher, these Niva family cars are supplied with the most common spring chain tensioners, such tensioners cannot be removed at all difficult, but one downside (and maybe a nose) is that they don't stretch, in other words, sometimes you have to pull them yourself, which is very inconvenient, but some people like it because tightening the chain tensioner only takes 1- 2 minutes!
Replacing chain tensioner pads on a VAZ 2101 VAZ 2107
Want to learn more about how to replace chain tensioner pads?
for
VAZ
2101-
VAZ
2107 And also interesting.
Replacement: Tensioner, shoes, camshaft and timing chain VAZ-2101
replacement
:
tensioning device
,
shoes
, calming and
chain
timing
VAZ
-2101.
We are now analyzing a new type of tensioner that was used in cars that were manufactured much later, so to speak, and not in Soviet times, so currently the so-called hydraulic tensioner has been installed on these families of cars. chain tensioner , its whole advantage is that you do not need to constantly tighten it, i.e. installed at the factory, but as you say, they forgot about it, but it is not easy, if this tensioner suddenly gets stuck or something happens to it, then you will have to replace it with a new one, and how you replace this type of chain tensioner today, you will learn from this article. (By the way, this is what the hydraulic chain tensioner looks like, by the way, you can see the photo below)
READ Replacing Side Dimensions on a Ford Transit
By the way, if you have a normal stretch of the old model, but it looks like it is shown in the photo, then in detail about how to replace this unit, read the article entitled “Replacing the chain tensioner on a VAZ 2107”!
1) At the very beginning, unscrew the pipe that connects to the hydraulic chain tensioner itself, and after unscrewing the pipe, disconnect it and set it aside.
If oil leaks out of this tube, immediately close the holes in the same tube with a bolt of the appropriate diameter or something else to prevent the oil from leaking!
2) Then remove the two nuts that secure the hydraulic tensioner to the car engine using a wrench or gimbal cover (if it's hard to crawl) (one of the nuts is not visible in the photo, but when you look at the tensioner on the machine, then you will immediately know where there is a second nut because it's nearby) and then carefully remove it from the hole it's in.
when that tensioner is removed, immediately after (it will most likely be left on the engine itself), you will see a gasket, so remove it, and if it is torn or warped anywhere, be sure to replace it with a new one!
Installing a new tensioner is done in the reverse order before removing it and, by the way, after installation, close the hood and sit behind the wheel of your car, then try to start the car, and if the chain roar disappears, then you did everything on the right, and the chain cracked due to the same tensioner
READ Replacing the Alternator Belt on a Grant with Air Conditioning
Check the hydraulic puller for wear:
1) If you take out your old tensioner and think that it is in working order and there is no point in changing it, first wash this tensioner in a container filled with gasoline (wash the tensioner at your discretion, only if all dirt has been removed. Based on this, even this may improve performance since fine dirt particles will not interfere with the piston itself, but later), and after washing, dry this tensioner thoroughly or simply blow it with compressed air.
2) After washing and drying, let's find out what it consists of, namely the plunger itself, it is also designated by the number 1, and the tensioner body is designated by the number 2.
3) Now, after studying this material, we will proceed to check, firstly, inspecting the plunger of the tensioner itself; in no case should there be any defects on its surface, such as, for example, clogging, deep scratches, etc.
4) Then inspect the case itself; there should be no damage, dents, etc. on its surface.
If all of the listed defects are found in the chain tensioners, then this is the case and you will need to change it to a new one!
5) Finally, do another fairly simple check, which is to take the plunger piston itself and then try to move it, if the data plunger sticks to any place, then replace the piston with a new one.
If you want to find out for yourself a little more information about this tensioner, namely where it is located, what it is attached to, etc. Then watch the video below, everything is shown and explained in detail.
Installing the piston of the 4th cylinder to the TDC position Niva Chevrolet
The piston of the 4th cylinder is set to the TDC position of the compression stroke so that when carrying out work related to removing the Niva Chevrolet camshaft drive chain, the valve timing is not disturbed. If the valve timing is incorrect, the engine will not operate normally. Set TDC according to the mark on the camshaft sprocket (when setting according to the marks on the crankshaft pulley and on the front cover of the camshaft drive chain, the piston of either the 1st or 4th cylinder may be in this position). Then make sure that the marks on the crankshaft pulley and the cover match. If, in all this, the shaft marks do not coincide, it means that the valve timing is incorrect (the piston of the 4th cylinder is not installed at TDC). In this case, you need to remove the camshaft drive chain from the camshaft sprocket and rotate the crankshaft until the marks align.
To install the piston of the 4th cylinder Niva to the top dead center position, turn the crankshaft. You can rotate the crankshaft using the following methods. Purchase a special wrench to turn the crankshaft by the pulley nut. With this key you can turn the crankshaft from above the engine compartment (in the photo the radiator is removed for clarity). Engage 4th gear and slowly roll the car in a suitable direction until the mark on the camshaft sprocket matches the mark on the camshaft bearing housing. Engage 4th gear and lift one of the rear wheels. Then turn the hanging wheel in the appropriate direction until the mark on the camshaft sprocket matches the mark on the camshaft bearing housing.
Procedure for replacing the timing chain Niva 21214 injector
It makes sense that you will need a brand new spare part. The secret to choosing is to check the property. You need to place it flat on your palm and look at the sagging. If it is more than 1 cm, then you need to find another part. Additionally, a tensioner , a set of gaskets and seals, and dampers are purchased. Then the hood is opened, the battery is disconnected and the part is changed in the following order:
- Remove the air filter, disconnect the electronic drives, the pipe and the choke cable (and move it aside). Remove the pallet protection.
- Remove the fan, pump shaft and alternator belt.
- Remove the valve plug and unscrew the camshaft sprocket screw.
- Unscrew the ratchet nut.
- Rotate the crankshaft until the mark coincides with the marker on the engine casing (the marks on the camshaft sprockets and bearings must certainly coincide).
- Remove the engine cover and damper.
- Loosen the screw securing the pump.
- Remove the MM line, pressure sensor and tensioner.
- Remove the camshaft gear and then the timing chain.
- Replace the seals with new ones.
- Lubricate the timing chain.
- Put on in the indicated order: crankshaft gear, oil pump, camshaft (be sure to check that the marks match).
- Secure the tensioner by carefully tightening the nuts.
- Fix the stars.
- Check that the marks match by turning the shaft to the right.
- Put on the alternator belt and then assemble all the elements in the reverse order.
It remains to check the correctness of the assembly. You need to start the engine and listen. If there is a grinding noise, the function will have to be repeated. The sound itself should be standard (rustling).
Timing marks VAZ(LADA) 21214 NIVA
Installation of timing marks on VAZ (LADA) 21214 NIVA. Sorry about the quality. The camera died.
Timing marks on a Niva Chevrolet, including the injector, how to set the photo correctly
Why are timing chain marks set?
Every passenger car engine has two shafts: a camshaft and a crankshaft. In most cars they are connected by a belt drive. On a Chevrolet Niva , this is a chain transmission, and chain is used there. The advantages of such a system are obvious: the chain, unlike a belt, never slips on the pulleys and lasts even longer. At the same the chain can stretch over time, and the teeth on the shaft sprockets can wear out or even break. This will lead to desynchronization of the camshaft and crankshaft. Their work will not be coordinated, so the engine may fail. Therefore, when adjusting or replacing the timing chain, it is very important to align the motor shafts in accordance with the marks on the pulleys and timing case. This is difficult to do, because, firstly, the marks are placed in inaccessible places, and secondly, they must be set with pinpoint precision, because the chain, unlike a regular belt, will be impossible to tighten a little if necessary .
Timing chain - why is it important and what problems does its wear cause?
A timing belt or chain connects the camshafts and crankshaft. A belt drive has a specific number of teeth to synchronize the operation of the shafts. A chain is a more reliable option because the length can be adjusted in an emergency. In addition, it wears out even more slowly.
This element affects all components of the car and its overall performance. Incorrect operation of the gas distribution mechanism can lead to malfunctions of the engine and even final destruction of the power plant. Typically, the initial replacement of a part is caused by its stretching. Because of this deformation, it begins to make a lot of noise when the engine is running (very audible at medium speeds and variable loads)
How to install an injector on a Chevrolet Niva (with photo). Timing chain replacement time for Niva 21214 injector
There is no specific advice from VAZ on replacing the chain. Experts advise doing this after approximately 100,000 km. But it is necessary to inspect the condition frequently. It is entirely possible that difficulties may appear even earlier. The most common reasons for replacing the timing chain:
- Sagging that cannot be resolved by lifting;
- Mismatch between the camshaft gear mark and the mark on the bearing housing;
- Chips or cracks along the length of the chain.
These tasks are the main reason to change a part. A part that scatters while driving will not only send the car to the parking lot until it can be replaced. It is entirely possible that other elements of the power plant will be damaged while driving. And this will reasonably increase the price and time of repair.
Sources:
https://www.Niva4x4.ru/t/CuLGJh3kRlCihmITsEb2cQ/1 https://vaz-21214.ru/tyuning/gidronatyazhitel-cepi-dlya-vaz-21214-ustrojstvo-i-princip-raboty.html https:// vaz-russia.com/remont-vaz-21213-niva-trehdvernaya/zamena-natyazhitelya-tsepi-na-vaz-21213-vaz-21214-vaz-2131.html https://tuning-vaz2106.ru/raznoe/metki -grm-na-nive-shevrole-inzhektor-fotografii-metki-grm-niva-shevrole-2123.html
When to change the chain tensioner
It changes only if it has become unusable, but how can you understand this, you ask? In general, when the tensioner becomes unusable, the car’s engine begins to run significantly louder, because the chain is weakened and thus there is such a roar as if you started the car with a diesel injection system, and not with a gasoline one, so if you hear something rattling in the engine, vibration may also appear, and by the way, this knocking should become less as the speed increases, that is, if the engine is noisy at idle and the chain rattles, then just give a little gas and if this knock goes away (the higher the speed, the weaker it should be knocking) then it is most likely really the tensioner, although many other parts could be to blame for this, but first you need to check it, since it is removed very quickly and is also checked accordingly.
An interesting article about biofuel produced from ordinary sawdust, read more here.