During engine repair of any of the classic VAZ models, the car owner, who is accustomed to doing everything with his own hands, has a question about how to grind the valves to the cylinder head seats. This problem is known to owners of other cars developed by the Soviet automobile industry. New domestic and foreign machines do not allow one to master this process, since the valve seats are either ideally ground in at the factory or are ground in automatically during operation.
Why is valve lapping necessary?
Grinding valves in a simple way
One of the key indicators of stable engine operation is the presence of a sufficient level of compression in the combustion chambers during the compression stroke. This indicator is influenced by the following factors:
- condition of the piston, piston rings and cylinder liner;
- quality of gasket seal between the block and the BC head;
- degree of tightness of the inlet and outlet valves closing the gaps.
In addition to the fact that compression must correspond to certain parameters, its indicator for all cylinders must be the same. The elements of the piston group wear out approximately equally, and the valves can affect the compression difference in the cylinders.
In order for each valve to close the channel as reliably as possible when closed, the working surface on its plate is ground in to the seat. This procedure should be carried out every time the cylinder head or valves are replaced.
How to properly grind valves - manual grinding
Various valve grinding methods
There are several methods that can be used to grind valve plates. The simplest, most accessible, but very labor-intensive is manual grinding. To work, you need to acquire a special device in the form of a tube, at one end of which there is a T-shaped handle; the valve rod must fit into the hole on the opposite side.
To hold the valve, a hole is made in the side wall of the tube, a thread is cut and a bolt is screwed in to clamp the rod. Another important component of the process is the lapping paste. This is a mixture of lubricants with fine abrasive, which is applied periodically to the surfaces to be ground.
The procedure for grinding valves manually:
- the disassembled cylinder head is placed on a workbench and secured;
- the valve is inserted into its regular place and a device is secured to its end;
- a small amount of paste is applied to the valve at the point of contact with the seat along the entire circumference;
- holding the device by the handle, pull the valve towards you until the lumen closes and perform circular movements to the right and left, as far as the capabilities of the wrist joint allow;
- after several movements, the valve rotates 180 degrees, opens, the paste is renewed and grinding is repeated;
- It should be rubbed in until a uniform matte strip with a width of at least 1.5 mm appears on the valve plate and seat.
Thus, knowing how to grind the valves yourself, you can save a significant amount on paying for the services of a mechanic. The manual method, although it leads to fatigue, is considered the most correct, since the quality of the grinding is constantly monitored, and a person, through tactile sensations, controls the correctness of the pressure, avoiding jumps and impacts.
How to properly grind valves using mechanical means
For those who want to speed up the valve grinding process, there is a method that allows, with a significant reduction in physical labor, to reduce the work time. To do this, you need to acquire a mechanical or electric drill, which must meet certain criteria: the ability to reverse rotation; regulation of the number of revolutions of the cartridge. Using drills, grinding is possible in two ways: from the side of the combustion chamber or from above.
Let's look at how to properly grind the valves using the first method:
- to work, it is necessary to make metal coins smaller in size than the diameter of the valve plate, in the center of which a slot is made, like on the heads of screws for a screwdriver;
- Having melted a little bitumen, the nickels are glued to the valve plate;
- after this, the cylinder head is placed with the combustion chambers facing up, the valve is inserted and the grinding area is lubricated with paste;
- a metal rod is inserted into the drill chuck, which is flattened at the end, like the end of a screwdriver;
- By inserting the end of the rod into the cut of the nickel, we begin to grind the valve, rotating it with a drill. The revolutions should be low;
- after turning about 10 times in one direction, it is necessary to refresh the paste and grind in the opposite direction;
- before installing the valve, a spring is put on its rod, which will lift it, but at the same time its resistance should be insignificant;
- You can remove the penny if you heat the valve;
- bitumen residues are washed off with gasoline or solvent.
The second method is no different in technology from manual grinding, with the only difference being that rotation is also performed with a drill. To do this, you need to insert a rod into the drill chuck, which is similar in diameter to the diameter of the valve stem, and also select a piece of rubber tube about 10 cm long, which can be put on the valve and the rod on the chuck. For reliability, the ends of the tube are crimped with clamps.
A few secrets of proper valve lapping
Mastering the valve grinding process is not at all difficult. Once the coveted stripe appears on the first valve plate, no more questions will arise. Modern means of communication allow you to turn to specialists for help, because there are thousands of video clips posted on the Internet on how to grind valves.
When starting to repair the cylinder head, in particular the grinding of valves, you must strictly follow certain rules:
- Each valve has its own place; after grinding in, the valves cannot be swapped;
- in your work you should use pastes of different abrasiveness: from the largest to the smallest;
- After grinding in, it is imperative to thoroughly rinse the head and valves to remove abrasive particles.
We recommend: How to make the exhaust quieter with your own hands
Before installing the cylinder head, the assembled valves are checked for leaks, for which a small amount of kerosene is poured into the channels, which should not leak into the combustion chamber.
Why is valve lapping necessary? As you know, a certain working pressure is generated in the engine cylinders, which pushes the piston in the downward direction. When this pressure is not very strong, engine power is reduced. A similar phenomenon is quite often observed on machines that have recently undergone major overhauls. This is explained by poor valve lapping. Because of this, a loss of pressure occurs. Therefore, in some cases, we advise you to carry out the grinding yourself in order to achieve the maximum positive effect and avoid secondary disassembly of the power unit.
What do you need to prepare for lapping valves?
When you decide to do the valve grinding yourself, then you should prepare certain tools and materials. Firstly, to work you will need:
- a special paste used for grinding valves. It is sold under index 1 and index 2 (which indicates the granularity of the granules present). Both options will be required;
- valve processing tool. With the help of it the whole procedure is carried out.
In addition, you need to check the condition of the valve itself. When a valve is deformed, there is no need to try to repair it, because without high-precision tools you will not be able to achieve a very accurate geometry. It will be easier to purchase a new valve.
Features of manual valve grinding
Technologically, this procedure does not contain anything difficult, so every car enthusiast can perform valve grinding. First, the first version of the paste should be applied to the surface of the valve, which is called the plate. Then the valve is placed in a lapping device and installed in its usual place (pressed against the cylinder head). This is followed by turning left and right. In this case, it is necessary to periodically open the valve.
After the initial grinding is completed, you need to pull the valve out of the device, evaluate the result of the work performed and repeat all the steps, but with paste No. 2. You need to be patient, because this procedure is quite long and tedious, and considering that the engine may have 16 or more valves, grinding in can take a very long time. But since you are doing this for yourself, you should try hard so that you don’t need to do this again later.
Grinding in valves using a drill
To make the grinding procedure go much faster, you can use an electric drill. The sequence of actions is similar, but everything will be completed much faster. In this case, the drill must contain a rotation speed setting and a reverse mode.
When grinding begins to be done with a drill, then you should also buy an adapter for the valves. As in the first option, rotation is performed in both directions, and paste No. 1 and No. 2 are used. Make sure that the paste does not end up on the valve stems. You can remove it with kerosene. Regarding the sockets for the valve plates, they must be absolutely the same size, so control measurements should be carried out periodically.
As you can see, the valve grinding procedure is quite lengthy, but not difficult. Any car owner can do it without any problems. At the same time, car mechanics strive to do everything very quickly when performing major repairs, and often the quality of their work is far from ideal. Therefore, we recommend that you undertake this procedure yourself, since the best results are obtained when you do all the work yourself.
What lapping paste should I use?
At the dawn of the automotive industry, dust from diamond wheels mixed with engine oil was used to grind valves. Today, these mixtures are replaced by a variety of grinding pastes. They differ in the content of abrasive elements, fraction sizes and, accordingly, price.
The paste is selected depending on the degree of contamination, quality and grade of valve metal, year of manufacture and engine model. The grinding method – manual or mechanical – also matters.
An important factor in choosing a paste is the experience of the master . For example, a beginner using coarse paste can easily damage a valve or seat. Therefore, for novice craftsmen, it is recommended to use a fine-grained paste, while grinding in with this product will take more time.
Automotive stores sell coarse-grained paste called “Classic” or “Diamond” for initial lapping. For final grinding, FABO paste is used - a finishing anti-friction, non-abrasive treatment. This paste is sold in a set of two tubes, with large fractions and a grinding one.
There are also multifunctional pastes such as ABRO Grinding Paste GP-201. It can not only grind valves, but also clean rust from metal parts and even be used to sharpen cutting tools, such as planes. Its price is much lower than the special “FABO”, so, as they say, it will come in handy on the farm.
“PERMATEX” or “Done Deal” pastes are also used for polishing chrome parts, since they do not contain technical diamond, but silicon carbide.
Important! Before buying a paste, you need to carefully read its composition and range of applications.
If the repair finds the driver without paste, and it is impossible to postpone the grinding - the engine has already been disassembled, you can mix abrasive removed from ordinary, fine sandpaper with oil, and for final polishing use the paste of the State Optical Institute or better known as GOI paste.
Nuances worth knowing about
To an experienced repairman, the tips below may seem unnecessary, but a novice repairman should definitely remember the following:
- It is better not to remove all rockers (cams on the valves) right away. It is necessary that each valve gets its own rocker back. While the engine is running, the camshaft cam and the corresponding rocker grind in and if they are “separated”, unpleasant clicks may appear when the valves operate, despite the fact that they have been properly adjusted before.
- And you also need to understand that each valve must return to its place. Changing them even after grinding in would not be the best idea.
- You can use various abrasive pastes in your work. You can start with the largest and end with the smallest. This will improve the results obtained.
- For a better fit, it is sometimes suggested to use machine oil at the finishing stage.
Valve grinding is carried out using various abrasive pastes
- Do-it-yourself replacement of valves on a VAZ 2112 16-valve: video instructions
How to do it yourself correctly
There are several ways to grind valves. The best option is to use machines and cutters, but they are not always nearby. In this case, it is better to resort to the manual option.
Lapping Tools
Lapping devices are divided into 2 groups.
- Clamping the valve from above, fixed on the rod. There is a handle on one side. To achieve the result, you need to pull and rotate it.
- "Suckers." They are fixed on the valve plate and are also equipped with a handle. To use, you need to press the valve against the plate and rotate the device in different directions.
Valve lapping tool: top clamping model
If you don't have a tool, a screwdriver or drill will do.
Regardless of the tool you choose, you will need the following equipment:
- abrasive or diamond paste;
- spring - such that you can easily squeeze it with your hands and put it on the valve;
- kerosene.
Can't get hold of abrasive paste? Prepare it! To do this, you will need fine-grain sandpaper or sandstone shavings. Remove the stones from it and mix them with grease or a similar substance in a ratio of 2 to 1. The consistency of the mixture should resemble shampoo. In extreme cases, standard motor oil will work as a base.
An important step in valve grinding: applying abrasive paste
We recommend: Vehicle intake system
Do-it-yourself lapping on a VAZ 2109 using paste
- Take the valve in your hands and put the spring on it. Return the valve to its place, back to the car.
- Press it with your fingers and place the pre-prepared tool on the leg.
- Use a screw to secure the tool to the valve.
- Apply abrasive paste to the grinding surface of the plate.
- Rotate the valve in both directions while lapping. You need to perform about 5 movements, after which you should lift the product, turn it 90 degrees and repeat the steps.
- Perform the procedure until a matte gray ring appears on the plate and head seat.
- Upon completion of work on all valves, wipe them with kerosene and dry them thoroughly with a rag.
This is what the valve should look like after lapping.
How to lap on a machine
If you have access to a machine, it is better to use it.
- Clamp the valve in a special clamp, turn on the machine. The grinding wheel rotates quickly in one direction, the valve rotates in the other, more slowly. Carefully bring the product to the circle and rub it in.
- Do not sand the product too hard. Stop processing as soon as the sanding process becomes continuous.
- Stop the unit, remove the valve and wipe it with kerosene.
- After this, you need to inspect the cylinder head. Examine the seats pressed into the head. They can be ground in only if there is no damage. If there is a burn on the saddles, work it with a rolling cutter until a gray ring appears all over the circle.
To process the saddles, you need this kind of cutter
We take a screwdriver in our hands
Since not everyone has the required amount of free time, patience and perseverance, folk craftsmen introduced another method using a screwdriver.
A drill is also often recommended, but its chuck has a significantly higher rotation speed, which may not have the best effect on the final result. So if you still decide on a drill, then you need to take a tool with the ability to adjust the speed and the reverse function. In this case, the valves can be ground in either through the combustion chambers or simply from above.
Grinding in valves from the combustion chamber side
The work is performed in the following sequence:
- The first step is to make small solid washers from metal with a diameter slightly smaller than that of the valve discs. Holes are cut in the center of these washers, as for a flat screwdriver.
- Using molten bitumen (or equivalents), slotted washers are attached to the valve discs.
- The cylinder head is turned over with the combustion chambers facing up, the required valve is put in place and a layer of paste is applied to the area to be ground.
- A rod with an end like a flat-head screwdriver is attached to the drill chuck.
- The flat end of the rod is inserted into the cut of the washer and at low speeds of the drill, grinding of the valve begins.
- The valve is turned in each direction about ten times. It must also be remembered that when changing the direction of rotation, the abrasive paste must be reapplied.
- After the procedure, its spring is attached to the valve.
- You can remove the washer from the valve by heating it.
- The remaining bitumen is removed with solvent, gasoline or similar means.
How to lap valves from above
The entire process is almost identical to the manual method. The main difference here is that the valve is rotated using a tool. Some people directly attach the valve stem to the drill chuck, but for greater efficiency and safety, it is better to insert a stem with a diameter close to that of the valve stem into the chuck. Then an approximately 10-centimeter piece of rubber tube is taken and the mentioned rods are connected with its help. For greater reliability, the rubber tube should be clamped at the ends with clamps.
Minimum required tool for grinding valves with a drill
Video: how to grind valves with a drill
How to properly grind valves: basic methods
There are four main processing methods.
Method 1. Grinding in valves with a drill
To carry out the work you will need a piece of hose. One of its “tails” is attached to the valve stem, and the second to the drill. A small amount of lapping compound should be applied to the valve itself and the seat, after which the part is installed in its workplace in the cylinder head.
The process has several features:
- Grinding is carried out at low speeds - it is recommended to use drills capable of operating at such speeds, or screwdrivers.
- At the moment of contact between the plate and the seat, it is necessary to reset - release the trigger of the electric drill.
- Do not apply force during the grinding process - this may cause damage to the elements of the valve system.
- It is recommended to carry out grinding in several stages - first with a coarse-grained paste, then with a medium-grained paste, and at the end, finishing with a fine-grained compound.
Practice is important - if this type of work is performed by an amateur, there is a risk that his unskilled actions will lead to the machine needing expensive repairs.
Method 2: Using hand tools
This method is something like the process of making fire by primitive people - suction cups are attached to a wooden stick, they fix the rod, and the stick itself is rotated by hand. This so-called “old-fashioned” method was in use when there were no power tools. Its advantage is the minimal risk of damaging the valve system. But it takes a lot of time - up to half an hour for each valve.
Method 3: Using a pneumatic tool (rotary method)
Do-it-yourself valve grinding using pneumatic tools is quick, simple and requires minimal effort. The device consists of a motor connected to a pin. A special suction cup is attached to the latter, which secures the valve. The system is brought into working condition using compressed air.
The advantage of this method is that there is practically no risk of making a mistake, even if you have no experience. The tool controls the entire process - rotation angle, speed and intensity. And all this happens even faster than using an electric drill - it only takes a couple of minutes per valve.
Method 4. Using a pneumatic machine (tapping method)
The difference between the pneumatic machine and the previous tool is the lapping technology. The tool does not operate with rotational movements, but simulates the operation of valves in real conditions.
The tool is easy to use and makes lapping the most accurate and high quality.
Important! After grinding in, the abrasive compound must be carefully removed. If it gets into the engine, it will damage the cylinders and other parts.
Grinding in VAZ valves (models 01 to 07)
For stable engine operation and adequate gasoline consumption, precise operation of its components is required, and valves are no exception. They must open and close clearly, and most importantly on time, and sit tightly in the seats and ensure tightness when the pistons operate.
After the engine travels several hundred or even tens of thousands of kilometers, carbon deposits form on the valves, so they do not sit tightly in the seats and do not provide complete sealing of the combustion chambers, which leads to loss of power and unnecessary fuel consumption. In such cases, it is necessary to apply the valve grinding procedure. On imported (expensive) cars, this procedure is carried out by highly qualified specialists (at a service station). And on inexpensive domestically produced cars, such as the VAZ (classic), a similar procedure is carried out independently in a garage, which will save the family budget. Of the “complex” tools, you need a drill.
Determining valve status
To determine the condition of the valve without completely disassembling the cylinder head, you need to visually determine whether it is leaking or not. To do this, you need to look at the valve plate (its color) on the removed head; it should be uniform, usually brown. If in some place between the valve seat and the plate there is not a complete fit, then there will be black carbon deposits in this place.
This applies to exhaust valves; intake valves burn out extremely rarely, as many car enthusiasts say.
How to grind in correctly - the process of completing the work
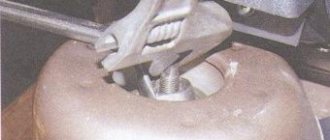
The grinding process begins with desiccation of the valves. First, we place an object under the valve plate that serves as a stop for it.
To facilitate the memorization process and to ensure that errors are eliminated when installing rockers, experienced car enthusiasts recommend removing and grinding the valves one at a time. A popular way to remove valves is using a special puller (purchased at a car dealership or car market), but sometimes the crackers on the cone stick and are not immediately removed. In this case, according to the experienced Kulibins, you can take a tube of suitable diameter and, placing it on the top of the valve (cracker), lightly “bale” it with a hammer. A light blow breaks off the crack if it is stuck and makes it easier to remove the valve with a puller.
After removing the spring, pull the valve out of the seat and visually inspect it. After a long period of work, even if it hasn’t burned out, there is still carbon deposits on it, so we grind in the valves. To do this, you will need a special grinding powder or paste (Permatex® Valve Grinding Compound, GOI paste, VPM-Auto, M-14 - M-40, etc.). The pastes are used immediately, and the powders are diluted with engine oil, resulting in a viscous substance that is applied to the chamfer of the valve plate. Pastes and powders have different grain sizes: coarser for initial grinding, finer for final grinding.
After spreading the bevel of the seat with paste or diluted powder, insert it back into the seat, press lightly and turn so that the paste is evenly distributed along the bevel of the plate and hits the seat. After this, on the back side of the cylinder head, attach the chuck of a drill or screwdriver to the valve stem (a drill is better because it has more pure revolutions).
Pasta selection
The choice of abrasive pastes for lapping in modern stores can shock any novice driver. We won’t talk about price, since the choice for this parameter depends entirely on the capabilities and personal preferences of the buyer. Factors such as composition and grain size are more important, so they are worth considering:
- For beginners, it is better to avoid using coarse-grained pastes, otherwise the slightest mistake will lead to defects in the seat and chamfer. Medium grit is preferable when it comes to basic machining, while fine grit is needed for sanding.
- Often the equipment includes two containers with pastes with compositions of different grain sizes.
- If you didn't bother buying pasta, you can make it yourself. To do this, select sandpaper with a minimum grit level and remove the abrasive, mix the resulting powder with lubricant. Use GOI paste at the final stage to finish the surface. It should be mixed in the same way as with abrasive powder. It’s worth mentioning right away that the quality of grinding will be an order of magnitude lower than when using store-bought abrasives.
How much to rub?
How can you tell when the valve is ground in? There are several ways
- air check
- kerosene
- pencil
The vacuum tester performed best, which is not surprising, because the principle of operation of the vacuum tester is similar to the processes occurring in the engine. In the engine, gases break through the cracks, which we will check with this test.
The device is connected one by one to all openings on the intake and exhaust manifold sides and a vacuum is created. If the valves are poorly lapped, then there will be insufficient vacuum on the pressure gauge, as air breaks through the valves. This shouldn't happen.
Another test method, which is available in any garage, is the kerosene test. The valves are inserted into place, the head is placed with the combustion chamber facing up, and kerosene is poured on top. According to legend, if all the kerosene does not leak out overnight (or if it does not leak out at all? There are different opinions), then the valves are ground in correctly. But the inconsistency is that it makes no difference to the engine whether kerosene spills or not; air can either break through the connections or not, so this verification method can be neglected.
Another simple way is to check for uniform distribution of the marking substance. On the working edge of the valve seat, radial marks are drawn along the entire circumference. Then they insert the valve, press it and make rotational movements. Then they take out the valve and see what pattern has formed: if the marks have been erased and the entire surface of the seat is painted evenly, then it’s fine, it can work, if there are any irregularities, we continue grinding in.
Lada 2107 Emmanuel › Logbook › Under the hood, part 8: “Repairing the cylinder head. Valve grinding"
Hi all! =)))
Well, finally Andryukha ground these valves... it turned out to be a bit of a tedious task. And replacing the guide bushings... First things first! =)))
After the head was removed, disassembled and cleaned (here), all its components were replaced - from valves to springs. It was decided that if we were to do it, then it would be normal.
The only thing is... Still, Andryukha did not dare to “saw and melt” the head, because there was no suitable tool, and he could also bore the fruit with scissor paper... This item is postponed for the future, when it will be possible to find a tool (spherical cutters).
The first step was to replace the valve guides. The valves in them moved perpendicularly, that is, there was a runout, a large gap. It is quite possible that this was also the reason for the interrupted life of the valve system.
The bushings were, of course, lubricated with graphite lubricant, but they were still tight.
After pressing in the bushings, another very labor-intensive process began - grinding in the valves. Everything would be fine, but the valves still didn’t want to go into the bushings - we had to open the holes a little, only then they calmly went into place.
Everything in the head was replaced: bushings, valves, external and internal valve springs, pushers, pusher springs, valve stem seals. Well, we immediately screwed in new studs under the camshaft bed =)
The piston one was also assembled =)) The next post is about this.
How to achieve results at home
- Using a special machine. In fact, such a unit does not perform grinding - it chamfers the seat and valve, thanks to which it is possible to achieve the tightest possible alignment and ensure precise mating. The result is a high-strength cut profile that ensures high-quality engine performance. The advantage of the method is its simplicity - after processing, all that remains is to wash and assemble the head.
Lapping valves using a machine
Do-it-yourself valve lapping
We recommend: Engine crankcase protection: how to choose and where to buy
Functionality check
There are three ways to check that the valve is properly lapping.
- Using a vacuum tester. The most reliable and simple option. Connect a tool to each hole on the intake and exhaust sides of the manifolds. Now use it. If the valves are poorly lapped, the vacuum level on the pressure gauge will be insufficient.
- Using kerosene. Reinstall the valves, place the combustion chamber head up and pour kerosene on top. Leave them like this for several hours. If the kerosene does not leak out, everything is in order. Experts do not recommend using this method as it is not very reliable.
- Using a pencil. We draw radial lines along the entire circumference of the working edge of the valve seat. We install the valve in place, press it firmly and rotate it in a circle. We take out the product and look at the pattern. If the lines are erased and evenly paint the surface, everything is in order. If there are irregularities, the grinding was performed incorrectly.
Grinding in the valves ensures normal engine operation. Be sure to regularly resort to the procedure - this way you can avoid problems with the power unit.
Hello! My name is Dmitry, I am a journalist by training. I specialize in automotive topics - I started my career in an online store of automotive components, and I myself am a car enthusiast.
Basic rules and secrets
To carry out the process, you need to remove the cylinder head.
- To remove the valves from the bushings that guide them, you must first remove the valve springs. To do this, you can use valve tools available in specialized stores.
- Usually a rubber hose and clamps are put on the rod of the device. Instead, you can use a tip with a through threaded hole in the side wall. A bolt is screwed into this hole to secure the valve stem.
- Before grinding in, inspect the valves. If they show signs of deformation (bends and cracks), such products cannot be used. Replace them with new ones. Is there carbon deposits? Clean it - you can use a stiff brush for this.
How to determine if the valve is tightly seated on the seat?
If you have removed the head, be sure to pay attention to the valves; at first glance, it may seem that the valves are good, but there is one sure sign that the valve definitely needs to be changed or ground in. Valves can be of different colors, white, brown, black, etc. This is normal, it all depends on the carburetor settings and engine oil consumption. But if the valve has different shades as shown in the photo below, this is a sure sign that the valve is poorly ground to the seat. This valve must be ground in or replaced with a new one, but it must be ground in.
Photo. Valve showing signs of burnout.
The valve in the photo can still be ground in, but if there is a blue tint, it is better to replace such a valve with a new one.
When is it time to think about grinding in?
To understand whether lapping is necessary, you can use different testing methods - with their help you can clarify the degree of depressurization of the valve system.
How to check the lapping:
- The cylinder head is being dismantled.
- The head is cleaned of soot, oily film and dirt.
- The BC head and bearings are checked. They must be without any deformation or mechanical damage.
- The camshaft bearings are checked. They should also be free from damage, burrs and metal deposits.
- To control the tightness of the valve system, it is necessary to install the cylinder head on a flat surface, pour a little kerosene or gasoline into the combustion chambers and leave for a while. If the kerosene level begins to decrease, it means there is a leak and the seal of the valve system is broken.
When a leak occurs (that is, depressurization), the motor operates unevenly, so it is necessary to carry out grinding.
When to grind in
Traditionally, it is advisable to perform the procedure in question after a full engine repair or when replacing piston rings. The following step-by-step instructions will allow you to understand whether it is time to grind the valves.
- Remove the cylinder head and install it so that the plates are directed upward. The surface should be as smooth as possible.
- Pour kerosene or gasoline into the combustion chambers.
- Measure the level and leave the cylinder head in this state for 12 hours.
- After 12 hours, take another measurement, and if the level of the poured substance has not changed during this period, there is no need to grind the valves.
- If the amount of substance has partially decreased, it remains to determine the leaking valve. It will help to detect pockets of moisture and dampness in one of the collectors.
Another method of checking involves installing the head in a side position, the leak is assessed from the side of the plates. The rest of the procedure is similar.
We also recommend that you carefully study our expert’s article, which talks about servicing the VAZ-2112 engine with 16 valves.
Why do you need to grind valves?
If the procedure is not followed, the valves may not function properly - for example, they may allow gasoline and air to pass into a closed combustion chamber. This will degrade the engine's performance and may lead to breakdown over time. Lapping helps to achieve maximum tightness. Work must be done not only after installing new valves; it is often necessary in cases where the products have not been changed for a long time. The reason for the car's "jerking" at idle may be the difference in compression in the cylinders. Grinding in is the only way to deal with the problem.
Lapping Tools
Lapping devices are divided into 2 groups. 1. Clamping the valve from above, fixed on the rod. There is a handle on one side. To achieve the result, you need to pull and rotate it. 2. "Suckers". They are fixed on the valve plate and are also equipped with a handle. To use, you need to press the valve against the plate and rotate the device in different directions. Valve grinding tool: top-clamping model If you don’t have a tool, a screwdriver or drill will do. Regardless of the tool you choose, you will need the following equipment: ✔ abrasive or diamond paste; ✔ spring - such that you can easily squeeze it with your hands and put it on the valve; ✔ kerosene. Can't get hold of abrasive paste? Prepare it! To do this, you will need fine-grain sandpaper or sandstone shavings. Remove the stones from it and mix them with grease or a similar substance in a ratio of 2 to 1. The consistency of the mixture should resemble shampoo. In extreme cases, standard motor oil will work as a base. Applying abrasive paste
Checking the quality of work performed
You can check how tightly the valves fit, as mentioned at the beginning, using kerosene. This is the most common method. The valves are assembled, springs are installed on them, then the head block is turned over so that the combustion chambers face up. After this, the cylinder head, where the ground-in valves need to be checked, is filled with kerosene. If after 10–15 minutes no leaks have occurred, then you can proceed to grinding in the next “clients”.
Using a vacuum tester will be no less reliable. The device is connected to the holes on the side of the intake and exhaust manifolds. If the pressure gauge readings are lower than required, it means that the seal of the valves is insufficient and you need to repeat their grinding.
There is also a method using a pencil. To do this, lines are drawn on the working edge of the valve seat along the entire circumference. The next step is to install the valve in its place, press it and turn it clockwise a couple of times and back. After this, we take out the valve and look at the marks made with a pencil. Everything is fine if the lines have disappeared and the surface has been painted over evenly. If there are any irregularities, grinding should be continued.
Visual comparison of lapped and unlapped valves
A short digression about lapping pastes
No matter how you grind the valves, you still need to understand that the car’s engine will still “bring them in.” You can spend a lot of time and effort achieving the ideal result, and after starting the engine (after a few hours), the tightness of the valves will become worse. Or you can do everything casually and quickly, and after a while the tightness of the valves will only improve.
As a result, it turns out that the engine has worked the valves to a certain “comfortable” state. As a result, there is an opinion that fiddling with different pastes and other finishing touches to achieve the ideal result is nothing more than a waste of time.
Timely and correctly performed valve grinding will ensure smooth and precise operation of the engine. During a major overhaul, this procedure is one of the mandatory ones. The task is not particularly difficult, in addition, you can always seek advice from more experienced comrades or masters.
Stuffing the valve seals
But first you need to remove the old valve seals, on Zhiguli they must be removed carefully and in no case should you try to knock them off with a blow, the place where the seal is packed will break off, take pliers, hold the valve seal with them and try to turn it if it doesn’t work right away, grab it and try to turn it again, then grab it with the pliers and the valve seal will loosen and rotate and come out. Also remove the valve seals from the UAZ and GAZ.
And now we will fill the valve seals on the Zhiguli, insert the valve and put the valve seal on it up to the guide sleeve, take a tube with an internal diameter of 13 mm and carefully, with a light hammer, tap the valve seal with light blows, just do not overdo it, otherwise you will break the seal. If there is no such tube, you can flatten the larger tube a little to size, and saw the smaller one a little lengthwise and spread it to size. You can also first remove the spring from the valve seal so as not to accidentally damage it and then put it on the seal.
On UAZ and Gas, fill it in the same way as on Zhiguli, but the tube should have an internal diameter of 16mm.