GTZ NIVA
Removing and installing the Niva brake master cylinder (instructions)
We remove the spare wheel support bracket of the VAZ 2131.
Using pliers, we loosen the clamps securing the flexible hoses to the fittings of the main brake cylinder.
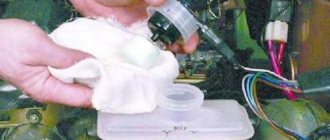
Carefully holding the fittings, remove the hoses. Drain the brake fluid from the reservoir into a substitute container. To replace the brake master cylinder fitting...
pry it off with a screwdriver...
and remove it from the brake master cylinder socket.
Use a screwdriver to pry up the rubber connecting sleeve...
and take it out. To remove a vehicle's brake master cylinder...
Using a special “10” wrench covering the five sides of the nut, unscrew the fittings of the four Niva 2121 brake pipes.
We remove the pipes from the brake cylinder Niva 2131.
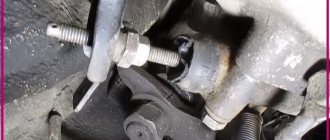
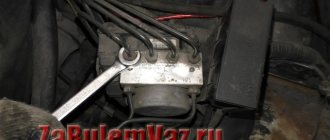
Using a 17mm spanner, unscrew the two nuts securing the master brake cylinder to the vacuum booster...
and remove the main brake cylinder of the VAZ 2121. Install the main brake cylinder of the VAZ 2121 in the reverse order. We bleed the hydraulic drive system.
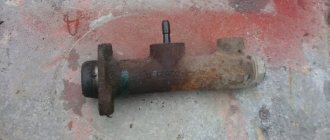
Repair of GTZ NIVA
Problem: the Main Brake Cylinder on the NIVA leaked directly into the Vacuum Booster.
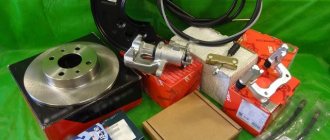
I took out the main brake assembly with vacuum from a Peugeot 405 from old bins, and also bought two cylinder connectors for the front calipers and two front brake hoses from Shevik.
cylinder connector VAZ-2123
front brake hose VAZ-2123
GTZ and VUT from Peugeot 405 (front view)
GTZ and VUT from Peugeot 405 (rear view)
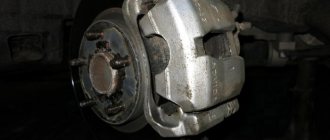
I started disassembling the old system. As it turned out, the old owner was wise here too. I threw out absolutely everything old, leaving only the pedal and the front cylinders, and began to assemble everything in a new way: 1. Put the cylinder connectors on the front calipers;
installed cylinder connector on brake cylinder
installed cylinder connector on brake cylinder
2. At first I took the hoses to the turners - they cut threads on the outside at the ends where the tube is screwed in, turned out two thin nuts and two thin washers - to attach one end of the hose to the body;
here we modify the brake hoses
3. Installed the hoses, connecting them at one end with the cylinder connectors, and securing the other end with the modified end to the body in the normal place; 4.Laid new copper pipes from the tee to the hoses. Then it came to the Chief with the vacuum cleaner. Having estimated approximately where it would stand, I began to split hairs: 1. Making an adapter bracket, because the vacuum itself is much larger than Nivovsky, we had to carry it some distance
READ How to install the carousel channel on a regular TV
plate for vacuum booster
We weld the plates together with an angle of 25x25mm and a length of 120mm at 4 corners; 2. Manufacturing of an intermediate drive rod from the pedal to the vacuum itself with the possibility of adjusting its length;
transitional drive rod from pedal to amplifier with adjustable length
3. Because The main brake reservoir in Peugeot is not installed as it should be, we had to make adapters to connect the hoses from the fluid reservoir and lengthen the hoses themselves. Once all of this was done, the adapter bracket was painted and dried, and assembly began. Everything fell into place, as I had planned. All that remained was to run the pipelines from the main cylinder to the tees. It was then that I decided to check the vacuum cylinder that had been lying in the garage for about ten years - I plugged the outlet holes of the cylinder and tried to bleed it. To my surprise, everything turned out to be more than 100% working. Next, I ran the pipelines to the tees, only on the tee that placed one plug on the rear brakes. After all, now the brakes are like those of a normal car - rear/front.
plug on tee for rear brakes
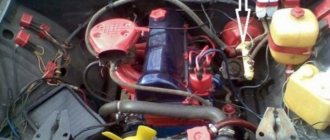
We started bleeding the system - not an easy task, because there were still two bleeding fittings left on the front cylinders. But we still succeeded. I took it for a test drive and was more than pleased. The brakes are 100% clearer. Even when skidding, the car goes smoothly - without skidding, all wheels brake as they should, and not each on its own. The result exceeded my expectations. And under the hood it all looks like this.
everything is in place and looks like this
Replacing brake discs and pads NIVA
Replacing Niva brake discs and pads (step-by-step instructions) Video on replacing brake pads
Source
Replacement and repair of GTZ - some points
The recommendation for carrying out repair work on this element is simple - it is easier to replace it completely if a banal replacement of rubber seals is not required. The most common reason for incorrect operation of the brake cylinder is leakage of hydraulic fluid, therefore it is necessary to periodically check the joint of the brake cylinder.
In the absence of external mechanical damage, it is necessary to replace worn-out spare parts, making sure to wash the repair parts with isopropyl alcohol. The presence of swollen cuffs may indicate low quality brake fluid, so it is worth changing it too.
The parameters of the pressure regulator are set by the manufacturer, therefore independent adjustment and repair work is prohibited!
The car owner himself decides whether to repair the brake master cylinder personally or contact specialists. However, before drawing conclusions, the cause of the failure should be determined. How to check the brake master cylinder?
If the test result reveals the cause of the brake malfunction, then urgent measures must be taken to eliminate it. If you couldn’t find the root cause on your own, but the problem remains, you should seek qualified help. In most cases, it is enough to clean or bleed the turbocharger. Replacing it entirely is provided in case of depressurization of the housing or damage to the piston.
How to install the brake master cylinder on a VAZ 2121
1. Disconnect the flexible hoses from the master cylinder and close the hose openings and fittings on the cylinder to prevent fluid from leaking from the reservoir and preventing dust, dirt or foreign matter from entering the cylinder. 2. Disconnect the steel pipes from the master cylinder that drain fluid to the wheel cylinders of the front and rear brakes, having first unscrewed the pipe nuts. 3. Remove the cylinder by unscrewing the nuts securing it to the vacuum booster. 4. Install the master cylinder in the reverse order of removal. After installing the cylinder, bleed the hydraulic drive system to remove air from it.
1. Remove fittings 2 with connecting sleeves 3, unscrew locking bolts 5 and remove all parts in the order shown in Fig. Master cylinder parts. 2. Assemble the cylinder in the reverse order of disassembly. In this case, lubricate the parts with brake fluid. When assembling, use tool 67.7853.9543.
READ How to properly install a stove radiator on gas 3110
Before assembly, wash all parts with isopropyl alcohol; Dry them with a blast of compressed air or wipe them with a clean cloth, avoiding contact with mineral oil, kerosene or diesel fuel, which can damage the seals.
Warning The time for washing the sealing rings in isopropyl alcohol is no more than 20 s, followed by blowing with compressed air.
The cylinder bore and the working surface of the pistons must be completely clean, free of rust, marks and other defects. An increased gap between the cylinder and pistons is unacceptable.
Each time you disassemble the cylinder, replace the seals with new ones, even if they appear to be in good condition.
Check the elasticity of the piston spring, the length of which should be 41.7 mm under a load of 42.18 ± 3.92 N (4.3 ± 0.4 kgf), 21 mm under a load of 90.64 ± 8.83 N (9.24 ±0.9 kgf), in a free state - 59.7 mm.
1. Install the master cylinder on the stand and connect it to the stand elements. 2. Open valves 1 to bleed the stand and, moving the master cylinder pistons several times to their full stroke length, bleed the system. Then close valves 1. Rotating flywheel 5, slowly move the pistons of the main cylinder until the pressure, controlled by pressure gauges 2, reaches 12.5 MPa (125 kgf/cm2). In this position, block the master cylinder pusher. The specified pressure must remain constant for at least 5 s. 3. In cases of fluid leakage or a decrease in the set pressure within 5 seconds, replace the cylinder piston seals.
Source
Diagnostics and repair
From the signs listed above, it is easy to understand that in most cases there is only one source of problems - rubber products that have become unusable. The cuffs crack and swell, as a result they leak liquid and close the discharge holes. Hence the recommendation: all “rubber bands” of the brake system should be changed at intervals of approximately 100 thousand km, without waiting for critical wear.
Reference. Many auto mechanics express the opinion that after replacing the cuffs, the main hydraulic cylinder will not last long. The statement is true if the car owner purchased cheap, low-quality spare parts or installed new o-rings in the cylinder, where internal wear has formed in the walls.
Before checking the GTZ for operability, make sure there are no other faults:
A clear symptom indicating a breakdown of the main hydraulic cylinder is drops of brake fluid on the body . If you discover a leak, feel free to dismantle the unit and disassemble it to look for the cause. Another common problem - fluid flowing through the seals - is diagnosed as follows:
Also, problems with the GTZ are indicated by jamming or too little pedal travel. Sit behind the wheel, press it several times, and start the engine while holding the pedal with your foot. If it sinks to the floor or does not budge, disassemble the hydraulic cylinder.
To replace or repair the master brake cylinder, you need to remove the unit from the vehicle. Work is carried out in the following order:
Further actions depend on the design of the master cylinder. If the element is completely disassembled, change the rubber seals. Otherwise, you will have to replace the pistons assemblies. Pre-wash the body and all openings with alcohol; do not use gasoline. After assembly, add fluid and bleed the brake system to remove air.
When purchasing a car, every person realizes how complex a mechanism he will have to operate. All mechanisms and elements have their own design purpose. In particular, the brake master cylinder (MBC) is responsible for converting pressure on the brake pedal into hydraulic pressure, which starts the braking process of the car. This functionality is provided by the supply of hydraulic fluid, which has a high boiling point. Every motorist needs to know the design of the GTZ in order to correctly understand the causes of failures.
Maximum brake reliability and an increased level of safety in modern cars is achieved by installing 2-section master cylinders. Since the intra-cylinder circuits are practically independent of each other, it is partially ensured that the brake remains operational in the event of depressurization of one of them. The single-chamber system has actually gone into oblivion due to the impossibility of distributing mechanical force to all chains so that the car does not lose controllability.